


前言
在Windows+Anaconda环境下安装BERT,遇到各种问题,几经磨难,最终成功。接下来,先介绍成功的安装方法,再附上遇到的问题汇总
成功的安装方法
1、创建虚拟环境
注意:必须加上python=3.7.12以创建环境,否在在虚拟环境里直接使用pip会遇到很多问题,有可能导致pip安装的包会挂到其他环境里,导致无法使用
conda create --name bert python=3.7.12
2、切换到创建的虚拟环境
conda activate bert
查看pip 的位置,确保是在虚拟环境下:
(bert) C:\Users\Carino\BERT练习>pip -V
pip 23.0.1 from C:\Users\Carino\.conda\envs\bert\lib\site-packages\pip (python 3.10)
从上面可以看出,pip已经在创建的bert虚拟环境里,因此,接下来可以直接使用pip安装依赖包
3、 安装依赖包,最好使用conda安装
注意:由于使用conda安装招不到BERT相关的依赖包,只能使用pip安装
pip install bert-serving-server -i https://pypi.tuna.tsinghua.edu.cn/simple #服务端
pip install bert-serving-client -i https://pypi.tuna.tsinghua.edu.cn/simple # 客户端
4、下载并解压预训练模型文件

5、启动服务
bert-serving-start -model_dir ./chinese_L-12_H-768_A-12/ -num_worker=2
6、服务启动成功
运行成功后,会显示:
I:[33mWORKER-0[0m:use device cpu, load graph from C:\Users\Carino\AppData\Local\Temp\tmpm2mrl2ke
I:[33mWORKER-1[0m:use device cpu, load graph from C:\Users\Carino\AppData\Local\Temp\tmpm2mrl2ke
I:[33mWORKER-0[0m:ready and listening!
I:[33mWORKER-1[0m:ready and listening!
I:[35mVENTILATOR[0m:all set, ready to serve request!
7、编写服务调用程序
编程服务程序BertClient.py,并将其放在模型文件所在的目录:
from bert_serving.client import BertClient
bc = BertClient()
value = bc.encode(['你真的很优秀', '你很厉害啊'])
print(value)
8、调用服务
启动另一个Anaconda prompt,切换到刚刚创建的bert虚拟环境,运行:
python BertClient.py
9、服务调用成功
服务调用成功后,在服务端会显示:
I:[35mVENTILATOR[0m:new config request        req id: 1       client: b'c736012d-9e44-4cdd-8861-55bc0bd762ff'
I:[32mSINK[0m:send config     client b'c736012d-9e44-4cdd-8861-55bc0bd762ff'
I:[35mVENTILATOR[0m:new encode request        req id: 2       size: 3 client: b'c736012d-9e44-4cdd-8861-55bc0bd762ff'
I:[32mSINK[0m:job register    size: 3 job id: b'c736012d-9e44-4cdd-8861-55bc0bd762ff#2'
I:[33mWORKER-1[0m:new job     socket: 0       size: 3 client: b'c736012d-9e44-4cdd-8861-55bc0bd762ff#2'
I:[33mWORKER-1[0m:job done    size: (3, 768)  client: b'c736012d-9e44-4cdd-8861-55bc0bd762ff#2'
I:[32mSINK[0m:collect b'EMBEDDINGS' b'c736012d-9e44-4cdd-8861-55bc0bd762ff#2' (E:3/T:0/A:3)
I:[32mSINK[0m:send back       size: 3 job id: b'c736012d-9e44-4cdd-8861-55bc0bd762ff#2'
在客户端会显示:
(bert) C:\Users\Carino\BERT练习\chinese_L-12_H-768_A-12>python BertClient01.py
[[ 0.47229123 -0.4915491   0.43824643 ...  0.07783739  0.4108253
  -0.7585359 ]
 [ 0.29905218  0.11368733  0.25767356 ...  0.04950948  0.35148147
  -0.97578394]]
问题汇总及解决办法
1、 NumPy版本过低
当尝试启动服务时,出现错误提示:
FutureWarning: Passing (type, 1) or '1type' as a synonym of type is deprecated; in a future version of numpy, it will be understood as (type, (1,)) / '(1,)type'.
这个是numpy的版本过低导致的,实际测试下来,不影响bert的适应,因此也没有管它
2、protoc版本过低
当尝试启动服务时,出现错误提示:
---以上省略---
  File "C:\Users\Carino\.conda\envs\bert\lib\site-packages\tensorflow\core\framework\resource_handle_pb2.py", line 41, in <module>
    serialized_options=None, file=DESCRIPTOR),
  File "C:\Users\Carino\.conda\envs\bert\lib\site-packages\google\protobuf\descriptor.py", line 561, in __new__
    _message.Message._CheckCalledFromGeneratedFile()
TypeError: Descriptors cannot not be created directly.
If this call came from a _pb2.py file, your generated code is out of date and must be regenerated with protoc >= 3.19.0.
If you cannot immediately regenerate your protos, some other possible workarounds are:
 1. Downgrade the protobuf package to 3.20.x or lower.
 2. Set PROTOCOL_BUFFERS_PYTHON_IMPLEMENTATION=python (but this will use pure-Python parsing and will be much slower).

More information: https://developers.google.com/protocol-buffers/docs/news/2022-05-06#python-updates
这个是protobuf版本太高导致,需要调整其版本,
查看现有版本:
pip show protobuf

(bert) C:\Users\Carino\BERT练习>pip show protobuf
Name: protobuf
Version: 4.22.1
Summary:
Home-page: https://developers.google.com/protocol-buffers/
Author: protobuf@googlegroups.com
Author-email: protobuf@googlegroups.com
License: 3-Clause BSD License
Location: c:\users\carino\.conda\envs\bert\lib\site-packages
Requires:
Required-by: tensorboard, tensorflow
删除现有版本,
pip uninstall protobuf
然后安装低版本
pip install protobuf==3.19.0 -i https://pypi.tuna.tsinghua.edu.cn/simple
3、启动服务失败,缺tensorflow模块
在conda prompt里运行:
bert-serving-start -model_dir ./chinese_L-12_H-768_A-12/ -num_worker=2
报错:
(bert) C:\Users\Carino\BERT练习\chinese_L-12_H-768_A-12>bert-serving-start -model_dir ./chinese_L-12_H-768_A-12/ -num_worker=2
Traceback (most recent call last):
  File "C:\Users\Carino\.conda\envs\bert\lib\runpy.py", line 196, in _run_module_as_main
    return _run_code(code, main_globals, None,
  File "C:\Users\Carino\.conda\envs\bert\lib\runpy.py", line 86, in _run_code
    exec(code, run_globals)
  File "C:\Users\Carino\.conda\envs\bert\Scripts\bert-serving-start.exe\__main__.py", line 4, in <module>
  File "C:\Users\Carino\.conda\envs\bert\lib\site-packages\bert_serving\server\__init__.py", line 29, in <module>
    _tf_ver_ = check_tf_version()
  File "C:\Users\Carino\.conda\envs\bert\lib\site-packages\bert_serving\server\helper.py", line 170, in check_tf_version
    import tensorflow as tf
ModuleNotFoundError: No module named 'tensorflow'
解决办法就是安装TensorFlow
4、已安装TensorFlow,但是启动bert-serving-server失败,提示 self.graph_path, self.bert_config = pool.apply(optimize_graph, (self.args,))TypeError: cannot unpack non-iterable NoneType object
pip install tensorflow==2.10.0 -i https://pypi.tuna.tsinghua.edu.cn/simple
继续尝试启动服务,报错:
(bert) C:\Users\Carino>bert-serving-start -model_dir ./chinese_L-12_H-768_A-12/ -num_worker=2
C:\Users\Carino\.conda\envs\bert\lib\site-packages\bert_serving\server\helper.py:175: UserWarning: Tensorflow 2.10.0 is not tested! It may or may not work. Feel free to submit an issue at https://github.com/hanxiao/bert-as-service/issues/
  warnings.warn('Tensorflow %s is not tested! It may or may not work. '
usage: C:\Users\Carino\.conda\envs\bert\Scripts\bert-serving-start -model_dir ./chinese_L-12_H-768_A-12/ -num_worker=2
                 ARG   VALUE
__________________________________________________
           ckpt_name = bert_model.ckpt
         config_name = bert_config.json
                cors = *
                 cpu = False
          device_map = []
       do_lower_case = True
  fixed_embed_length = False
                fp16 = False
 gpu_memory_fraction = 0.5
       graph_tmp_dir = None
    http_max_connect = 10
           http_port = None
        mask_cls_sep = False
      max_batch_size = 256
         max_seq_len = 25
           model_dir = ./chinese_L-12_H-768_A-12/
no_position_embeddings = False
    no_special_token = False
          num_worker = 2
       pooling_layer = [-2]
    pooling_strategy = REDUCE_MEAN
                port = 5555
            port_out = 5556
       prefetch_size = 10
 priority_batch_size = 16
show_tokens_to_client = False
     tuned_model_dir = None
             verbose = False
                 xla = False

I:[35mVENTILATOR[0m:freeze, optimize and export graph, could take a while...
C:\Users\Carino\.conda\envs\bert\lib\site-packages\bert_serving\server\helper.py:175: UserWarning: Tensorflow 2.10.0 is not tested! It may or may not work. Feel free to submit an issue at https://github.com/hanxiao/bert-as-service/issues/
  warnings.warn('Tensorflow %s is not tested! It may or may not work. '
E:[36mGRAPHOPT[0m:fail to optimize the graph!
Traceback (most recent call last):
  File "C:\Users\Carino\.conda\envs\bert\lib\runpy.py", line 196, in _run_module_as_main
    return _run_code(code, main_globals, None,
  File "C:\Users\Carino\.conda\envs\bert\lib\runpy.py", line 86, in _run_code
    exec(code, run_globals)
  File "C:\Users\Carino\.conda\envs\bert\Scripts\bert-serving-start.exe\__main__.py", line 7, in <module>
  File "C:\Users\Carino\.conda\envs\bert\lib\site-packages\bert_serving\server\cli\__init__.py", line 4, in main
    with BertServer(get_run_args()) as server:
  File "C:\Users\Carino\.conda\envs\bert\lib\site-packages\bert_serving\server\__init__.py", line 71, in __init__
    self.graph_path, self.bert_config = pool.apply(optimize_graph, (self.args,))
TypeError: cannot unpack non-iterable NoneType object
查找原因,说是因为TensorFlow的版本过高,需要降低到TensorFlow==1.*版本,首先卸载已经安装好的TensorFlow,
pip uninstall tensorflow
下载TensorFlow1.* 的.whl安装文件:tensorflow · PyPI
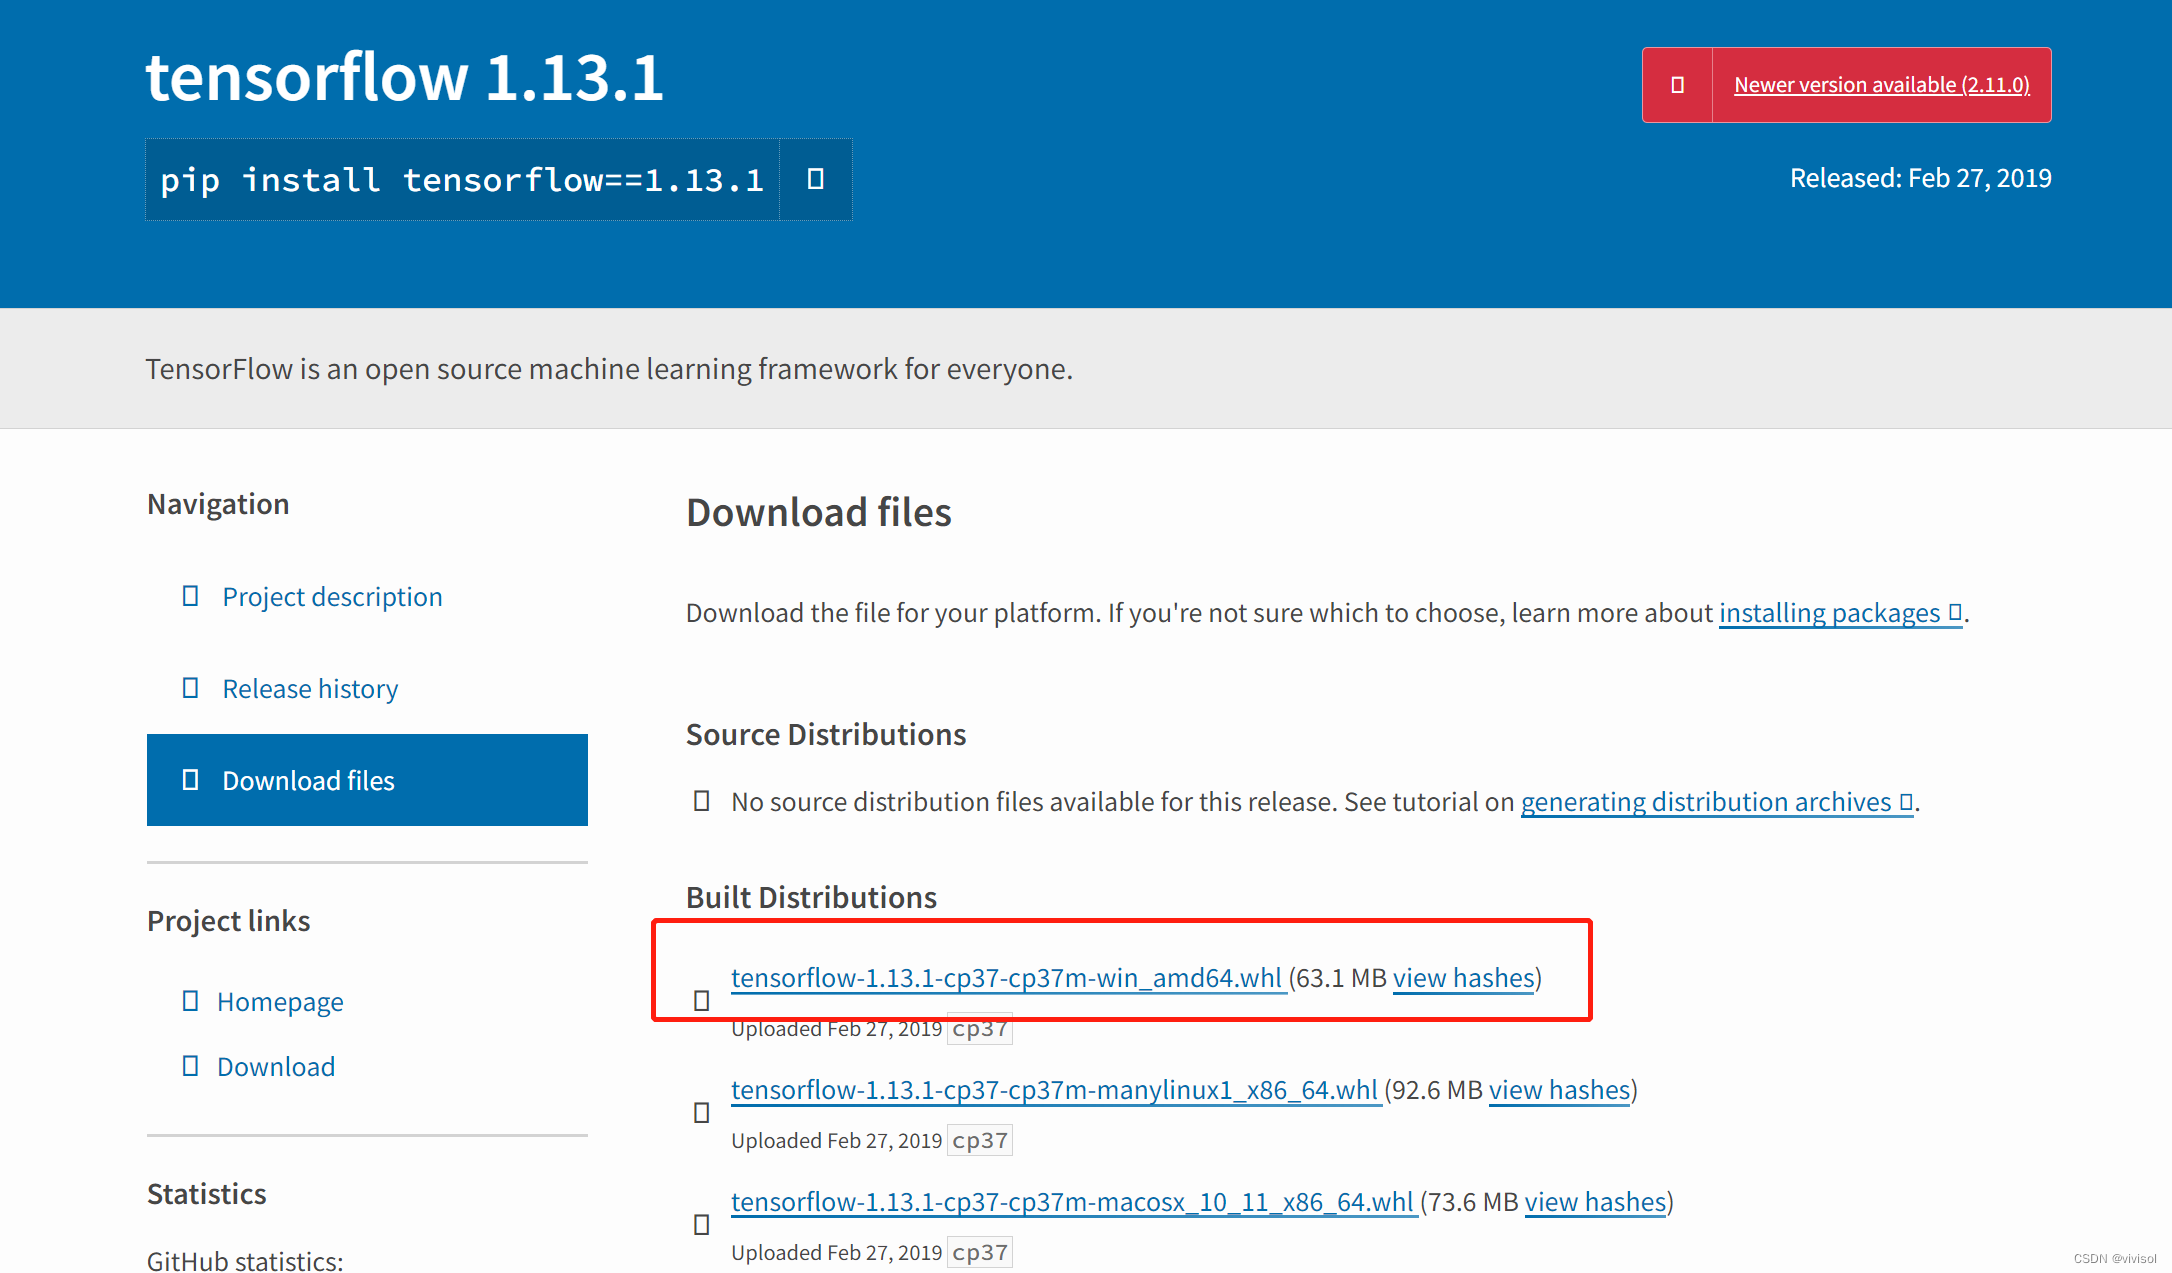
切换到.whl文件所在路径,执行安装命令:
pip install tensorflow-1.13.1-cp37-cp37m-win_amd64.whl
5、使用pip安装.whl文件失败
虽然已经将.whl文件下载到本地,但在使用pip安装.whl文件时,仍然会从https://pypi.org/上下载其他的依赖包,在这过程中,因为网络的原因,要么提示无法连接,要么提示无法找到指定版本的依赖包,真的很沮丧。
但是,经过多次在Anaconda prompt里反复执行安装命令,
pip install tensorflow-1.13.1-cp37-cp37m-win_amd64.whl
最终安装成功。
6、如果遇到各种依赖库版本的问题,最好的办法就是建一个新的虚拟环境,选择其他的版本,重新安装
其他可能会遇到的问题
anaconda删除虚拟环境
conda remove -n <env-name> --all
anaconda查看环境包
conda info --envs
查看pip安装包的依赖包及版本
使用pipdeptree -p <pkg-name>查看
为什么conda的base环境里明明有pip,但在创建的其他虚拟环境里使用pip安装依赖包时,却安装到了系统环境的Python路径下
原因是因为在创建虚拟环境时,没有添加python=3.8类似的参数,导致没有在虚拟环境里安装Python,因此无法使用base环境下的pip
conda安装依赖包如何添加镜像源
要添加镜像源以加速conda包的下载,可以按照以下步骤操作:
- 打开终端或Anaconda Prompt。
- 输入以下命令:
conda config --add channels <镜像源地址>
其中,<镜像源地址>是你想要添加的镜像源地址,可以是国内的镜像源如清华大学、中科大等,也可以是其他自行维护的镜像源。
例如,假设要添加清华大学的镜像源,可以输入以下命令:
conda config --add channels https://mirrors.tuna.tsinghua.edu.cn/anaconda/pkgs/free/
- 通过以下命令验证是否添加成功:
conda config --show channels
会打印出当前的镜像源列表,包括官方和你刚刚添加的镜像源。
现在,当你使用conda安装依赖包时,它们将从你添加的镜像源中下载,大大加快下载速度。
如何查看conda安装的依赖包
你可以使用conda env export命令来查看当前环境中所有包及其依赖关系。
conda env export --name myenv > myenv.yml
这将导出确认许可的环境myenv并将其保存在名为myenv.yml的文件中。
你还可以使用conda list命令来列出当前环境中安装的所有包,包括其版本和构建信息。
conda list
这将列出所有包的名称、版本和构建信息。
你可以学习如何使用conda的其他功能。
conda里如何安装bert-serving-server
- 首先需要确保已经在conda中安装了bert-serving-server的依赖包:
conda install tensorflow-gpu
- 接着,在conda中安装bert-serving-server:
conda install -c anaconda bert-serving-server
- 确认是否安装成功
bert-serving-start -version
输出的版本号即为服务器版本,如果输出了版本号,则说明安装成功,可以开始使用bert-serving-server。
CMD里如何启动bert-server
- 安装bert-serving-server模块,可以使用pip命令安装:
pip install bert-serving-server。 - 下载需要使用的BERT模型并解压缩,可以在官方GitHub仓库中找到。例如,下载中文BERT模型:
wget https://storage.googleapis.com/bert_models/2018_11_03/chinese_L-12_H-768_A-12.zip
unzip chinese_L-12_H-768_A-12.zip -d chinese_L-12_H-768_A-12/
- 在命令行中进入解压缩后的BERT模型目录下执行bert-serving-start命令,启动BERT Server:
bert-serving-start -model_dir chinese_L-12_H-768_A-12/ -num_worker=4 -max_seq_len=50
其中,-num_worker表示启动的进程数,-max_seq_len表示最大处理文本长度。 4. 启动成功后,可以通过HTTP请求访问BERT Server提供的API接口进行使用。例如,使用Python代码:
from bert_serving.client import BertClient
bc = BertClient()
bc.encode(['输入文本'])
这将返回一个嵌套列表,每个列表代表一个输入。列表中包含一个NumPy数组,表示该输入文本的特征表示。
如何查看BERT-SERVING-SERVER是否启动
为了指导bert-serving-server是否启动,你可以尝试以下步骤:
- 检查是否安装了bert-serving-server。在命令行中输入
bert-serving-start,如果出现“命令未找到”的错误消息,则需要先安装bert-serving-server。 - 在命令行中输入以下命令启动bert-serving-server:
bert-serving-start -model_dir /path/to/bert_model/ -num_worker=4
请将上述命令中的 /path/to/bert_model/ 替换为你实际的BERT模型文件路径,并根据需要指定 -num_worker 参数(默认值是1,可以增加多个工作线程来提高性能)。
- 查看命令行输出以确认BERT服务器是否已经启动。如果一切正常,应该看到类似以下的输出:
[2019-12-19 02:01:53,810] INFO:root:initialize variables ...
[2019-12-19 02:01:56,667] INFO:tensorflow:Saver not created because there are no variables in the graph to restore
[2019-12-19 02:01:56,812] INFO:root:running at localhost:5555...
这表明bert-serving-server已经成功启动,并正在监听端口5555上的请求。
- 在另一个终端窗口中运行BERT客户端代码,以测试BERT服务器是否正常运行。例如,你可以使用bert-client Python库来构建一个客户端程序:
from bert_serving.client import BertClient
bc = BertClient()
result = bc.encode(['Hello, World!'])
print(result)
如果BERT服务器正常运行,应该会输出一组向量值,可用于执行文本分类、情感分析等NLP任务。


 4064
4064

 被折叠的 条评论
为什么被折叠?
被折叠的 条评论
为什么被折叠?
 到【灌水乐园】发言


