


在 VBA 中编写 UDF 以暴露给 Excel 单元格是直截了当的,只需在 VBA 模块中编写函数,Bob 就是你的叔叔。但是,使用托管语言(例如 C# 或 F#)将函数公开给 Excel 会稍微复杂一些。
从本质上讲,有两种方法可以实现这一点,每种方法都有优点和缺点:
- 自动化插件方法
- XLL 加载项方法
我将演示如何实现每种方法,然后我将讨论我的判断。我在每种方法中都创建了一个示例项目;你可以在这篇文章的末尾下载它。
自动化插件方法

自动化插件是从 Excel 工作表中的公式调用的 COM 函数,自 Excel 2002 起就支持它。这个想法是 .NET 可以公开一个 COM 接口,该接口可以通过自动化插件支持从 Excel 中使用。
要创建自定义函数,您需要从 Visual Studio 创建一个新的 C# 代码库项目,然后转到:
右键单击项目 > 属性 > 构建 > 注册 COM 互操作并启用它。
然后转到Assembly.cs并设置ComVisible为true. 然后,您需要创建一个稍后将继承的基类来创建您的 UDF:
using System;
using System.Runtime.InteropServices;
using Microsoft.Win32;

namespace ExcelUdf.Automation
{
public abstract class UdfBase
{
[ComRegisterFunction]
public static void ComRegisterFunction(Type type)
{
    Registry.ClassesRoot.CreateSubKey(
        GetClsIdSubKeyName(type, "Programmable"));

    // Solves an intermittent issue where Excel
    // reports that it cannot find mscoree.dll
    // Register the full path to mscoree.dll.
    var key = Registry.ClassesRoot.OpenSubKey(
        GetClsIdSubKeyName(type, "InprocServer32"), true);
    if (key == null)
    {
        return;
    }
    key.SetValue("",
        String.Format("{0}\\mscoree.dll", Environment.SystemDirectory),
        RegistryValueKind.String);
}

[ComUnregisterFunction]
public static void ComUnregisterFunction(Type type)
{
    // Adds the "Programmable" registry key under CLSID
    Registry.ClassesRoot.DeleteSubKey(
        GetClsIdSubKeyName(type, "Programmable"));
}

private static string GetClsIdSubKeyName(Type type, String subKeyName)
{
    return string.Format("CLSID\\{{{0}}}\\{1}",
        type.GUID.ToString().ToUpper(), subKeyName);
}

// Hiding these methods from Excel
[ComVisible(false)]
public override string ToString()
{
    return base.ToString();
}

[ComVisible(false)]
public override bool Equals(object obj)
{
    return base.Equals(obj);
}

[ComVisible(false)]
public override int GetHashCode()
{
    return base.GetHashCode();
}
}
}
那么你的 UDF 类应该继承UdfBase如下:
using System.Runtime.InteropServices;
using ExcelUdf.Automation;

namespace AutomationSample
{
    [ClassInterface(ClassInterfaceType.AutoDual)]
    [Guid("7a9de936-0e99-4d37-9c2b-a02a09fb371f")]
    public class AutomationSample : UdfBase
    {
        public double AutomationSampleAdd(double a, double b)
        {
            return a + b;
        }

        public double AutomationSampleSubtract(double a, double b)
        {
            return a - b;
        }
    }
}
构建您的项目,最后一步是打开一个 Excel 文件,转到:文件 > 选项,然后选择加载项。在下拉列表中选择“Excel Add-Ins”,然后点击“Go...”。选择“自动化”按钮并选择您的组件(在本例中,要选择的项目名称是AutomationSample.AutomationSample)。
在工作表单元格中写入=AutomationSampleAdd(1,2),您应该得到3.
引用 Excel 的自动化加载项方法
上面提到的前一种方法允许 Excel 调用 .NET,而不是相反。如果您想引用执行 .NET 代码的 Excel 应用程序怎么办?假设根据某些标准或异步回调为某些工作表列着色。在这种情况下,您需要实现IDTExtensibility2接口。
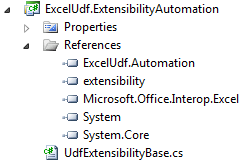
要实现该方法,需要引用右侧显示的程序集,继承UdfBase abstract类并实现IDTExtensibility2接口。
using System;
using ExcelUdf.Automation;
using Extensibility;
using Microsoft.Office.Interop.Excel;

namespace ExcelUdf.ExtensibilityAutomation
{
public abstract class UdfExtensibilityBase : UdfBase, IDTExtensibility2
{
protected Application ExcelApplication { get; set; }

public void OnConnection(object application,
    ext_ConnectMode connectMode, object addInInst,
    ref Array custom)
{
    ExcelApplication = application as Application;
}

public void OnDisconnection(ext_DisconnectMode removeMode,
    ref Array custom)
{
}

public void OnAddInsUpdate(ref Array custom)
{
}

public void OnStartupComplete(ref Array custom)
{
}

public void OnBeginShutdown(ref Array custom)
{
}
}
}
在我的下载项目中,我在一个独立的项目中实现了这个类,而不是将它与现有的一个结合起来。原因是这种方法需要引用特定的 Excel 互操作组件版本。一旦你有了这些引用,你的部署项目的复杂性就会增加,因为现在你需要管理更多的依赖项并确保在目标机器上安装了正确的引用版本的 Excel(如果你想避免这种情况,请检查NetOffice )。
要创建 UDF 方法并引用当前 Excel 实例:
using System.Runtime.InteropServices;
using ExcelUdf.ExtensibilityAutomation;

namespace ExtensibilitySample
{
[ClassInterface(ClassInterfaceType.AutoDual)]
[Guid("7a9de936-0e99-4d38-9c2b-a02a09fb371f")]
public class ExtensibilitySample : UdfExtensibilityBase
{
    public double ExtensibilitySampleAdd(double a, double b)
    {
        return a + b;
    }

    public string WhoAreYou()
    {
        string name =
           ExcelApplication.Application.InputBox("Who are you?");
        if (string.IsNullOrWhiteSpace(name))
        {
            return string.Empty;
        }
        return "Hello " + name;
    }
}
}
如上所述,将此项目与 Excel 一起使用。
XLL 加载项方法

XLL 是 Excel 的加载项,您可以使用任何支持构建本机 DLL(动态链接库)的编译器构建它,它从 Excel 97 开始受支持。它比自动化加载项更快并且具有更多功能,但 XLL组件通常通过 C/C++ 构建。
对 .NET 来说幸运的是,有一个开源组件具有一个名为Excel DNA的许可许可证,它允许 .NET 轻松构建 XLL 插件。
要构建 XLL 组件,请创建一个新项目,下载Excel DNA并引用ExcelDna.Integration.dll,然后编写您的函数:
using ExcelDna.Integration;

namespace XllSample
{
    public class XllSample
    {
        [ExcelFunction(Description = "Adds two numbers",
                Category = "XLL with .NET Sample Function")]
        public static double XllSampleAdd(double a, double b)
        {
            return a + b;
        }
    }
}构建,然后创建一个名为YourDllName.dna的文件,在本例中为 XllSample.dna,其内容如下:
<DnaLibrary RuntimeVersion="v4.0">
	<ExternalLibrary Path="XllSample.dll" />
</DnaLibrary>
将其放在您的 DLL 旁边,然后将ExcelDna.xll或ExcelDna64.xll复制到您的 DLL 旁边,并将其重命名以匹配您的 DLL 名称,在本例中为 XllSample.xll。
构建您的项目,最后一步是打开一个 Excel 文件,转到:文件 > 选项,然后选择加载项。在下拉列表中选择“Excel Add-Ins”,然后点击“Go...”。选择“浏览”按钮并选择您的XllSample.xll。
在 Excel 单元格中,开始输入XllSampleAdd,然后您将通过 Excel 的自动完成功能获得其余功能。
比较
这是两种方法之间的比较表:
| 自动化插件 | XLL 加载项 | |
|---|---|---|
| 最低支持版本 | Excel 2002 | Excel 97 |
| 表现 | 慢点 | 快点 |
| UDF 自动完成 | 不支持 | 支持的 |
| UDF Documentation Tooltip | Not supported | Supported |
| Building in .NET | Easier | Harder (without a 3rd party component) |


 3万+
3万+


 被折叠的 条评论
为什么被折叠?
被折叠的 条评论
为什么被折叠?
 到【灌水乐园】发言


