


1.父控件给子控件传参
在salesforce的lwc中,如果父控件想给子控件传参数,可以在子控件的参数前加@api,并在父控件的html上传参。
例子:子控件是一个input框,input框中的value是从父控件传过来的。
子控件
在子控件js中用来接收值的变量前加@api。
子控件html:
<template>
    <lightning-input label="子控件input框" value={fromParentValue}></lightning-input>
</template>
子控件js:
import { LightningElement, api } from 'lwc';
export default class ChildComponent extends LightningElement {
  @api fromParentValue
}
父控件
父控件中包含子控件<ChildComponent>,调用的时候需要将驼峰表达改成“-”,并在前面加“c”。传参的属性名从fromParentValue改成from-parent-value后,就可以给子控件传参。
父控件html:
<template>
  <p>----parent----</p>
  <p>parentValue: {parentValue}</p>
  <button onclick={valueUp}>parentValue + 1</button>

  <p>--------------</p>
  <p>----child----</p>
  <c-child-component from-parent-value = {parentValue}></c-child-component>
</template>
父控件js:
import { LightningElement} from "lwc";
export default class parentComponent extends LightningElement {
parentValue = 1;
valueUp(){
this.parentValue += 1
}
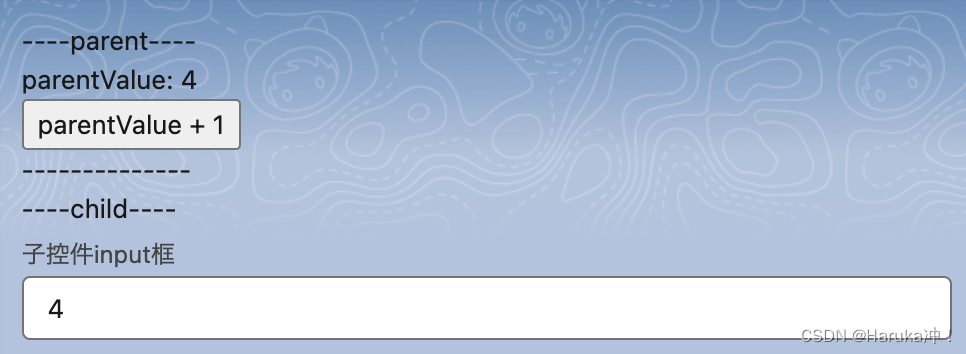
}结果
加载完成后,子控件的input框的value是父控件传过去的初始值。

点击+1按钮,子控件的input框value也会随着父控件的值响应。
2.父控件调用子控件的方法
在上面例子中的子控件中加一个方法:获取input框中的value并显示在画面上。父控件想要调用子控件的方法,需要在子控件的方法前加@api。
子控件
子控件html:
<template>
    <lightning-input label="子控件input框" value={fromParentValue} lwc:ref="myInput"></lightning-input>
    <p>输入值为:{inputValue}</p>
</template>
子控件js:
import { LightningElement, api } from 'lwc';

export default class ChildComponent extends LightningElement {
  @api fromParentValue
  inputValue

  @api getInputValue(){
    this.inputValue = this.refs.myInput.value
  }
}
父控件
父控件中点击button调用自己的getChildInputValue方法,在这个方法中先取到子控件的dom,再调用子控件的方法。
父控件html:
<template>
  <p>----parent----</p>
  <p>parentValue: {parentValue}</p>
  <lightning-button variant="brand" label="parentValue + 1" onclick={valueUp} class="slds-m-left_x-small"></lightning-button>
  <lightning-button variant="brand" label="获取子控件input的值" onclick={getChildInputValue} class="slds-m-left_x-small"></lightning-button>

  <p>--------------</p>
  <p>----child----</p>
  <c-child-component from-parent-value = {parentValue} lwc:ref="childInput"></c-child-component>
</template>
父控件js:
import { LightningElement} from "lwc";

export default class parentComponent extends LightningElement {

  parentValue  = 1

  valueUp(){
    this.parentValue += 1
  }
  getChildInputValue(){
    this.refs.childInput.getInputValue();
  }
}
结果
加载完成时子控件中的输入值不显示
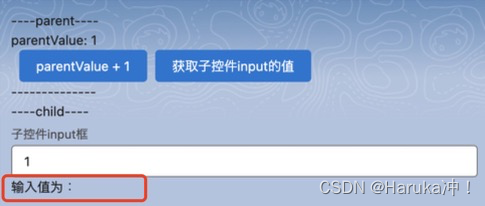
点击parentValue + 1几次后,子控件中的值随着变化,此时输入值仍然为空。
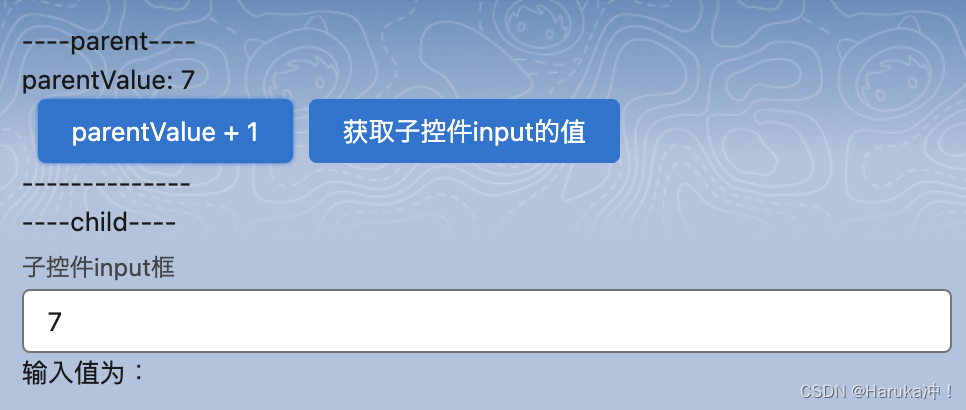
点击父控件本身的button【获取子控件input的值】,点击后,子控件的输入值在画面中显示出来。在父控件中成功调用子控件中的方法。

3.子控件给父控件传参
因为@api的数据是单向的,所以只能从父传给子。想要子控件给父控件传参可以在子控件中发自定义事件,在父控件中接收。
子控件
在上面的例子的基础上,在子控件中加一个button,点击之后把input框中的value通过自定义事件发给父控件。
注意⚠️:自定义事件名必须是全小写
子控件html:
<template>
    <lightning-input label="子控件input框" value={fromParentValue} lwc:ref="myInput"></lightning-input>
    <p>输入值为:{inputValue}</p>
    <lightning-button variant="brand" label="把input框中的value发给父控件" onclick={passValue} class="slds-m-left_x-small"></lightning-button>
</template>
子控件js:
import { LightningElement, api } from 'lwc';

export default class ChildComponent extends LightningElement {
  @api fromParentValue
  inputValue

  @api getInputValue(){
    this.inputValue = this.refs.myInput.value
  }
  passValue(){
    this.dispatchEvent(new CustomEvent("childvalue", {detail: this.refs.myInput.value}));
  }

}
父控件
在父控件html中,使用on+自定义事件名“childvalue”来监听子控件发来的事件,在js中进行后续处理。
父控件html:
<template>
  <p>----parent----</p>
  <p>parentValue: {parentValue}</p>
  <lightning-button variant="brand" label="parentValue + 1" onclick={valueUp} class="slds-m-left_x-small"></lightning-button>
  <lightning-button variant="brand" label="获取子控件input的值" onclick={getChildInputValue} class="slds-m-left_x-small"></lightning-button>
  <p>子控件传来的值为:{childInputValue}</p>
  <p>--------------</p>
  <p>----child----</p>
  <c-child-component from-parent-value = {parentValue} onchildvalue={childValueDisplay} lwc:ref="childInput"></c-child-component>
</template>
父控件js:
import { LightningElement} from "lwc";

export default class parentComponent extends LightningElement {

  parentValue  = 1;
  childInputValue

  valueUp(){
    this.parentValue += 1
  }
  getChildInputValue(){
    this.childInputValue = this.refs.childInput.getInputValue();
  }
  childValueDisplay(event){
    this.childInputValue = event.detail
  }
}
结果
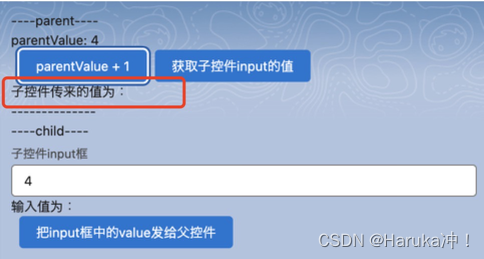
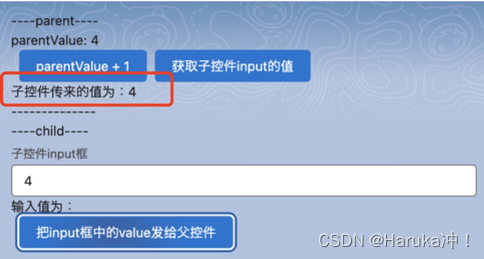
点3下【parentValue +1】后,子控件input框中的值是4,【子控件传来的值】是空的。点按钮【把input框中的value发给父控件】后,4从子控件发给了父控件。
在子控件的input框中直接输入值111,点击【把input框中的value发给父控件】后,同样也把值传给了父控件。


 202
202


 被折叠的 条评论
为什么被折叠?
被折叠的 条评论
为什么被折叠?
 到【灌水乐园】发言


