


部署前准备:
mysql-8.0.27下载地址:https://cdn.mysql.com//Downloads/MySQL-8.0/mysql-8.0.27-1.el7.x86_64.rpm-bundle.tar
mha-manager下载地址:https://github.com/yoshinorim/mha4mysql-manager/releases/download/v0.58/mha4mysql-manager-0.58-0.el7.centos.noarch.rpm
mha-node下载地址:https://github.com/yoshinorim/mha4mysql-node/releases/download/v0.58/mha4mysql-node-0.58-0.el7.centos.noarch.rpm
部署架构:
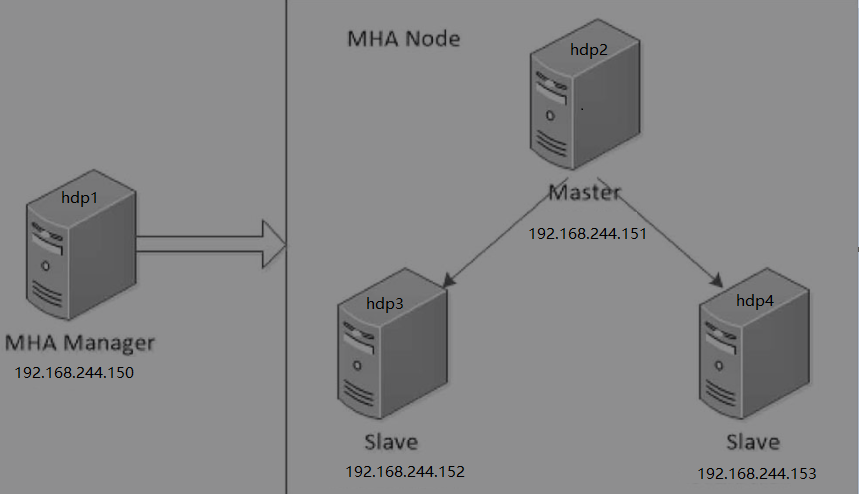
基本配置
4个节点逐台配置hostname和/etc/hosts文件

安装mysql8
4个节点均创建/data目录,将mysql-8.0.27-1.el7.x86_64.rpm-bundle.tar上传到/data目录下,进行解压安装
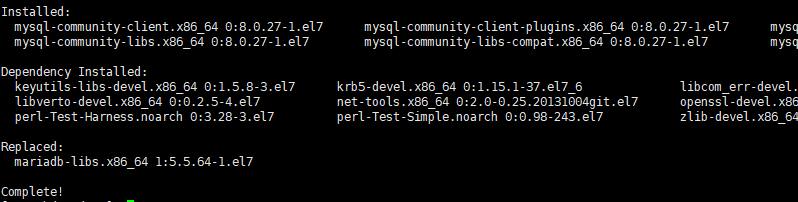
我这里使用操作系统镜像制作了本地yum源,用来解决依赖问题,命令见下图

看到如下内容,代表安装完成
配置Mysql异步复制集群
启动hdp2、hdp3、hdp4上的mysql服务,并配置开机自启
| 1 |
|
连接3个节点的mysql数据库,数据库默认root密码通过查看日志获取
| 1 2 |
|
3个节点数据库修改root用户密码,命令及sql如下
| 1 2 3 4 5 6 7 8 9 10 11 12 13 14 15 16 17 18 19 20 21 22 |
|
3个节点配置数据库server_id,以root用户登录mysql进行临时配置,然后将server_id配置在/etc/my.cnf中,防止重启后失效
| 1 2 3 4 5 6 7 8 9 10 11 12 |
|
查看主库hdp2的二进制日志信息
| 1 2 3 4 5 6 7 8 9 10 11 12 13 14 15 16 17 18 19 20 21 22 23 |
|
在主库hdp2上建立复制专用用户,并授权
| 1 2 3 4 5 6 7 |
|
在从库hdp3和hdp4上创建主库信息
| 1 2 3 4 5 6 7 8 9 10 |
|
在从库启动复制并查看从库状态
| 1 2 3 4 5 6 7 8 9 10 11 12 13 14 15 16 17 18 19 20 21 22 23 24 25 26 27 28 29 30 31 32 33 34 35 36 37 38 39 40 41 42 43 44 45 46 47 48 49 50 51 52 53 54 55 56 57 58 59 60 61 62 63 64 65 66 67 68 |
|
配置Mysql半同步复制
在主库加载插件semisync_master.so,从库加载插件semisync_slave.so
| 1 2 3 4 5 6 7 8 9 |
|
启用半同步复制
| 1 2 3 4 5 6 7 8 9 |
|
将半同步插件配置持久化到配置文件中
| 1 2 3 4 5 6 |
|
重启从库上的IO线程,否则仍然为异步复制模式,查询状态及重启命令如下
| 1 2 3 4 5 6 7 8 9 10 11 12 13 14 15 16 17 18 19 20 21 22 23 24 25 26 27 28 29 30 31 32 33 34 35 36 37 38 39 40 41 42 43 44 45 46 47 48 49 |
|
查询主库的半同步复制是否在运行
| 1 2 3 4 5 6 7 8 9 10 |
|
部署MHA相关组件
环境说明

组件:
mha-manager:部署在hdp1
mha-node:部署在hdp2、hdp3、hdp4
4个节点安装perl相关依赖
下载epel源
| 1 |
|
安装perl-DBD-MySQL、perl-Log-DIspatch、perl-Parallel-ForkManager、perl-Time-HiRes
| 1 |
|
安装perl-Config-Tiny,下载地址:http://mirror.centos.org/altarch/7/os/aarch64/Packages/perl-Config-Tiny-2.14-7.el7.noarch.rpm
| 1 2 3 4 5 6 7 8 9 10 11 12 13 14 15 16 17 18 19 20 21 22 23 24 25 26 27 28 29 30 31 32 33 34 35 36 |
|
4个节点互相配置免密登录
| 1 2 3 4 5 6 7 8 9 10 11 12 13 14 15 16 17 18 19 20 21 22 23 24 25 26 27 28 29 30 31 32 33 34 35 36 37 38 39 40 41 42 43 44 45 46 47 48 49 50 51 52 53 54 55 56 57 58 59 60 61 62 63 64 65 66 67 68 69 70 71 72 73 74 75 76 77 78 79 80 81 |
|
hdp2、hdp3、hdp4安装mha-node
| 1 2 3 4 |
|
hdp1安装mha-manager和mha-node
| 1 2 3 4 5 6 7 8 9 10 11 12 13 14 15 16 17 18 19 20 21 22 23 24 25 26 27 28 29 30 31 32 33 34 35 36 37 38 39 40 41 42 |
|
配置MHA
在hdp1上创建配置文件目录并创建配置app1.cnf
| 1 2 3 4 5 6 7 8 9 10 11 12 13 14 15 16 17 18 19 20 21 22 23 24 25 26 27 28 29 30 31 32 |
|
在hdp3、hdp4设置从库relay_log_purge参数
MHA在发生主从切换的过程中,从库的恢复过程依赖于relay log,所以这里要将relay log的自动清除设置为OFF,即采用手动清除relay log的方式。
在默认情况下,从服务器上的中继日志会在SQL线程执行完毕后被自动删除。
但是在MHA环境中,这些中继日志在恢复其他从服务器时可能会被用到,因此需要禁用中继日志的自动删除功能。
| 1 2 3 4 5 6 7 8 9 10 11 12 13 14 15 16 17 18 |
|
在hdp1上创建自动故障转移脚本
| 1 2 3 4 5 6 7 8 9 10 11 12 13 14 15 16 17 18 19 20 21 22 23 24 25 26 27 28 29 30 31 32 33 34 35 36 37 38 39 40 41 42 43 44 45 46 47 48 49 50 51 52 53 54 55 56 57 58 59 60 61 62 63 64 65 66 67 68 69 70 71 72 73 74 75 76 77 78 79 80 81 82 83 84 85 86 87 88 89 90 91 |
|
给自动故障转移脚本授权
| 1 |
|
hdp1上检查MHA
1、检查SSH
| 1 2 3 4 5 6 7 8 9 10 11 12 |
|
2、 检查整个复制环境状况
在hdp2执行root的登录授权,以及普通用户repl的登录授权
| 1 2 3 4 5 6 7 8 9 10 11 12 13 14 15 16 17 18 |
|
进行复制环境检查
| 1 2 3 4 5 6 7 8 9 10 11 12 13 14 15 16 17 18 19 20 21 22 23 24 25 26 27 28 29 30 31 32 33 34 35 36 37 38 39 40 41 42 43 44 45 46 47 48 49 50 51 52 53 54 55 56 57 58 59 60 61 62 63 64 65 66 67 68 69 70 71 72 73 74 75 76 77 78 79 80 81 82 83 84 85 |
|
3、检查MHA Manager的状态
| 1 2 |
|
启动MHA Manager
| 1 2 3 4 5 |
|
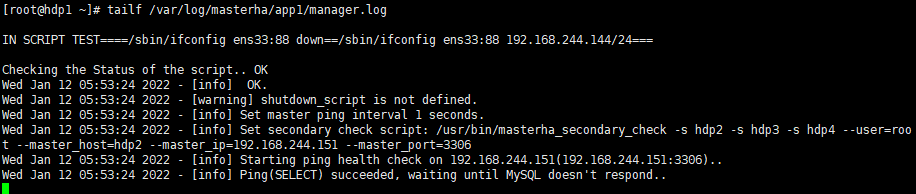
4、查看启动日志:tailf /var/log/masterha/app1/manager.log
功能测试
在 hdp2上初始绑定VIP
| 1 2 3 4 5 6 7 8 9 10 11 12 13 14 15 16 |
|
模拟主从延时,关闭hd3的slave IO线程
| 1 2 |
|
在hdp2上生成数据,这里使用sysbench
hdp2安装sysbench
| 1 |
|
在hdp2上生成数据
| 1 2 |
|
| 1 2 3 4 5 6 7 8 9 10 11 12 13 14 15 16 17 18 19 20 21 22 23 24 25 26 27 28 29 30 31 32 33 |
|
停止主服务器hdp2的MySQL服务
| 1 |
|
验证VIP漂移
在hdp3上查看ip
| 1 2 3 4 5 6 7 8 9 10 11 12 13 14 15 |
|
可以看到VIP已经从hdp2(master)漂移到了hdp3(slave1)
通过VIP连接数据库,查看表数据
| 1 2 3 4 5 6 7 8 9 10 11 12 13 14 15 16 17 18 19 20 21 22 23 24 25 26 27 28 29 30 31 32 33 34 35 36 37 38 39 40 41 42 43 |
|
至此,MHA基本搭建完毕!!


 1196
1196


 被折叠的 条评论
为什么被折叠?
被折叠的 条评论
为什么被折叠?
 到【灌水乐园】发言


