编程式事务:所谓编程式事务指的是通过编码方式实现事务,即类似于JDBC编程实现事务管理。管理使用TransactionTemplate或者直接使用底层的PlatformTransactionManager。对于编程式事务管理,spring推荐使用TransactionTemplate。
声明式事务:管理建立在AOP之上的。其本质是对方法前后进行拦截,然后在目标方法开始之前创建或者加入一个事务,在执行完目标方法之后根据执行情况提交或者回滚事务。声明式事务最大的优点就是不需要通过编程的方式管理事务,这样就不需要在业务逻辑代码中掺杂事务管理的代码,只需在配置文件中做相关的事务规则声明(或通过基于@Transactional注解的方式),便可以将事务规则应用到业务逻辑中。
显然声明式事务管理要优于编程式事务管理,这正是spring倡导的非侵入式的开发方式。
声明式事务管理使业务代码不受污染,一个普通的POJO对象,只要加上注解就可以获得完全的事务支持。和编程式事务相比,声明式事务唯一不足地方是,后者的最细粒度只能作用到方法级别,无法做到像编程式事务那样可以作用到代码块级别。但是即便有这样的需求,也存在很多变通的方法,比如,可以将需要进行事务管理的代码块独立为方法等等。
扩展:
Spring中的事务分为物理事务和逻辑事务;
物理事务:就是底层数据库提供的事务支持,如JDBC或JTA提供的事务;
逻辑事务:是Spring管理的事务,不同于物理事务,逻辑事务提供更丰富的控制,而且如果想得到Spring事务管理的好处,必须使用逻辑事务,因此在Spring中如果没特别强调一般就是逻辑事务;
逻辑事务解决方案:
低级别解决方案:
使用工具类获取连接(会话)和释放连接(会话),如使用org.springframework.jdbc.datasource包中的DataSourceUtils 类来获取和释放具有逻辑事务功能的连接。当然对集成第三方ORM框架也提供了类似的工具类,如对Hibernate提供了SessionFactoryUtils工具类,JPA的EntityManagerFactoryUtils等,
高级别解决方案:
使用Spring提供的模板类,如JdbcTemplate、HibernateTemplate和JpaTemplate模板类等,而这些模板类内部其实是使用了低级别解决方案中的工具类来管理连接或会话
Spring提供两种编程式事务支持:直接使用PlatformTransactionManager实现和使用TransactionTemplate模板类,用于支持逻辑事务管理。如果采用编程式事务推荐使用TransactionTemplate模板类和高级别解决方案
总结:
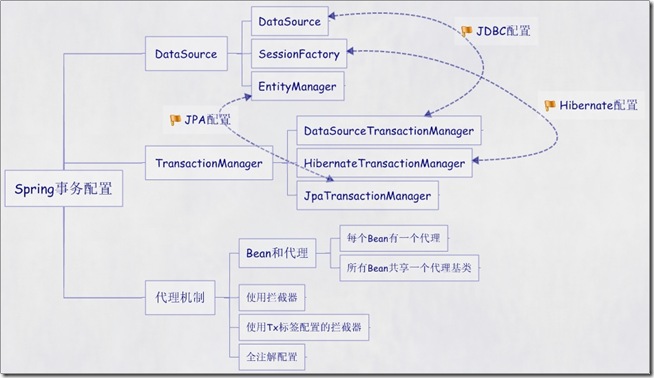
Spring配置文件中关于事务配置总是由三个组成部分,分别是DataSource、TransactionManager和代理机制这三部分,无论哪种配置方式,一般变化的只是代理机制这部分。
DataSource、TransactionManager这两部分只是会根据数据访问方式有所变化,比如使用Hibernate进行数据访问时,DataSource实际为SessionFactory,TransactionManager的实现为HibernateTransactionManager。
具体如下图:
实例:
声明式事务:
声明式事务又分为两种实现方式
1、XML配置方式,这里面又分为两种不同的配置方式
2.1、方式一
利用Aspectj(AspectJ是一个面向切面的框架,它扩展了Java语言。AspectJ定义了AOP语法所以它有一个专门的编译器用来生成遵守Java字节编码规范的Class文件。)
需要导入如下包:
<?xml version="1.0" encoding="UTF-8"?>
<beans xmlns="http://www.springframework.org/schema/beans"
    xmlns:xsi="http://www.w3.org/2001/XMLSchema-instance"
    xmlns:aop="http://www.springframework.org/schema/aop"
    xsi:schemaLocation="
        http://www.springframework.org/schema/beans http://www.springframework.org/schema/beans/spring-beans.xsd
        http://www.springframework.org/schema/tx http://www.springframework.org/schema/tx/spring-tx.xsd
        http://www.springframework.org/schema/aop http://www.springframework.org/schema/context/spring-aop.xsd">

    <description>数据源及事务配置</description>

    <!-- 数据源配置 -->
    <!-- 代理datasource,使其能够显式获取preparedStatement的参数值 -->
    <bean id="proxyDataSource" class="org.jdbcdslog.ConnectionPoolDataSourceProxy">
        <property name="targetDSDirect" ref="dataSource"/>
    </bean>

    <!-- 配置事务管理器 -->
    <bean id="transactionManager" class="org.springframework.jdbc.datasource.DataSourceTransactionManager">
        <property name="dataSource" ref="proxyDataSource" />
    </bean>

    <tx:advice id="txAdvice" transaction-manager="transactionManager">
        <tx:attributes>
            <tx:method name="save*" propagation="REQUIRED" />
            <tx:method name="update*" propagation="REQUIRED" />
            <tx:method name="delete*" propagation="REQUIRED" />
            <tx:method name="*" read-only="true" />
        </tx:attributes>
    </tx:advice>
    <!-- 配置哪些方法参与事务 -->
    <aop:config>
        <aop:pointcut id="allMethod" expression="execution(* service.*.*(..))"/>
        <aop:advisor pointcut-ref="allMethod" advice-ref="txAdvice"/>
    </aop:config>

</beans>
2.2、方式二(利用Spring框架自己的aop实现)
<?xml version="1.0" encoding="UTF-8"?>
<beans xmlns="http://www.springframework.org/schema/beans"
    xmlns:xsi="http://www.w3.org/2001/XMLSchema-instance"
    xmlns:aop="http://www.springframework.org/schema/aop"
    xsi:schemaLocation="
        http://www.springframework.org/schema/beans http://www.springframework.org/schema/beans/spring-beans.xsd
        http://www.springframework.org/schema/aop http://www.springframework.org/schema/context/spring-aop.xsd">

    <description>数据源及事务配置</description>

    <!-- 数据源配置 -->
    <!-- 代理datasource,使其能够显式获取preparedStatement的参数值 -->
    <bean id="proxyDataSource" class="org.jdbcdslog.ConnectionPoolDataSourceProxy">
        <property name="targetDSDirect" ref="dataSource"/>
    </bean>

    <!-- 配置事务管理器 -->
    <bean id="transactionManager" class="org.springframework.jdbc.datasource.DataSourceTransactionManager">
        <property name="dataSource" ref="proxyDataSource" />
    </bean>

    <bean id="transactionInterceptor"
        class="org.springframework.transaction.interceptor.TransactionInterceptor">
        <!--  事务拦截器bean需要依赖注入一个事务管理器 -->
        <property name="transactionManager">
            <ref bean="transactionManager" />
        </property>
        <property name="transactionAttributes">
            <!--  下面定义事务传播属性-->
            <props>
                <prop key="*">readOnly</prop>
                <prop key="add*">PROPAGATION_REQUIRED,-Exception</prop>
                <prop key="save*">PROPAGATION_REQUIRED,-Exception</prop>
                <prop key="modify*">PROPAGATION_REQUIRED,-Exception</prop>
                <prop key="update*">PROPAGATION_REQUIRED,-Exception</prop>
                <prop key="delete*">PROPAGATION_REQUIRED,-Exception</prop>
                <prop key="remove*">PROPAGATION_REQUIRED,-Exception</prop>
                <prop key="query*">PROPAGATION_REQUIRED, readOnly,-Exception</prop>
                <prop key="load*">PROPAGATION_REQUIRED, -Exception</prop>
            </props>
        </property>
    </bean>

    <!-- 自动代理 -->
    <bean id="autoproxy"
        class="org.springframework.aop.framework.autoproxy.BeanNameAutoProxyCreator">
        <property name="beanNames">
            <list>
                <value>*Service</value><!--下面是所有需要自动创建事务代理的bean 所有以service结尾的都会创建事务代理-->
            </list>
        </property>
        <property name="interceptorNames">
            <list>
                <value>transactionInterceptor</value>
            </list>
        </property>
    </bean>

</beans>
2、注解方式,也是我们最为常用的
同样注解方式也是aspect提供的,上面已经提供了xml的方式,现在我们看看怎么开启aspect注解。
<?xml version="1.0" encoding="UTF-8"?>
<beans xmlns="http://www.springframework.org/schema/beans"
    xmlns:xsi="http://www.w3.org/2001/XMLSchema-instance"
    xsi:schemaLocation="
        http://www.springframework.org/schema/beans http://www.springframework.org/schema/beans/spring-beans.xsd
        http://www.springframework.org/schema/tx http://www.springframework.org/schema/tx/spring-tx.xsd">

    <description>数据源及事务配置</description>

    <!-- 数据源配置 -->
    <!-- 代理datasource,使其能够显式获取preparedStatement的参数值 -->
    <bean id="proxyDataSource" class="org.jdbcdslog.ConnectionPoolDataSourceProxy">
        <property name="targetDSDirect" ref="dataSource"/>
    </bean>

    <!-- 配置事务管理器 -->
    <bean id="transactionManager" class="org.springframework.jdbc.datasource.DataSourceTransactionManager">
        <property name="dataSource" ref="proxyDataSource" />
    </bean>

    <!-- 开启注解方式配置事物 -->
    <tx:annotation-driven transaction-manager="transactionManager" proxy-target-class="true"/>

</beans>
那么类中如何使用注解,这里就不说了,这里只讲配置。
编程式事务:
<?xml version="1.0" encoding="UTF-8"?>
<beans xmlns="http://www.springframework.org/schema/beans"
    xmlns:xsi="http://www.w3.org/2001/XMLSchema-instance"
    xmlns:tx="http://www.springframework.org/schema/tx"
    xsi:schemaLocation="
        http://www.springframework.org/schema/beans http://www.springframework.org/schema/beans/spring-beans.xsd
        http://www.springframework.org/schema/tx http://www.springframework.org/schema/tx/spring-tx.xsd">

    <description>数据源及事务配置</description>

    <!-- 数据源配置 -->
    <!-- 代理datasource,使其能够显式获取preparedStatement的参数值 -->
    <bean id="proxyDataSource" class="org.jdbcdslog.ConnectionPoolDataSourceProxy">
        <property name="targetDSDirect" ref="dataSource"/>
    </bean>

    <!-- 配置事务管理器 -->
    <bean id="transactionManager" class="org.springframework.jdbc.datasource.DataSourceTransactionManager">
        <property name="dataSource" ref="proxyDataSource" />
    </bean>

    <!--事务模板 -->
    <bean id="transactionTemplate" class="org.springframework.transaction.support.TransactionTemplate">
        <property name="transactionManager" ref="transactionManager"/>
        <!--ISOLATION_DEFAULT 表示由使用的数据库决定  -->
        <property name="isolationLevelName" value="ISOLATION_DEFAULT"/>
        <property name="propagationBehaviorName" value="PROPAGATION_REQUIRED" />
        <!-- <property name="timeout" value="30"/> -->
    </bean>

    <!-- 注解方式配置事物 -->
    <tx:annotation-driven transaction-manager="transactionManager" proxy-target-class="true"/>
</beans>
package com.somnus.module.defaults.initialize;
import org.springframework.beans.factory.InitializingBean;
import org.springframework.jdbc.core.JdbcTemplate;
import org.springframework.transaction.TransactionStatus;
import org.springframework.transaction.support.TransactionCallback;
import org.springframework.transaction.support.TransactionTemplate;
public class DataInitializer implements InitializingBean{
private TransactionTemplate transactionTemplate;
private JdbcTemplate jdbcTemplate;
@Override
public void afterPropertiesSet() throws Exception {
transactionTemplate.execute(new TransactionCallback<Object>() {
@Override
public Object doInTransaction(TransactionStatus status) {
jdbcTemplate.execute("truncate table SET_RESOURCE");
jdbcTemplate.execute(String.format("INSERT INTO SET_RESOURCE VALUES ('%s','%s','%s','%s',%s,%s)",
"100", "cAuthc", "/sample/component.html", "1", "null", "null"));
jdbcTemplate.execute(String.format("INSERT INTO SET_RESOURCE VALUES ('%s','%s','%s','%s',%s,%s)",
"992", "cAuthc", "/mt/rgroup/rgroup_read.html", "1", "null", "null"));
return null;
}
});
}
public void setTransactionTemplate(TransactionTemplate transactionTemplate) {
this.transactionTemplate = transactionTemplate;
}
public void setJdbcTemplate(JdbcTemplate jdbcTemplate) {
this.jdbcTemplate = jdbcTemplate;
}
}


 1624
1624

 被折叠的 条评论
为什么被折叠?


