


实操
首先使用jedis的方式来实现,后面使用spring-boot-data-redis
		<dependency>
			<groupId>redis.clients</groupId>
			<artifactId>jedis</artifactId>
		</dependency>
		<dependency>
            <groupId>org.springframework.boot</groupId>
            <artifactId>spring-boot-starter-data-redis</artifactId>
            <exclusions>
                <exclusion>
                    <groupId>io.lettuce</groupId>
                    <artifactId>lettuce-core</artifactId>
                </exclusion>
            </exclusions>
        </dependency>
		<dependency>
			<groupId>io.protostuff</groupId>
			<artifactId>protostuff-core</artifactId>
			<version>1.5.9</version>
		</dependency>
        <dependency>
            <groupId>io.protostuff</groupId>
            <artifactId>protostuff-runtime</artifactId>
            <version>1.5.9</version>
        </dependency>
由于使用的spring-boot-starter-data-redis,它是对redis客户端的一层封装,默认使用的lettuce客户端,这里使用jedis,所以先exclusion掉它
/**
 * Created by zkk on 2019/3/14
 * 增加protostuff序列化方式,生成的码流比jdk序列化小,速度更快
 * 解决devtool热加载在jdk序列化下类型转换报错的情况
 **/
public class ProtostuffSerializer implements RedisSerializer<Object> {

    private boolean isEmpty(byte[] data) {
        return (data == null || data.length == 0);
    }

    private final Schema<ProtoWrapper> schema;

    private final ProtoWrapper wrapper;

    private final LinkedBuffer buffer;

    public ProtostuffSerializer() {
        this.wrapper = new ProtoWrapper();
        this.schema = RuntimeSchema.getSchema(ProtoWrapper.class);
        this.buffer = LinkedBuffer.allocate(LinkedBuffer.DEFAULT_BUFFER_SIZE);
    }

    @Override
    public byte[] serialize(Object t) throws SerializationException {
        if (t == null) {
            return new byte[0];
        }
        wrapper.data = t;
        try {
            return ProtostuffIOUtil.toByteArray(wrapper, schema, buffer);
        } finally {
            buffer.clear();
        }
    }

    @Override
    public Object deserialize(byte[] bytes) throws SerializationException {
        if (isEmpty(bytes)) {
            return null;
        }

        ProtoWrapper newMessage = schema.newMessage();
        ProtostuffIOUtil.mergeFrom(bytes, newMessage, schema);
        return newMessage.data;
    }

    // Protostuff 无法直接序列化集合类对象,需要包装类包一下
    private static class ProtoWrapper {
        public Object data;
    }
}
然后就是序列化的实现类,它实现了RedisSerializer接口
主要的方法就是byte[] serialize(T t)和 deserialize(byte[] bytes)
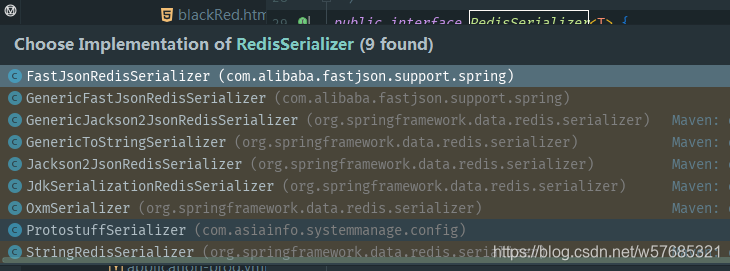
可以看出该接口实现了各种序列化方式,这些也可以在RedisTemplate里面使用,可以set它的序列化方式,比如常用的stringRedisTemplate就是使用的StringRedisSerializer序列化方式
/**
 * Created by zkk on 2019/2/1
 * mybatis的redis二级缓存
 * 需要用到缓存的就在mapper.xml里面加上
 * <cache type="com.xxx.xxx.config.MybatisRedisCache"/>
 **/
public class MybatisRedisCache implements Cache {
    private static Logger LOGGER = LogManager.getLogger(MybatisRedisCache.class);
    private final String id;
    private final ReadWriteLock readWriteLock = new ReentrantReadWriteLock();

    private static JedisConnectionFactory jedisConnectionFactory;

    /**
     * 这个地方需要静态注入,这里通过中间类 MybatisRedisCacheTransfer 实现的
     *
     * @param jedisConnectionFactory
     */
    public static void setJedisConnectionFactory(JedisConnectionFactory jedisConnectionFactory) {
        MybatisRedisCache.jedisConnectionFactory = jedisConnectionFactory;
    }

    public MybatisRedisCache(final String id) {
        if (null == id || "".equals(id)) {
            throw new IllegalArgumentException("mybatis redis cache need an id.");
        }
        this.id = id;
        LOGGER.debug("mybatis redis cache id: {}", id);
    }


    @Override
    public String getId() {
        return this.id;
    }

    /**
     * 存值
     *
     * @param key
     * @param value
     */
    @Override
    public void putObject(Object key, Object value) {
        if (null == key) {
            return;
        }
        LOGGER.debug("mybatis redis cache put. K={} value={}", key, value);
        RedisConnection redisConnection = null;
        try {
            redisConnection = jedisConnectionFactory.getConnection();
            RedisSerializer serializer = new ProtostuffSerializer();

            redisConnection.setEx(serializer.serialize(key), 500, serializer.serialize(value));

            // 将key保存到redis.list中
            redisConnection.lPush(serializer.serialize(id), serializer.serialize(key));
            redisConnection.expire(serializer.serialize(id), 500);
        } catch (Exception e) {
            LOGGER.error("mybatis redis cache put exception. K=" + key + " V=" + value + "", e);
        } finally {
            if (null != redisConnection) {
                redisConnection.close();
            }
        }
    }

    /**
     * 取值
     *
     * @param key
     * @return
     */
    @Override
    public Object getObject(Object key) {
        if (null == key) {
            return null;
        }
        LOGGER.debug("mybatis redis cache get. K={}", key);
        RedisConnection redisConnection = null;
        Object result = null;
        try {
            redisConnection = jedisConnectionFactory.getConnection();
            RedisSerializer serializer = new ProtostuffSerializer();
            result = serializer.deserialize(redisConnection.get(serializer.serialize(key)));
        } catch (Exception e) {
            LOGGER.error("mybatis redis cache get exception. K=" + key + " V=" + result + "", e);
        } finally {
            if (null != redisConnection) {
                redisConnection.close();
            }
        }
        return result;
    }

    /**
     * 删值
     *
     * @param key
     * @return
     */
    @Override
    public Object removeObject(Object key) {
        if (null == key) {
            return null;
        }
        LOGGER.debug("mybatis redis cache remove. K={}", key);
        RedisConnection redisConnection = null;
        Object result = null;
        try {
            redisConnection = jedisConnectionFactory.getConnection();
            RedisSerializer serializer = new ProtostuffSerializer();
            // 讲key设置为立即过期
            result = redisConnection.expireAt(serializer.serialize(key), 0);

            // 将key从redis.list中删除
            redisConnection.lRem(serializer.serialize(id), 0, serializer.serialize(key));
        } catch (Exception e) {
            LOGGER.error("mybatis redis cache remove exception. " + key + " V=" + result + "", e);
        } finally {
            if (null != redisConnection) {
                redisConnection.close();
            }
        }
        return result;
    }

    /**
     * 清空缓存
     * flushCache="true" 的时候会调用这个地方
     */
    @Override
    public void clear() {
        LOGGER.debug("mybatis redis cache clear. ");
        RedisConnection redisConnection = null;
        try {
            redisConnection = jedisConnectionFactory.getConnection();
            RedisSerializer serializer = new ProtostuffSerializer();
            /**
             * 千万不要直接 redisConnection.flushDb(),会把整个redis的东西都清除掉,我不相信你的redis里没有其他东西
             * 获取redis.list中的保存的key值,遍历删除
             */
            Long length = redisConnection.lLen(serializer.serialize(id));
            if (0 == length) {
                return;
            }
            List<byte[]> keyList = redisConnection.lRange(serializer.serialize(id), 0, length - 1);
            for (byte[] key : keyList) {
                redisConnection.expireAt(key, 0);
            }
            redisConnection.expireAt(serializer.serialize(id), 0);
            keyList.clear();
        } catch (Exception e) {
            LOGGER.error("mybatis redis cache clear exception. ", e);
        } finally {
            if (null != redisConnection) {
                redisConnection.close();
            }
        }
    }

    @Override
    public int getSize() {
        int result = 0;
        try {
            RedisConnection redisConnection = jedisConnectionFactory.getConnection();
            result = Math.toIntExact(redisConnection.dbSize());
        } catch (Exception e) {
            e.printStackTrace();
        }
        return result;
    }

    @Override
    public ReadWriteLock getReadWriteLock() {
        return this.readWriteLock;
    }
}
这些是在网上找的demo,修改了些参数,现在能很好的运行的代码
需要注意的是在spring-boot-devtools热加载工具开启的情况下经常会发生java.lang.ClassCastException:异常,就是两个相同的类不能cast,关闭devtool就可以了。
然后在mybatis-config.xml配置上加上一句
<setting name="cacheEnabled" value="true"/>
最后在需要的mapper.xml加上
<mapper namespace="com.xxx.mapper.xxx">
 <cache type="com.config.MybatisRedisCache"/>
 </mapper>
来开启二级缓存
使用spring-boot-starter-data-redis的实现
因为他们说尽量都用spring-boot集成了的东西,这样有利于平滑升级,所以这里把上面的换成spring-boot-starter-data-redis实现一遍
       <dependency>
            <groupId>org.springframework.boot</groupId>
            <artifactId>spring-boot-starter-data-redis</artifactId>
        </dependency>
redis客户端用spring封装好的就可以了,它底层是用的lettuce客户端
import org.apache.ibatis.cache.Cache;
import org.apache.logging.log4j.LogManager;
import org.apache.logging.log4j.Logger;
import org.springframework.data.redis.connection.RedisServerCommands;
import org.springframework.data.redis.core.RedisTemplate;

import java.util.concurrent.TimeUnit;
import java.util.concurrent.locks.ReadWriteLock;
import java.util.concurrent.locks.ReentrantReadWriteLock;

/**
 * Created by zkk on 2019/2/1
 * mybatis的redis二级缓存
 * 需要用到缓存的就在mapper.xml里面加上
 * <cache type="com.xxx.xxx.MybatisRedisCache"/>
 **/
public class MybatisRedisCache implements Cache {
    private static Logger LOGGER = LogManager.getLogger(MybatisRedisCache.class);
    private final String id;
    private final ReadWriteLock readWriteLock = new ReentrantReadWriteLock();

    private static RedisTemplate<Object, Object> redisTemplate;

    /**
     * 这里需要外部去set redisTemplate来注入
     * @param redisTemplate
     */
    public static void setRedisTemplate(RedisTemplate redisTemplate) {
        MybatisRedisCache.redisTemplate = redisTemplate;
    }

    public MybatisRedisCache(final String id) {
        if (null == id || "".equals(id)) {
            throw new IllegalArgumentException("mybatis redis cache need an id.");
        }
        this.id = id;
        LOGGER.debug("mybatis redis cache id: {}", id);
    }


    @Override
    public String getId() {
        return this.id;
    }


    /**
     * 向redis中存值,设置过期时间500s
     * @param key
     * @param value
     */
    @Override
    public void putObject(Object key, Object value) {
        if (null == key) {
            return;
        }
        LOGGER.debug("mybatis redis cache put. K={} value={}", key, value);
        try {
            redisTemplate.opsForValue().set(key, value, 500, TimeUnit.SECONDS);
        } catch (Exception e) {
            LOGGER.error("mybatis redis cache put exception. K=" + key + " V=" + value + "", e);
        }
    }


    /**
     * 从redis中取值
     * @param key
     * @return
     */
    @Override
    public Object getObject(Object key) {
        if (null == key) {
            return null;
        }
        LOGGER.debug("mybatis redis cache get. K={}", key);
        Object result = null;
        try {
            result = redisTemplate.opsForValue().get(key);
        } catch (Exception e) {
            LOGGER.error("mybatis redis cache get exception. K=" + key + " V=" + result + "", e);
        }
        return result;
    }


    @Override
    public Object removeObject(Object key) {
        if (null == key) {
            return null;
        }
        LOGGER.debug("mybatis redis cache remove. K={}", key);
//        RedisConnection redisConnection = null;
        Object result = null;
        try {
            result = redisTemplate.delete(key);
        } catch (Exception e) {
            LOGGER.error("mybatis redis cache remove exception. " + key + " V=" + result + "", e);
        }
        return result;
    }

    @Override
    public void clear() {
        // TODO
    }

    @Override
    public int getSize() {
        int result = 0;
        try {
            result = Math.toIntExact(redisTemplate.execute(RedisServerCommands::dbSize));
        } catch (Exception e) {
            e.printStackTrace();
        }
        return result;
    }

    @Override
    public ReadWriteLock getReadWriteLock() {
        return this.readWriteLock;
    }
}
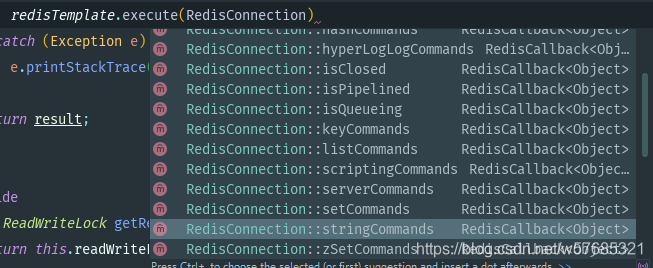
这里使用redisTemplate.opsForValue()就可以了,关于这个方法是spring-boot对redis常用操作的一层封装,底层是通过RedisCallback接口获取到了RedisConnection来实现的,所以当使用一些不常用的操作就可以使用这个
redisTemplate.execute((RedisCallback<Object>) connection -> {
                connection.set(new byte[]{1},new byte[]{1},
                        Expiration.from(5, TimeUnit.SECONDS), RedisStringCommands.SetOption.SET_IF_ABSENT);
                return null;
            });
这里就是redis的setnx、setpx结合方法
继续回到主题,实现了Cache之后,跟前面的类似,需要指定序列化方式
import org.springframework.beans.factory.annotation.Autowired;
import org.springframework.context.annotation.Configuration;
import org.springframework.data.redis.core.RedisTemplate;
import org.springframework.data.redis.serializer.RedisSerializer;

/**
 * Created by zkk on 2019/3/27
 **/
@Configuration
public class RedisTemplateConfig {

    @Autowired
    @SuppressWarnings("unchecked")
    public void setRedisTemplate(RedisTemplate redisTemplate) {

        // 使用ProtostuffSerializer 替换默认序列化
        RedisSerializer serializer = new ProtostuffSerializer();

        // 设置value的序列化规则和 key的序列化规则
        redisTemplate.setKeySerializer(serializer);
        redisTemplate.setValueSerializer(serializer);
        redisTemplate.setDefaultSerializer(serializer);
        redisTemplate.setHashKeySerializer(serializer);
        redisTemplate.setHashValueSerializer(serializer);
        redisTemplate.setStringSerializer(serializer);
        redisTemplate.afterPropertiesSet();

        MybatisRedisCache.setRedisTemplate(redisTemplate);
    }
}
指定的之前的protostuff序列化方式,使用setter注入,往MybatisRedisCache中注入redisTemplate,其实当然也可以配置一个新的bean来实现


 192
192


 被折叠的 条评论
为什么被折叠?
被折叠的 条评论
为什么被折叠?
 到【灌水乐园】发言


