


目录
3、访问http://localhost:xxxx/doc.html
1、Failed to start bean ‘documentationPluginsBootstrapper’
2、No operations defined in spec!
一、什么是Swagger2
目前的项目有数量巨大的接口调用,而在开发过程中,直接浏览接口代码、妄想程序员编写详细的注释是不现实的(lll¬ω¬),以及认为编写数量庞大的接口文档也是劳民伤财的(●ˇ∀ˇ●)。此时我们就需要有能供帮我们处理大量工作的接口文档自动化工具,于是Swagger出来了。
二、Swagger优缺点
1.自动生成文档:只需要少量的注解,Swagger 就可以根据代码自动生成 API 文档,很好的保证了文档的时效性。
2.跨语言性,支持 40 多种语言。
3.Swagger UI 呈现出来的是一份可交互式的 API 文档,我们可以直接在文档页面尝试 API 的调用,省去了准备复杂的调用参数的过程。
4.将文档规范导入相关的工具(例如 SoapUI), 这些工具将会为我们自动地创建自动化测试。
三、使用步骤
1、引入依赖包
 		 <!-- swagger2 -->
        <dependency>
            <groupId>io.springfox</groupId>
            <artifactId>springfox-swagger2</artifactId>
            <version>2.9.2</version>
        </dependency>
        <dependency>
            <groupId>io.springfox</groupId>
            <artifactId>springfox-swagger-ui</artifactId>
            <version>2.9.2</version>
        </dependency>
2、编辑swagger配置类
注意扫描controller包
package com.king.other.short_link.config;

import org.springframework.beans.factory.annotation.Value;
import org.springframework.context.annotation.Bean;
import org.springframework.context.annotation.Configuration;
import springfox.documentation.builders.ApiInfoBuilder;
import springfox.documentation.builders.PathSelectors;
import springfox.documentation.builders.RequestHandlerSelectors;
import springfox.documentation.service.ApiInfo;
import springfox.documentation.service.Contact;
import springfox.documentation.spi.DocumentationType;
import springfox.documentation.spring.web.plugins.Docket;
import springfox.documentation.swagger2.annotations.EnableSwagger2;

import javax.servlet.http.HttpServletRequest;
import javax.servlet.http.HttpSession;

/**
 * @program: springboot
 * @description:
 * @author: King
 * @create: 2021-10-10 22:33
 */
@Configuration
@EnableSwagger2  //启用swaggerr 注解解析器
public class Swagger2Config {

    // 是否开启swagger,正式环境一般是需要关闭的,可根据springboot的多环境配置进行设置
    @Value(value = "${swagger.enable}")  //通过 @Value  获取配置信息
    // 复习@Environement  @Value    @ConfigurationProperties
    private Boolean swaggerEnable;

    @Bean
    public Docket createRestApi() {
        return new Docket(DocumentationType.SWAGGER_2)
                .apiInfo(apiInfo())
                .ignoredParameterTypes(HttpSession.class, HttpServletRequest.class)  //在生成的文档将哪些类对象的属性排除
                // 是否开启
                .enable(swaggerEnable)
                .select()
                // 扫描的路径包,只要这些包中的类配有swagger注解,则启用这些注解
                .apis(RequestHandlerSelectors.basePackage("com.xxx"))
                // 指定路径处理PathSelectors.any()代表所有的路径
                .paths(PathSelectors.any())
                .build();
    }

    private ApiInfo apiInfo() {
        return new ApiInfoBuilder()
                .title("测试平台-平台管理API文档")
                .description("平台管理服务api")
                // 作者信息
                .contact(new Contact("李非凡"))
                .version("1.0.0")
                .build();
    }
}
3、对Controller类加注解(示例)
swagger注解在后面有解释
//登录操作实现的Controller
@Api(value = "登录控制接口,tags = 测试接口1")
@RestController
@RequestMapping("/admin")
public class LoginController {
@Autowired
UserServiceImpl userService;
// 用户登录
@ApiOperation("跳转登录页面")
@ApiImplicitParams({
@ApiImplicitParam(
name = "username",
value = "用户名",
dataType = "string",
paramType = "query",
example = "admin",
required = true),
@ApiImplicitParam(
name = "password",
value = "用户密码",
dataType = "string",
paramType = "query",
example = "jinpeng.qmail@qq.com",
required = true),
})
@PostMapping("/login")
public String login(@RequestParam String username,
@RequestParam String password,
HttpSession session,
RedirectAttributes attributes){
User user = userService.checkUser(username, password);
if (user!=null){
user.setPassword(null);
session.setAttribute("user",user);
return "admin/index";
}else {
attributes.addAttribute("msg","用户名或密码错误!");
return "redirect:/admin";
}
}
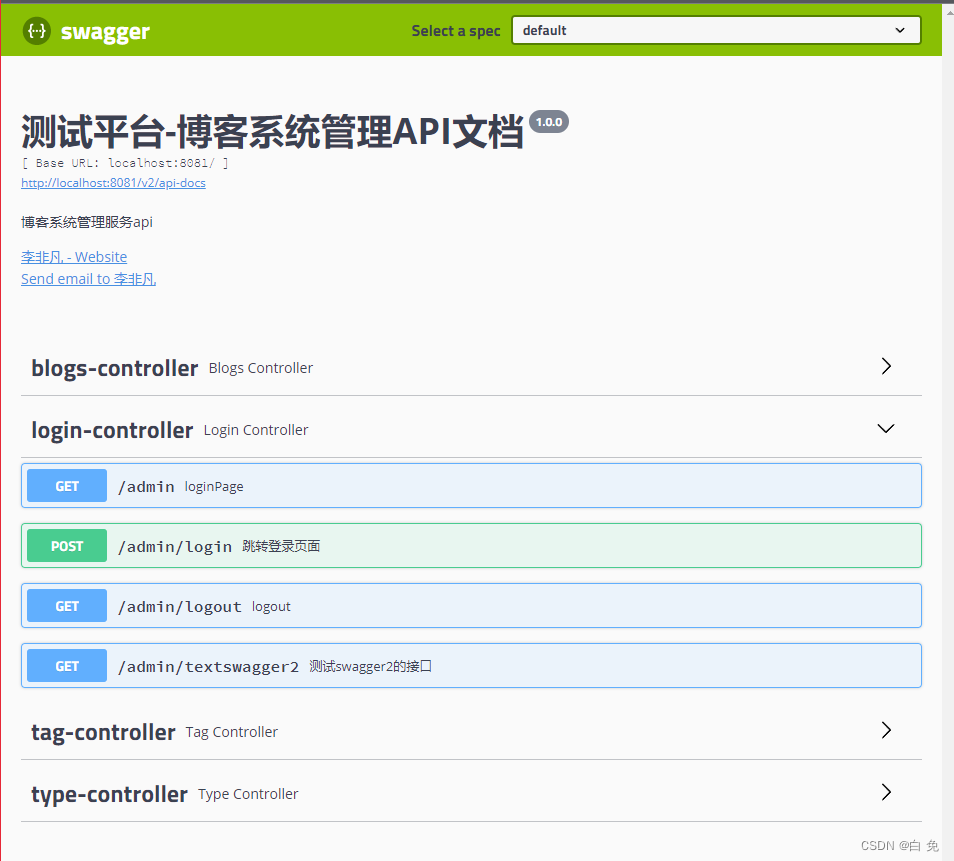
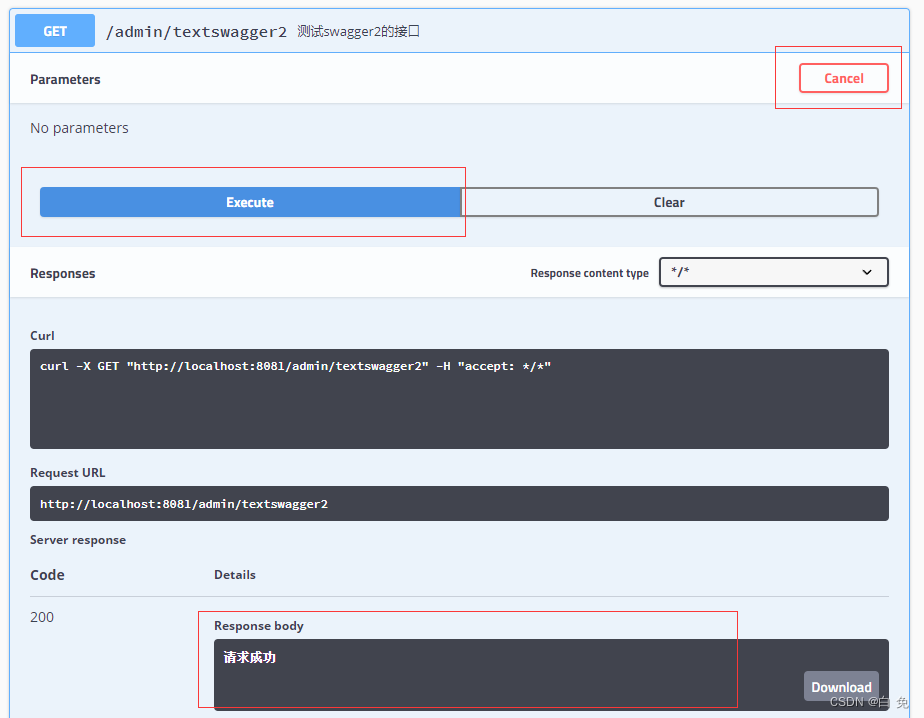
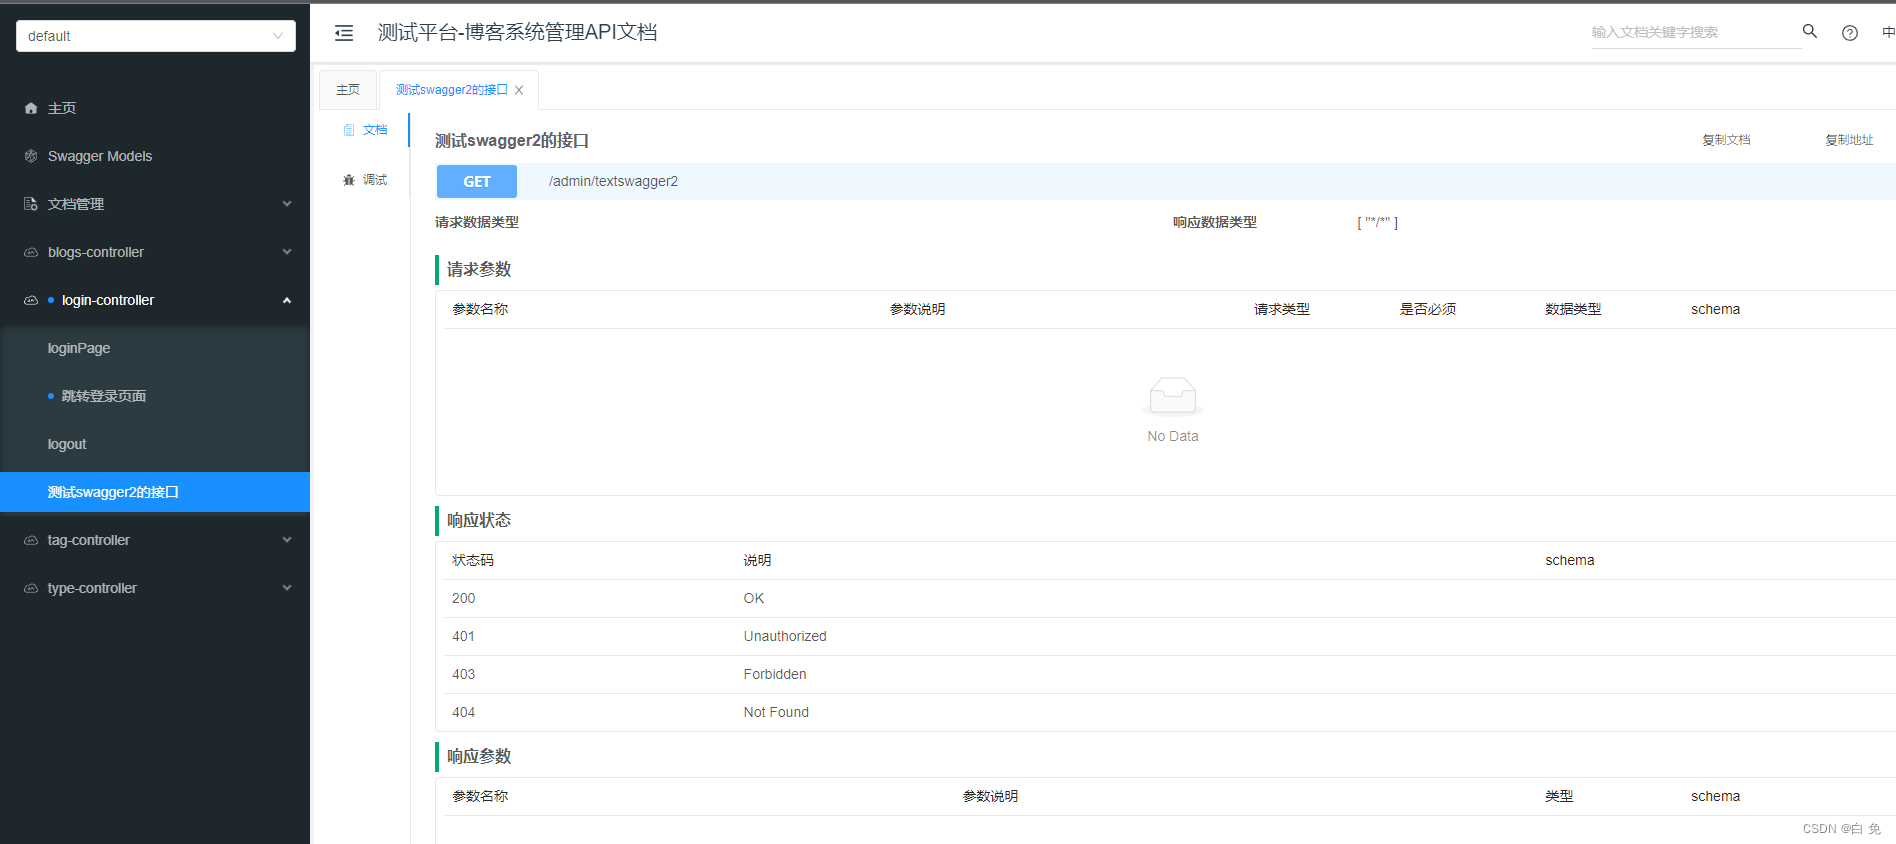
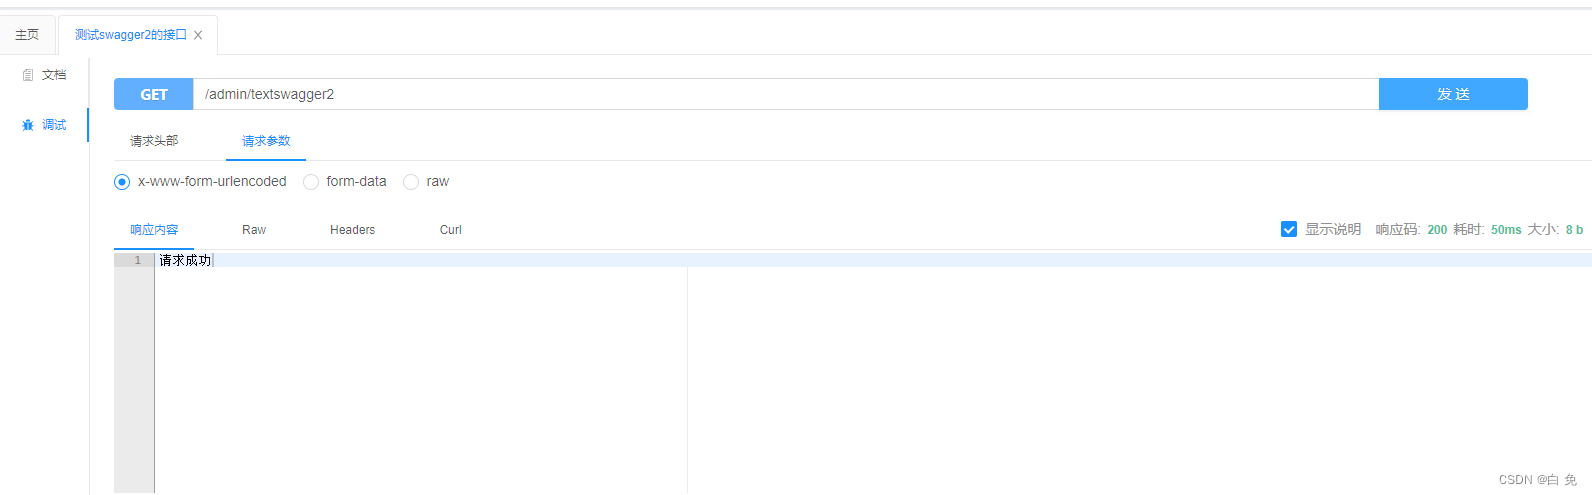
@ApiOperation("测试swagger2的接口")
@ApiImplicitParams({
})
@GetMapping("/textswagger2")
public String textswagger2(){
return "请求成功";
}
4、对pojo加注解(不加也行,示例)
@ApiModel:是一个Swagger注解,用来为pojo类做注释;
@ApiModel(" 用户模型")
public class User {
    @ApiModelProperty("用户ID")
    private int id;
    @ApiModelProperty("用户姓名")
    private String name;
    @ApiModelProperty("用户密码")
    private String password;
}
5、给封装的统一响应类加注解(不加也行,实例)
如果你封装了这样的类的话
@ApiModel(value = "返回响应类")
public class Result {
    @ApiModelProperty(value = "状态")
    protected boolean status;
    @ApiModelProperty(value = "返回信息")
    protected String message;
    @ApiModelProperty(value = "数据")
    protected Object data;
}
6、运行项目,进入api文档界面
1、在springboot配置文件加入配置,开启swagger
swagger:
    enable: true
2、在启动类加注解@EnableSwagger2
@SpringBootApplicationcation
@EnableSwagger2
public class Application {
    public static void main(String[] args) {
        SpringApplication.run(Application.class,args);
    }
}
3、启动springBoot项目
4、访问http://localhost:xxxx/swagger-ui.html
5、测试接口
四、ui界面美化
1、引入依赖包
        <!-- knife4j -->
        <dependency>
            <groupId>com.github.xiaoymin</groupId>
            <artifactId>knife4j-spring-boot-starter</artifactId>
            <version>2.0.2</version>
        </dependency>
        <dependency>
            <groupId>org.springframework.boot</groupId>
            <artifactId>spring-boot-starter-validation</artifactId>
        </dependency>
2、启用knife4j增强
在swagger配置类上加入注解@EnableKnife4j //启用knife4j增强
3、访问http://localhost:xxxx/doc.html
五、swagger注解说明
@Api:用在请求的类上,表示对类的说明
    tags="说明该类的作用,可以在UI界面上看到的注解"
    value="该参数没什么意义,在UI界面上也看到,所以不需要配置"


@ApiOperation:用在请求的方法上,说明方法的用途、作用
    value="说明方法的用途、作用"
    notes="方法的备注说明"


@ApiImplicitParams:用在请求的方法上,表示一组参数说明
    @ApiImplicitParam:用在@ApiImplicitParams注解中,指定一个请求参数的各个方面
        name:参数名
        value:参数的汉字说明、解释
        required:参数是否必须传
        paramType:参数放在哪个地方
            · header --> 请求参数的获取:@RequestHeader
            · query --> 请求参数的获取:@RequestParam
            · path(用于restful接口)--> 请求参数的获取:@PathVariable
            · body(不常用)
            · form(不常用)
        dataType:参数类型,默认String,其它值dataType="Integer"
        defaultValue:参数的默认值


@ApiResponses:用在请求的方法上,表示一组响应
    @ApiResponse:用在@ApiResponses中,一般用于表达一个错误的响应信息
        code:数字,例如400
        message:信息,例如"请求参数没填好"
        response:抛出异常的类


@ApiModel:用于响应类上,表示一个返回响应数据的信息
            (这种一般用在post创建的时候,使用@RequestBody这样的场景,
            请求参数无法使用@ApiImplicitParam注解进行描述的时候)
    @ApiModelProperty:用在属性上,描述响应类的属性
六、一些错误及解决方法
1、Failed to start bean ‘documentationPluginsBootstrapper’
原因:springboot的版本更新,导致的swagger2的异常,springboot2.6.0(以及更高版本)中将SpringMVC 默认路径匹配策略从AntPathMatcher 更改为PathPatternParser,导致出错,解决办法是切换回原先的AntPathMatcher
解决办法:
①:在yml中新增配置
spring:
  mvc:
    pathmatch:
      matching-strategy: ant_path_matcher
②:在pom.xml修改springboot的版本
    <parent>
        <groupId>org.springframework.boot</groupId>
        <artifactId>spring-boot-starter-parent</artifactId>
        <version>2.4.0</version>
        <relativePath/>
    </parent>
③:新增依赖
     <dependency>
            <groupId>com.google.guava</groupId>
            <artifactId>guava</artifactId>
            <version>25.1-jre</version>
     </dependency>
2、No operations defined in spec!
所有配置都完成了,而且没有错误,服务可以正常启动,api页面一直是
No operations defined in spec!
说明,swagger没有找到带有swagger注解的类
解决:
①:检查注解是否正确
②:检查扫描controller的路径是否配置正确


 2万+
2万+


 被折叠的 条评论
为什么被折叠?
被折叠的 条评论
为什么被折叠?
 到【灌水乐园】发言


