


LinkedHashMap.Entry

private static class Entry<K,V> extends HashMap.Entry<K,V> {
    // These fields comprise the doubly linked list used for iteration.
    //每个节点包含两个指针,指向前继节点与后继节点
    Entry<K,V> before, after;
    Entry(int hash, K key, V value, HashMap.Entry<K,V> next) {
        super(hash, key, value, next);
    }
    /**
     * Removes this entry from the linked list.
     */
    //删除一个节点时,需要把
    //1. 前继节点的后继指针 指向 要删除节点的后继节点
    //2. 后继节点的前继指针 指向 要删除节点的前继节点
    private void remove() {
        before.after = after;
        after.before = before;
    }
    /**
     * Inserts this entry before the specified existing entry in the list.
     */
    //在某节点前插入节点
    private void addBefore(Entry<K,V> existingEntry) {
        after  = existingEntry;
        before = existingEntry.before;
        before.after = this;
        after.before = this;
    }
    /**
     * This method is invoked by the superclass whenever the value
     * of a pre-existing entry is read by Map.get or modified by Map.set.
     * If the enclosing Map is access-ordered, it moves the entry
     * to the end of the list; otherwise, it does nothing.
     */
    void recordAccess(HashMap<K,V> m) {
        LinkedHashMap<K,V> lm = (LinkedHashMap<K,V>)m;
        // 如果需要key的访问顺序,需要把
        // 当前访问的节点删除,并把它插入到双向链表的起始位置
        if (lm.accessOrder) {
            lm.modCount++;
            remove();
            addBefore(lm.header);
        }
    }
    void recordRemoval(HashMap<K,V> m) {
        remove();
    }
}
为了更形象表示双向链表是如何删除、增加节点,下面用代码加图示的方式
删除节点

上图中,删除的是b节点
private void remove() {
    before.after = after;  //相当于上图中的操作 1
    after.before = before; //相当于上图中的操作 3
}
增加节点
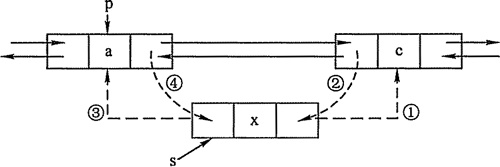
上图中的c节点相当于下面代码中的existingEntry,要插入的是x节点
private void addBefore(Entry<K,V> existingEntry) {
    after  = existingEntry;         //相当于上图中的操作 1
    before = existingEntry.before;  //相当于上图中的操作 3
    before.after = this;            //相当于上图中的操作 4
    after.before = this;            //相当于上图中的操作 2
}
/*以下是小编自己的理解 start
注解:起初,小编对remove(),addBefore()方法不理解(此处为链表操作,
但小编对C语言中的链表操作是理解的),小编看的所有介绍LinkedHashMap的代码中
关于remove()和addBefore()方法中的变量都不带this(this默认省略了),
小编在带入this后才理解了这两个方法后,加上this后可以更好理解
private void remove() {
this.before.after = this.after; //相当于上图中的操作 1
this.after.before = this.before; //相当于上图中的操作 3
}
对于图1
其中this即为图1中b节点,后一个节点和下一个节点表示一个意思
this.after为c节点(this.after意思是b节点的后一个节点c,
或者是b节点的后一个节点指向c<即后一个节点是c>)
this.before为a节点(this.before意思是b节点的前一个节点)
this.before.after意为为a节点的下一个节点(this.before.after等价于a.after)
this.before.after = this.after;
等价于a.after = c;将c节点赋值给a.after,意思为a的后一个节点为c
同理
this.after.before = this.before;意思为c的前一个节点为a */
/*以下是小编自己的理解 start
private void addBefore(Entry<K,V> existingEntry) {
this.after = existingEntry; //相当于上图中的操作 1
this.before = existingEntry.before; //相当于上图中的操作 3
this.before.after = this; //相当于上图中的操作 4
this.after.before = this; //相当于上图中的操作 2
}
对于图2,this相当于图2中的x节点(将要插入的节点),将existingEntry变量名换为c,
在recordAccess()方法中调用时,addBefore()方法里面的参数是header结点(头节点)*/
private void addBefore(Entry<K,V> c) {
this.after = c; /*即x的下一个节点指向c*/
/*c.before在插入x前为a节点,此操作后即x的上一个节点指向a*/
this.before = c.before; //相当于上图中的操作 3
/*此操作前a的下一个节点还指向c,此操作后a的下一个节点指向x*/
this.before.after = this; //相当于上图中的操作 4
/*此操作前c的上一个节点还指向a,此操作后c的上一个节点还指向x*/
this.after.before = this; //相当于上图中的操作 2
}
/*以上是小编自己的理解 end*/参考链接
http://www.importnew.com/16695.html
http://www.cnblogs.com/tstd/p/5059589.html


 481
481

 被折叠的 条评论
为什么被折叠?
被折叠的 条评论
为什么被折叠?
 到【灌水乐园】发言


