本人水平有限,文章中如果出现什么不正确或者模糊的地方,还请各位小伙伴留下评论,多多指教 : )
Http概述
什么是Http
采用知识点的形式,个人认为会更加高效直观一点。
- HTTP,即超文本传输协议
- 它定义了浏览器(客户端的一种),如何向服务器请求文档,以及服务器怎样把文档传送给浏览器(客户端)
- HTTP面向应用层,它是万维网上能够可靠交换文件(声音、文本、图片等各种多媒体文件)的重要基础
Http基本工作流程
一次Http操作称为一个事务,其工作流程可以分为四步:
1)客户机与服务器建立连接
2)连接建立完成后,客户机发送请求,请求方式的格式为:统一资源标识符(URL)、协议版本号,后面是MIME信息包括请求修饰符、客户机信息和可能的内容
3)服务器接收到请求后,给予相应的响应信息。
4)客户端接收到服务器返回的状态行,并面向用户作出相应的显示,最后客户端断开连接

HttpUrlConnection
小栗子1_通过WebView加载网页
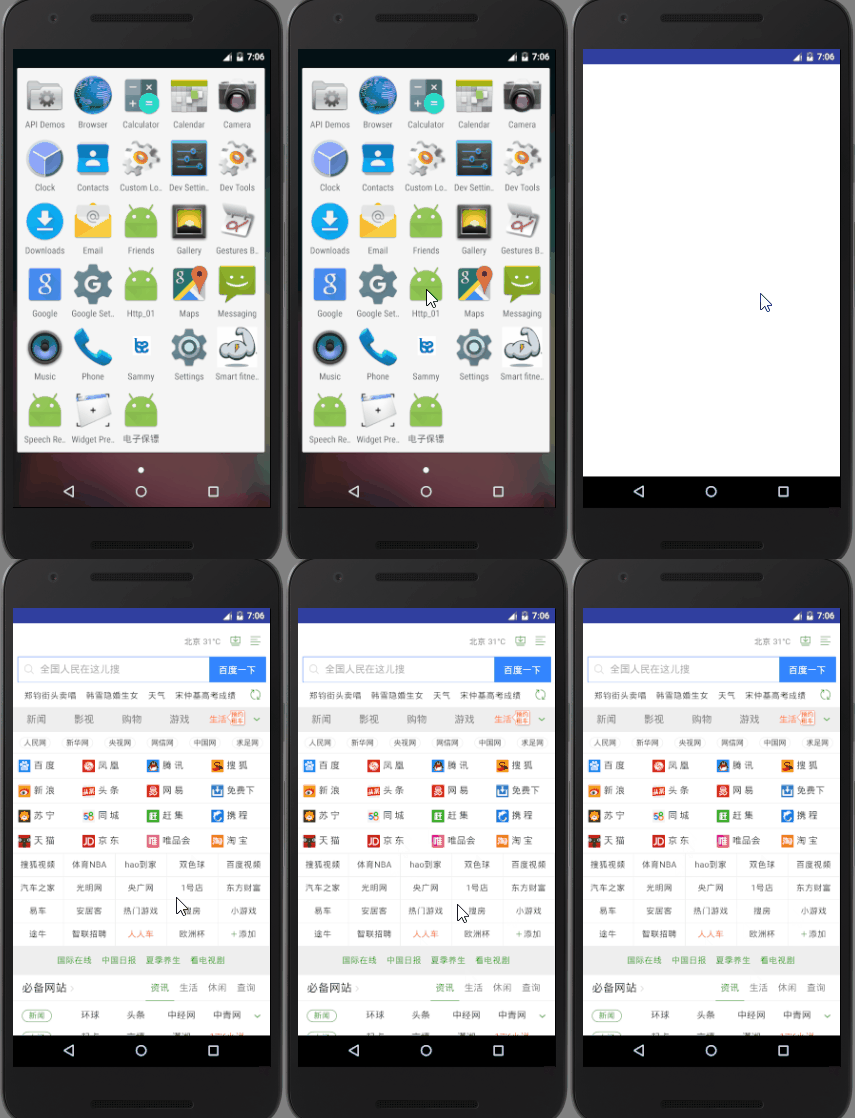
栗子描述:使用HttpUrlConnection访问百度的网址,然后把它的网页源码在WebView上面显示
首先我们新建一个项目,在AndroidManifest.xml加入网络访问的权限
<uses-permission android:name="android.permission.INTERNET" /> 布局文件 main_activity .xml
<?xml version="1.0" encoding="utf-8"?>
<LinearLayout xmlns:android="http://schemas.android.com/apk/res/android"
    android:orientation="vertical" android:layout_width="match_parent"
    android:layout_height="match_parent">
    <WebView
        android:id="@+id/webview"
        android:layout_width="match_parent"
        android:layout_height="match_parent"/>

</LinearLayout>
接下来我们要创建一个线程类,因为网络操作一般都是比较耗时的操作,我们不能直接在ui线程中去完成这类耗时操作。
HttpThread.class
public class HttpThread extends  Thread {
    private String url; //访问的url
    private WebView webView ;
    private Handler handler ;

    //构造函数


    public HttpThread(String url, Handler handler, WebView webView) {
        this.url = url;
        this.handler = handler;
        this.webView = webView;
    }

    @Override
    public void run() {
       //在这里完成网络连接的逻辑代码

        try {
            //第一步:拿到传递进来的url
            URL httpurl =new URL(url);

            //第二步:通过url的openConnection,拿到HttpURLConnection
            HttpURLConnection httpURLConnection = (HttpURLConnection) httpurl.openConnection();

            //第三步:通过httpURLConnection,对网络访问进行设置
            httpURLConnection.setReadTimeout(5000); //设置请求超时时间
            httpURLConnection.setRequestMethod("GET"); //请求方式GET

            //第四步:准备接受网页回传的信息,通过StringBuffer
            final StringBuffer stringBuffer =new StringBuffer();
            String str;

            //调用httpURLConnection的getInputStream方法获取输入流,然后再创建包装类BufferedReader
            BufferedReader bufferedReader =new BufferedReader(new InputStreamReader(httpURLConnection.getInputStream()));

            //不断去读取输入流中的数据,并拼接在StringBuffer当中
            while((str=bufferedReader.readLine())!=null){
                stringBuffer.append(str);
            }

            handler.post(new Runnable() {
                @Override
                public void run() {
                    //在这里拿到webView
                    webView.loadData(stringBuffer.toString(),"text/html;charset=utf-8",null);
                }
            });

        } catch (MalformedURLException e) {
            e.printStackTrace();
        } catch (IOException e) {
            e.printStackTrace();
        }

    }
}
对应的MainActivity中的代码就非常简单了
public class MainActivity extends Activity {
    private WebView webView;
    private Handler handler=new Handler();

    @Override
    protected void onCreate(Bundle savedInstanceState) {
        super.onCreate(savedInstanceState);
        setContentView(R.layout.main_activity);
        webView= (WebView) findViewById(R.id.webview);
        new HttpThread("http://www.hao123.com",handler,webView).start();

    }
}
只是去加载一些布局,并开启我们之前写的HttpThread的线程即可
效果图:
最后在总结一下HttpUrlConnection的使用方法:
第一步:设置网络访问的权限,并定于URL对象(统一资源定位符)
第二步:通过URL,拿到HttpURLConnection对象,进而对网络进行设置
第三步:调用HttpURLConnection的getInputStream方法拿到输入流,在本例子中,输入流输入流内容即为网址的源代码
第四步:然后通过BufferReader去处理获取的输入流,通过不断读取缓冲BufferReader缓冲区的内容,将数据添加到StringBuffer当中
第五步:将数据加载到WebView当中
至此,这个小例子就全部完成了,是不是很简单呢~
小栗子2_下载网络图片并显示
这个例子在上面例子的基础之上加以改进
首先,我们修改布局文件,让WebView组建隐藏掉,然后加入ImageView用于显示图片
<?xml version="1.0" encoding="utf-8"?>
<LinearLayout xmlns:android="http://schemas.android.com/apk/res/android"
    android:orientation="vertical" android:layout_width="match_parent"
    android:layout_height="match_parent">
    <WebView
        android:visibility="gone"
        android:id="@+id/webview"
        android:layout_width="match_parent"
        android:layout_height="match_parent"/>

    <ImageView
        android:id="@+id/image"
        android:layout_width="match_parent"
        android:layout_height="match_parent" />
</LinearLayout>
然后在MainActivity当中实例化这个ImageView
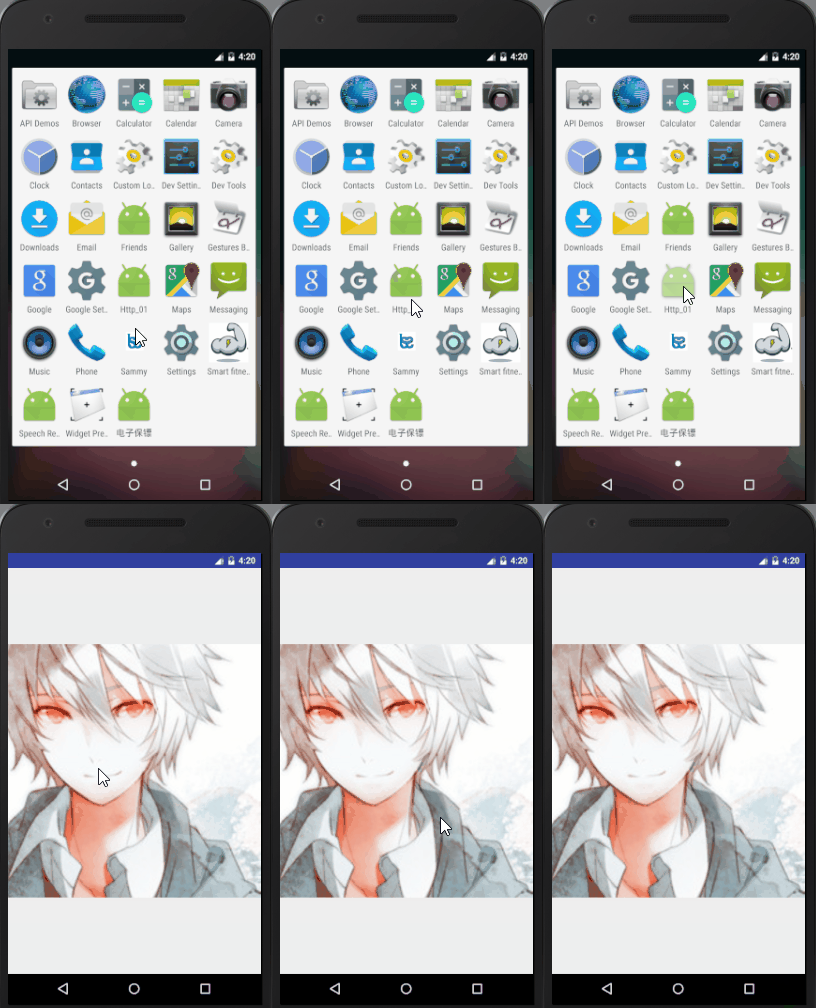
接下来我们重新创建一个线程类,命名为HttpThread2,这个线程类和HttpThread类中做的工作差不多,通过HttpUrlConnection从网络上去下载图片,并通过ImageView显示
实例图片的URL:http://115.28.28.149/img/001.png
大家可以点击试试看,这个图片是我放在阿里云服务器上的一张。
HttpThread2类的代码
public class HttpThread2 extends Thread {
    private ImageView imageView;
    private Handler handler;
    private String url;

    //线程2传递3个参数,第一个参数是要显示的ImageView,第二个参数是一个在主线程中定义的Handler,第三个参数是要下载图片的Url
    public HttpThread2(ImageView imageView, Handler handler, String url) {
        this.imageView = imageView;
        this.handler = handler;
        this.url = url;
    }

    @Override
    public void run() {
        try {
            URL httpUrl=new URL(url);
            HttpURLConnection httpURLConnection = (HttpURLConnection) httpUrl.openConnection();
            httpURLConnection.setRequestMethod("GET");
            httpURLConnection.setReadTimeout(5000);
            //可以获取到输入流
            httpURLConnection.setDoInput(true);
            //获取输入流,格式为图片二进制式
            InputStream in=httpURLConnection.getInputStream();

            //把图片下载到本地
            //文件输出流
            FileOutputStream fileOut ;

            //下载目录
            File downLoadFile=null;

            //文件名称
            String fileName=String.valueOf(System.currentTimeMillis());

            //判断sd卡是否存在
            if(Environment.getExternalStorageState().equals(Environment.MEDIA_MOUNTED));
            //如果sd卡存在,则父目录即为SD卡目录
            File parent =Environment.getExternalStorageDirectory();

            //确定下载的目录,第一个参数传递父目录,第二个参数为目录的名称
           downLoadFile =new File(parent,fileName);

            //确定输出流对应的输出目录
            fileOut=new FileOutputStream(downLoadFile);


            //创建缓冲区,用于从数据流中不断读出数据
            final byte[] b=new byte[2*1024];
            //指定长度
            int len;
            if (fileOut!=null){
                //如果文件输出流不为空,则进行数据读取
                while ((len=in.read(b))!=-1){
                    //in.read(b),以2kb读取数据流,!=-1即说明依然有数据
                    //讲读取的数据流写入到fileOutStream当中,第一个参数是写入的数据源,第二个参数是起始位置,第三个参数是
                    //结束位置
                    fileOut.write(b,0,len);
                }
        }


            //读取文件的BitMap,BitmapFactory.decodeFile(下载图片的路径),将图片的数据进行解码,变成一副位图
            final Bitmap bitmap = BitmapFactory.decodeFile(downLoadFile.getAbsolutePath());
            //通过handler去更新UI
            handler.post(new Runnable() {
                @Override
                public void run() {
                    imageView.setImageBitmap(bitmap);
                }
            });
    } catch (MalformedURLException e) {
            e.printStackTrace();
        } catch (FileNotFoundException e) {
            e.printStackTrace();
        } catch (ProtocolException e) {
            e.printStackTrace();
        } catch (IOException e) {
            e.printStackTrace();
        }
    }
}
上面有非常详细的注释,就不多做解释了,这里涉及到了一些文件目录操作和数据读写,所以没有基础的小伙伴看起来可能会有点吃力,大家可以自行百度涉及到的几个类。
接下来就是MainActivity中的代码
public class MainActivity extends Activity {
    private WebView webView;
    private Handler handler=new Handler();
    private ImageView imageView;
    //图片的下载地址
    private String url="http://115.28.28.149/img/001.png";

    @Override
    protected void onCreate(Bundle savedInstanceState) {
        super.onCreate(savedInstanceState);
        setContentView(R.layout.main_activity);
        imageView= (ImageView) findViewById(R.id.img);
        //开启HttpThread2
        new HttpThread2(imageView,handler,url).start();


    }
}
最后一定不要忘记在Manifest文件中加入对sd卡的相应权限
<uses-permission android:name="android.permission.WRITE_EXTERNAL_STORAGE"/>大功告成!~!~,现在我们来看一下效果图
至此关于Http在android之中的一些基本使用就介绍完毕了,通过2个简单的例子,我们成功地从网络上取得了数据,并在android上进行显示。
在后面的博客中,我将进一步地去介绍android中关于http使用的内容~
敬请期待~(≧▽≦)/


 1782
1782

 被折叠的 条评论
为什么被折叠?


