


前言
Shiro 是什么?
Shiro 是一个功能强大且易于使用还很灵活的 Java 开源安全框架;
可以干净地处理身份验证、授权、企业会话管理、单点登录和加密服务。
出自 Apache 、也叫 Apache Shiro
Shiro 能干什么?
1)验证用户身份;
2)用户访问控制;比如用户是否被赋予了某个角色,是否允许访问某些资源
3)会话管理
4)事件响应(在身份验证,访问控制期间,或session生命周期中)
5)集成多种用户信息数据源
6)SSO单点登录、记住我、加密、缓存、并发等等
Shiro 优缺点?
1)易于使用;易用性是项目的最终目标。
2)全面;一站式为您的安全需求提供保障。
3)灵活;可以在任何应用程序环境中工作。
4)Web支持;
5)低耦合;干净的API和设计模式使它容易与许多其他框架和应用程序集成。无缝地集成Spring
6)在任何环境都可以使用Session API,即使不是WEB项目或没有EJB容器
同类框架:
Apache Shiro VS Spring Security
Apache Shiro: 简单灵活、可脱离spring、粒度较粗
Spring Security: 复杂笨重、不可脱离spring、粒度更细
官方网站
官网地址:Apache Shiro | Simple. Java. Security.
文档地址:Apache Shiro | Simple. Java. Security.
下载地址:Apache Shiro | Simple. Java. Security.
Github:https://github.com/apache/shiro.git
主题
什么是权限管理?
基本上涉及到用户参与的系统都要进行权限管理,权限管理属于系统安全的范畴,权限管理实现对用户访问系统的控制,按照安全规则或者安全策略控制用户可以访问且只能访问自己被授权的资源。
权限管理包括用户身份认证和授权两部分,简称认证授权。
对于需要访问控制的资源用户首先经过身份认证,认证通过后用户具有该资源的访问权限访问;
用户身份认证?
身份认证,就是判断一个用户是否为合法用户的处理过程。最常用的简单身份认证方式是系统通过核对用户输入的用户名和口令,看其是否与系统中存储的该用户的用户名和口令一致,来判断用户身份是否正确。
Shiro 介绍
Apache Shiro 的首要目标是易于使用和理解。
安全有时可能非常复杂,甚至令人痛苦,但并非必须如此。
框架应尽可能掩盖复杂性,并公开简洁直观的 API,以简化开发人员确保其应用程序安全的工作。
特性
应用程序安全的四大基石:身份认证、授权、会话管理和加密;
Authentication【】
身份认证:有时也称为登录,就是认证用户进行身份验证的一个行为。
Authorization【】
授权:访问控制的过程,就是确定谁可以访问什么
Session Management【】
会话管理:管理特定于用户的会话,即使是在非 Web 或 EJB 应用程序中。
Cryptography【】
加密:使用密码算法确保数据安全,同时仍然易于使用。
核心
主题(Subject):当前与软件交互的任何东西(用户、3方软件服务、cron作业等)
Subject实例都绑定到(并且需要)SecurityManager。当与Subject交互时,这些交互将转化为与SecurityManager的特定于主题的交互。
安全管理器(SecurityManager):SecurityManager是 Shiro 架构的核心,协调其内部安全组件之间的工作交互;
领域(Realms):领域充当 Shiro 和应用程序安全数据之间的“桥梁”或“连接器”。可以把Realm看成DataSource,即安全数据源。
架构

Subject
主体:当前与软件交互的实体(用户、第 3 方服务、cron 作业等)的特定于安全的“视图”。
SecurityManager
安全管理:是 Shiro 架构的核心。用于协调其托管组件以确保它们一起顺利工作;
管理 Shiro 对每个应用程序用户的视图,也就是一个Subject对象,由SecurityManager统一对Subject进行认证和授权;
Authenticator
认证器:是负责执行和响应用户的身份验证(登录)尝试的组件。主要对Subject进行认证,Subject的信息在shrio中是通过AuthenticationToken对象来储存,由AuthenricationStrategy进行验证管理;
Authentication Strategy
身份认证策略:如果配置了多个域,则AuthenticationStrategy将协调域以确定身份验证尝试成功或失败的条件;
Authorizer
授权器:是负责确定应用程序中用户访问控制的组件。Subject认证后,由它来对其授予对应角色权,即控制着用户能访问应用中的哪些功能;
SessionManager
会话管理:创建和管理用户会话生命周期,以便为所有环境中的用户提供强健的会话体验。这是安全框架世界中的一个独特特性;Shiro能够在任何环境中以本机方式管理用户会话,即使没有可用的Web/Servlet或EJB容器。
SessionDAO
会话接口:SessionDAO允许任何数据源用于持久化(CRUD)会话。
允许将任何数据存储插入会话管理基础结构。
CacheManager
缓存控制器:创建并管理其他Shiro组件使用的缓存实例生命周期;主要对session数据和授权数据进行缓存,减小数据库的访问压力;可以通过和ehcache的整合对缓存数据进行管理;
缓存一直是框架中的一流体系结构功能,可以在使用这些数据源时提高性能;
Cryptography
密码模块:一个密码管理工具,提供了一套加密/解密的组件;比如常用的散列,加/解密等功能。
之前使用的MD5算法是一种散列算法,就是只能加密,不能解密
Shiro的crypto API简化了复杂的Java机制,使加密技术易于普通人使用。
Realms
领域:充当Shiro和应用程序安全数据之间的“桥梁”或“连接器”。也就是Shiro在做一些操作时(登录、认证、授权等)要从Realm获取安全数据(如用户、角色、权限),就是说SecurityManager要验证用户身份,那么它需要从Realm获取相应的用户进行比较以确定用户身份是否合法;也需要从Realm得到用户相应的角色/权限进行验证用户是否能进行操作;
代码
Shiro 下载
除非是下载源码,可在官网进行下载,若要在项目中使用,则直接引入依赖
<properties>
    <shiro.version>1.7.1</shiro.version>
</properties>

<!-- shiro 依赖 -->
<dependency>
    <groupId>org.apache.shiro</groupId>
    <artifactId>shiro-core</artifactId>
    <version>${shiro.version}</version>
</dependency>
<dependency>
    <groupId>org.apache.shiro</groupId>
    <artifactId>shiro-web</artifactId>
    <version>${shiro.version}</version>
</dependency>
<dependency>
    <groupId>org.apache.shiro</groupId>
    <artifactId>shiro-spring</artifactId>
    <version>${shiro.version}</version>
</dependency>
<dependency>
    <groupId>org.apache.shiro</groupId>
    <artifactId>shiro-ehcache</artifactId>
    <version>${shiro.version}</version>
</dependency>
SSM 集成 Shiro
1)web.xml 配置 shiro 拦截器
 <!-- 加载spring和shiro上下文配置文件 -->
<context-param>
  <param-name>contextConfigLocation</param-name>
  <param-value>
    classpath:applicationContext.xml
    classpath:spring-shiro.xml
  </param-value>
</context-param>

 <!-- 配置 shiro 拦截器  -->
<filter>
   <filter-name>shiroFilter</filter-name>
   <filter-class>org.springframework.web.filter.DelegatingFilterProxy</filter-class>
   <init-param>
     <param-name>targetFilterLifecycle</param-name>
     <param-value>true</param-value>
   </init-param>
 </filter>
 <filter-mapping>
   <filter-name>shiroFilter</filter-name>
   <url-pattern>/*</url-pattern>
 </filter-mapping>
2)spring-shiro.xml :shiro的核心组件&拦截规则
<?xml version="1.0" encoding="UTF-8"?>
<beans xmlns="http://www.springframework.org/schema/beans"
       xmlns:xsi="http://www.w3.org/2001/XMLSchema-instance"
       xsi:schemaLocation="http://www.springframework.org/schema/beans http://www.springframework.org/schema/beans/spring-beans.xsd">

    <description>Spring Shiro Configuration</description>

    <!-- 配置 shiro 的核心组件:securityManager -->
    <bean id="securityManager" class="org.apache.shiro.web.mgt.DefaultWebSecurityManager">
        <!-- 配置缓存 -->
        <property name="cacheManager" ref="cacheManager"/>
        <!-- 配置域realm,用户名,密码,角色都保存在域里:实现从数据库中获取用户信息,需要我们自己创建一个类(实现Realm接口) -->
        <property name="realm" ref="shiroRealm"/>
    </bean>

    <!-- 配置ehcache缓存bean,导入ehcache并新建配置文件 -->
    <bean id="cacheManager" class="org.apache.shiro.cache.ehcache.EhCacheManager">
        <property name="cacheManagerConfigFile" value="classpath:ehcache.xml"></property>
    </bean>

    <!-- 配置自己realm实现  -->
    <bean id="shiroRealm" class="com.fh.cloud.shiro.ShiroRealm"></bean>

    <!-- 配置shiro的拦截规则,id必须和web.xml中的 shiro 拦截器名一致 -->
    <bean id="shiroFilter" class="org.apache.shiro.spring.web.ShiroFilterFactoryBean">
        <!-- Shiro的核心安全接口,这个属性是必须的 -->
        <property name="securityManager" ref="securityManager"/>
        <!-- 身份认证失败,则跳转到登录页面的配置 -->
        <property name="loginUrl" value="/index.jsp"/>
        <!-- 登录成功后的页面 -->
        <property name="successUrl" value="/main.jsp"/>
        <!-- 权限认证失败,则跳转到指定页面 -->
        <property name="unauthorizedUrl" value="/403.jsp"/>
        <!-- Shiro连接约束配置,即过滤链的定义 -->
        <property name="filterChainDefinitions">
            <value>
                <!-- 注意:规则是有顺序的,从上到下,拦截范围必须是从小到大的 -->
                <!--  url = 拦截规则(anon为匿名,authc为要登录后,才能访问,logout登出过滤) -->
                /user/login = anon
                /static/** = anon
                /logout = logout
                / = authc
                /** = authc
            </value>
        </property>
    </bean>

</beans>
3)ehcache.xml
<?xml version="1.0" encoding="UTF-8"?>
<ehcache xmlns:xsi="http://www.w3.org/2001/XMLSchema-instance"
         xsi:noNamespaceSchemaLocation="http://ehcache.org/ehcache.xsd"
         updateCheck="false">
    <!--
       diskStore:为缓存路径,ehcache分为内存和磁盘两级,此属性定义磁盘的缓存位置。参数解释如下:
       user.home – 用户主目录
       user.dir  – 用户当前工作目录
       java.io.tmpdir – 默认临时文件路径
     -->
    <diskStore path="java.io.tmpdir/Tmp_EhCache"/>
    <!--
       defaultCache:默认缓存策略,当ehcache找不到定义的缓存时,则使用这个缓存策略。只能定义一个。
     -->
    <!--
      name:缓存名称。
      maxElementsInMemory:缓存最大数目
      maxElementsOnDisk:硬盘最大缓存个数。
      eternal:对象是否永久有效,一但设置了,timeout将不起作用。
      overflowToDisk:是否保存到磁盘,当系统当机时
      timeToIdleSeconds:设置对象在失效前的允许闲置时间(单位:秒)。仅当eternal=false对象不是永久有效时使用,可选属性,默认值是0,也就是可闲置时间无穷大。
      timeToLiveSeconds:设置对象在失效前允许存活时间(单位:秒)。最大时间介于创建时间和失效时间之间。仅当eternal=false对象不是永久有效时使用,默认是0.,也就是对象存活时间无穷大。
      diskPersistent:是否缓存虚拟机重启期数据 Whether the disk store persists between restarts of the Virtual Machine. The default value is false.
      diskSpoolBufferSizeMB:这个参数设置DiskStore(磁盘缓存)的缓存区大小。默认是30MB。每个Cache都应该有自己的一个缓冲区。
      diskExpiryThreadIntervalSeconds:磁盘失效线程运行时间间隔,默认是120秒。
      memoryStoreEvictionPolicy:当达到maxElementsInMemory限制时,Ehcache将会根据指定的策略去清理内存。默认策略是LRU(最近最少使用)。你可以设置为FIFO(先进先出)或是LFU(较少使用)。
      clearOnFlush:内存数量最大时是否清除。
      memoryStoreEvictionPolicy:可选策略有:LRU(最近最少使用,默认策略)、FIFO(先进先出)、LFU(最少访问次数)。
      FIFO,first in first out,这个是大家最熟的,先进先出。
      LFU, Less Frequently Used,就是上面例子中使用的策略,直白一点就是讲一直以来最少被使用的。如上面所讲,缓存的元素有一个hit属性,hit值最小的将会被清出缓存。
      LRU,Least Recently Used,最近最少使用的,缓存的元素有一个时间戳,当缓存容量满了,而又需要腾出地方来缓存新的元素的时候,那么现有缓存元素中时间戳离当前时间最远的元素将被清出缓存。
   -->
    <defaultCache eternal="false"
                  maxElementsInMemory="10000"
                  overflowToDisk="false"
                  diskPersistent="false"
                  timeToIdleSeconds="1800"
                  timeToLiveSeconds="259200"
                  memoryStoreEvictionPolicy="LRU"/>

    <cache name="cloud_user"
           eternal="false"
           maxElementsInMemory="5000"
           overflowToDisk="false"
           diskPersistent="false"
           timeToIdleSeconds="1800"
           timeToLiveSeconds="1800"
           memoryStoreEvictionPolicy="LRU"/>

</ehcache>
4)springmvc.xml 中配置 Shiro 的注解
<!-- 配置shiro开启注解支持 -->
<bean id="lifecycleBeanPostProcessor" class="org.apache.shiro.spring.LifecycleBeanPostProcessor"/>
<bean class="org.springframework.aop.framework.autoproxy.DefaultAdvisorAutoProxyCreator"
      depends-on="lifecycleBeanPostProcessor"/>
<bean class="org.apache.shiro.spring.security.interceptor.AuthorizationAttributeSourceAdvisor">
    <property name="securityManager" ref="securityManager"/>
</bean>
5)自定义 ShiroRealm 实现
package com.fh.cloud.shiro;

import com.fh.cloud.user.model.User;
import com.fh.cloud.user.service.UserService;
import org.apache.commons.lang3.StringUtils;
import org.apache.shiro.SecurityUtils;
import org.apache.shiro.authc.*;
import org.apache.shiro.authz.AuthorizationInfo;
import org.apache.shiro.authz.SimpleAuthorizationInfo;
import org.apache.shiro.realm.AuthorizingRealm;
import org.apache.shiro.subject.PrincipalCollection;
import org.springframework.beans.factory.annotation.Autowired;

import java.util.Set;

public class ShiroRealm extends AuthorizingRealm {

    @Autowired
    private UserService userService;


    @Override
    protected AuthorizationInfo doGetAuthorizationInfo(PrincipalCollection principalCollection) {
        // 从shiro里获取用户的信息
        User user = (User) SecurityUtils.getSubject().getPrincipal();
        if(null == user){
            return null;
        }
        // 获取到用户ID
        Integer userId = user.getId();
        // 根据用户ID查询用户角色名集合
        Set<String> roles = userService.getUserRolesByUserId(userId);
        // 根据用户ID查询用户权限名集合
        Set<String> menus = userService.getUserMenusByUserId(userId);
        // 将用户的角色和权限交给shiro框架管理
        SimpleAuthorizationInfo simpleAuthorizationInfo = new SimpleAuthorizationInfo();
        simpleAuthorizationInfo.addRoles(roles);
        simpleAuthorizationInfo.addStringPermissions(menus);
        return simpleAuthorizationInfo;
    }

    @Override
    protected AuthenticationInfo doGetAuthenticationInfo(AuthenticationToken authenticationToken) throws AuthenticationException {
        UsernamePasswordToken token = (UsernamePasswordToken) authenticationToken;
        String username = token.getUsername();
        String password = new String(token.getPassword());
        // 校验用户名和密码是否为空
        if (StringUtils.isBlank(username) || StringUtils.isBlank(password)) {
            throw new AuthenticationException("用户或密码不能为空");
        }
        User user = userService.queryUserByUsername(username);
        if (null == user) {
            throw new AuthenticationException("用户不存在");
        }
        // 业务逻辑校验:密码校验、是否被锁
        String dbPassword = user.getPassword();
        if (!password.equals(dbPassword)) {
            throw new AuthenticationException("密码错误");
        }

        /**
         * principals: 可以使用户名,或登录用户的对象
         * hashedCredentials: 从数据库中获取的密码
         * credentialsSalt:密码加密的盐值
         * RealmName:  类名(ShiroRealm)
         */
        AuthenticationInfo info = new SimpleAuthenticationInfo(user, dbPassword, null, getName());
        return info;
    }
}
6)登录接口
@RequestMapping("/login")
@ResponseBody
public Map<String,Object> login(String username, String password){
    Map<String,Object> map = new HashMap<>();
    Subject subject = SecurityUtils.getSubject();
    UsernamePasswordToken token = new UsernamePasswordToken(username,password);
    try {
        subject.login(token);
        map.put("code",200);
    }catch (AuthenticationException e){
        e.printStackTrace();
        map.put("code",2321);
    }
    return map;
}
7)shiro 标签
<%@ taglib prefix="shiro" uri="http://shiro.apache.org/tags" %>

<!--
权限标签:https://blog.csdn.net/lizhiqiang1217/article/details/91129218
-->
<shiro:hasPermission name="addUser">添加用户</shiro:hasPermission>
<shiro:hasPermission name="addRole">添加角色</shiro:hasPermission>
8)shiro 注解
@RequiresPermissions("addUser")
@RequestMapping("addUser")
@ResponseBody
public void addUser(User user){

    userService.addUser(user);
}
异常
集成 shiro 之后,访问项目地址栏自动增加 jsessionId
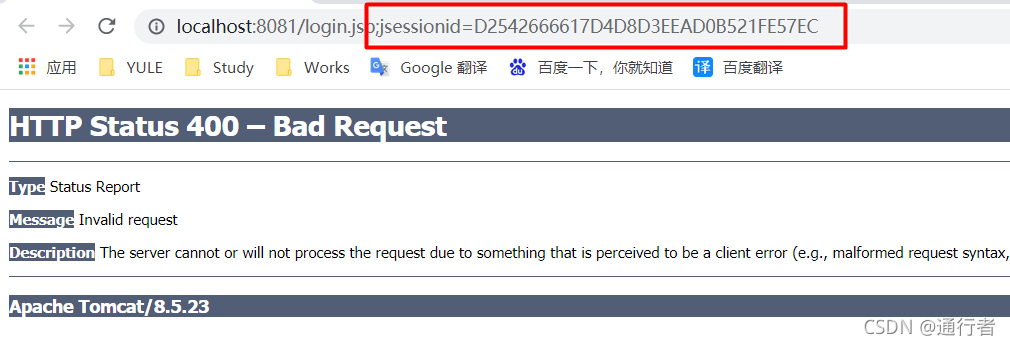
解决方案:在 web.xml 增加如下配置
<session-config>
    <tracking-mode>COOKIE</tracking-mode>
</session-config>
用户授权之后,访问无权限方法,异常
org.apache.shiro.authz.AuthorizationException:
Not authorized to invoke method:解决方案:使用异常拦截器 去拦截 AuthorizationException
@ControllerAdvice
public class GlobalExceptionHandler {

    /**
     * 拦截处理 shiro 授权后,访问无权限方法的异常
     * @param request
     * @param response
     * @return
     */
    @ExceptionHandler(AuthorizationException.class)
    public void customException(HttpServletRequest request, HttpServletResponse response) throws IOException {
        // 判断是否ajax请求
        if(AjaxUtil.isAjax(request)){
            AjaxUtil.outStr(response, "no permission");
        }else{
            response.sendRedirect("/common/403.jsp");
        }
    }

}

public class AjaxUtil {

    private static final String name = "X-Requested-With";
    private static final String XMLHttpRequest = "XMLHttpRequest";

    /**
     * 判断一个请求是否ajax
     *
     * @param request
     * @return
     */
    public static boolean isAjax(HttpServletRequest request) {
        String header = request.getHeader(name);
        if (XMLHttpRequest.equalsIgnoreCase(header)) {
            return true;
        }
        return false;
    }

    /**
     * 写出字符串
     *
     * @param response
     * @param str      要写出的字符串
     */
    public static void outStr(HttpServletResponse response, String str) throws IOException {
        response.setContentType("application/json;charset=utf-8");
        response.setCharacterEncoding("utf-8");
        response.getOutputStream().print(str);
    }
} 


 1万+
1万+


 被折叠的 条评论
为什么被折叠?
被折叠的 条评论
为什么被折叠?
 到【灌水乐园】发言


