


综合案例2.0 - ESP32拍照上传阿里云OSS
最新案例教程点击下方链接跳转,CSDN已停止更新
点
击
跳
转
案例说明
使用ESP32拍照,将照片数据上传阿里云OSS(通过4G网络上传)。
- 代码流程
- haas506连接阿里云,云端物模型下发指令给Haas506。
- Haas506通过TTL串口发送拍照指令给ESP32。
- ESP32将拍摄的照片数据发送给Haas506以TXT格式存入SD卡。
- Haas506将TXT文件上传OSS。
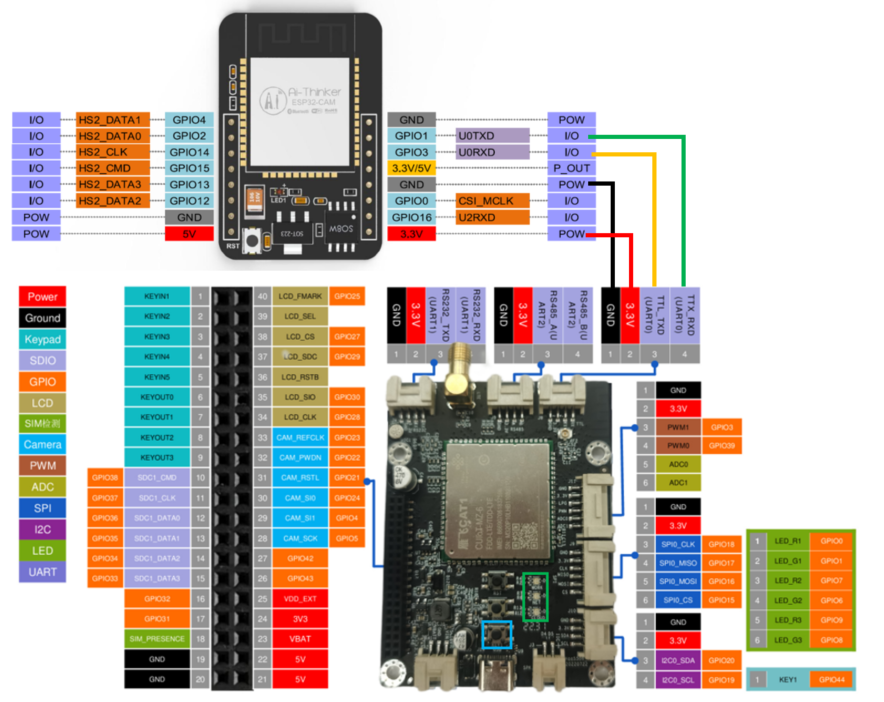
连线
功能实现
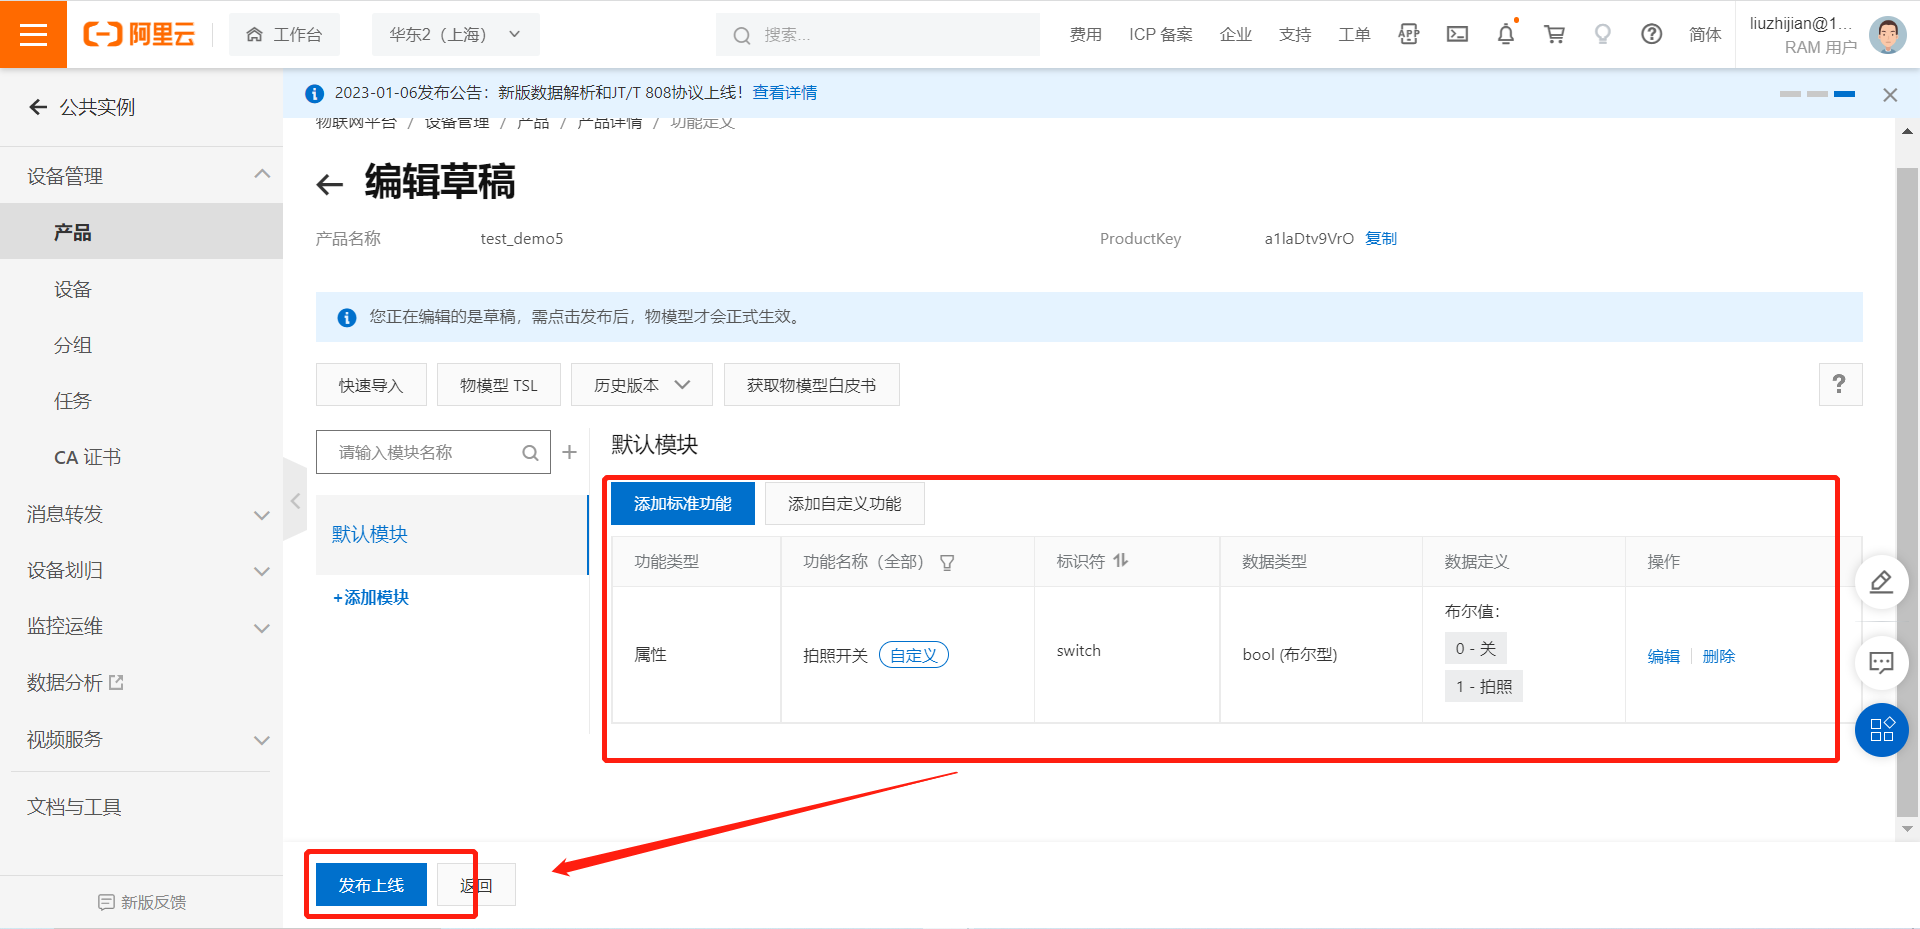
1.阿里云平台连接
阿里云环境创建参考高级组件库-aliyunIoT进行搭建。
创建产品,添加产品后添加物模型。
2.OSS对象存储服务
OSS对象存储服务开通参考2.12 haas506开发教程-高级组件库-OSS
开通存储服务,注意记录相关信息
keyid = 'yourKeyId'
keysecret = 'yourKeySecret'
endpoint = 'yourEndPoint'
bucketname = 'yourBucketName'
objectname = '文件存储地址'
3.ESP32-CAM开发环境
参考3.26 haas506 2.0开发教程-example- 简易相机-串口控制ESP32-CAM OV2640拍照
详细Arduino环境安装需要自己搜一下,网上资源很多。
4.代码
ESP32-CAM开发板代码
- 使用Arduino环境下载
#include "esp_camera.h"
#include "FS.h"
#include <time.h>
#include "string.h"

String inputString = "";
bool stringComplete = false;


//**************************************************************************************************************************************  摄像头初始化
static camera_config_t camera_config = {
    .pin_pwdn = 32,
    .pin_reset = -1,
    .pin_xclk = 0,
    .pin_sscb_sda = 26,
    .pin_sscb_scl = 27,

    .pin_d7 = 35,
    .pin_d6 = 34,
    .pin_d5 = 39,
    .pin_d4 = 36,
    .pin_d3 = 21,
    .pin_d2 = 19,
    .pin_d1 = 18,
    .pin_d0 = 5,
    .pin_vsync = 25,
    .pin_href = 23,
    .pin_pclk = 22,

    .xclk_freq_hz = 20000000,
    .ledc_timer = LEDC_TIMER_0,
    .ledc_channel = LEDC_CHANNEL_0,

    .pixel_format = PIXFORMAT_JPEG,
    .frame_size = FRAMESIZE_SVGA,   // FRAMESIZE_ + QVGA|CIF|VGA|SVGA|XGA|SXGA|UXGA      320×240|  |640×480|800×600|1024×768|1400×1050|1600×1200
    .jpeg_quality = 12,            //10-63 lower number means higher quality
    .fb_count = 1,
};

esp_err_t camera_init() {
    //initialize the camera
    esp_err_t err = esp_camera_init(&camera_config);
    if (err != ESP_OK) {
        Serial.print("Camera Init Failed");
        return err;
    }
    sensor_t * s = esp_camera_sensor_get();
    //initial sensors are flipped vertically and colors are a bit saturated
    if (s->id.PID == OV2640_PID) {
    //        s->set_vflip(s, 1);//flip it back
    //        s->set_brightness(s, 1);//up the blightness just a bit
    //        s->set_contrast(s, 1);
    }
    Serial.print("Camera Init OK");
    return ESP_OK;
}
//**************************************************************************************************************************************


void setup()
{
  Serial.begin(115200);   //初始化串口波特率
  camera_init();  //摄像头初始化
}


void loop()
{
    if (Serial.available()) {
    // get the new byte:
    char inChar = (char)Serial.read();
    // add it to the inputString:
    if (inChar != '\n')
    {
      inputString += inChar;
    }
    // if the incoming character is a newline, set a flag
    // so the main loop can do something about it:
    if (inChar == '\n')
    {
      stringComplete = true;
    }

    if (stringComplete)
    {
      inputString=String(inputString);
      if (inputString == "123")  //指令正确进行拍照
      {
        camera_fb_t * fb = esp_camera_fb_get();
        delay(10);
        //由于Haas506串口接收到的收据限制(1024以下),将照片数据分段发送给Haas506,每50ms发送1000个数据(可以根据实际情况自行调整)
        if(fb != NULL)
        {
        long len_tol=fb->len;
        unsigned char i=0,j=1000;
        for(i=0;i<(len_tol/j);i++)
        {
          // Serial.print(i);
          // Serial.print(len_tol/j);
          Serial.write(fb->buf+i*j,j);
          delay(50);
          }
        Serial.write(fb->buf+i*j,len_tol-i*j);
        }

      }
      inputString = "";
      stringComplete = false;
    }
  }
}
HaaS506开发板代码
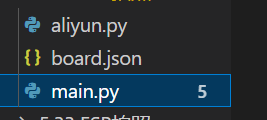
aliyun.py
- 注意更改阿里云产品信息
# coding=utf-8
import network
import ujson
import utime as time
import modem
from  aliyunIoT import Device
import ota
import kv


#更改产品信息
###############################
productKey = "*********"
productSecret = "***********"
###############################
global deviceName,g_connect_status,device_dyn_resigter_succed,netw
g_connect_status = False
netw = None
device = None
deviceSecret = None
device_dyn_resigter_succed = False

#初始化物联网平台Device类,获取device实例
device = Device()
# 定义需要升级的模块和版本号
module_name = 'default'
app_version = '1.0.1'
# 定义升级包的下载和安装路径,其中url,hash_type和hash 会通过服务端推送被保存下来
info = {
        'url': '',
        'store_path': '/data/pyamp/app.zip',
        'install_path': '/data/pyamp/',
        'length': 0,
        'hash_type': '',
        'hash': ''
}

 # ota 消息推送的接受函数
def on_trigger(data):
     global info
 # 保存服务端推送的ota信息
     info['url'] = data['url']
     info['length'] = data['length']
     info['module_name'] = data['module_name']
     info['version'] = data['version']
     info['hash'] = data['hash']
     info['hash_type'] = data['hash_type']
    # 开始ota 包下载
     dl_data = {}
     dl_data['url'] = info['url']
     dl_data['store_path'] = info['store_path']
     ota.download(dl_data)


 # ota 升级包下载结果回调函数
def on_download(data):
     global info
     if data >= 0:
         print('Ota download succeed')
     # 开始ota包校验
         param = {}
         param['length'] = info['length']
         param['store_path'] = info['store_path']
         param['hash_type'] = info['hash_type']
         param['hash'] = info['hash']
         ota.verify(param)

 # ota 升级包校验结果回调函数
def on_verify(data):
      global info
      print(data)
      if data >= 0 :
          print('Ota verify succeed')
          print('Start Upgrade')
     # 开始ota升级
          param = {}
          param['length'] = info['length']
          param['store_path'] = info['store_path']
          param['install_path'] = info['install_path']
          ota.upgrade(param)

 # ota 升级包结果回调函数
def on_upgrade(data):
     if data >= 0 :
        print('Ota succeed')
        #ota升完级后 重启设备
        reboot()


connect_state = False
def get_connect_state():
    global connect_state
    return connect_state
#当iot设备连接到物联网平台的时候触发'connect' 事件
def on_connect(data):
    global module_name,default_ver,productKey,deviceName,deviceSecret,on_trigger,on_download,on_verify,on_upgrade,connect_state
    print('***** connect lp succeed****')
    data_handle = {}
    data_handle['device_handle'] = device.getDeviceHandle()
    # 初始化ota服务
    ota.init(data_handle)
    connect_state = True
    # ota 回调函数注册
    ota.on(1,on_trigger)
    ota.on(2,on_download)
    ota.on(3,on_verify)
    ota.on(4,on_upgrade)
    report_info = {
         "device_handle": data_handle['device_handle'],
         "product_key": productKey ,
         "device_name": deviceName ,
         "module_name": module_name ,
         "version": app_version
         }
    # 上报本机ota相关信息,上报版本信息返回以后程序返回,知道后台推送ota升级包,才会调用on_trigger函数
    ota.report(report_info)

def re_wicth(ret):
    global switch
    switch = ret
    update('switch',switch)

def get_switch():
    global switch
    return switch
switch = 0
#当iot云端下发属性设置时,触发'props'事件
def on_props(request):
    global switch
    print('clound req data is {}'.format(request))
    # # # #获取消息中的params数据
    params=request['params']
    # #去除字符串的'',得到字典数据
    params=eval(params)

    if "switch" in params :
        switch = params["switch"]


#当连接断开时,触发'disconnect'事件
def on_disconnect():
    print('linkkit is disconnected')


#当iot云端调用设备service时,触发'service'事件
def on_service(id,request):
    print('clound req id  is {} , req is {}'.format(id,request))
#当设备跟iot平台通信过程中遇到错误时,触发'error'事件
def on_error(err):
    print('err msg is {} '.format(err))

#网络连接的回调函数
def on_4g_cb(args):
    global g_connect_status
    pdp = args[0]
    netwk_sta = args[1]
    if netwk_sta == 1:
        g_connect_status = True

    else:
        g_connect_status = False


#网络连接
def connect_network():
    global netw,on_4g_cb,g_connect_status
    #NetWorkClient该类是一个单例类,实现网络管理相关的功能,包括初始化,联网,状态信息等.
    netw = network.NetWorkClient()
    g_register_network = False
    if netw._stagecode is not None and netw._stagecode == 3 and netw._subcode == 1:
        g_register_network = True
    else:
        g_register_network = False
    if g_register_network:
    #注册网络连接的回调函数on(self,id,func);  1代表连接,func 回调函数  ;return 0 成功
        netw.on(1,on_4g_cb)
        netw.connect(None)
    else:
        print('网络注册失败')
    while True:
        if g_connect_status:
            print('网络连接成功')
            break
        time.sleep_ms(20)


#动态注册回调函数
def on_dynreg_cb(data):
    global deviceSecret,device_dyn_resigter_succed
    deviceSecret = data
    device_dyn_resigter_succed = True

# 连接物联网平台
def dyn_register_device(productKey,productSecret,deviceName):
    global on_dynreg_cb,device,deviceSecret,device_dyn_resigter_succed

    key = '_amp_customer_devicesecret'
    deviceSecretdict = kv.get(key)
    print("deviceSecretdict:",deviceSecretdict)
    if isinstance(deviceSecretdict,str):
        deviceSecret = deviceSecretdict

    if deviceSecretdict is None or deviceSecret is None:
        key_info = {
            'productKey': productKey  ,
            'productSecret': productSecret ,
            'deviceName': deviceName
            }
        # 动态注册一个设备,获取设备的deviceSecret
        #下面的if防止多次注册,当前若是注册过一次了,重启设备再次注册就会卡住,
        if not device_dyn_resigter_succed:
            device.register(key_info,on_dynreg_cb)

def connect():
    global deviceName,g_connect_status,device_dyn_resigter_succed
    deviceName = None
     # 获取设备的IMEI 作为deviceName 进行动态注册
    deviceName = modem.info.getDevImei()
    # 连接网络
    connect_network()
    if deviceName is not None and len(deviceName) > 0 :
        #动态注册一个设备
        dyn_register_device(productKey,productSecret,deviceName)
    else:
        print("获取设备IMEI失败,无法进行动态注册")
    while deviceSecret is None:
        time.sleep(0.2)
    print('动态注册成功:' + deviceSecret)
    key_info = {
        'region' : 'cn-shanghai' ,
        'productKey': productKey ,
        'deviceName': deviceName ,
        'deviceSecret': deviceSecret ,
        'keepaliveSec': 60,
        }
    #打印设备信息
    print(key_info)
    #device.ON_CONNECT 是事件,on_connect是事件处理函数/回调函数
    device.on(device.ON_CONNECT,on_connect)
    device.on(device.ON_DISCONNECT,on_disconnect)
    device.on(device.ON_PROPS,on_props)
    device.on(device.ON_SERVICE,on_service)
    device.on(device.ON_ERROR,on_error)
    device.connect(key_info)

def update(key,value):
    global device
    post_data_str=ujson.dumps({key:value})
    data={
        "params":post_data_str
    }
    device.postProps(data)
main.py
- 更改代码中的相关信息
- keyid = ‘yourKeyId’
- keysecret = ‘yourKeySecret’
- endpoint = ‘yourEndPoint’
- bucketname = ‘yourBucketName’
- objectname = ‘文件存储地址’
import utime as time
import aliyun
import _thread
from driver import UART
import ubinascii
import OSS as oss
import uos

writeBuf = bytearray('123\n')       #拍照指令
readBuf = bytearray(1000)       #每次读取字节,不超过1024
total_data=bytearray()      #总数据初始化
#计算串口收发是否完成
t=0
t_add = False


#上传阿里云oss
def oss_upload_file(filename):
    keyid = 'LTAI5t7czX8UZBqzj14Fry9V'
    keysecret = '5LKycgC9rXCulXt9mbsGhWMPJOztZk'
    endpoint = 'oss-cn-shanghai.aliyuncs.com'
    bucketname = 'testdemo5'
    objectname = '/test/test.log'
    ret = oss.uploadFile(keyid,keysecret,endpoint,bucketname,objectname,filename)
    return ret


#将数据保存SD卡,如需使用删除ffd9后的补充字符
# 文本保存的字符串必须是形如"c8770783a87b86d5..."的十六进制字符串,有无效字符会读取失败。
def write_txt_content(path,mode,data):
    with open(path, mode) as f:
        f.write(data)
    print("--------------write----------------")
    time.sleep_ms(1200)


if __name__ == '__main__':
    #串口实例化
    uart=UART()
    uart.open("serial1")

    #等待阿里云连接
    aliyun.connect()
    aliyun.get_connect_state()
    while  not aliyun.get_connect_state():
        time.sleep_ms(20)

    while  True:
        if aliyun.get_switch():
            uart.write(writeBuf)
            aliyun.re_wicth(0)
            print('start---')

        ret = uart.read(readBuf)
        if ret > 0:
            t_add = True
            t=0
            #print(ret,readBuf[:ret])
            total_data+=readBuf[:ret]
            #print(ubinascii.hexlify(total_data))
        elif ret==0:
            if t_add:
                t+=1

        time.sleep_ms(20)

        if t >3:  # 串口接收到数据后连续4次读取为空
            #启用sd卡
            uos.mountsd()
            total_data+=bytearray('5')       #补充一个上传oss时丢失的字符
            total_data=ubinascii.hexlify(total_data).decode()     #转化为字符格式
            #print(total_data)      #方便看到完整的接收数据
            print('total_data ok!!')
            write_txt_content('/sdcard0/test.log','w',total_data)      #存入SD中的文件名
            oss_upload_file('/sdcard0/test.log')
            time.sleep_ms(1200)
            print('upload oss finished...')
            total_data=bytearray()
            t_add = False
            t=0
borad.json
- 使用485读取log
{
  "name": "haas506",
  "version": "2.0.0",
  "io": {
  "serial1":{
    "type":"UART",
    "port":0,
    "dataWidth":8,
    "baudRate":115200,
    "stopBits":1,
    "flowControl":"disable",
    "parity":"none"
  }
  },
  "debugLevel": "ERROR",
  "repl": "enable",
  "replPort": 2
}
测试
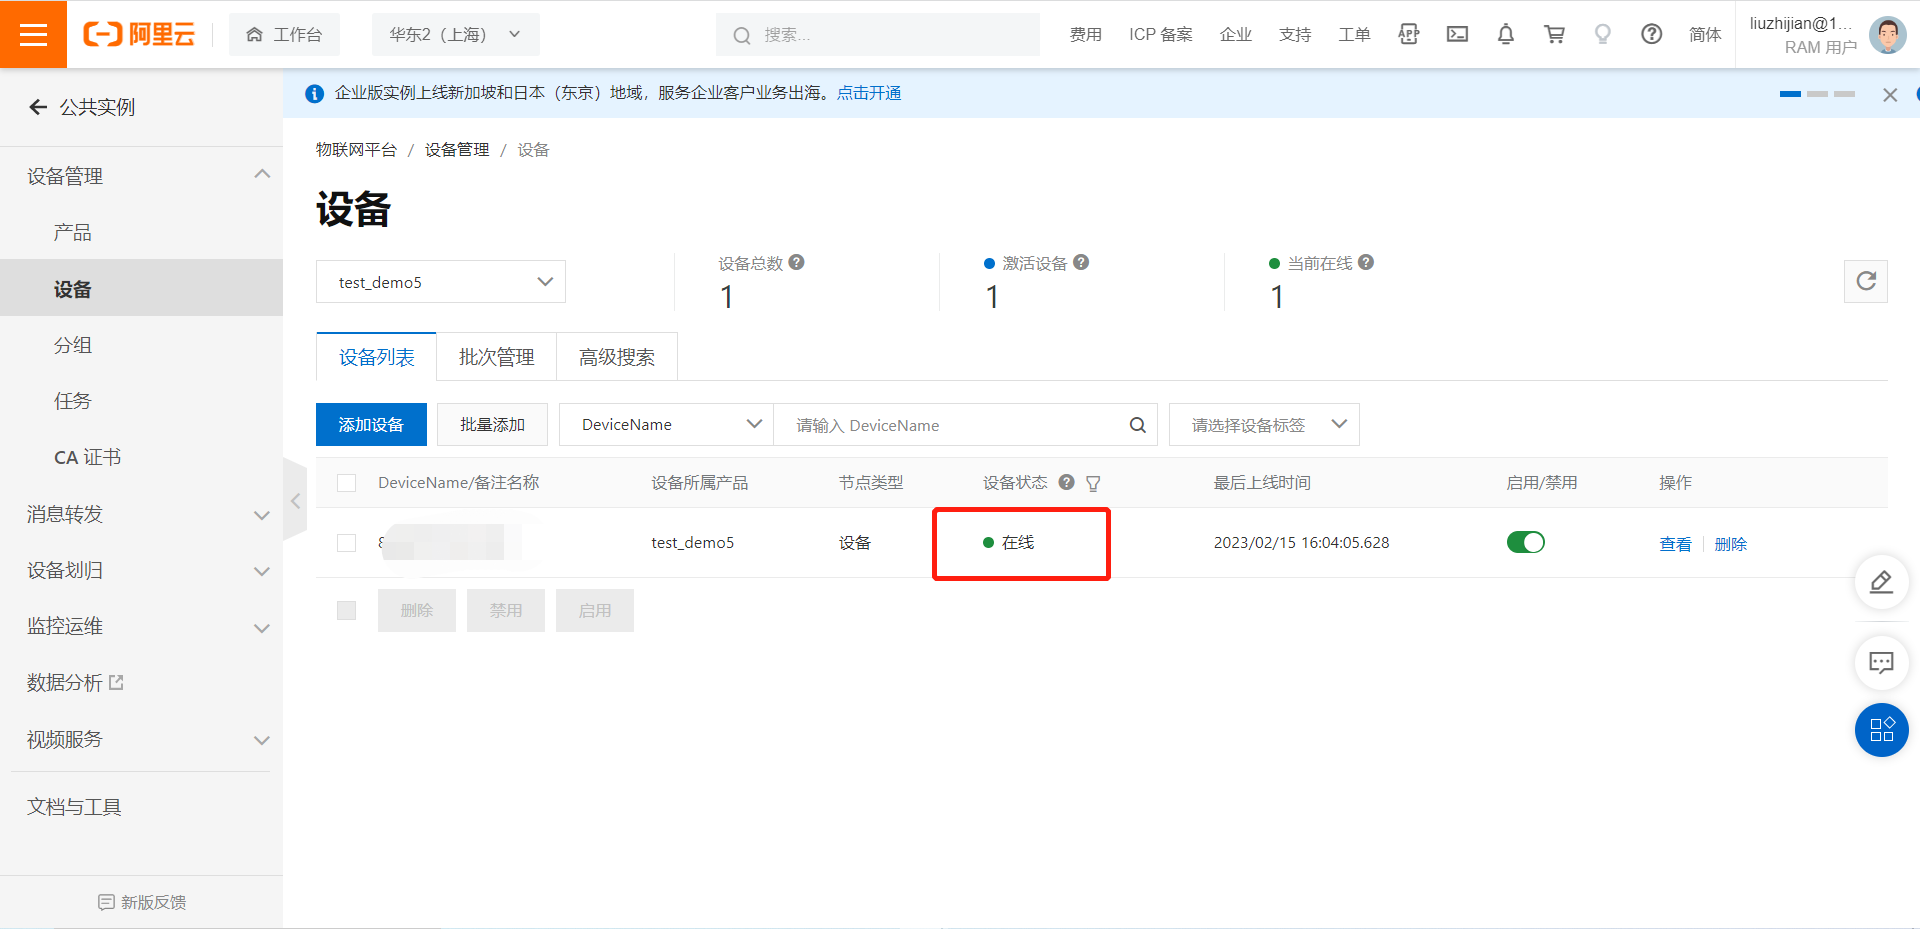
1.上电后打印连接阿里云相关信息
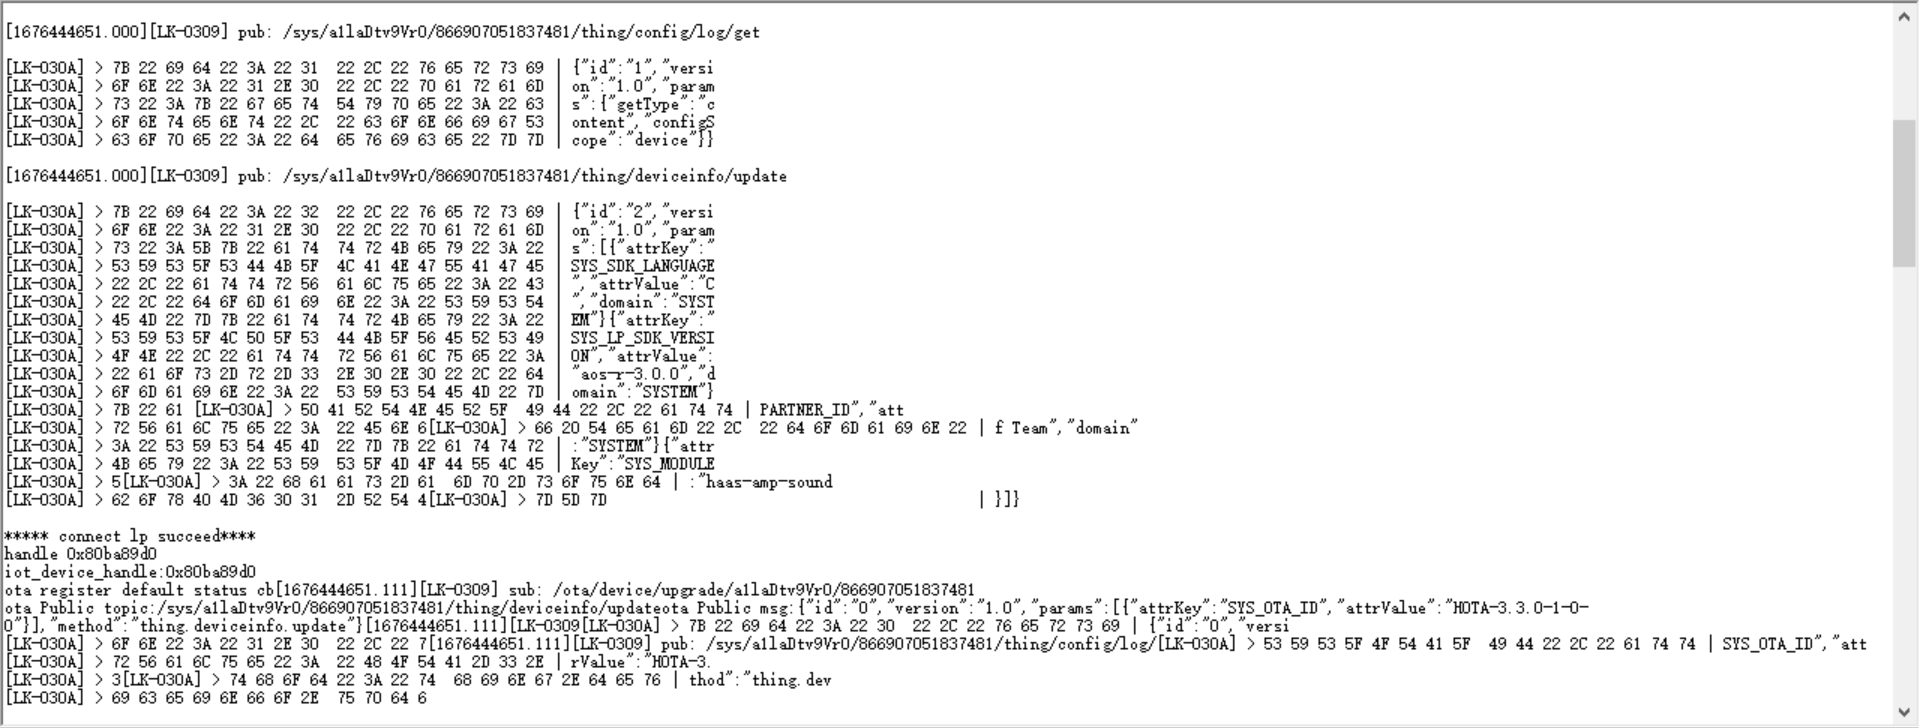
阿里云设备在线
2.在线调试,发送拍照指令给Haas506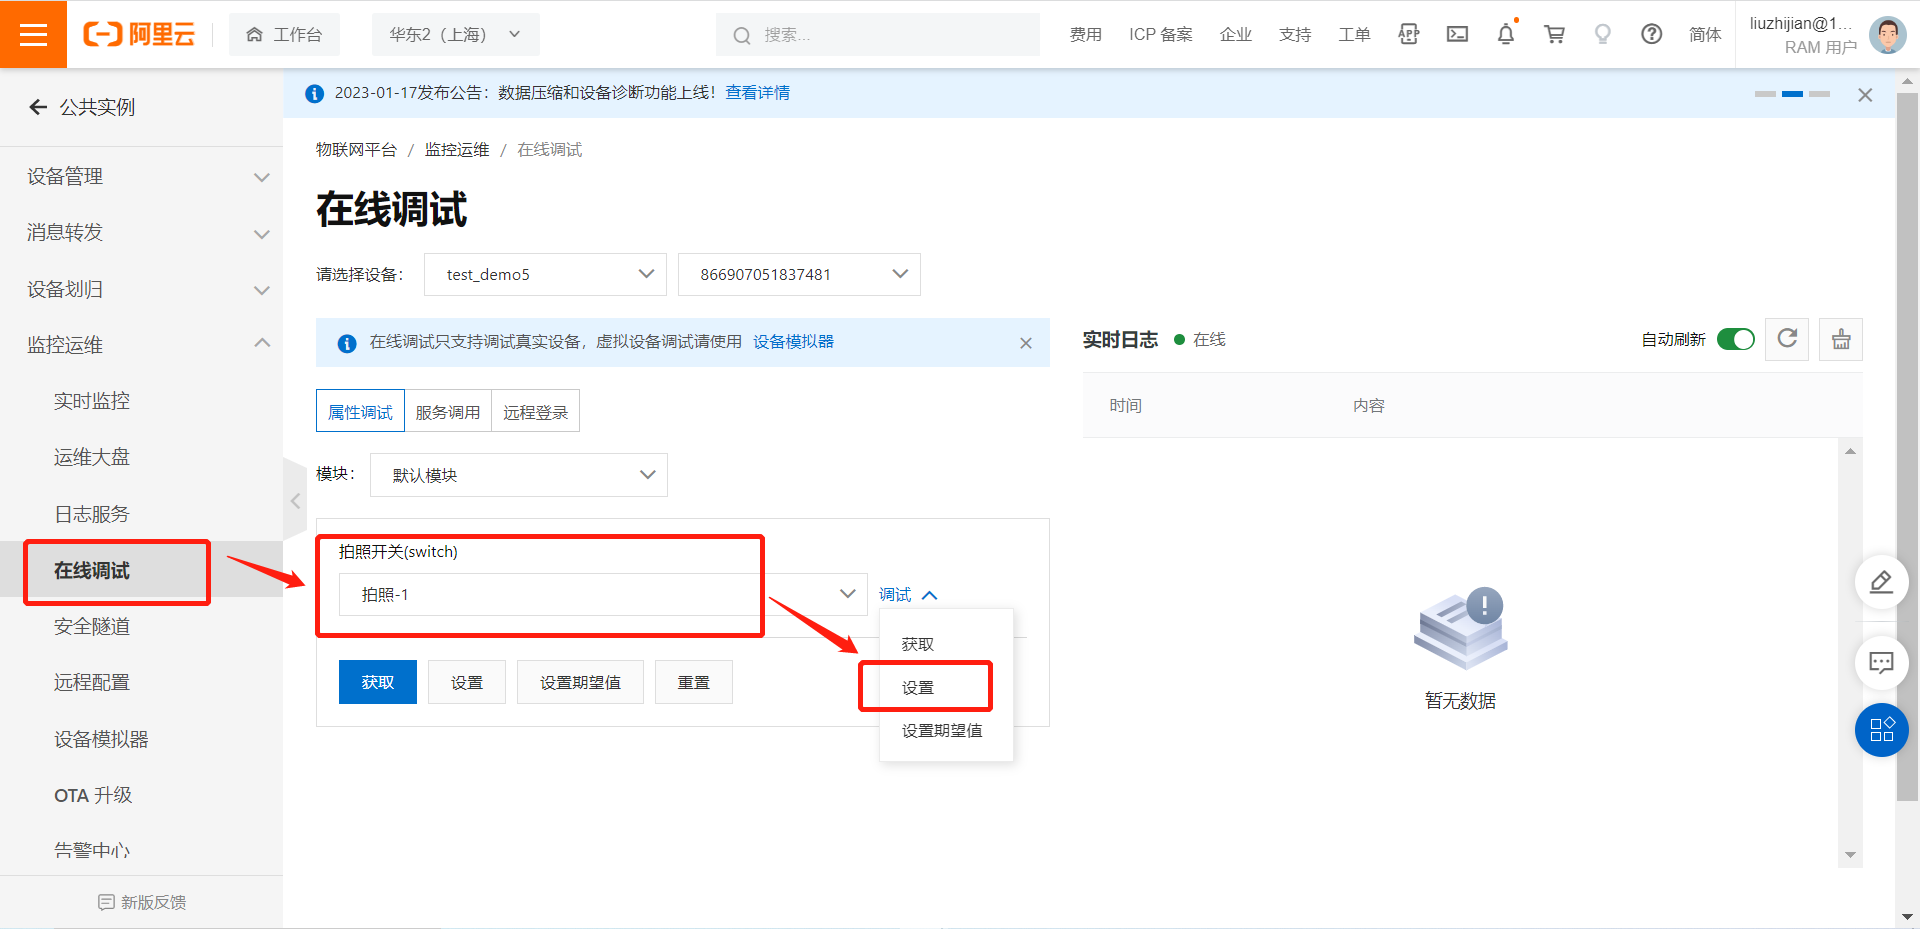
-
阿里云指令下发成功
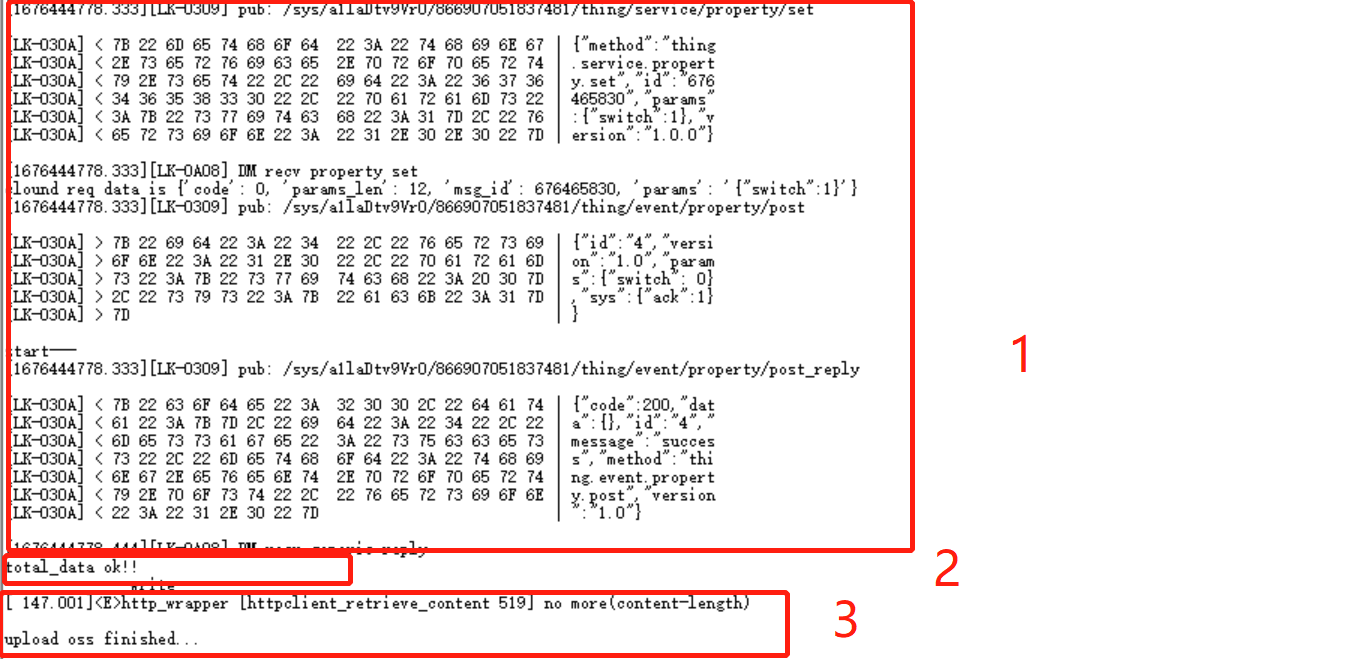
-
照片数据传回并写入SD卡
-
上传0SS
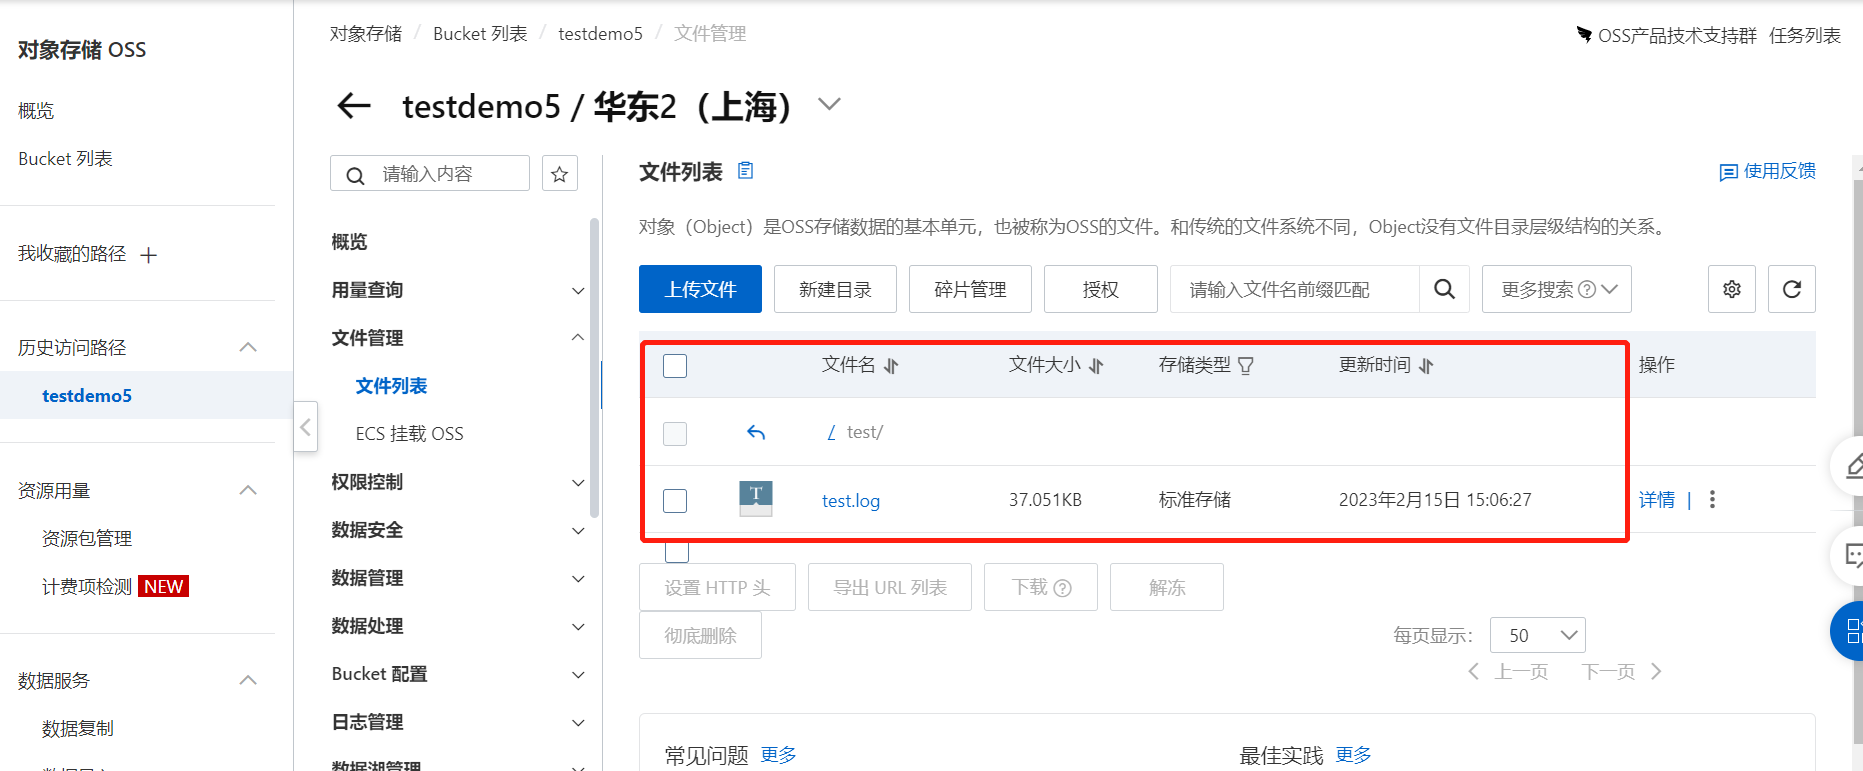
-
文件存入OSS成功
数据转图片方法
(1)复制数据
代码运行完毕,会打印图片的16进制数据,该数据以ffd8开头,ffd9结尾,复制该数据。


(2)粘贴数据
先在电脑桌面上新建一个文件夹,例如txt2jpg。然后在该文件夹内创建一个txt文本,例如text.txt,将(1)中所复制的数据粘贴到test.txt内。

(3)执行python脚本
打开pythonIDE,将test.txt的路径填写到下面的代码中(注意是"/"),执行该脚本,将txt文本转化成jpg图片。
import binascii
with open('C:/Users/further/Desktop/txt2jpg/test.txt','rb') as f1, open('C:/Users/further/Desktop/txt2jpg/test.jpg', "wb") as f2:
    payload=f1.read()
    pic = binascii.a2b_hex(payload)
    f2.write(pic)


 8281
8281


 被折叠的 条评论
为什么被折叠?
被折叠的 条评论
为什么被折叠?
 到【灌水乐园】发言


