


**
Android布局优化:
参考:http://blog.csdn.net/qq_17766199/article/details/52863741
1.使用TextView的行间距

<?xml version="1.0" encoding="utf-8"?>
<LinearLayout
    xmlns:android="http://schemas.android.com/apk/res/android"
    android:layout_height="100dp"
    android:background="@color/white"
    android:layout_width="match_parent">

    <ImageView
        android:padding="25dp"
        android:src="@drawable/kd_1"
        android:layout_width="100dp"
        android:layout_height="match_parent"/>

    <TextView
        android:textSize="14dp"
        android:lineSpacingExtra="8dp"
        android:gravity="center_vertical"
        android:text="揽件方式:上门取件\n快递公司:顺丰快递\n预约时间:9月6日 立即取件\n快递费用:等待称重确定价格"
        android:layout_width="match_parent"
        android:layout_height="match_parent" />

</LinearLayout>我们仅仅利用Android:lineSpacingExtra=”8dp”这一行代码设置行间距,达到效果就省去了3个TextView,
同时还有lineSpacingMultiplier属性,它代表行间距倍数,默认为1.0f,是一个相对高度值。
2.使用Spannable设置TextView显示
=========================
//创建一个 SpannableString对象
SpannableString   msp = new SpannableString("字体测试字体大小一半两倍前景色背景色正常粗体斜体粗斜体下划线删除线x1x2电话邮件网站短信彩信地图X轴综合/bot");

//设置字体(default,default-bold,monospace,serif,sans-serif)
msp.setSpan(new TypefaceSpan("monospace"), 0, 2,Spanned.SPAN_EXCLUSIVE_EXCLUSIVE);
msp.setSpan(new TypefaceSpan("serif"), 2, 4, Spanned.SPAN_EXCLUSIVE_EXCLUSIVE);

//设置字体大小(绝对值,单位:像素)
msp.setSpan(new AbsoluteSizeSpan(20), 4, 6, Spanned.SPAN_EXCLUSIVE_EXCLUSIVE);
//第二个参数boolean dip,如果为true,表示前面的字体大小单位为dip,否则为像素,同上。
msp.setSpan(new AbsoluteSizeSpan(20,true), 6, 8, Spanned.SPAN_EXCLUSIVE_EXCLUSIVE);

//设置字体大小(相对值,单位:像素) 参数表示为默认字体大小的多少倍
msp.setSpan(new RelativeSizeSpan(0.5f), 8, 10, Spanned.SPAN_EXCLUSIVE_EXCLUSIVE);  //0.5f表示默认字体大小的一半,2.0f表示默认字体大小的两倍
msp.setSpan(new RelativeSizeSpan(2.0f), 10, 12, Spanned.SPAN_EXCLUSIVE_EXCLUSIVE);

//设置字体前景色,此处设置为洋红色
msp.setSpan(new ForegroundColorSpan(Color.MAGENTA), 12, 15, Spanned.SPAN_EXCLUSIVE_EXCLUSIVE);

//设置字体背景色 此处设置背景色为青色
msp.setSpan(new BackgroundColorSpan(Color.CYAN), 15, 18,Spanned.SPAN_EXCLUSIVE_EXCLUSIVE);

//设置字体样式正常,粗体,斜体,粗斜体
msp.setSpan(new StyleSpan(android.graphics.Typeface.NORMAL), 18, 20, Spanned.SPAN_EXCLUSIVE_EXCLUSIVE);  //正常
msp.setSpan(new StyleSpan(android.graphics.Typeface.BOLD), 20, 22, Spanned.SPAN_EXCLUSIVE_EXCLUSIVE);  //粗体
msp.setSpan(new StyleSpan(android.graphics.Typeface.ITALIC), 22, 24, Spanned.SPAN_EXCLUSIVE_EXCLUSIVE);  //斜体
msp.setSpan(new StyleSpan(android.graphics.Typeface.BOLD_ITALIC), 24, 27, Spanned.SPAN_EXCLUSIVE_EXCLUSIVE);  //粗斜体

//设置下划线
msp.setSpan(new UnderlineSpan(), 27, 30, Spanned.SPAN_EXCLUSIVE_EXCLUSIVE);
//设置删除线
msp.setSpan(new StrikethroughSpan(), 30, 33, Spanned.SPAN_EXCLUSIVE_EXCLUSIVE);
//设置下标
msp.setSpan(new SubscriptSpan(), 34, 35, Spanned.SPAN_EXCLUSIVE_EXCLUSIVE);
//设置上标
msp.setSpan(new SuperscriptSpan(), 36, 37, Spanned.SPAN_EXCLUSIVE_EXCLUSIVE);


//电话
msp.setSpan(new URLSpan("tel:4155551212"), 37,39,Spanned.SPAN_EXCLUSIVE);
//邮件
msp.setSpan(new URLSpan("mailto:webmaster@google.com"), 39, 41,Spanned.SPAN_EXCLUSIVE_EXCLUSIVE);
//网络
msp.setSpan(new URLSpan("http://www.baidu.com"), 41, 43, Spanned.SPAN_EXCLUSIVE_EXCLUSIVE);
//短信   使用sms:或者smsto:
msp.setSpan(new URLSpan("sms:4155551212"), 43, 45, Spanned.SPAN_EXCLUSIVE_EXCLUSIVE);
//彩信   使用mms:或者mmsto:
msp.setSpan(new URLSpan("mms:4155551212"), 45, 47, Spanned.SPAN_EXCLUSIVE_EXCLUSIVE);
//地图
msp.setSpan(new URLSpan("geo:38.899533,-77.036476"), 47, 49, Spanned.SPAN_EXCLUSIVE_EXCLUSIVE);

//设置字体大小(相对值,单位:像素) 参数表示为默认字体宽度的多少倍
//2.0f表示默认字体宽度的两倍,即X轴方向放大为默认字体的两倍,而高度不变
msp.setSpan(new ScaleXSpan(2.0f), 49, 51, Spanned.SPAN_EXCLUSIVE_EXCLUSIVE);


//设置字体(依次包括字体名称,字体大小,字体样式,字体颜色,链接颜色)
ColorStateList csllink = null;
ColorStateList csl = null;
XmlResourceParser xppcolor=getResources().getXml (R.color.color);
  try {
          csl= ColorStateList.createFromXml(getResources(),xppcolor);
      }catch(XmlPullParserException e){
          // TODO: handle exception
          e.printStackTrace();
      }catch(IOException e){
          // TODO: handle exception
          e.printStackTrace();
      }

XmlResourceParser xpplinkcolor=getResources().getXml(R.color.linkcolor);
        try {
            csllink= ColorStateList.createFromXml(getResources(),xpplinkcolor);
        }catch(XmlPullParserException e){
            // TODO: handle exception
            e.printStackTrace();
        }catch(IOException e){
            // TODO: handle exception
            e.printStackTrace();
        }

msp.setSpan(new TextAppearanceSpan("monospace",android.graphics.Typeface.BOLD_ITALIC, 30, ****csl****, **csllink**), 51, 53, Spanned.SPAN_EXCLUSIVE_EXCLUSIVE);

//设置项目符号
//第一个参数表示项目符号占用的宽度,第二个参数为项目符号的颜色
msp.setSpan(new BulletSpan(android.text.style.BulletSpan.STANDARD_GAP_WIDTH,Color.GREEN),0,msp.lenth(), Spanned.SPAN_EXCLUSIVE_EXCLUSIVE);

//设置图片
Drawable drawable = getResources().getDrawable(R.drawable.icon);
drawable.setBounds(0, 0, drawable.getIntrinsicWidth(), drawable.getIntrinsicHeight());
msp.setSpan(new ImageSpan(drawable), 53, 57, Spanned.SPAN_EXCLUSIVE_EXCLUSIVE);

//最后为TextView设置Spannable
mTextView.setText(msp);
mTextView.setMovementMethod(LinkMovementMethod.getInstance());
3.ViewStub的使用
在开发中经常会遇到这样的情况,会在程序运行时动态根据条件来决定显示哪个View或某个布局。那么通常做法就是把用到的View都写在布局中,然后在代码中动态的更改它的可见性。但是它的这样仍然会创建View,会影响性能。
这时就可以用到ViewStub了,ViewStub是一个轻量级的View,不占布局位置,占用资源非常小。
例子:比如我们请求网络加载列表,如果网络异常或者加载失败我们可以显示一个提示View,上面可以点击重新加载。当然一直没有错误时,我们就不显示。
<?xml version="1.0" encoding="utf-8"?>
<merge xmlns:android="http://schemas.android.com/apk/res/android"
    android:layout_width="match_parent"
    android:layout_height="match_parent" >
    ……
    <ViewStub
        android:layout_gravity="center"
        android:id="@+id/hint_view"
        android:layout_width="match_parent"
        android:inflatedId="@+id/hint_view"
        android:layout_height="wrap_content"
        android:layout="@layout/hint_view"/><!--此处加载的时外部的布局-->
    ......
</merge>
hint_view.xml就是这个提示View,可以根据情况自己写。
用法:
private View hintView;

if (网络异常。。。) {
    if (hintView == null) {
        ViewStub viewStub = (ViewStub)this.findViewById(R.id.hint_view);
        hintView = viewStub.inflate();
        TextView textView = (TextView) hintView.findViewById(R.id.tv);
        textView.setText("网络异常!");
    }
    hintView.setVisibility(View.VISIBLE);
}else{
    if (hintView != null) {
        hintView.setVisibility(View.GONE);
    }
}
用法很简单,记得一旦ViewStub可见或是被inflate了,ViewStub就不存在了,取而代之的是被inflate的Layout。所以它也被称做惰性控件。
4. 用LinearLayout自带的分割线
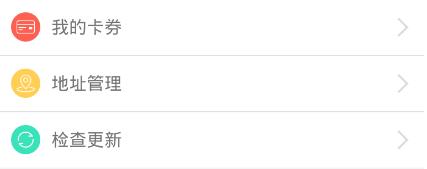
<LinearLayout
    xmlns:android="http://schemas.android.com/apk/res/android"
    android:layout_width="match_parent"
    android:layout_height="match_parent"
    android:orientation="vertical"
    android:divider="@drawable/divider"
    android:showDividers="middle">

    <TextView
        android:drawableLeft="@drawable/icon_1"
        android:drawableRight="@drawable/icon_4"
        android:drawablePadding="10dp"
        android:paddingLeft="10dp"
        android:paddingRight="10dp"
        android:textSize="16sp"
        android:text="我的卡券"
        android:background="@color/white"
        android:gravity="center_vertical"
        android:layout_width="match_parent"
        android:layout_height="50dp" />

    <TextView
        android:drawableLeft="@drawable/icon_2"
        android:drawableRight="@drawable/icon_4"
        android:drawablePadding="10dp"
        android:paddingLeft="10dp"
        android:paddingRight="10dp"
        android:textSize="16sp"
        android:text="地址管理"
        android:background="@color/white"
        android:gravity="center_vertical"
        android:layout_width="match_parent"
        android:layout_height="50dp" />

    <TextView
        android:drawableLeft="@drawable/icon_3"
        android:drawableRight="@drawable/icon_4"
        android:drawablePadding="10dp"
        android:paddingLeft="10dp"
        android:paddingRight="10dp"
        android:textSize="16sp"
        android:text="检查更新"
        android:background="@color/white"
        android:gravity="center_vertical"
        android:layout_width="match_parent"
        android:layout_height="50dp" />

</LinearLayout>
核心部分其实是LinearLayout的这两行:
android:divider="@drawable/divider"
android:showDividers="middle"
divider.xml是分隔线样式:
<?xml version="1.0" encoding="utf-8"?>
<shape xmlns:android="http://schemas.android.com/apk/res/android"
       android:shape="rectangle">

    <size android:width="1dp"
          android:height="1dp"/>

    <solid android:color="#e1e1e1"/>

</shape>
showDividers 是分隔线的显示位置,beginning、middle、end分别代表显示在开始位置,中间,末尾。
还有dividerPadding属性这里没有用到,意思很明确给divider添加padding。感兴趣可以试试
5. Space控件,此处用作条目中间添加间距
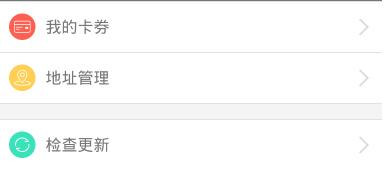
代码的实现:
<?xml version="1.0" encoding="utf-8"?>
<LinearLayout
    xmlns:android="http://schemas.android.com/apk/res/android"
    android:layout_width="match_parent"
    android:layout_height="match_parent"
    android:orientation="vertical"
    android:divider="@drawable/divider"
    android:showDividers="middle|beginning|end">

    <TextView
        android:drawableLeft="@drawable/icon_1"
        android:drawableRight="@drawable/icon_4"
        android:drawablePadding="10dp"
        android:paddingLeft="10dp"
        android:paddingRight="10dp"
        android:textSize="16sp"
        android:text="我的卡券"
        android:background="@color/white"
        android:gravity="center_vertical"
        android:layout_width="match_parent"
        android:layout_height="50dp" />

    <TextView
        android:drawableLeft="@drawable/icon_2"
        android:drawableRight="@drawable/icon_4"
        android:drawablePadding="10dp"
        android:paddingLeft="10dp"
        android:paddingRight="10dp"
        android:textSize="16sp"
        android:text="地址管理"
        android:background="@color/white"
        android:gravity="center_vertical"
        android:layout_width="match_parent"
        android:layout_height="50dp" />

    ****<Space
        android:layout_width="match_parent"
        android:layout_height="15dp"/>****

    <TextView
        android:drawableLeft="@drawable/icon_3"
        android:drawableRight="@drawable/icon_4"
        android:drawablePadding="10dp"
        android:paddingLeft="10dp"
        android:paddingRight="10dp"
        android:textSize="16sp"
        android:text="检查更新"
        android:background="@color/white"
        android:gravity="center_vertical"
        android:layout_width="match_parent"
        android:layout_height="50dp" />

</LinearLayout>


 1323
1323

 被折叠的 条评论
为什么被折叠?
被折叠的 条评论
为什么被折叠?
 到【灌水乐园】发言


