


目录
1|0准备工作
1.Linux系统
2.安装redis(也可以安装docker,然后再docker中装redis,本文章就直接用Linux安装redis做演示)
redis下载地址:http://download.redis.io/releases/redis-4.0.14.tar.gz
2|0修改redis,开启远程访问
找到redis中的redis.conf文件并编辑(在安装路径中找到)
vim ./redis.conf
1、找到bind 127.0.0.1并注释掉
默认127.0.0.1只能本地访问,注释掉即可ip访问
2、修改 protected-mode 属性值为no
注释掉并把保护模式禁用以后可以IP访问
3、修改daemonize属性将no 改为yes
将daemonize设置为yes即启动后台运行
4、开放6379端口
/sbin/iptables -I INPUT -p tcp --dport 6379 -j ACCEPT
默认不对外开放6379
5、启动redis
redis-server /myconf/redis.conf
redis-server默认在/usr/local/bin路径下,redis.conf在redis的安装路径下
6、测试连接
redis-cli -h 192.168.126.129 -p 6379
redis-cli -h redis服务器IP -p 6379 -a 密码(没有设置redis密码不要写空,否则报错)

3|0 Java代码编写
3|1 目录结构
项目源码结构
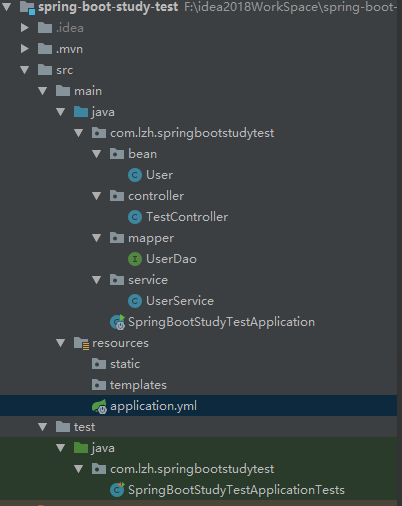
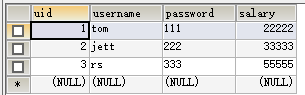
一个user表
3|2 代码
pom.xml文件(可以根据自己的需要来添加或修改)
<dependencies>
        <dependency>
            <groupId>org.springframework.boot</groupId>
            <artifactId>spring-boot-starter-web</artifactId>
        </dependency>

        <!-- mybatis 与 spring boot 2.x的整合包 -->
        <dependency>
            <groupId>org.mybatis.spring.boot</groupId>
            <artifactId>mybatis-spring-boot-starter</artifactId>
            <version>1.3.2</version>
        </dependency>

        <!--mysql JDBC驱动 -->
        <dependency>
            <groupId>mysql</groupId>
            <artifactId>mysql-connector-java</artifactId>
            <version>5.1.39</version>
        </dependency>

        <dependency>
            <groupId>org.springframework.boot</groupId>
            <artifactId>spring-boot-starter-test</artifactId>
            <scope>test</scope>
        </dependency>

        <dependency>
            <groupId>org.springframework.boot</groupId>
            <artifactId>spring-boot-starter-data-redis</artifactId>
        </dependency>

        <dependency>
            <groupId>org.springframework.boot</groupId>
            <artifactId>spring-boot-starter-cache</artifactId>
        </dependency>
    </dependencies>
下面是springboot的配置文件application.yml,配置redis(里面都有注释解释)
| 1 2 3 4 5 6 7 8 9 10 11 12 13 14 15 16 17 18 19 20 21 22 23 24 25 26 27 28 29 30 31 32 33 34 35 36 37 38 39 40 41 42 43 44 45 46 47 48 49 50 51 52 53 54 55 56 |
|
接着是实体类,这个比较简单就不多说了
| 1 2 3 4 5 6 7 8 9 10 11 12 13 14 15 16 17 18 19 20 21 22 23 24 25 26 27 28 29 30 31 32 33 34 35 36 37 38 39 40 41 42 43 44 45 46 47 48 49 50 |
|
这是controller类,用于暴露接口访问
| 1 2 3 4 5 6 7 8 9 10 11 12 13 14 15 16 17 18 19 20 21 22 23 24 25 26 27 28 29 30 31 32 33 34 35 36 37 38 39 40 41 42 43 44 45 46 47 48 49 50 51 52 53 54 55 56 57 58 59 60 61 62 63 64 65 66 67 68 |
|
配置redistemplate序列化
| 1 2 3 4 5 6 7 8 9 10 11 12 13 14 15 16 17 18 19 20 21 22 23 24 25 26 27 28 29 30 31 32 33 34 35 36 37 38 39 40 41 42 43 44 45 46 47 48 49 50 51 52 53 54 55 56 57 58 59 60 61 62 63 64 65 66 67 68 69 70 71 72 73 74 75 76 77 78 79 80 81 82 83 84 85 86 87 88 89 90 91 92 93 94 95 96 97 98 99 100 101 102 103 104 105 106 107 108 109 110 111 112 113 114 115 116 117 118 119 120 121 122 123 124 125 126 127 128 129 130 131 132 133 134 135 136 137 138 |
|
接着是Mapper持久层Dao,这里主要用注解写比较方便,也可以使用mybatis的xml配置文件写sql语句
| 1 2 3 4 5 6 7 8 9 10 11 12 13 14 15 16 17 18 19 20 21 22 23 24 25 26 27 |
|
service层,这里主要是使用redis模板来写
| 1 2 3 4 5 6 7 8 9 10 11 12 13 14 15 16 17 18 19 20 21 22 23 24 25 26 27 28 29 30 31 32 33 34 35 36 37 38 39 40 41 42 43 44 45 46 47 48 49 50 51 52 53 54 55 56 57 58 59 60 61 62 63 64 65 66 67 68 69 70 71 72 73 74 75 76 77 78 79 80 81 82 83 84 85 86 87 88 89 90 91 92 93 94 95 |
|
这里主要是使用RedisTemplate来对远程redis操作,每次访问controller暴露的接口,首先判断redis缓存中是否存在该数据,若不存在就从数据库中读取数据,然后保存到redis缓存中,当下次访问的时候,就直接从缓存中取出来。这样就不用每次都执行sql语句,能够提高访问速度。 但是在保存数据到缓存中,通过设置键和值和超时删除,注意设置超时删除缓存时间不要太长,否则会给服务器带来压力。
执行spring boot的启动类,访问http://localhost:8081/findUserById?id=1

再次访问http://localhost:8081/findUserById?id=1就是从缓存中获取保存的数据


 488
488


 被折叠的 条评论
为什么被折叠?
被折叠的 条评论
为什么被折叠?
 到【灌水乐园】发言


