


1. 创建线程
1.1 Thread类和Runnable接口
1.1.1 继承Thread类
public class ThreadDemo {

    static class ChildThread extends Thread {
        @Override
        public void run() {
            System.out.println("childThread");
        }
    }

    public static void main(String[] args) throws Exception {
        ChildThread childThread = new ChildThread();
        System.out.println("mainThread");
        TimeUnit.SECONDS.sleep(5);
        childThread.start();
    }
}
1.1.2 实现Runnable接口
public class RunnableDemo {

    static class ChildThread implements Runnable{
        @Override
        public void run() {
            System.out.println("childThread");
        }
    }

    public static void main(String[] args) throws Exception {
        ChildThread childThread = new ChildThread();
        Thread thread = new Thread(childThread);
        System.out.println("mainThread");
        TimeUnit.SECONDS.sleep(5);
        thread.start();
    }
}
1.1.3 Thread类与Runnable接口的比较
实现一个自定义的线程类,可以有继承Thread类或者实现Runnable接口这两种方式,它们之间有什么优劣呢?
- 由于Java“单继承,多实现”的特性,Runnable接口使用起来比Thread更灵活。
- Runnable接口出现更符合面向对象,将线程单独进行对象的封装。
- Runnable接口出现,降低了线程对象和线程任务的耦合性。
1.2 Callable、Future与FutureTask
通常来说,我们使用Runnable和Thread来创建一个新的线程。但是它们有一个弊端,就是run方法是没有返回值的。而有时候我们希望开启一个线程去执行一个任务,并且这个任务执行完成后有一个返回值。
JDK提供了Callable接口与Future类为我们解决这个问题。
1.2.1 Callable接口
public class CallDemo {

    public static class Task implements Callable<String> {
        @Override
        public String call() throws Exception {
            System.out.println("call_start");
            // 模拟计算需要10秒
            TimeUnit.SECONDS.sleep(10);
            System.out.println("call_end");
            return "call_result";
        }
    }

    /**
     * 异步执行,等待获取结果get()
     * */
    public static void main(String[] args) throws Exception {
        Task task = new Task();
        ExecutorService executorService = Executors.newSingleThreadExecutor();
        System.out.println("result_start");
        Future<String> result = executorService.submit(task);
        System.out.println("result_end");
        // 阻塞10S获取结果
        System.out.println("result---" + result.get());
        executorService.shutdown();
    }
}
1.2.2 FutureTask类
public class FutureTaskDemo {

    public static class Task implements Callable<Integer> {
        @Override
        public Integer call() throws Exception {
            System.out.println("call_start");
            // 模拟计算需要10秒
            TimeUnit.SECONDS.sleep(10);
            System.out.println("call_end");
            return 8;
        }
    }

    public static void main(String[] args) throws Exception{
        ExecutorService executor = Executors.newCachedThreadPool();
        FutureTask<Integer> futureTask = new FutureTask<>(new Task());
        System.out.println("result-start");
        executor.submit(futureTask);
        System.out.println("result-end");
        // 阻塞10S获取结果
        System.out.println("result-"+futureTask.get());
        executor.shutdown();
    }
}
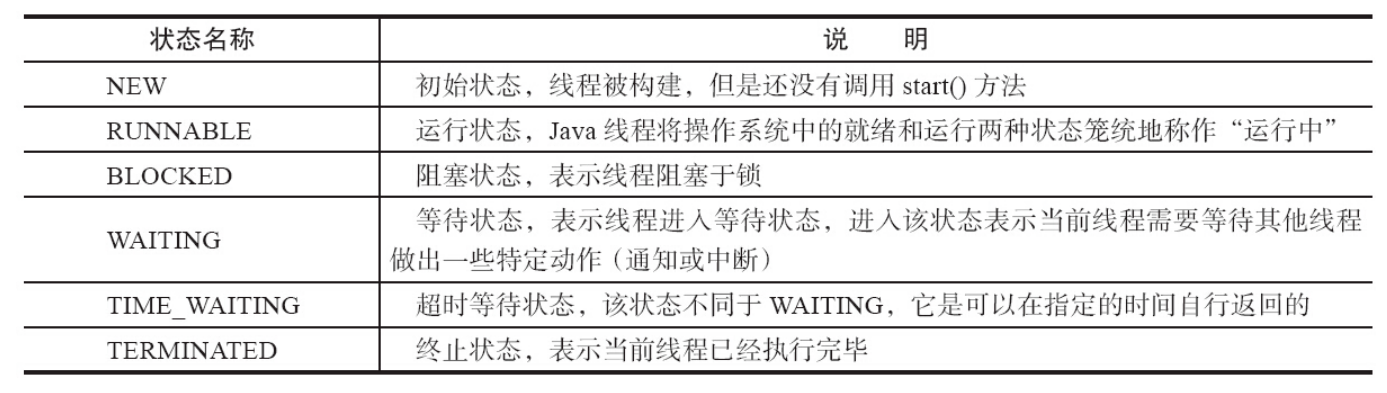
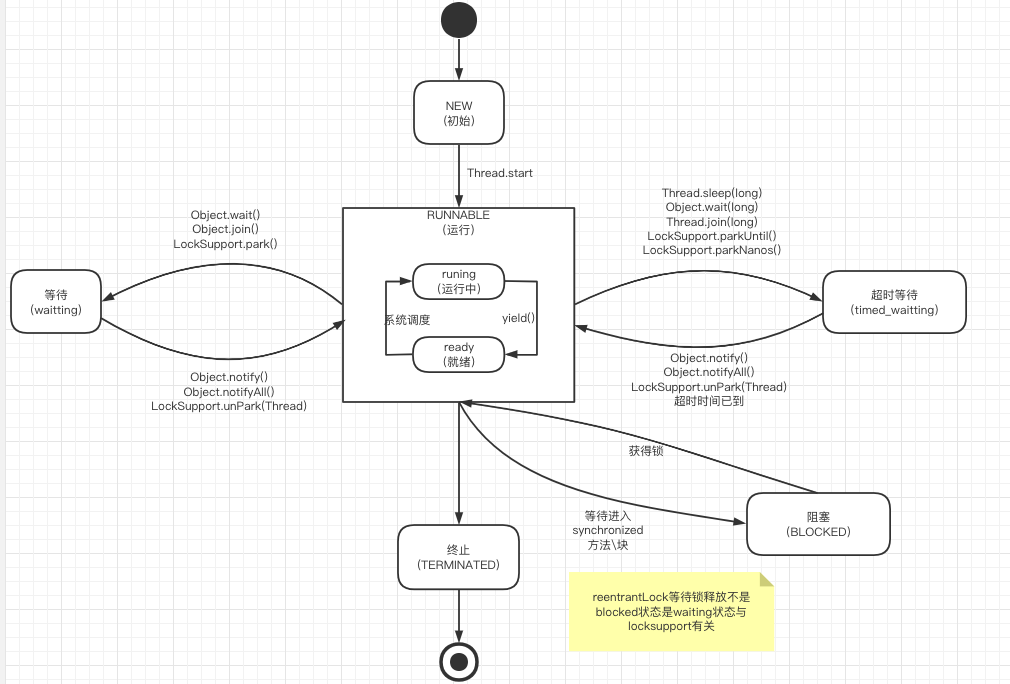
2. 线程的状态
java线程在运行的生命周期中可能处于以下6种的不同状态,在给定的一个时刻,线程只能处于其中的一个状态。
public class ThreadState {

    public static void main(String[] args) {
        Object object = new Object();
        ReentrantLock reentrantLock = new ReentrantLock();
        //waiting状态
        new Thread(new Waitting(), "WaittingThread").start();
        //time_waiting状态
        new Thread(new TimeWaitting(), "TimeWaitting").start();
        //time_waiting状态(获得锁)
        new Thread(new Blocked(object), "Blocked---Waitting").start();
        //blocked状态(无法获得锁)
        new Thread(new Blocked(object), "Blocked---Blocked").start();
        //time_waiting状态(获得锁)
        new Thread(new Lock(reentrantLock), "Lock---Waitting").start();
        //waiting状态,无法获取锁,不是blocked状态而是waiting状态与locksupport有关
        new Thread(new Lock(reentrantLock), "Lock---Blocked").start();
    }


    // WAITTING
    static class Waitting implements Runnable {
        @Override
        public void run() {
            while (true) {
                Object o = new Object();
                synchronized (o) {
                    try {
                        o.wait();
                    } catch (InterruptedException e) {
                        e.printStackTrace();
                    }
                }
            }
        }
    }

    // TIMEWAITTING
    static class TimeWaitting implements Runnable {
        @Override
        public void run() {
            while (true) {
                try {
                    TimeUnit.SECONDS.sleep(10);
                } catch (InterruptedException e) {
                    e.printStackTrace();
                }
            }
        }
    }

    // BLOCKED
    static class Blocked implements Runnable {
        private Object object;

        public Blocked(Object object) {
            this.object = object;
        }

        @Override
        public void run() {
            synchronized (object) {
                while (true) {
                    try {
                        TimeUnit.SECONDS.sleep(10);
                    } catch (InterruptedException e) {
                        e.printStackTrace();
                    }
                }
            }
        }
    }

    // LOCK
    static class Lock implements Runnable {
        private ReentrantLock reentrantLock;

        public Lock(ReentrantLock reentrantLock) {
            this.reentrantLock = reentrantLock;
        }

        @Override
        public void run() {
            reentrantLock.lock();
            while (true) {
                try {
                    TimeUnit.SECONDS.sleep(10);
                } catch (InterruptedException e) {
                    e.printStackTrace();
                }
            }
        }
    }
}
在终端命令使用jps -l 查询出相应pid后使用jstack打印堆栈信息
scarecrow@192 jps -l
8533 org.jetbrains.idea.maven.server.RemoteMavenServer36
8456
10218 sun.tools.jps.Jps
10141 com.scarecrow.gupao.day01.ThreadState
10127 org.jetbrains.kotlin.daemon.KotlinCompileDaemon
scarecrow@192 jstack 10141
线程的生命周期不是固定的处于某个状态,而是随着代码的执行在不同的状态间切换。
3. 线程的启动
线程对象在初始化完成之后调用start()方法就可以启动这个线程,而不是调用run()方法。
4. 线程的终止
线程的终止,并不是简单的调用 stop 命令。虽然 api 仍然可以调用,但是和其他的线程控制方法如 suspend、resume 一样都是过期了的不建议使用,就拿 stop 来说,stop 方法在结束一个线程时并不会保证线程的资源正常释放,因此会导致程序可能出现一些不确定的状态。要优雅的去中断一个线程,在线程中提供了一个 interrupt方法。
当其他线程通过调用当前线程的 interrupt 方法,表示向当前线程打个招呼,告诉他可以中断线程的执行了,至于什么时候中断,取决于当前线程自己。线程通过检查自身是否被中断来进行相应,可以通过isInterrupted()来判断是否被中断。
4.1 isInterrupted()
通过下面的代码来实现线程终止的逻辑。
Thread threadA = new Thread(() -> {
            System.out.println("threadA start time :" + System.currentTimeMillis());
             // thread.isInterrupted()默认为false
             // 当thread.interrupt,会变为true
             while (!Thread.currentThread().isInterrupted()) {

             }
             // thread.isInterrupted()不会进行复位
            System.out.println("threadA recive interrupt flag:" + Thread.currentThread().isInterrupted());
            System.out.println("threadA end time :" + System.currentTimeMillis());
        }, "threadA");

// 启动线程A
threadA.start();
TimeUnit.SECONDS.sleep(3);
// 3s后发送线程中断指令
threadA.interrupt();
这种通过标识位或者中断操作的方式能够使线程在终止时有机会去清理资源,而不是武断地将线程停止,因此这种终止线程的做法显得更加安全和优雅。
4.2 Thread.interrupted
上面的案例中,通过 interrupt,设置了一个标识告诉线程可以终止了 , 线程中还提供了静态方法Thread.interrupted()除了判断是否中断线程,还会对设置中断标识的线程复位。
Thread threadB = new Thread(() -> {
            System.out.println("threadB start time :" + System.currentTimeMillis());
            // 获得中断信号Thread.interrupted()为True
            while (!Thread.interrupted()) {

            }
            System.out.println("threadA end time :" + System.currentTimeMillis());
            // Thread.interrupted()对线程进行复位,变为FALSE
            System.out.println("threadB recive interrupt flag1:" + Thread.interrupted());
            // Thread.interrupted()对线程进行复位,变为FALSE
            System.out.println("threadB recive interrupt flag2:" + Thread.currentThread().isInterrupted());
        }, "threadB");

threadB.start();
TimeUnit.SECONDS.sleep(3);
// 3s后发送线程中断指令
threadB.interrupt();
4.3 InterruptedException 线程中断标识复位
除了通过 Thread.interrupted 方法对线程中断标识进行复位以外 ,还 有一 种被动复位的场景 ,就是对抛出InterruptedException异常的方法在InterruptedException 抛出之前,JVM 会先把线程的中断标识位清除,然后才会抛出 InterruptedException,这个时候如果调用 isInterrupted 方法,将会返回 false。
Thread threadC = new Thread(() -> {
            while (!Thread.currentThread().isInterrupted()) {
                try {
                    // 睡眠时被中断,抛出InterruptedException
                    TimeUnit.SECONDS.sleep(300);
                }
                catch (InterruptedException e) {
                    //在InterruptedException 抛出之前,JVM会先把线程的中断标识位清除。
                    //然后才会抛出 InterruptedException,这个时候如果调用 isInterrupted 方法,将会返回 false
                    System.out.println("threadC recive interrupt flag2:" + Thread.currentThread().isInterrupted());
                    e.printStackTrace();
                    break;
                }
            }
        }, "threadC");

threadC.start();
TimeUnit.SECONDS.sleep(3);
// 3s后发送线程中断指令
threadC.interrupt();
4.4 为什么抛出InterruptedException
为什么 Object.wait、Thread.sleep 和 Thread.join都会抛出InterruptedException?
你会发现这几个方法有一个共同点,都是属于阻塞的方法而阻塞方法的释放会取决于一些外部的事件,但是阻塞方法可能因为等不到外部的触发事件而导致无法终止,所以它允许一个线程请求自己来停止它正在做的事情。当一个方法抛出 InterruptedException 时,它是在告诉调用者如果执行该方法的线程被中断,它会尝试停止正在做的事情并且通过抛出 InterruptedException 表示提前返回。所以,这个异常的意思是表示一个阻塞被其他线程中断了。然后 ,由于线程调用interrupt() 中断方法 , 那么Object.wait、Thread.sleep 等被阻塞的线程被唤醒以后会通过 is_interrupted 方法判断中断标识的状态变化,如果发现中断标识为 true,则先清除中断标识,然后抛出InterruptedException。
需要注意的是,InterruptedException 异常的抛出并不意味着线程必须终止,而是提醒当前线程有中断的操作发生,至于接下来怎么处理取决于线程本身。
4.5 interrupt中断原理
简单分析中断的底层代码实现,需要下载hotspot代码。
查看interrupt()方法代码
public void interrupt() {
        if (this != Thread.currentThread())
            checkAccess();

        synchronized (blockerLock) {
            Interruptible b = blocker;
            if (b != null) {
                interrupt0();           // Just to set the interrupt flag
                b.interrupt(this);
                return;
            }
        }
        // 本地方法C语言实现
        interrupt0();
}
interrupt0()本地方法的定义在文件Thread.c.。Thread.c 定义了各个操作系统平台要用的关于线程的公共数据和操作,以下是 Thread.c 的全部内容
http://hg.openjdk.java.net/jdk8/jdk8/jdk/file/00cd9dc3c2b5/src/share/native/java/lang/Thread.c
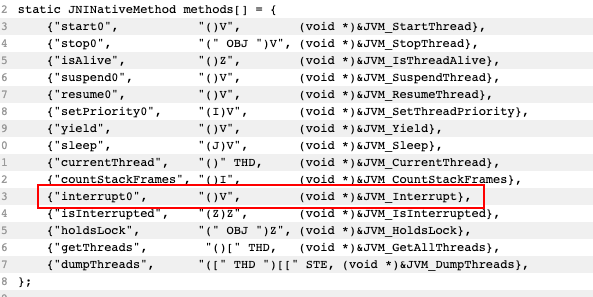
我们找到 jvm.cpp 文件,找到JVM_Interrupt 的定义
JVM_ENTRY(void, JVM_Interrupt(JNIEnv* env, jobject jthread))
  JVMWrapper("JVM_Interrupt");

  // Ensure that the C++ Thread and OSThread structures aren't freed before we operate
  oop java_thread = JNIHandles::resolve_non_null(jthread);
  MutexLockerEx ml(thread->threadObj() == java_thread ? NULL : Threads_lock);
  // We need to re-resolve the java_thread, since a GC might have happened during the
  // acquire of the lock
  JavaThread* thr = java_lang_Thread::thread(JNIHandles::resolve_non_null(jthread));
  if (thr != NULL) {
    // 调用thread.cpp(Thread::interrupt)方法
    Thread::interrupt(thr);
  }
JVM_END
这个方法比较简单,直接调用了Thread::interrupt(thr)这个方法,这个方法的定义在 Thread.cpp 文件中,代码如下
void Thread::interrupt(Thread* thread) {
  trace("interrupt", thread);
  debug_only(check_for_dangling_thread_pointer(thread);)
  // 调用平台的 interrupt方法(以os_linux.cpp为例)
  os::interrupt(thread);
}
Thread::interrupt方法调用了 os::interrupt 方法,这个是调用平台的 interrupt 方法,这个方法的实现是在 os_*.cpp文件中,其中星号代表的是不同平台,因为 jvm 是跨平台的,所以对于不同的操作平台,线程的调度方式都是不一样的。我们以 os_linux.cpp 文件为例
void os::interrupt(Thread* thread) {
  assert(Thread::current() == thread || Threads_lock->owned_by_self(),
    "possibility of dangling Thread pointer");

  OSThread* osthread = thread->osthread();

  // 先判断线程中断标识位interrupted()(osThread.hpp)
  // 判断_interrupted不为1,中断标识位不为true
  if (!osthread->interrupted()) {
    // 设置线程中断标识位为true
    osthread->set_interrupted(true);
    // More than one thread can get here with the same value of osthread,
    // resulting in multiple notifications.  We do, however, want the store
    // to interrupted() to be visible to other threads before we execute unpark().
    OrderAccess::fence();
    ParkEvent * const slp = thread->_SleepEvent ;
    if (slp != NULL) slp->unpark() ;
  }

  // For JSR166. Unpark even if interrupt status already was set
  if (thread->is_Java_thread())
    ((JavaThread*)thread)->parker()->unpark();

  ParkEvent * ev = thread->_ParkEvent ;
  if (ev != NULL) ev->unpark() ;

}
osthread->interrupted()及set_interrupted(true)代码在osThread.hpp文件中
// 定义中断成员属性 0为false,1为true
volatile jint _interrupted;

// 判断是否中断
volatile bool interrupted() const                 { return _interrupted != 0; }

// 设置中断标志
void set_interrupted(bool z)                      { _interrupted = z ? 1 : 0; }
前面讲到Thread.sleep()睡眠时,遇到interrupt()时会清除中断标识及抛出异常,我们从代码层面进行简单分析
public static native void sleep(long millis) throws InterruptedException;
Thread.sleep()为本地方法
JVM_ENTRY(void, JVM_Sleep(JNIEnv* env, jclass threadClass, jlong millis))
  JVMWrapper("JVM_Sleep");

  if (millis < 0) {
    THROW_MSG(vmSymbols::java_lang_IllegalArgumentException(), "timeout value is negative");
  }
  // 设置中断标识位为true清除中断标识。
  // 如果中断标识位为true,抛出中断异常。
  if (Thread::is_interrupted (THREAD, true) && !HAS_PENDING_EXCEPTION) {
    THROW_MSG(vmSymbols::java_lang_InterruptedException(), "sleep interrupted");
  }
Thread::is_interrupted设置清除中断标识为true,在Thread.cpp文件中
bool Thread::is_interrupted(Thread* thread, bool clear_interrupted) {
  trace("is_interrupted", thread);
  debug_only(check_for_dangling_thread_pointer(thread);)
  // Note:  If clear_interrupted==false, this simply fetches and
  // returns the value of the field osthread()->interrupted().
  return os::is_interrupted(thread, clear_interrupted);
}
os::is_interrupted(thread, clear_interrupted)以os_linux.cpp为例
bool os::is_interrupted(Thread* thread, bool clear_interrupted) {
  assert(Thread::current() == thread || Threads_lock->owned_by_self(),
    "possibility of dangling Thread pointer");

  OSThread* osthread = thread->osthread();

  // 获取当前线程中断标识位
  bool interrupted = osthread->interrupted();
  // 当前线程中断标识位为true且需要清除中断标识位
  if (interrupted && clear_interrupted) {
    // 设置中断标识位为false
    osthread->set_interrupted(false);
    // consider thread->_SleepEvent->reset() ... optional optimization
  }

  return interrupted;
}
5. Daemon线程
Daemon线程是一种支持性线程,主要被用作于后台调度,当java虚拟机中不存在非Daemon线程的时候,java虚拟机会退出,所有Daemon线程会立即终止。
public class DaemonDemo {

    static class DaemonRunner implements Runnable {
        @Override
        public void run() {
            try {
                System.out.println("DaemonThread start run.");
                TimeUnit.SECONDS.sleep(10);
                // 主线程1s后终止,此时没有非Daemon线程,Daemon线程也会立即终止,此行输出不会打印
                System.out.println("DaemonThread end run.");
            } catch (InterruptedException e) {
                e.printStackTrace();
            }
        }
    }

    public static void main(String[] args) throws Exception {
        Thread thread = new Thread(new DaemonRunner(),"daemon_thread");
        // 设置线程daemon_thread为Daemon
        thread.setDaemon(true);
        thread.start();
        TimeUnit.SECONDS.sleep(1);
    }
}
6. 过期的suspend()、resume()、stop()
suspend()暂停线程,resume()恢复线程、stop()终止当前线程。这些API已经废弃不建议使用。
suspend()方法调用后线程不会释放已经占有的锁,而是占着资源进入睡眠状态容易引发死锁问题。
stop()方法终止线程时不会保证线程的资源正常释放,因此会导致程序工作在不确定的状态。
7. Thread.join()
如果一个线程A执行了thread.join()含义是:当前线程A等待thread线程终止之后才从thread.join返回。
在实际使用过程中,我们可以通过join方法来等待线程执行的结果,其实有点类似future/callable的功能。
代码示例如下:Main线程等到Child线程执行结束后,Main线程从join()方法返回后继续执行。
public class JoinDemo {

    static class ChildThread implements Runnable {
        @Override
        public void run() {
            System.out.println("Child Thread Start");
            try {
                TimeUnit.SECONDS.sleep(5);
            } catch (InterruptedException e) {
                e.printStackTrace();
            }
            System.out.println("Child Thread End");
        }
    }

    public static void main(String[] args) throws InterruptedException {
        System.out.println("Main Thread Start");
        Thread childThread = new Thread(new ChildThread(), "childThread");
        TimeUnit.SECONDS.sleep(1);
        childThread.start();
        childThread.join();
        System.out.println("Main Thread End");
    }
}
查看join()方法实现代码分析其原理
public final synchronized void join(long millis) throws InterruptedException {
        long base = System.currentTimeMillis();
        long now = 0;

        if (millis < 0) {
            throw new IllegalArgumentException("timeout value is negative");
        }

        if (millis == 0) {
            while (isAlive()) {
                wait(0);
            }
        } else {
            while (isAlive()) {
                long delay = millis - now;
                if (delay <= 0) {
                    break;
                }
                wait(delay);
                now = System.currentTimeMillis() - base;
            }
        }
}
代码中我们注意synchronized与wait关键字
调用链:mianthread.main() -> childThread.join() -> childThread.join(0) -> childThread.wait(0)(此时 Min线程会获得 childThread 实例作为锁)。
如果 childThread 线程是 Active,则调用 childThread.wait(0) 此时mianthread进入等待状态 等待childThread被notify()。
那什么时候被唤醒呢?
要了解这个问题,我们又得翻jdk的源码,但是如果大家对线程有一定的基本了解的话,通过wait方法阻塞的线程,需要通过notify或者notifyall来唤醒。所以在线程执行完毕以后会有一个唤醒的操作,只是我们不需要关心。接下来在hotspot的源码中找到 thread.cpp,看看线程退出以后有没有做相关的事情来证明我们的猜想.
void JavaThread::exit(bool destroy_vm, ExitType exit_type) {
  assert(this == JavaThread::current(),  "thread consistency check");
  ...
  // Notify waiters on thread object. This has to be done after exit() is called
  // on the thread (if the thread is the last thread in a daemon ThreadGroup the
  // group should have the destroyed bit set before waiters are notified).
  ensure_join(this);
  assert(!this->has_pending_exception(), "ensure_join should have cleared");
  ...
观察一下 ensure_join(this)这行代码上的注释,唤醒处于等待的线程对象,这个是在线程终止之后做的清理工作,这个方法的定义代码片段如下
static void ensure_join(JavaThread* thread) {
  // We do not need to grap the Threads_lock, since we are operating on ourself.
  Handle threadObj(thread, thread->threadObj());
  assert(threadObj.not_null(), "java thread object must exist");
  ObjectLocker lock(threadObj, thread);
  // Ignore pending exception (ThreadDeath), since we are exiting anyway
  thread->clear_pending_exception();
  // Thread is exiting. So set thread_status field in  java.lang.Thread class to TERMINATED.
  java_lang_Thread::set_thread_status(threadObj(), java_lang_Thread::TERMINATED);
  // Clear the native thread instance - this makes isAlive return false and allows the join()
  // to complete once we've done the notify_all below
  //这里是清除native线程,这个操作会导致isAlive()方法返回false
  java_lang_Thread::set_thread(threadObj(), NULL);
  //注意这里,唤醒所有等待thread锁的线程
  lock.notify_all(thread);
  // Ignore pending exception (ThreadDeath), since we are exiting anyway
  thread->clear_pending_exception();
}
ensure_join方法中,调用 lock.notify_all(thread); 唤醒所有等待thread锁的线程,意味着调用了join方法被阻塞的主线程会被唤醒; 到目前为止,我们基本上对join的原理做了一个比较详细的分析。


 7717
7717


 被折叠的 条评论
为什么被折叠?
被折叠的 条评论
为什么被折叠?
 到【灌水乐园】发言


