


多数据源,读写分离,分库分表,基本上已经是现在任何一个项目的基本配置了,在之前的文章
Spring多数据源实现![]() https://blog.csdn.net/wangerrong/article/details/131910740 里讲了多数据源的实现,其实已经包含了读写分离(master和slave分别配置主库和只读库就好了),现在就记录下分库分表的实现过程。
https://blog.csdn.net/wangerrong/article/details/131910740 里讲了多数据源的实现,其实已经包含了读写分离(master和slave分别配置主库和只读库就好了),现在就记录下分库分表的实现过程。
1,引入jdbc, mybatis, shardingsphere等依赖
<dependency>
<groupId>org.springframework.boot</groupId>
<artifactId>spring-boot-starter-jdbc</artifactId>
<version>2.4.2</version>
</dependency>
<dependency>
<groupId>mysql</groupId>
<artifactId>mysql-connector-java</artifactId>
<version>8.0.30</version>
</dependency>
<dependency>
<groupId>com.baomidou</groupId>
<artifactId>mybatis-plus-boot-starter</artifactId>
<version>8.0.30</version>
</dependency>
<!-- jpa持久化工具 -->
<dependency>
<groupId>org.springframework.boot</groupId>
<artifactId>spring-boot-starter-data-jpa</artifactId>
<version>2.7.6</version>
</dependency>
<!-- 必须引入的包 ShardingSphere -->
<dependency>
<groupId>org.apache.shardingsphere</groupId>
<artifactId>shardingsphere-jdbc-core-spring-boot-starter</artifactId>
<version>5.2.0</version>
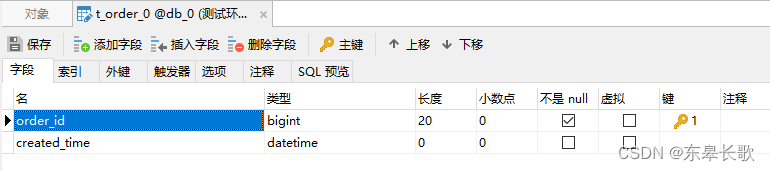
</dependency>2,建立数据库和数据表

3,添加分库分表配置到bootsrap.yml
server:
  port: 9102
# NaCos
spring:
  application:
    name: deviceservice
  shardingsphere:
    # 数据源配置
    datasource:
      # 数据源名称,多数据源以逗号分隔
      names: db0,db1
      db0:
        type: com.zaxxer.hikari.HikariDataSource
        driver-class-name: com.mysql.cj.jdbc.Driver
        jdbc-url: jdbc:mysql://xxxx:3306/db_0?useUnicode=true&characterEncoding=utf-8&useSSL=false&serverTimezone=Asia/Shanghai&allowPublicKeyRetrieval=true
        username: root
        password: xxxxxxxxx
      db1:
        type: com.zaxxer.hikari.HikariDataSource
        driver-class-name: com.mysql.cj.jdbc.Driver
        jdbc-url: jdbc:mysql://yyyy:3306/db_1?useUnicode=true&characterEncoding=utf-8&useSSL=false&serverTimezone=Asia/Shanghai&allowPublicKeyRetrieval=true
        username: root
        password: yyyyyyyyy
    # 分片规则配置
    rules:
      sharding:
        # 分片算法配置
        sharding-algorithms:
          database-inline:
            # 分片算法类型
            type: INLINE
            props:
              # 分片算法的行表达式(算法自行定义,此处为方便演示效果)
              algorithm-expression: db$->{order_id%10 > 4?1:0}
              # 关键,查询时是否在所有分库分表中查询
              allow-range-query-with-inline-sharding: true
          table-inline:
            # 分片算法类型
            type: INLINE
            props:
              # 分片算法的行表达式
              algorithm-expression: t_order_$->{order_id % 3}
              # 关键,查询时是否在所有分库分表中查询
              allow-range-query-with-inline-sharding: true
        tables:
          # 逻辑表名称
          t_order:
            # 行表达式标识符可以使用 ${...} 或 $->{...},但前者与 Spring 本身的属性文件占位符冲突,因此在 Spring 环境中使用行表达式标识符建议使用 $->{...}
            actual-data-nodes: db${0..1}.t_order_${0..2}
            # 分库策略
            database-strategy:
              standard:
                # 分片列名称
                sharding-column: order_id
                # 分片算法名称
                sharding-algorithm-name: database-inline
            # 分表策略
            table-strategy:
              standard:
                # 分片列名称
                sharding-column: order_id
                # 分片算法名称
                sharding-algorithm-name: table-inline
    # 属性配置
    props:
      # 展示修改以后的sql语句
      sql-show: true
  profiles:
    active: dev
---
spring:
  config:
    activate:
      on-profile: dev
    import: optional:config\application-dev.yml
4, 实体类和mapper
import com.baomidou.mybatisplus.annotation.TableName;
import lombok.Data;

@Data
@TableName("t_order")
public class Order {
    private long orderId;
    private String createdTime;
}
import com.baomidou.mybatisplus.annotation.TableName;
import lombok.Data;

@Data
@TableName("t_device")
public class Device {
    private long deviceId;
    private String name;
    private String createdTime;
}
import com.baomidou.mybatisplus.core.mapper.BaseMapper;
import com.xxx.domain.Order;
import org.apache.ibatis.annotations.Mapper;
import org.springframework.stereotype.Repository;

@Mapper
@Repository
public interface OrderMapper extends BaseMapper<Order> {

}
import com.baomidou.mybatisplus.core.mapper.BaseMapper;
import com.xxx.domain.Device;
import org.apache.ibatis.annotations.Mapper;
import org.springframework.stereotype.Repository;
@Mapper
@Repository
public interface DeviceMapper extends BaseMapper<Device> {
}
import com.xxx.domain.Order;
import org.springframework.stereotype.Service;

import java.util.List;

@Service
public interface OrderService {
    public void saveOrder(Order order);

    public List<Order> list();

    public void delete(long orderId);

    public void update(long orderId);
}
import com.xxx.domain.Device;
import org.springframework.stereotype.Service;

@Service
public interface DeviceService {
    public void saveDevice(Device device);
}
import com.baomidou.mybatisplus.core.conditions.query.QueryWrapper;
import com.xxx.domain.Order;
import com.xxx.mapper.OrderMapper;
import com.xxx.service.OrderService;
import org.springframework.beans.factory.annotation.Autowired;
import org.springframework.stereotype.Service;

import java.util.List;

@Service
public class OrderServiceImpl implements OrderService {
    @Autowired
    private OrderMapper orderMapper;

    @Override
    public void saveOrder(Order order) {
        orderMapper.insert(order);
    }

    @Override
    public void delete(long orderId) {
        QueryWrapper qw = new QueryWrapper<Order>();
        qw.eq("order_id",orderId);
        orderMapper.delete(qw);
    }

    @Override
    public void update(long orderId) {
        Order order = new Order();
        order.setOrderId(orderId);
        order.setCreatedTime("2200-07-26 00:00:01");

        QueryWrapper qw = new QueryWrapper<Order>();
        qw.eq("order_id",orderId);
        orderMapper.update(order,qw);
    }


    @Override
    public List<Order> list() {
        QueryWrapper qw = new QueryWrapper<Order>();
        qw.ge("order_id",0);
        qw.orderByAsc("order_id");
        return orderMapper.selectList(qw);
    }
}
import com.xxx.domain.Device;
import com.xxx.mapper.DeviceMapper;
import com.xxx.service.DeviceService;
import org.springframework.beans.factory.annotation.Autowired;
import org.springframework.stereotype.Service;
@Service
public class DeviceServiceImpl implements DeviceService {
@Autowired
private DeviceMapper deviceMapper;
@Override
public void saveDevice(Device device) {
deviceMapper.insert(device);
}
}
import com.xxx.common.UserContext;
import com.xxx.domain.Device;
import com.xxx.domain.Order;
import com.xxx.service.DeviceService;
import com.xxx.service.OrderService;
import lombok.extern.slf4j.Slf4j;
import org.springframework.beans.factory.annotation.Autowired;
import org.springframework.beans.factory.annotation.Value;
import org.springframework.cloud.context.config.annotation.RefreshScope;
import org.springframework.web.bind.annotation.*;

import java.text.DateFormat;
import java.text.SimpleDateFormat;
import java.util.ArrayList;
import java.util.Date;
import java.util.List;

@RestController
@RefreshScope
@Slf4j
@RequestMapping("/device")
public class DeviceController extends AbstractController{
    @Autowired
    private OrderService orderService;
    @Autowired
    private DeviceService devieService;

    @GetMapping("/save")
    public String save(@RequestParam("orderId") int orderId){
        Order order = new Order();
        order.setOrderId(orderId);
        DateFormat sdf = new SimpleDateFormat("yyyy-MM-dd hh:mm:ss");
        String dateStr = sdf.format(new Date());
        order.setCreatedTime(dateStr);
        orderService.saveOrder(order);

        Device device = new Device();
        device.setDeviceId(orderId);
        device.setName(orderId+"_"+dateStr);
        device.setCreatedTime(dateStr);
        devieService.saveDevice(device);

        return "success";
    }

    @GetMapping("/delete")
    public String delete(@RequestParam("orderId") long orderId) {
        orderService.delete(orderId);
        return "success";
    }

    @GetMapping("/update")
    public String update(@RequestParam("orderId") int orderId) {
        orderService.update(orderId);
        return "success";
    }

    @GetMapping("/list")
    public List<Order> list() {
        return orderService.list();
    }
}
上面代码是一个简单的验证:
1, 通过对做了分库分表配置的t_order表的增删改查,验证分库分表后的增删改查是否生效,验证通过。
2,验证对没做分库分表配置的t_device表的增加,验证正常数据库操作(默认走spring.shardingsphere.datasource.names: db0,db1配置里的第一个数据库)是否生效,验证通过。
5,总结
Springboot + shardingsphere 实现分库分表的需求,比较简单,但是要想真正地投入实用,还有很多路要走,比如实现自定义分库分表规则的算法,自定义分布式表的主键ID,基于分库分表后的排序(默认已实现按分库分表的列进行排序)和分页等等等。
码字不易,记得点赞关注哟!


 3232
3232


 被折叠的 条评论
为什么被折叠?
被折叠的 条评论
为什么被折叠?
 到【灌水乐园】发言


