


起源
由于我们公司的app,支持多国语言,所以就导致了 同样的文案,但是长度不同,就会出现适配的问题,因为 中文 是 字表义,外文是 音表义。 今天就用8.0新特新来解决这个问题。
适配前是这样的
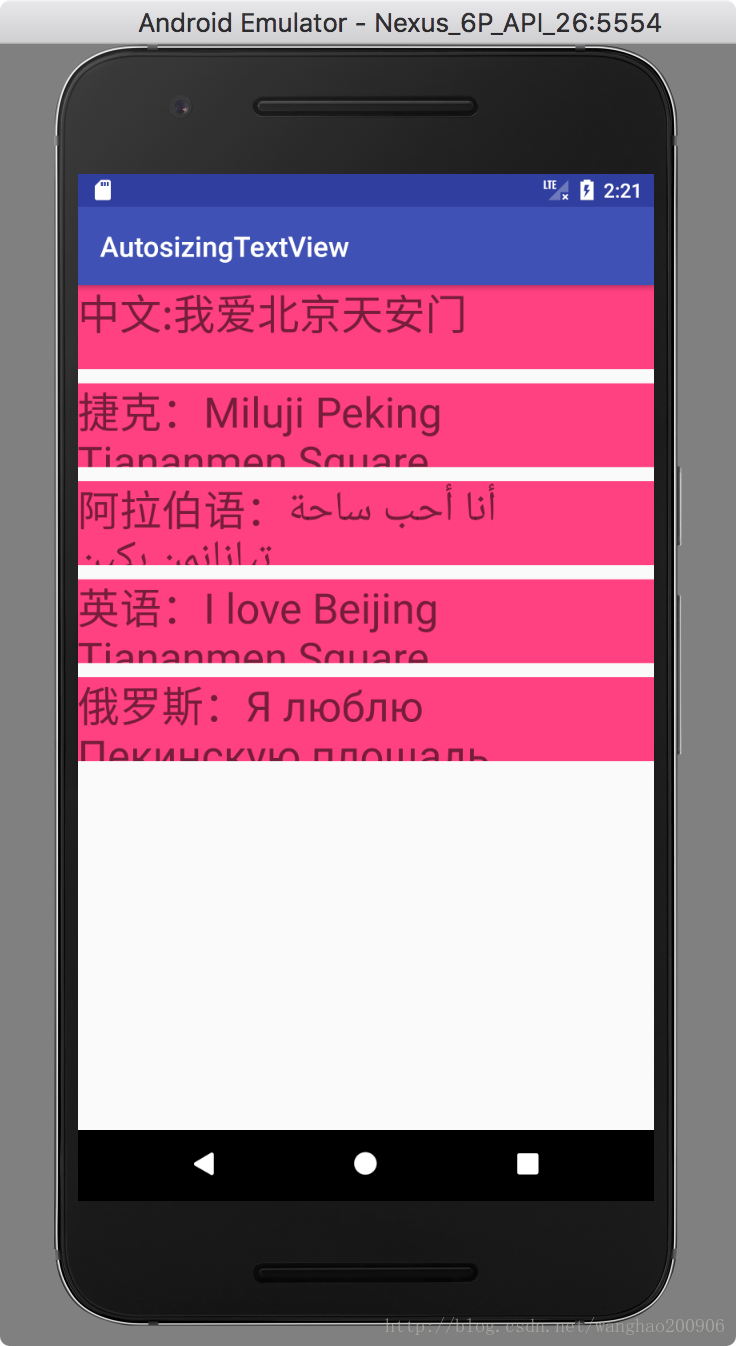
在固定的宽高就会出现适配的问题,在之前博客中也写过解决方案
多语言适配,让text自动改变大小
但现在谷歌已经完全解决了该问题,我们就直接用谷歌的了。
适配方法
只支持最低版本是26的方法
    android:autoSizeTextType="uniform" 设置字体类型
    android:autoSizeMinTextSize="12sp"  设置最大值
    android:autoSizeMaxTextSize="100sp"  设置最小值
    android:autoSizeStepGranularity="2sp"  设置颗粒度
    android:autoSizePresetSizes="@array/autosize_text_sizes" 预设字体的大小
但是现在基本最低版本都是14。 v4包提供了一些方法解决此问题,一共有三个方法
public static void setAutoSizeTextTypeWithDefaults(
           TextView textView,
           int autoSizeTextType) 设置字体类型


public static void setAutoSizeTextTypeUniformWithConfiguration(
            TextView textView,
            int autoSizeMinTextSize,
            int autoSizeMaxTextSize,
            int autoSizeStepGranularity, 设置颗粒度 字体变大变小的幅度,默认是1
            int unit)

public static void setAutoSizeTextTypeUniformWithPresetSizes(
            TextView textView,
            @NonNull int[] presetSizes,  设置字体预设值,字体的变化只会在预设的几个值内变化
            int unit)
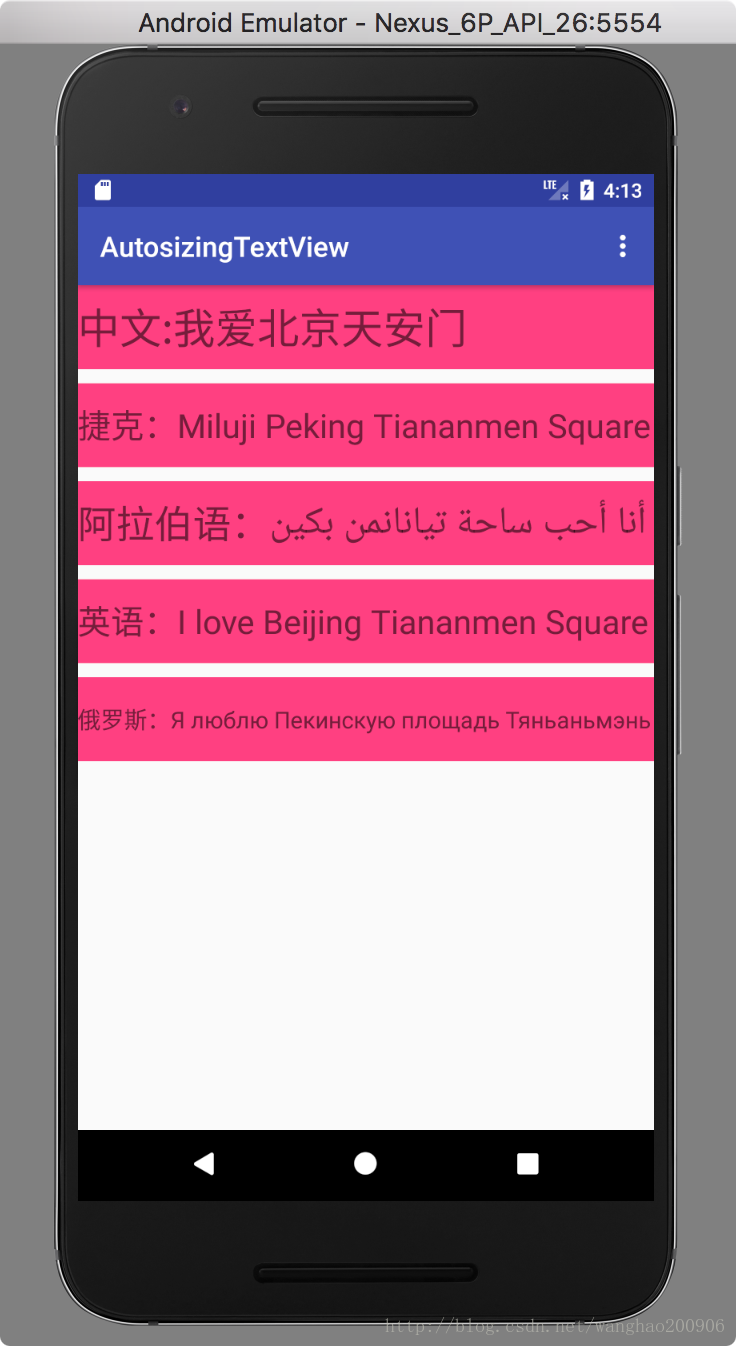
适配后
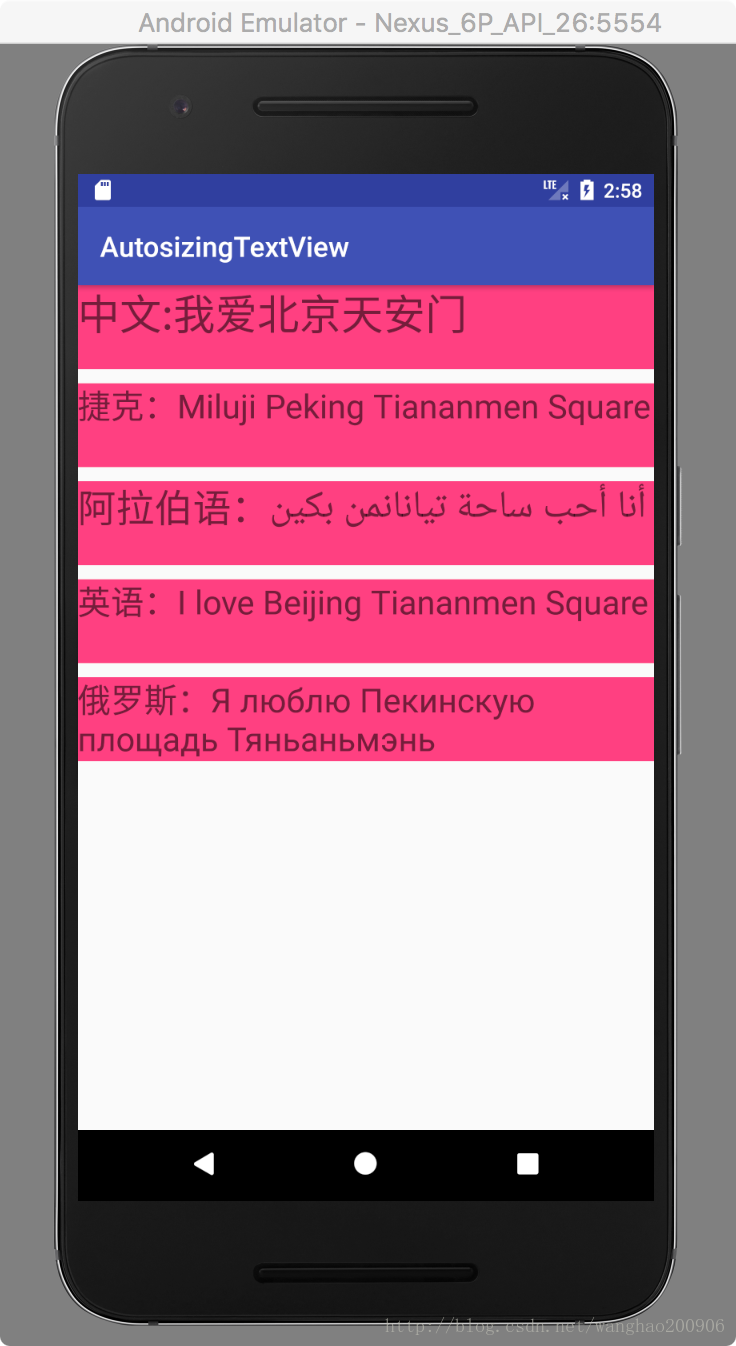
如果只想显示一行代码
代码
/**
* Created by wanghao on 2017/11/13.
*/
public class MultiLanguageTextViewActivity extends AppCompatActivity {
TextView tv_content_cs;
TextView tv_content_us;
TextView tv_content_fa;
TextView tv_content_ru;
LinearLayout ll_content;
@Override
protected void onCreate(Bundle savedInstanceState) {
super.onCreate(savedInstanceState);
setContentView(R.layout.multi_language);
tv_content_cs = findViewById(R.id.tv_content_cs);
tv_content_us = findViewById(R.id.tv_content_us);
tv_content_fa = findViewById(R.id.tv_content_fa);
tv_content_ru = findViewById(R.id.tv_content_ru);
ll_content = findViewById(R.id.ll_content);
}
@Override
public boolean onCreateOptionsMenu(Menu menu) {
getMenuInflater().inflate(R.menu.menu, menu);
return true;
}
@Override
public boolean onOptionsItemSelected(MenuItem item) {
int id = item.getItemId();
//noinspection SimplifiableIfStatement
switch (id) {
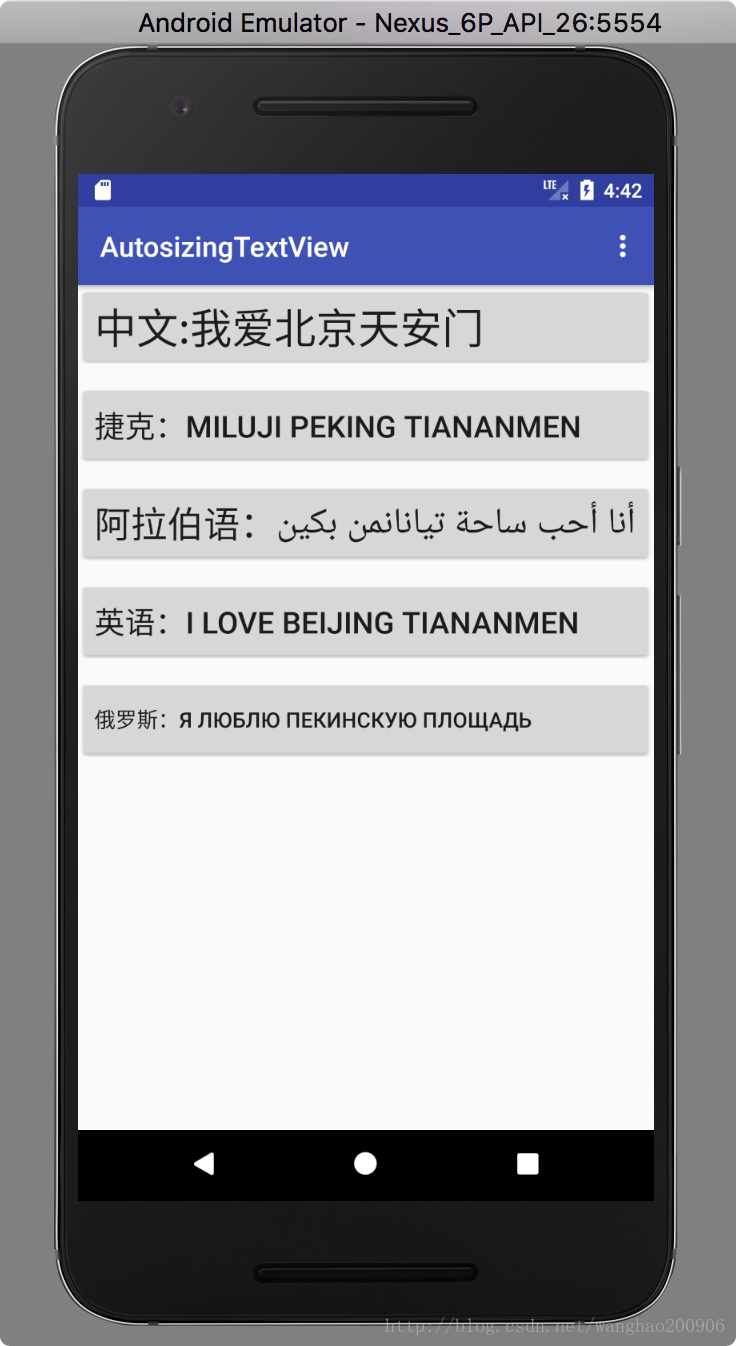
case R.id.action_none:
AutoSizingAdapter(TextViewCompat.AUTO_SIZE_TEXT_TYPE_NONE);
break;
case R.id.action_uniform:
setLine(2);
AutoSizingAdapter(TextViewCompat.AUTO_SIZE_TEXT_TYPE_UNIFORM);
break;
case R.id.action_singleLine:
setLine(1);
AutoSizingAdapter(TextViewCompat.AUTO_SIZE_TEXT_TYPE_UNIFORM);
break;
}
return super.onOptionsItemSelected(item);
}
public void setLine(int lineNum) {
tv_content_cs.setLines(lineNum);
tv_content_us.setLines(lineNum);
tv_content_fa.setLines(lineNum);
tv_content_ru.setLines(lineNum);
}
public void AutoSizingAdapter(int type) {
TextViewCompat.setAutoSizeTextTypeWithDefaults(tv_content_cs, type);
TextViewCompat.setAutoSizeTextTypeWithDefaults(tv_content_us, type);
TextViewCompat.setAutoSizeTextTypeWithDefaults(tv_content_fa, type);
TextViewCompat.setAutoSizeTextTypeWithDefaults(tv_content_ru, type);
}
}
xml
<?xml version="1.0" encoding="utf-8"?>
<ScrollView xmlns:android="http://schemas.android.com/apk/res/android"
    android:layout_width="match_parent"
    android:layout_height="match_parent">

    <LinearLayout
        android:id="@+id/ll_content"
        android:layout_width="match_parent"
        android:layout_height="match_parent"
        android:orientation="vertical">

        <Button
            android:id="@+id/tv_content_cn"
            android:layout_width="match_parent"
            android:layout_height="60dp"
            android:layout_toRightOf="@id/tv_country"
            android:gravity="center_vertical"
            android:text="中文:我爱北京天安门"
            android:textSize="30sp" />

        <Button
            android:id="@+id/tv_content_cs"

            android:layout_width="match_parent"
            android:layout_height="60dp"
            android:layout_marginTop="10dp"
            android:layout_toRightOf="@id/tv_country"
            android:gravity="center_vertical"
            android:text="捷克:Miluji Peking Tiananmen Square"
            android:textSize="30sp" />

        <Button
            android:id="@+id/tv_content_fa"
            android:layout_width="match_parent"
            android:layout_height="60dp"
            android:layout_marginTop="10dp"
            android:layout_toRightOf="@id/tv_country"
            android:gravity="center_vertical"
            android:text="阿拉伯语:أنا أحب ساحة تيانانمن بكين"
            android:textSize="30sp" />

        <Button
            android:id="@+id/tv_content_us"
            android:layout_width="match_parent"
            android:layout_height="60dp"
            android:layout_marginTop="10dp"
            android:layout_toRightOf="@id/tv_country"
            android:gravity="center_vertical"
            android:text="英语:I love Beijing Tiananmen Square"
            android:textSize="30sp" />

        <Button
            android:id="@+id/tv_content_ru"
            android:layout_width="match_parent"
            android:layout_height="60dp"
            android:layout_marginTop="10dp"
            android:layout_toRightOf="@id/tv_country"
            android:gravity="center_vertical"
            android:text="俄罗斯:Я люблю Пекинскую площадь Тяньаньмэнь"
            android:textSize="30sp" />

    </LinearLayout>
</ScrollView>
Button上的样式 一样通用
美滋滋。
到这里只用到了一个方法就是
public static void setAutoSizeTextTypeWithDefaults(
           TextView textView,
           int autoSizeTextType) 设置字体类型
什么是颗粒度 预设值呢?
颗粒度Granularity
就是 当你的字体不断变大,默认是 不断让字体增加1,如果你的颗粒度设置为10,那么每次 字体变大就增加10,
比如 0,10,20,30 这样子
反过来
就是 你字体内容不断变多,显示不开的时候,没自动让字体变小,默认是不断让字体减1,如果你的颗粒度是10,那么每次字体减少10.
比如 30,20,10,0 这样子
public static void setAutoSizeTextTypeUniformWithConfiguration(
            TextView textView,
            int autoSizeMinTextSize,
            int autoSizeMaxTextSize,
            int autoSizeStepGranularity, 设置颗粒度 字体变大变小的幅度,默认是1
            int unit)
如下动图
这里我们设置
最大字体:400
最小字体:1
颗粒度:50
单位:px
xml字体设置:300px
我们发现。输入一个字符,字体大小是251,然后不断地减少50.
那么字体为什么是251呢?
一会儿一起看源码。
预设值 PresetSizes
预设值是一个数组,字体变大变小只会在这个数组的值中进行切换,选择一个最合适的
使用方法方法
TextViewCompat.setAutoSizeTextTypeUniformWithPresetSize现在设置数组为
{50, 105,200,100, 219, 230, 251} 随机,也没有规律
然后不断的增加输入的内容
如下效果:
可以发现。字体变化顺序是
251,230,200,105
为什么没有显示219呢。是因为219显示不开。就跳过去了。
看源码,如何实现
这里我们通过分析
TextViewCompat.setAutoSizeTextTypeUniformWithConfiguration方法就能了解它的原理。
这是V4包中我们调用的方法

 public static void setAutoSizeTextTypeUniformWithConfiguration(
            TextView textView,
            int autoSizeMinTextSize,
            int autoSizeMaxTextSize,
            int autoSizeStepGranularity,
            int unit) throws IllegalArgumentException {
        IMPL.setAutoSizeTextTypeUniformWithConfiguration(textView, autoSizeMinTextSize,
                autoSizeMaxTextSize, autoSizeStepGranularity, unit);
    }
这是V4包中我们调用的方法

在查看IMPL 方法


    static final TextViewCompatBaseImpl IMPL;

    static {
        if (Build.VERSION.SDK_INT >= 26) {
            IMPL = new TextViewCompatApi26Impl();
        } else if (Build.VERSION.SDK_INT >= 23) {
            IMPL = new TextViewCompatApi23Impl();
        } else if (Build.VERSION.SDK_INT >= 18) {
            IMPL = new TextViewCompatApi18Impl();
        } else if (Build.VERSION.SDK_INT >= 17) {
            IMPL = new TextViewCompatApi17Impl();
        } else if (Build.VERSION.SDK_INT >= 16) {
            IMPL = new TextViewCompatApi16Impl();
        } else {
            IMPL = new TextViewCompatBaseImpl();
        }
    }

往下看TextViewCompatApi26Impl 方法中


    @RequiresApi(26)
    static class TextViewCompatApi26Impl extends TextViewCompatApi23Impl {

    ...省略代码

        @Override
        public void setAutoSizeTextTypeUniformWithConfiguration(
                TextView textView,
                int autoSizeMinTextSize,
                int autoSizeMaxTextSize,
                int autoSizeStepGranularity,
                int unit) throws IllegalArgumentException {
            textView.setAutoSizeTextTypeUniformWithConfiguration(
                    autoSizeMinTextSize, autoSizeMaxTextSize, autoSizeStepGranularity, unit);
        }

        ...省略代码
}

进到setAutoSizeTextTypeUniformWithConfiguration 里面看看

public void setAutoSizeTextTypeUniformWithConfiguration(int autoSizeMinTextSize,
            int autoSizeMaxTextSize, int autoSizeStepGranularity, int unit) {
        //判断是否支持字体缩放
        if (supportsAutoSizeText()) {
            final DisplayMetrics displayMetrics = getResources().getDisplayMetrics();
            //获取单位是px的最小值
            final float autoSizeMinTextSizeInPx = TypedValue.applyDimension(
                    unit, autoSizeMinTextSize, displayMetrics);
            //获取单位是px的最大值
            final float autoSizeMaxTextSizeInPx = TypedValue.applyDimension(
                    unit, autoSizeMaxTextSize, displayMetrics);
            //获取单位是px的颗粒度
            final float autoSizeStepGranularityInPx = TypedValue.applyDimension(
                    unit, autoSizeStepGranularity, displayMetrics);

            //把这三个值 赋值给 textview中相应的变量
validateAndSetAutoSizeTextTypeUniformConfiguration(autoSizeMinTextSizeInPx,
                    autoSizeMaxTextSizeInPx,
                    autoSizeStepGranularityInPx);
//重点来了,现在获取到了 最大值,最小值,颗粒度三个值。下面进行一些逻辑判断
            if (setupAutoSizeText()) {//进一步判断是否能字体缩放
                autoSizeText();// 得到一个最合适的字体
                invalidate();//刷新
            }
        }
    }


先看看setupAutoSizeText 方法

    private boolean setupAutoSizeText() {
        //能否进行缩放操作
        if (supportsAutoSizeText() && mAutoSizeTextType == AUTO_SIZE_TEXT_TYPE_UNIFORM) {
            // Calculate the sizes set based on minimum size, maximum size and step size if we do
            // not have a predefined set of sizes or if the current sizes array is empty.
            //这段英文意思是
            //如果我们没有定义一些数值,可以通过最大值,最小值,颗粒度,三个值来获取一些 sizes
            //这个一些数值 就是上面说的第三个方法setAutoSizeTextTypeUniformWithPresetSize,设定的 预设值 。
            //但是这个方法没有,只能计算一下
            if (!mHasPresetAutoSizeValues || mAutoSizeTextSizesInPx.length == 0) {
                //size的数量
                int autoSizeValuesLength = 1;
                //获取不带小数的最小值
                float currentSize = Math.round(mAutoSizeMinTextSizeInPx);
                while (Math.round(currentSize + mAutoSizeStepGranularityInPx)
                        <= Math.round(mAutoSizeMaxTextSizeInPx)) {
                        //获取这个sizes 有多少个数
                    autoSizeValuesLength++;
                    currentSize += mAutoSizeStepGranularityInPx;
                }
                //创先size数组
                int[] autoSizeTextSizesInPx = new int[autoSizeValuesLength];
                //先获取最小值
                float sizeToAdd = mAutoSizeMinTextSizeInPx;
                for (int i = 0; i < autoSizeValuesLength; i++) {
                    autoSizeTextSizesInPx[i] = Math.round(sizeToAdd);
                    //获取数组里面的一些列值
                    sizeToAdd += mAutoSizeStepGranularityInPx;
                }
                //把获取的数组 ,赋值给全局变量
                //加入最小值是1,最大值是100,颗粒度是30
                //现在获取到的数组是 {1,31,61,91} 四个值
                mAutoSizeTextSizesInPx = cleanupAutoSizePresetSizes(autoSizeTextSizesInPx);
            }

            mNeedsAutoSizeText = true;
        } else {
            mNeedsAutoSizeText = false;
        }

        return mNeedsAutoSizeText;
    }

下面在看autoSizeText() 方法


    /**
     * Automatically computes and sets the text size.
     * 自动计算并设置文本大小。
     */
    private void autoSizeText() {
        if (!isAutoSizeEnabled()) {
            return;
        }

        if (mNeedsAutoSizeText) {
            if (getMeasuredWidth() <= 0 || getMeasuredHeight() <= 0) {
                return;
            }
            //获取界面字体可显示的宽度
            final int availableWidth = mHorizontallyScrolling
                    ? VERY_WIDE
                    : getMeasuredWidth() - getTotalPaddingLeft() - getTotalPaddingRight();
            //获取界面字体可显示的高度
            final int availableHeight = getMeasuredHeight() - getExtendedPaddingBottom()
                    - getExtendedPaddingTop();

            if (availableWidth <= 0 || availableHeight <= 0) {
                return;
            }

            synchronized (TEMP_RECTF) {
                TEMP_RECTF.setEmpty();
                //把宽高赋值给rectf
                TEMP_RECTF.right = availableWidth;
                TEMP_RECTF.bottom = availableHeight;
                // 获取rectf 范围内 ,可以显示字体的最大值
                final float optimalTextSize = findLargestTextSizeWhichFits(TEMP_RECTF);

                if (optimalTextSize != getTextSize()) {
                //给textview 赋值
                    setTextSizeInternal(TypedValue.COMPLEX_UNIT_PX, optimalTextSize,
                            false /* shouldRequestLayout */);
//
                    makeNewLayout(availableWidth, 0 /* hintWidth */, UNKNOWN_BORING, UNKNOWN_BORING,
                            mRight - mLeft - getCompoundPaddingLeft() - getCompoundPaddingRight(),
                            false /* bringIntoView */);
                }
            }
        }
        // Always try to auto-size if enabled. Functions that do not want to trigger auto-sizing
        // after the next layout pass should set this to false.
        mNeedsAutoSizeText = true;
    }

在看是如何获取范围内的最大值的呢


    /**
     * Performs a binary search to find the largest text size that will still fit within the size
     * available to this view.
     * 执行一个二进制搜索,以找到最大的文本大小,它仍然符合这个视图的大小。
     */
    private int findLargestTextSizeWhichFits(RectF availableSpace) {
        final int sizesCount = mAutoSizeTextSizesInPx.length;
        if (sizesCount == 0) {
            throw new IllegalStateException("No available text sizes to choose from.");
        }
        //下面是一个二分法的算法。
        int bestSizeIndex = 0;
        int lowIndex = bestSizeIndex + 1;//头
        int highIndex = sizesCount - 1;//尾
        int sizeToTryIndex;
        while (lowIndex <= highIndex) {
            sizeToTryIndex = (lowIndex + highIndex) / 2;//去中间值
            //还记得上面的我们定义的一个数组么{1,31,61,91}
            // 可以走一下下面的方法,感受一下二分法的魅力
            if (suggestedSizeFitsInSpace(mAutoSizeTextSizesInPx[sizeToTryIndex], availableSpace)) {
                bestSizeIndex = lowIndex;
                lowIndex = sizeToTryIndex + 1;
            } else {
                highIndex = sizeToTryIndex - 1;
                bestSizeIndex = highIndex;
            }
        }
        //这里返回一个最终值
        return mAutoSizeTextSizesInPx[bestSizeIndex];
    }

在来看看这个方法suggestedSizeFitsInSpace 是如何用 rectf 来判断字体是否合适的
    private boolean suggestedSizeFitsInSpace(int suggestedSizeInPx, RectF availableSpace) {

       省略代码...

        mTempTextPaint.set(getPaint());//获取画笔
        mTempTextPaint.setTextSize(suggestedSizeInPx);

//获取一个StaticLayout 。来让一行显示不开的字体 换行
        final StaticLayout.Builder layoutBuilder = StaticLayout.Builder.obtain(
                text, 0, text.length(),  mTempTextPaint, Math.round(availableSpace.right));

        layoutBuilder.setAlignment(getLayoutAlignment())
                .setLineSpacing(getLineSpacingExtra(), getLineSpacingMultiplier())
                .setIncludePad(getIncludeFontPadding())
                .setBreakStrategy(getBreakStrategy())
                .setHyphenationFrequency(getHyphenationFrequency())
                .setJustificationMode(getJustificationMode())
                .setMaxLines(mMaxMode == LINES ? mMaximum : Integer.MAX_VALUE)
                .setTextDirection(getTextDirectionHeuristic());

        final StaticLayout layout = layoutBuilder.build();

        //换行后判断是否大于设定的maxLines
        // Lines overflow.
        if (maxLines != -1 && layout.getLineCount() > maxLines) {
            return false;
        }

        //换行后判断高度是否高于rectf的高度
        // Height overflow.
        if (layout.getHeight() > availableSpace.bottom) {
            return false;
        }

        return true;
    }
结束
到这里就结束了。希望对你们有帮助。这里卖个关子。我上面的代码完全是TextView里面的。只适合在sdk是26的时候使用。下一篇介绍一下。V4包是如何 做到兼容低版本的


 411
411

 被折叠的 条评论
为什么被折叠?
被折叠的 条评论
为什么被折叠?
 到【灌水乐园】发言


