


一.moco简介
在开发过程中,后端接口没开发完成,测试不能写接口用例,前端不能写好相关页面?
在UI自动化测试里,后端返回的数据发生改变,导致断言失败?
有mock技术前端页面的调试以及接口测试用例的设计进度不用等待后端。可以采用mock技术,UI测试不再受后端的影响,后端则采用接口自动化验证数据的正确。
Moco 是一个搭建模拟服务器的工具,其支持 API 和独立运行两种方式,前者通常是在 junit 等测试框架中使用,后者则是通过运行一个 jar 包开启服务。以下总结作为服务的使用。
二.第一个demo
1.jar包下载 (github上搜moco看源码)
http://repo1.maven.org/maven2/com/github/dreamhead/moco-runner/0.12.0/
下载moco-runner-0.12.0-standalone.jar
2.写请求与响应数据:firstdemo.json
[
  {
    "description":"第一个mock例子",
    "request":{
      "uri":"/demo"
    },
    "response":{
      "text":"第一个moco框架demo"
    }
  }
]
3.启动服务
java -jar ./moco-runner-0.12.0-standalone.jar http -p 5812 -c firstdemo.json
4.启动成功后,本地浏览器或接口工具(Jmeter,postman等)访问localhost:5812/demo测试接口数据
三.json文件的编写
1.get请求示例:
[
  {
    "description":"模拟一个没有参数get请求",
    "request":{
      "uri":"/getdemo",
      "method":"get"
    },
    "response":{
      "text":"这是一个没有参数的get请求"
    }
  },

  {
    "description":"这是一个带参数get请求",
    "request":{
      "uri":"/getdemo2",
      "method":"get",
      "queries":{
        "name":"huhansan",
        "sex":"2"
      }
    },
    "response":{
      "text":"我胡汉三又回来啦!!!!"
    }
  }
][
{
"description":"模拟一个post请求",
"request":{
"method":"post",
"uri":"/postdemo2",
"forms":{
"name":"huhansan",
"sex":"2"
}
},
"response":{
"text":"我胡汉三用Post带着参数又回来了"
}
}
]注意:(1)json格式的传参不能以表格的形式提交,需要写到body里,否则400,请求错误(随意截图)
3.带cookies的请求示例
[
  {
    "description":"get请求必须带cookie",
    "request":{
      "uri":"/get/withcookies",
      "method":"get",
      "cookies":{
        "login":"true"
      }
    },
    "response":{
      "text":"with cookies"
    }
  },

  {
    "description":"带cookie的post请求",
    "request":{
      "uri":"/post/withcookies",
      "method":"post",
      "cookies":{
        "login":"true"
      },
      "json":{
        "name":"huanhansan",
        "sex":"2"
      }
    },
    "response":{
      "status":200,
      "json":{
        "name":"huhansan",
        "age":"20",
        "home":"casa residency"
      }
    }
  }
]
使用Jmeter发起请求

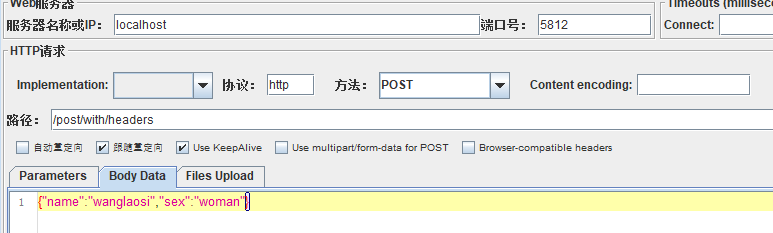
4.带header的请求
[
  {
    "description":"这是一个带header信息的post请求",
    "request":{
      "uri":"/post/with/headers",
      "method":"post",
      "headers":{
        "content-type":"application/json"
      },
      "json":{
        "name":"wanglaosi",
        "sex":"woman"
      }
    },
    "response":{
      "json":{
        "wanglaosi":"success",
        "status":"1"
      }
    }
  }
]
Jmeter header示例:

5.请求重定向
[
  {
    "description":"重定向到百度",
    "request":{
      "uri":"/redirectmemo"
      },
    "redirectTo":"http://www.baidu.com"
  },
  {
    "description":"重定向原始请求",
    "request":{
      "uri":"/redirectnew"
    },
    "redirectTo":"/wangjieinfo"
  },

  {
    "description":"目标页面",
    "request":{
      "uri":"/wangjieinfo"
    },
    "response":{
      "json":{
        "name":"wangjie",
        "sex":"man",
        "status":0
      }
    }
  }
  ]


 533
533


 被折叠的 条评论
为什么被折叠?
被折叠的 条评论
为什么被折叠?
 到【灌水乐园】发言


