Android 自定义控件简单Demo
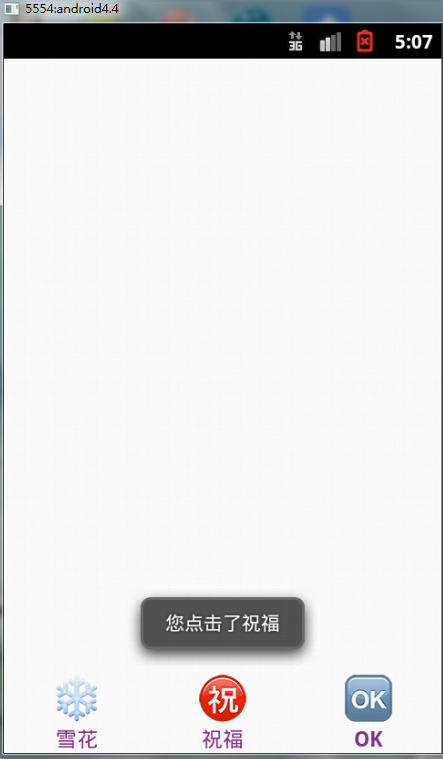
本篇所实现的是一个上面是图片,下面是文字的一个按钮,作为最简单的一种自定义控件,用户可以根据自己的需求添加其他组件进行组合,实现更多更实用的效果。
一、自定义控件的xml布局文件
image_btn_layout.xml代码如下:
<?xml version="1.0" encoding="utf-8"?>
<LinearLayout xmlns:android="http://schemas.android.com/apk/res/android"
    android:layout_width="match_parent"
    android:layout_height="match_parent"
    android:gravity="center"
    android:orientation="vertical" >


    <ImageView
        android:id="@+id/image"
        android:layout_width="wrap_content"
        android:layout_height="wrap_content"
        android:src="@drawable/ic_launcher"
        />

    <TextView
        android:id="@+id/text"
        android:layout_width="wrap_content"
        android:layout_height="wrap_content"
        android:textSize="15sp"
        android:textStyle="bold"
        android:textColor="#823783"
        android:text="主页"
        />

</LinearLayout>
二、继承LinearLayout自定义控件
实现比较简单,不再一一解释,ImageBtn.java代码如下:
public class ImageBtn extends LinearLayout {
    private ImageView imageView;

    private TextView textView;

    public ImageBtn(Context context) {
        super(context, null);
    }

    public ImageBtn(Context context, AttributeSet attrs) {
        super(context, attrs);
        LayoutInflater inflater = (LayoutInflater) context
                .getSystemService(Context.LAYOUT_INFLATER_SERVICE);
        inflater.inflate(R.layout.image_btn_layout, this, true);

        imageView = (ImageView) findViewById(R.id.image);
        textView = (TextView) findViewById(R.id.text);
    }

    public void setImageResource(int resId) {
        imageView.setImageResource(resId);
    }

    public void setTextViewText(String text) {
        textView.setText(text);
    }
}
三、在MainActivity的布局文件中加入自定义控件
加入xml中时,采用包名+类名的方式,activity_main.xml布局文件代码如下:
<RelativeLayout xmlns:android="http://schemas.android.com/apk/res/android"
    xmlns:tools="http://schemas.android.com/tools"
    android:layout_width="match_parent"
    android:layout_height="match_parent"
    tools:context="com.wangkeke.customwidgetdemo.MainActivity" >

    <LinearLayout
        android:layout_width="match_parent"
        android:layout_height="wrap_content"
        android:orientation="horizontal"
        android:layout_alignParentBottom="true"
        >
        <com.wangkeke.customwidgetdemo.ImageBtn
        android:id="@+id/image_btn_one"
        android:layout_width="0dp"
        android:layout_height="wrap_content"
        android:layout_weight="1"
        />

    <com.wangkeke.customwidgetdemo.ImageBtn
        android:id="@+id/image_btn_two"
        android:layout_width="0dp"
        android:layout_height="wrap_content"
        android:layout_weight="1"
        />

    <com.wangkeke.customwidgetdemo.ImageBtn
        android:id="@+id/image_btn_three"
        android:layout_width="0dp"
        android:layout_height="wrap_content"
        android:layout_weight="1"
        />

    </LinearLayout>


</RelativeLayout>
四、在MainActivity.java中具体实现控件初始化
public class MainActivity extends Activity implements OnClickListener{

    private ImageBtn btn_one;
    private ImageBtn btn_two;
    private ImageBtn btn_three;

    @Override
    protected void onCreate(Bundle savedInstanceState) {
        super.onCreate(savedInstanceState);
        setContentView(R.layout.activity_main);

        btn_one = (ImageBtn) findViewById(R.id.image_btn_one);
        btn_one.setOnClickListener(this);
        btn_two = (ImageBtn) findViewById(R.id.image_btn_two);
        btn_two.setOnClickListener(this);
        btn_three = (ImageBtn) findViewById(R.id.image_btn_three);
        btn_three.setOnClickListener(this);
        init();
    }

    /**
     * 初始化控件
     */
    public void init()
    {
        btn_one.setImageResource(R.drawable.emoji_177);
        btn_one.setTextViewText("雪花");
        btn_two.setImageResource(R.drawable.emoji_178);
        btn_two.setTextViewText("祝福");
        btn_three.setImageResource(R.drawable.emoji_179);
        btn_three.setTextViewText("OK");
    }

    @Override
    public void onClick(View v) {
        switch (v.getId()) {
        case R.id.image_btn_one:
            Toast.makeText(MainActivity.this, "您点击了雪花", Toast.LENGTH_SHORT).show();
            break;
        case R.id.image_btn_two:
            Toast.makeText(MainActivity.this, "您点击了祝福", Toast.LENGTH_SHORT).show();
            break;
        case R.id.image_btn_three:
            Toast.makeText(MainActivity.this, "您点击了OK", Toast.LENGTH_SHORT).show();
            break;

        default:
            break;
        }
    }

}
五、最后效果图如下:
六、资源下载地址
下载地址:Android 自定义控件Demo下载.


 本文介绍了一种简单的Android自定义按钮控件实现方法,该控件由图片和文字组成。通过继承LinearLayout并使用XML布局文件,实现了按钮的外观定制,并在MainActivity中展示了如何设置图片资源和文字。


 932
932

 被折叠的 条评论
为什么被折叠?


