


所谓Dialog其实就是一个小窗口,用户在对界面进行某些操作的时候,可以通过Dialog来响应,对用户进行反馈,但是我们一般在使用Dialog的时候是不会直接使用Dialog来进行编码创建对话框,而是使用它的子类来进行操作:
- AlertDialog
一个对话框—–可以显示一个标题,最多三个按钮,一个可选项列表,或自定义布局。
- Dialog继承关系图
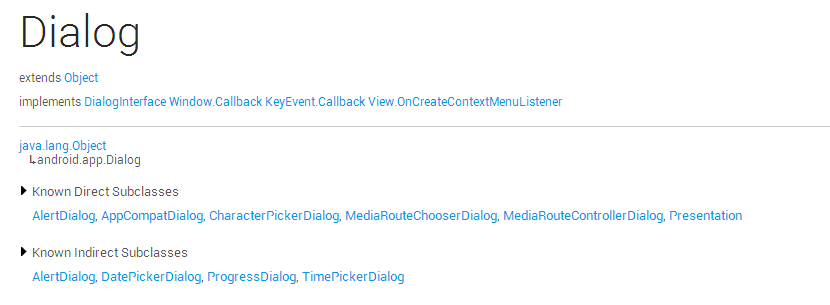
其他子类不在此处介绍,本篇主要介绍AlertDialog和Android官方推荐使用的DialogFragment这两种方式来创建Dialog。
- DialogFragment简介
DialogFragment在android 3.0时被引入,DialogFragment的父类是Fragment,其实它就是一个特殊的Framgent。
当用户按下返回按钮或旋转屏幕时,使用Dialogfragment管理对话框使得它可以正确的处理生命周期事件(状态不会丢失)。Dialogfragment类还允许你在不同大小的用户界面上重用同一个界面(例如当你想要的对话框出现在不同大小的屏幕上)。
一、创建一个DialogFragment
1.创建MyDialogFragment.java,该类继承DialogFragment类(导入的包为android.support.v4.app.DialogFragment),具体代码如下:
public class MyDialogFragment extends DialogFragment
{
    private static MyDialogFragment dialogFragment = null;

    /**
     *
     * 重写方法--创建一个Dialog
     * @param savedInstanceState
     * @return
     * @see android.support.v4.app.DialogFragment#onCreateDialog(android.os.Bundle)
     */
    @Override
    public Dialog onCreateDialog(Bundle savedInstanceState)
    {
        // Use the Builder class for convenient dialog construction
        AlertDialog.Builder builder = new AlertDialog.Builder(getActivity());
        builder.setMessage("确认要退出吗?").setPositiveButton("确认", new DialogInterface.OnClickListener()
        {
            public void onClick(DialogInterface dialog, int id)
            {
                dialog.dismiss();
            }
        }).setNegativeButton("取消", new DialogInterface.OnClickListener()
        {
            public void onClick(DialogInterface dialog, int id)
            {
                // User cancelled the dialog
                dialog.dismiss();
            }
        });
        // Create the AlertDialog object and return it
        return builder.create();
    }

    /**
     *
     * <提供该类的实例>
     * <功能详细描述>
     * @return
     * @see [类、类#方法、类#成员]
     */
    public static MyDialogFragment getInstance()
    {
        if (null == dialogFragment)
        {
            dialogFragment = new MyDialogFragment();
        }

        return dialogFragment;
    }
}
2.弹出提示框,使用show()方法。
FragmentTransaction transaction = fragmentManager.beginTransaction();
//第二个参数是一个独特的标签名称,系统用来保存和恢复Fragment状态
MyDialogFragment.getInstance().show(transaction, "test");
3.运行效果
二、创建一个AlertDialog
- AlertDialog包括三个部分,分布是标题title,内容区域content area,动作区域Action buttons,title是可选的,一般在如下情况才会显示title:在内容区域有详细的信息,比如占据了一个列表,或自定义布局,如果你需要一个简单的信息或问题(如图1中的对话框),你不需要一个标题。content area可以显示一个文本提示信息,一个列表或者是一个自定义布局,Action区域主要是显示操作按钮。
具体模块图如下:
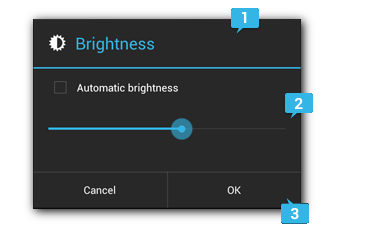
- 第三个部分按钮操作主要包含三个,分别是PositiveButton,NeutralButton,NegativeButton,分别代表确认,确认与取消之间的状态,取消,具体看下面的例子。
1.使用AlertDialog来创建一个Dialog
AlertDialog.Builder builder = new AlertDialog.Builder(MainActivity.this);

        AlertDialog dialog = builder.setMessage("确定打开GPS功能吗?").setPositiveButton("打开", new DialogInterface.OnClickListener()
        {
            @Override
            public void onClick(DialogInterface dialog, int which)
            {
                // 打开
            }
        }).setNeutralButton("以后提醒我", new DialogInterface.OnClickListener()
        {
            @Override
            public void onClick(DialogInterface dialog, int which)
            {
                // 介于打开与关闭之间的状态,比如:以后提醒我
            }
        }).setNegativeButton("关闭", new DialogInterface.OnClickListener()
        {
            @Override
            public void onClick(DialogInterface dialog, int which)
            {
                // 关闭
            }
        }).create();

        dialog.show();
2.通过以上代码即可显示一个对话框,效果如下:

三、Dialog展示可选择列表
有三种类型的列表可以使用Dialog来创建,分别是
A traditional single-choice list(单选)
A persistent single-choice list (radio buttons)(有radio的单选)
A persistent multiple-choice list (checkboxes)(多选)
下面分别来介绍一下这三种列表。
I. single-choice list
- 在values目录下添加arrays.xml文件
<?xml version="1.0" encoding="utf-8"?>
<resources>
     <string-array name="city">
        <item>南京市</item>
        <item>杭州市</item>
        <item>苏州市</item>
        <item>无锡市</item>
        <item>上海市</item>
    </string-array>
</resources>
2.创建Dialog并显示
AlertDialog.Builder builder = new AlertDialog.Builder(MainActivity.this);
        AlertDialog dialog = builder.setTitle("选择城市").setItems(R.array.city, new DialogInterface.OnClickListener()
        {
            public void onClick(DialogInterface dialog, int which)
            {
                String[] city = getResources().getStringArray(R.array.city);
                Toast.makeText(MainActivity.this, "当前选择城市:" + city[which], Toast.LENGTH_SHORT).show();
            }
        }).setNegativeButton("取消", new DialogInterface.OnClickListener()
        {

            @Override
            public void onClick(DialogInterface dialog, int which)
            {

            }
        }).setNeutralButton("以后再说", new DialogInterface.OnClickListener()
        {

            @Override
            public void onClick(DialogInterface dialog, int which)
            {

            }
        }).create();

        dialog.show();
3.效果截图

II. single-choice list (radio buttons)
1.在values目录下添加arrays.xml文件,和上面一样
2.创建Dialog并显示
AlertDialog.Builder builder = new AlertDialog.Builder(MainActivity.this);
        AlertDialog dialog = builder.setTitle("选择城市").setSingleChoiceItems(R.array.city, 0, new DialogInterface.OnClickListener()
        {

            @Override
            public void onClick(DialogInterface dialog, int which)
            {
                String[] city = getResources().getStringArray(R.array.city);
                Toast.makeText(MainActivity.this, "当前选择城市:" + city[which], Toast.LENGTH_SHORT).show();
            }
        }).setPositiveButton("确定", new DialogInterface.OnClickListener()
        {

            @Override
            public void onClick(DialogInterface dialog, int which)
            {

            }
        }).setNegativeButton("取消", new DialogInterface.OnClickListener()
        {

            @Override
            public void onClick(DialogInterface dialog, int which)
            {

            }
        }).create();
        dialog.show();
3.效果截图

III. multiple-choice list (checkboxes)
1.在values目录下添加arrays.xml文件,和上面一样
2.创建Dialog并显示
final List<Integer> mSelectedItems = new ArrayList<Integer>(); // Where we track the selected items
        AlertDialog.Builder builder = new AlertDialog.Builder(MainActivity.this);
        AlertDialog dialog = builder.setTitle("选择城市").setMultiChoiceItems(R.array.city, null, new DialogInterface.OnMultiChoiceClickListener()
        {

            @Override
            public void onClick(DialogInterface dialog, int which, boolean isChecked)
            {
                if (isChecked)
                {
                    // If the user checked the item, add it to the selected items
                    mSelectedItems.add(which);
                }
                else if (mSelectedItems.contains(which))
                {
                    // Else, if the item is already in the array, remove it
                    mSelectedItems.remove(Integer.valueOf(which));
                }

                StringBuffer buffer = new StringBuffer();
                String[] city = getResources().getStringArray(R.array.city);
                for (int i = 0; i < mSelectedItems.size(); i++)
                {
                    buffer.append(city[mSelectedItems.get(i)] + ",");
                }
                Toast.makeText(MainActivity.this, "当前已选择城市:" + buffer, Toast.LENGTH_SHORT).show();
            }
        }).setPositiveButton("确定", new DialogInterface.OnClickListener()
        {

            @Override
            public void onClick(DialogInterface dialog, int which)
            {

            }
        }).setNegativeButton("取消", new DialogInterface.OnClickListener()
        {

            @Override
            public void onClick(DialogInterface dialog, int which)
            {

            }
        }).create();
        dialog.show();
3.效果截图
四、创建自定义布局的Dialog
如果你想给对话框自定义布局,创建一个布局,AlertDialog通过调用setview()方法将它添加到你的AlertDialog中。默认情况下,自定义布局填充对话框窗口,但你仍然可以使用AlertDialog.Builder添加按钮和标题。
1.在res/layout目录下新建dialog_signin.xml
<LinearLayout xmlns:android="http://schemas.android.com/apk/res/android"
    android:orientation="vertical"
    android:layout_width="match_parent"
    android:layout_height="wrap_content">
    <TextView
        android:layout_width="match_parent"
        android:layout_height="64dp"
        android:background="#FFFFBB33"
        android:contentDescription="@string/app_name"
        android:textSize="22sp"
        android:gravity="center"
        android:text="用户登录"/>
    <EditText
        android:id="@+id/username"
        android:inputType="textEmailAddress"
        android:layout_width="match_parent"
        android:layout_height="wrap_content"
        android:layout_marginTop="16dp"
        android:layout_marginLeft="4dp"
        android:layout_marginRight="4dp"
        android:layout_marginBottom="4dp"
        android:hint="Username" />
    <EditText
        android:id="@+id/password"
        android:inputType="textPassword"
        android:layout_width="match_parent"
        android:layout_height="wrap_content"
        android:layout_marginTop="4dp"
        android:layout_marginLeft="4dp"
        android:layout_marginRight="4dp"
        android:layout_marginBottom="16dp"
        android:fontFamily="sans-serif"
        android:hint="Password"/>
</LinearLayout>
2.创建自定义Dialog并显示
AlertDialog.Builder builder = new AlertDialog.Builder(MainActivity.this);
        // Get the layout inflater
        LayoutInflater inflater = MainActivity.this.getLayoutInflater();

        // Inflate and set the layout for the dialog
        // Pass null as the parent view because its going in the dialog layout
        AlertDialog dialog = builder.setView(inflater.inflate(R.layout.dialog_signin, null))
        // Add action buttons
            .setPositiveButton("登录", new DialogInterface.OnClickListener()
            {
                @Override
                public void onClick(DialogInterface dialog, int id)
                {
                    // sign in the user ...
                }
            })
            .setNegativeButton("取消", new DialogInterface.OnClickListener()
            {
                public void onClick(DialogInterface dialog, int id)
                {
                    dialog.dismiss();
                }
            }).create();

        dialog.show();
3.效果截图
五、给DialogFragment添加回调接口
当用户触摸一个对话框的操作按钮或选择一个列表的某一项时,dialogfragment本身可能需要执行一些必要的响应,当打开对话框时,通常会想把事件传递给activity或fragment。为此,可以为每种类型的单击事件定义接口。然后在需要实现操作处理的地方实现接受动作的事件接口即可,看下面的例子。
1.这是一个Dialogfragment,定义一个接口,它给activity提供的事件回调:
public class NoticeDialogFragment extends DialogFragment {

    /* The activity that creates an instance of this dialog fragment must
     * implement this interface in order to receive event callbacks.
     * Each method passes the DialogFragment in case the host needs to query it. */
    public interface NoticeDialogListener {
        public void onDialogPositiveClick(DialogFragment dialog);
        public void onDialogNegativeClick(DialogFragment dialog);
    }

    // Use this instance of the interface to deliver action events
    NoticeDialogListener mListener;

    // Override the Fragment.onAttach() method to instantiate the NoticeDialogListener
    @Override
    public void onAttach(Activity activity) {
        super.onAttach(activity);
        // Verify that the host activity implements the callback interface
        try {
            // Instantiate the NoticeDialogListener so we can send events to the host
            mListener = (NoticeDialogListener) activity;
        } catch (ClassCastException e) {
            // The activity doesn't implement the interface, throw exception
            throw new ClassCastException(activity.toString()
                    + " must implement NoticeDialogListener");
        }
    }
    ...
}
2.主activity通过实现NoticeDialogListener接口来对dialog操作事件进行响应。
public class MainActivity extends FragmentActivity
                          implements NoticeDialogFragment.NoticeDialogListener{
    ...

    public void showNoticeDialog() {
        // Create an instance of the dialog fragment and show it
        DialogFragment dialog = new NoticeDialogFragment();
        dialog.show(getSupportFragmentManager(), "NoticeDialogFragment");
    }

    // The dialog fragment receives a reference to this Activity through the
    // Fragment.onAttach() callback, which it uses to call the following methods
    // defined by the NoticeDialogFragment.NoticeDialogListener interface
    @Override
    public void onDialogPositiveClick(DialogFragment dialog) {
        // User touched the dialog's positive button
        ...
    }

    @Override
    public void onDialogNegativeClick(DialogFragment dialog) {
        // User touched the dialog's negative button
        ...
    }
}
3.传入该接口实例后即可实现回调
public class NoticeDialogFragment extends DialogFragment {
    ...

    @Override
    public Dialog onCreateDialog(Bundle savedInstanceState) {
        // Build the dialog and set up the button click handlers
        AlertDialog.Builder builder = new AlertDialog.Builder(getActivity());
        builder.setMessage(R.string.dialog_fire_missiles)
               .setPositiveButton(R.string.fire, new DialogInterface.OnClickListener() {
                   public void onClick(DialogInterface dialog, int id) {
                       // Send the positive button event back to the host activity
                       mListener.onDialogPositiveClick(NoticeDialogFragment.this);
                   }
               })
               .setNegativeButton(R.string.cancel, new DialogInterface.OnClickListener() {
                   public void onClick(DialogInterface dialog, int id) {
                       // Send the negative button event back to the host activity
                       mListener.onDialogNegativeClick(NoticeDialogFragment.this);
                   }
               });
        return builder.create();
    }
}
六、Dialog弹出动画
1.在res目录下新建anim目录,在anim下新建dialog_enter.xml
<?xml version="1.0" encoding="utf-8"?>
<set xmlns:android="http://schemas.android.com/apk/res/android" >

    <translate
        android:duration="500"
        android:fromXDelta="0"
        android:fromYDelta="1000"
        android:toXDelta="0"
        android:toYDelta="0" />


    <scale
        android:fromXScale="0"
        android:toXScale="1"
        android:fromYScale="0"
        android:toYScale="1"
        android:duration="500"
        />

</set>
2.在anim目录下新建dialog_exit.xml
<?xml version="1.0" encoding="utf-8"?>
<set xmlns:android="http://schemas.android.com/apk/res/android" >

    <translate
        android:duration="500"
        android:fromXDelta="0"
        android:fromYDelta="0"
        android:toXDelta="0"
        android:toYDelta="1000"
        />

    <scale
        android:fromXScale="1"
        android:toXScale="0"
        android:fromYScale="1"
        android:toYScale="0"
        android:duration="500"
        />

</set>
3.在代码中使用
//dialog是已经创建好的Dialog实例
Window window = dialog.getWindow();
// 设置显示动画
window.setWindowAnimations(R.style.mystyle);
dialog.show();
4.效果截图
至此,Dialog基本使用方法就先扯到这了,下篇会详细介绍下Dialog高阶使用:【Android UI设计】Dialog对话框详解(二)!


 5908
5908

 被折叠的 条评论
为什么被折叠?
被折叠的 条评论
为什么被折叠?
 到【灌水乐园】发言


