网络上关于状态模式的所有内容感觉都是出自一人之手,什么“状态模式详解”、什么“深入理解状态模式”、什么“if else的终结者”等等等。。。虽然名字起的像那么回事,但内容却千篇一律,一个类图加上一个脱离实际业务的例子,好的话会介绍下优缺点。在这么多讲解中就没有一个说一下自己在实际工作中是怎么用的,为什么用,用了之后带来了什么具体的好处,是孩子晚上不哭了,还是媳妇儿变得贤惠了。也许这些作者认为:这么简单的东西大致讲讲应该没有人不会吧。可事实真的如此吗?
作为初学者,当看完上述关于状态模式的资料后估计只有两个结果:一,过段时间就忘了。二,放到记忆箱中,然后用把没有钥匙的锁把箱子锁起来,之后在实际工作中遇到真正需要状态模式来提升扩展性和可维护性的情况时依旧会延用毫无设计感的最原始方法来应对,比如像下面这样。
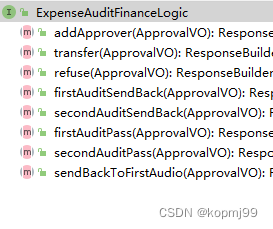
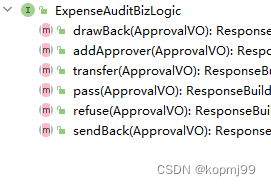
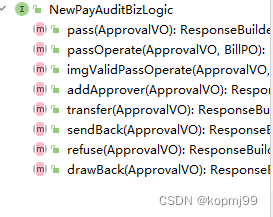
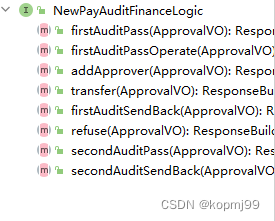
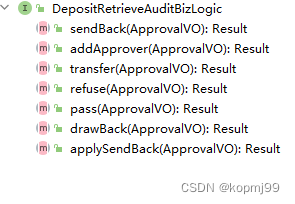
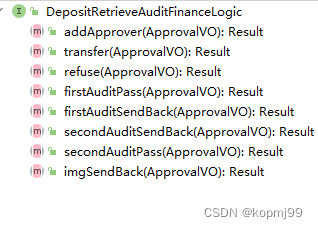
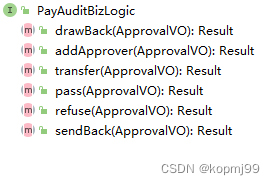
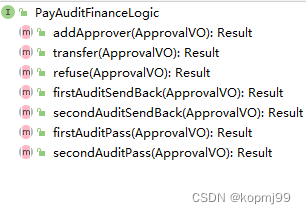
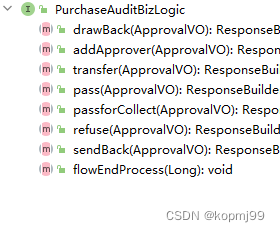
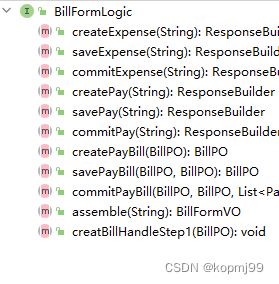
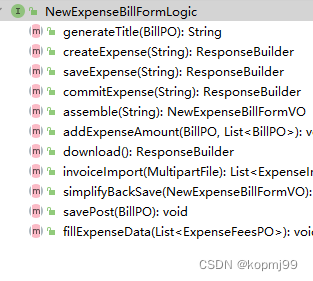
以上例举了最近接手的一个项目中有代表性的几个核心接口,可以看出这些接口中的方法都相差无几,完全可以只用一个接口来代替上面这些接口,而且上面这些接口的实现类中也包含着大量的重复代码,类似下面的代码比比皆是。
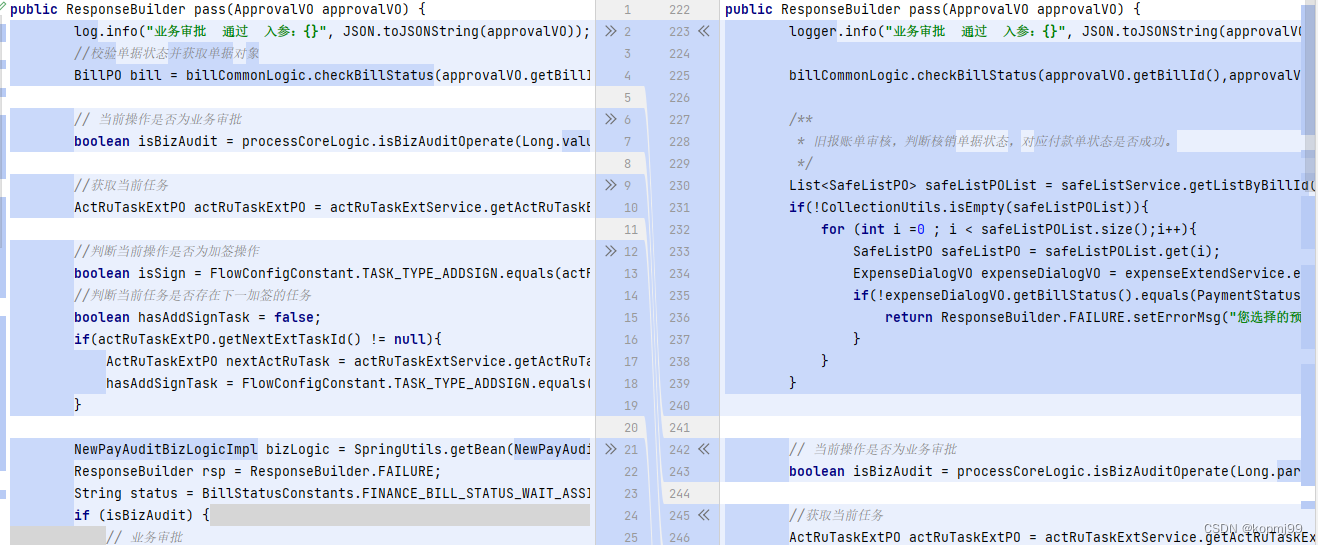

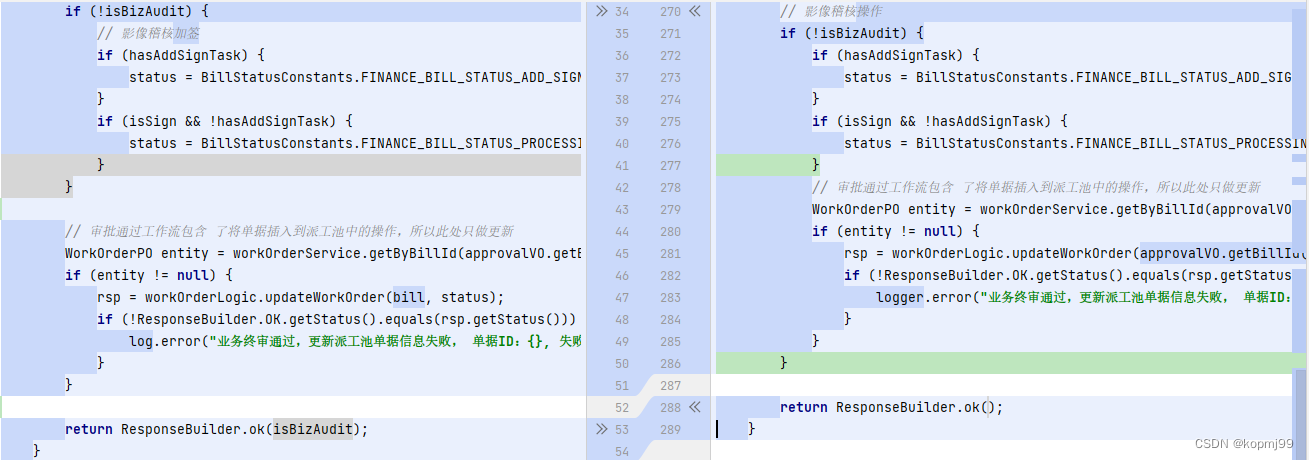 仅以上图的“审批通过”方法为例,可以看出除有少部分代码不同外(因单据类型不同),绝大部分代码基本一致。
相信写出以上代码的兄弟即使不知道有状态模式也肯定应该知道多态,但至于为什么仍会出现这样的代码,无非是固有开发习惯(ctrl + CV)和刻板遵守开发规范(一类一接口)的结果。由于实在无法忍受这样的代码,以及它们给维护和业务可扩展性造成的不便,所以也就有了以下介绍的重构。
用状态模式重构单据操作
单据的当前状态决定了能对该单据执行什么操作,这不正是状态模式所描述的典型的应用场景吗!
首先定义State,在此场景中与其对应的是将单据的操作抽象后的BillOperator。
public abstract class BillOperator {

    protected Bill bill;
    protected OperationCommandExecutor commandExecutor;
    protected final ProcessHelper processHelper = SpringUtils.getBean(ProcessHelper.class);
    protected final BillService billCrudService = SpringUtils.getBean(BillService.class);

    private static final String EXP_MSG = "当前状态不能", PREFIX = "billId:{0} [status:{1}] {2}";

    BillOperator setBill(Bill bill) {
        this.bill = bill;
        return this;
    }

    public Result submit() {
        return unsupportedOperationException("提交");
    }

    public Result cancelSubmit() {
        return unsupportedOperationException("撤回");
    }

    public Result approve(String opinion) {
        return unsupportedOperationException("批准");
    }

    public Result reject(String rejectReason) {
        return unsupportedOperationException("驳回");
    }

    public Result sendBack(String reason) {
        return unsupportedOperationException("退回");
    }

    public Result addApprover(Long employeeId, String opinion) {
        return unsupportedOperationException("加签");
    }

    public Result transferTo(Long toEmployeeId, String opinion) {
        return unsupportedOperationException("转交");
    }

    private Result unsupportedOperationException(String operation) {
        throw new UnsupportedOperationException(MessageFormat.format(PREFIX + operation
                , bill.getId(), bill.getBillStatus(), EXP_MSG));
    }
}
接下来就是定义具体State,对应到此处是继承BillOperator,然后覆盖抽象类中的相应方法。以下为BillOperator的继承类之一,该类专门用于处理未提交状态的单据,因此只重写了submit()。
@Component(BillStatusConstants.NOT_SUBMIT)
public class OperationOnNotSubmit extends BillOperator {

    private CommandExecutor commandExecutor;

    @Override
    public Result submit() {
        return commandExecutor.execute(OperationCommandFactory.getCommand(bill));
    }
}
OperationOnNotSubmitStatus只处理未提交的单据,因此其代码只有寥寥几行,但处理其他状态单据的类就需要重写多个方法,比如OperationOnSubmittedStatus类。
@Component(BillStatusConstants.SUBMITTED)
public class OperationOnSubmittedStatus extends BillOperator {

    private ProcessHelper processHelper;
    private OperationCommandExecutor commandExecutor;

    @Override
    public Result cancelSubmit() {
        return commandExecutor.execute(OperationCommandFactory.getCommand(bill));
    }

    @Override
    public Result approve(String opinion) {
        return commandExecutor.execute(OperationCommandFactory.getCommand(bill));
    }

    @Override
    public Result reject(String rejectReason) {
        return commandExecutor.execute(OperationCommandFactory.getCommand(bill));
    }

    @Override
    public Result sendBack(String reason) {
        return commandExecutor.execute(OperationCommandFactory.getCommand(bill));
    }

    @Override
    public Result addApprover(Long employeeId, String opinion) {
        processHelper.countersign(bill.getId(), opinion, employeeId);
        return Result.ofSuccess("加签完成");
    }

    @Override
    public Result transferTo(Long toEmployeeId, String opinion) {
        processHelper.transferAuditTask(bill.getId(), toEmployeeId, opinion);
        return Result.ofSuccess("向员工[" + toEmployeeId + "]转交审批任务完成");
    }
}
为了让像OperationOnSubmittedStatus这样需要重写多个方法的状态类保持清洁,于是采用命令模式将涉及代码量较大的几个操作,如approve,reject等方法封装为命令对象,从而让具体状态类的代码量保持在可控范围内。
也许你注意到了,以上代码并不像各种设计模式书籍或网上资料介绍的那样,在具体State执行完相应的操作之后将所持有的Context的State设置为另一个状态,取而代之的是更新数据库中单据的状态,再加上后面将要介绍的BillOperatorFactory,两者的结合实现了相当于修改context状态的效果。至于为什么无法像各种资料上讲的那样由具体State设置context的下一个状态会在本文最后说明。
下面的工厂类负责具体BillOperator的获取,通过Spring很容易建立起单据状态与具体BillOperator的映射关系。
class BillOperatorFactory {

    private static final Map<String, BillOperator> OPERATORS = SpringUtils.getBeansOfType(BillOperator.class);
    private static final BillDAO DAO = SpringUtils.getBean(BillDAO.class);

    private BillOperatorFactory() {}

    public static BillOperator getInstance(Long billId) {
        Bill bill = DAO.getById(billId);
        BillOperator billOperator = OPERATORS.get(bill.getBillStatus());
        Assert.notNull(billOperator, "未获取到与单据[billId:" + billId + "]当前状态[" + bill.getBillStatus() + "]匹配的 BillOperator.");

        return billOperator.setBill(bill);
    }
}
最后就可以在重构后的Service中通过上面的Factory获取与单据的状态对应的具体操作者对象了。
@Service
@Transactional(rollbackFor = Exception.class)
public class BillOperationService {

    private final BillService billService;
    private final EventPublisher eventPublisher;

    public void createBill(BillDTO billDTO) {
        billService.save(billDTO.toBill());
    }

    public void save(BillDTO billDTO) {
        billService.update(billDTO.toBill());
    }

    public Result submit(Long billId) {
        Result result = BillOperatorFactory.getInstance(billId).submit();
        eventPublisher.publish(new BillSubmittedEvent(billId));

        return result;
    }

    public Result cancelSubmit(Long billId) {
        Result result = BillOperatorFactory.getInstance(billId).cancelSubmit();
        eventPublisher.publish(new BillCancelSubmittedEvent(billId));

        return result;
    }

    public Result approve(Long billId, String opinion) {
        Result result = BillOperatorFactory.getInstance(billId).approve(opinion);
        eventPublisher.publish(new BillApprovedEvent(billId));

        return result;
    }

    public Result reject(Long billId, String reason) {
        Result result = BillOperatorFactory.getInstance(billId).reject(reason);
        eventPublisher.publish(new BillRejectedEvent(billId));

        return result;
    }

    public Result sendBack(Long billId, String reason) {
        return BillOperatorFactory.getInstance(billId).sendBack(reason);
    }

    public Result addApprover(Long billId, Long employeeId, String opinion) {
        return BillOperatorFactory.getInstance(billId).addApprover(employeeId, opinion);
    }

    public Result transferTo(Long billId, Long toEmployeeId, String opinion) {
        return BillOperatorFactory.getInstance(billId).transferTo(toEmployeeId, opinion);
    }
}
以上重构后的Service相较于重构前两千多行代码的Service变得异常清爽,单据所有操作的执行逻辑全部分散到了各个具体的BillOperator和OperationCommand中,既提升了代码重用程度,又保证了应对不同类型单据的灵活性,SRP和OCP在状态模式的加持下也水到渠成,方法调用起来更是相当丝滑。
也许有人会觉得这个service中像submit、approve那几个通过BillOperatorFactory调用的方法比较多余,既然都只有一行代码何不干脆在Controller或API层直接调用呢?其实这里可以将BillOperationService看作实际执行操作对象的代理,你可以在业务发生变化时在执行被代理对象的方法前后做一些与业务相关的,且不适合封装到具体的BillOperator类中的事情,比如业务逻辑校验、领域事件发布等。
结语
总感觉缺点什么
如果你看过了众多状态模式的讲解,也许你会发现所有网上和书中所介绍的状态模式的代码都有一个共同点,那就是Context在被赋予了一个初始状态后就不再与除State之外的对象交互了,换句话说就是Context中的所有方法是没有入参的,并且Context中如果维护了除State之外的属性,那这些属性的值是不能被使用Context的一方修改的。这是一种非常种理想的情况,实际业务中不会这么简单。来看下面的代码。
public static void main(String[] args) {
    Context context = new Context(new DefaultState());
    context.invoke1();
    context.invoke2();
    context.invoke3();
}
以上的测试代码很眼熟吧,你能找到的所有状态模式的测试代码基本都是这样来表明成功的写出了状态模式代码,可问题是在实际业务代码中根本不会像上面这样在同一个线程中连续调用Context中的方法,而这些方法在实际业务中更可能的执行方式是被一次来自于页面的请求或消息处理所调用,并且只会调用其中一个相应的方法(如果状态模式像上面这样调用的话,那么让责任链模式情何以堪),即只调用invoke1()或invoke2(),在调用完毕后就等待下一个请求或消息。那么问题来了,当context执行完invoke1()方法后就持有了新的State对象,那在下次页面请求或消息到来时要调用已持有了新State的context的invoke2()方法,那调用方该如何找到这个context呢?而这些不管是书中还是网络上的资料都没有进行说明,其实缺的便是这部分。
寻找之前的context
以上面的代码为例,比如在T1时刻调用了invoke1(),然后在T2时刻再去调用invoke2(),T1时刻与T2时刻可能间隔1分钟、1小时、一天或更久,不管相隔多久,如果想在T2时刻再次执行已持有了新State的context的invoke2()方法,就必须先得到T1时间的那个context,这就要求context必须被保存起来,至于是保存到内存中还是硬盘上就视情况而定了。
个人觉得由一个外部事件触发context中方法的调用的例子才能让初学者更好的领会如何运用状态模式,从而解决所遇问题。


 被折叠的 条评论
为什么被折叠?


