


目录
@Component 组件
1、@Controller、@Service、@Repository、@Component 注解的类会纳入 Spring 容器中进行管理,在需要使用的时候,只需要注入即可。
2、@Controller 用于标注控制层组件;@Service 用于标注业务层组件;@Repository 用于标注数据持久化层组件;@Component 泛指组件,用于标注不好归类的组件。
3、默认情况 bean 的名称为类名(首字母小写),可以通过 value 属性自定义 bean 的名称。默认情况下 bean 是单例的,可以使用 @Scope 注解指定。
4、代码举例如下:
@Repository 持久化层
import org.springframework.stereotype.Repository;

//默认 bean 的名称为类名首字母小写 BookServiceImpl
@Repository
public class BookRepository {
    public void deleteById(long id) {
        System.out.println("根据主键删除 id=" + id);
    }
}
@Service 业务层
public interface BookService {
    void deleteById(long id);
}

import com.wmx.web_app.repository.BookRepository;
import com.wmx.web_app.service.BookService;
import org.springframework.beans.factory.annotation.Autowired;
import org.springframework.stereotype.Service;

//使用 value 指定 bean 的名称,默认为类名首字母小写 BookServiceImpl
@Service(value = "bookServiceImpl")
public class BookServiceImpl implements BookService {

    @Autowired  //根据类型注入
    private BookRepository bookRepository;

    @Override
    public void deleteById(long id) {
        bookRepository.deleteById(id);
    }
}
@Controller 控制层
import com.wmx.web_app.service.BookService;
import org.springframework.stereotype.Controller;
import org.springframework.web.bind.annotation.GetMapping;
import org.springframework.web.bind.annotation.RequestParam;
import org.springframework.web.bind.annotation.ResponseBody;

import javax.annotation.Resource;

//@RestController 等同于在整个类上加了 @ResponseBody,表示类中所有的方法返回值都直接返回给页面
//对于前后端分离的项目,@RestController 更加方便
@Controller
public class BookController {

    //根据名称注入
    @Resource(name = "bookServiceImpl")
    private BookService bookService;

    /**
     * http://192.168.2.77:8080/deleteById?id=99890
     *
     * @param id
     * @return
     * @ResponseBody 注解表示将返回的内容直接输出到页面
     */
    @GetMapping("deleteById")
    @ResponseBody
    public String deleteById(@RequestParam long id) {
        bookService.deleteById(id);
        return "删除成功:" + id;
    }
}
重定向 与 服务端跳转
forward(服务端跳转) 与 redirect(重定向) 区别
| 对比项 | 对比结果 |
|---|---|
| 地址栏 | 1)forword 是服务器内部的转发,服务器直接访问目标地址,客户端并不知道,客户端浏览器的网址不会发生变化。 2)redirect 是服务器根据逻辑,发送一个状态码,告诉浏览器重新去请求新的地址,地址栏显示的是新的地址。 |
| 数据共享 | 1)由于在整个转发过程中用的是同一个 request,因此 forward 会将 request 的信息带到被转发的目标中使用,可以共享数据 2)redirect 重定向无法共享数据,必须重新赋值。 |
| 应用情况 | 1)forword 一般用于用户可以重复访问的时候,比如查询。 2)redirect 一般用于用户不可以重复访问的时候,比如新增后需要重定向到列表页面、注销登录后需要重定向到登陆页面等等。 |
| 请求次数 | 1、forword 请求一次;而 redirect 请求两次。 2、forword 效率高,而 redirect 效率低。 |
    /**
     * http://127.0.0.1:8080/redirect
     * 1、redirect 重定向时相当于浏览器重新发起了新的请求,所以使用 {@link Model} 是无法传递参数的。
     * 2、重定向可以使用 {@link javax.servlet.http.HttpSession} 或者 {@link RedirectAttributes} 传递参数
     * 3、也可以拼在 url 地址上,如 ?a=x&b=y
     *
     * @return
     */
    @GetMapping("/redirect")
    public String redirect(RedirectAttributes attributes) {
        System.out.println("重定向到主页");
        attributes.addAttribute("attr", "厉害");
        attributes.addAttribute("param", "不得了");
        return "redirect:/home?code=7845P87";
    }

    /**
     * 跳转到前端页面
     * 1、跳转到页面,不需要加‘forward’或者‘redirect’。
     * 2、可以使用 {@link Model} 往前端传递参数。
     * 3、或者直接使用 Map 往前端传参也行,默认Map的内容会放到请求域中,页面可以直接取值。
     *
     * @param model
     * @param code
     * @param attr
     * @return
     */
    @GetMapping("/home")
    public String home(Model model, String code, String attr, String param) {
        //进入主页面:code=7845P87,attr=厉害
        System.out.println("进入主页面:code=" + code + ",attr=" + attr + ",param=" + param);
        model.addAttribute("orderList", Arrays.asList(1, 2, 3, 4, 5, 6));
        return "/index.html";
    }

    /**
     * http://127.0.0.1:8080/forward?attr=厉害
     * 1、服务器端跳转可以使用 {@link javax.servlet.http.HttpSession} 传值,也可以拼接在 url 上
     * 2、前端给本方法传递的参数,在服务器跳转到的目标方法中同样可以获取的值。
     *
     * @param session
     * @return
     */
    @GetMapping("/forward")
    public String forward(HttpSession session, String attr, RedirectAttributes attributes) {
        session.setAttribute("param", "不得了");
        attributes.addAttribute("param", "不得了");
        System.out.println("服务器端跳转到主页");
        return "forward:/home?code=7845P87";
    }
src/main/java/com/wmx/reddoor/controller/JumpController.java · 汪少棠/red-door - Gitee.com
@ComponentScan 组件扫描
1、使用 @Controller,@Service,@Repository,@Component 等注解的类是如何添加实例到 Spring 容器中呢?这就是需要使用本注解。
2、@ComponentScan 注解对应的XML配置是 <context:component-scan/>, 根据指定的配置自动扫描 package,将符合条件的组件加入到 IOC 容器中。会将标识了 @Configuration 的类作为 Spring 配置类,当创建容器时会从该类加载注解。
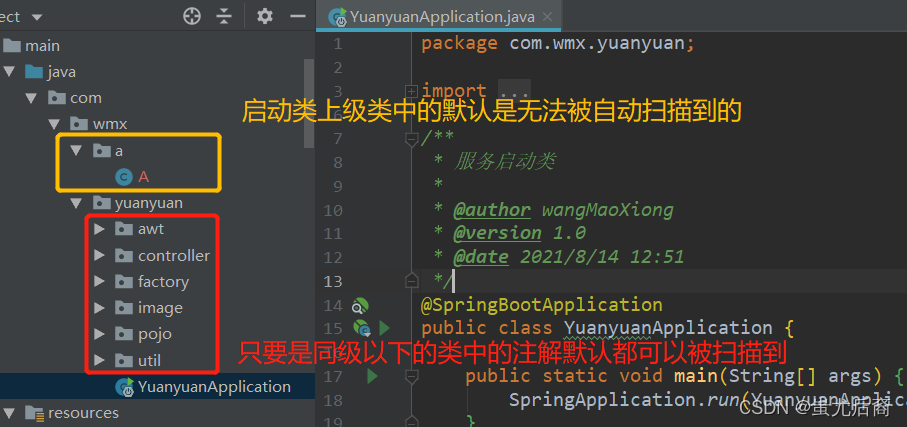
3、Spring Boot 项目的启动类会默认标记 @SpringBootApplication 注解,它的内部依赖了 @ComponentScan 注解,默认启动类同包名下的任意子孙包中类上的注解都会被自动扫描。
4、如下所示启动类的包名为 com.wmx.yuanyuan,则此时会自动扫描这个路径下的所有子孙包中的注解,其中不仅包括自己服务包中的此路径,还包括所有第三方包中的此路径也同样会被扫描。比如你有一个公共的组件包,只要其中的实例/组件的包名在启动类包名下面,那么也会被自动扫描。
5、如下所示 com.wmx.a 包下的类中注解默认是无法自动扫描到的,此时可以在启动类上自定义扫描路径,比如:@ComponentScan(value = "com.wmx") 或者 @ComponentScan({“com.wmx.yuanyuan”,”com.wmx.a”}),注意:一旦自定义了扫描路径,则必须全部的显示指定,不会在有默认扫描启动类同包名路径这回事了。
6、@ComponentScan 注解常用属性:
| String[] value() default {} | 指定需要被扫描包路径,可以是多个,默认只会扫描启动类同包名路径下的类。一旦自定义了扫描路径,则必须全部的显示指定,不会在有默认路径这回事了。 |
| String[] basePackages() | 等同于value() |
| Class<?>[] basePackageClasses() | 指定需要被扫描的具体类,在 value 的基础上再加上自己定义的类进行扫描。如:@ComponentScan(value = "com.wmx.yuanyuan", basePackageClasses = {A.class}) |
| Class<? extends BeanNameGenerator> nameGenerator() | 对应的 bean 名称的生成器,默认的是 BeanNameGenerator |
| Class<? extends ScopeMetadataResolver> scopeResolver() | 处理检测到的 bean 的 scope 范围 |
| ScopedProxyMode scopedProxy() | 是否为检测到的组件生成代理 |
| String resourcePattern() | 控制符合组件检测条件的类文件 默认是包扫描下的 **/*.class |
| boolean useDefaultFilters() | 是否对带有 @Component、@Repository、@Service、@Controller注解的类开启检测,默认开启. |
| Filter[] includeFilters() default {} | 包含过滤器扫描到的类,与 excludeFilters 同理 FilterType 有5种类型: |
| Filter[] excludeFilters() default {} | 排除过滤器扫描到的类,与 includeFilters 同理 |
| boolean lazyInit() default false | 扫描到的类是都开启懒加载 ,默认是不开启的 |
7、如果自己需要给其他系统提供的第三方依赖包,那么除了要求别人自定义扫描路径以为,还可以借助 META-INF\spring\spring.factories 文件,这样别人依赖后,不需要显示指定扫描路径,也能被自动扫描到。


 2580
2580

 被折叠的 条评论
为什么被折叠?
被折叠的 条评论
为什么被折叠?
 到【灌水乐园】发言


