


一、Autowired 注解执行原理
@Autowired注解的实现过程,其实就是Spring Bean的自动装配过程。通过看@Autowired源码注释部分我们可以看到@Autowired的实现是通过AutowiredAnnotationBeanPostProcessor后置处理器中实现的。
1. refresh
org.springframework.context.support.AbstractApplicationContext#refresh
public void refresh() throws BeansException, IllegalStateException {
    synchronized (this.startupShutdownMonitor) {
        //刷新前的预处理;
        prepareRefresh();

        //获取BeanFactory;默认实现是DefaultListableBeanFactory,在创建容器的时候创建的
        ConfigurableListableBeanFactory beanFactory = obtainFreshBeanFactory();

        //BeanFactory的预准备工作(BeanFactory进行一些设置,比如context的类加载器,BeanPostProcessor和XXXAware自动装配等)
        prepareBeanFactory(beanFactory);

        try {
            //BeanFactory准备工作完成后进行的后置处理工作
            postProcessBeanFactory(beanFactory);

            //执行BeanFactoryPostProcessor的方法;
            invokeBeanFactoryPostProcessors(beanFactory);

            //注册BeanPostProcessor(Bean的后置处理器),在创建bean的前后等执行
            registerBeanPostProcessors(beanFactory);

            //初始化MessageSource组件(做国际化功能;消息绑定,消息解析);
            initMessageSource();

            //初始化事件派发器
            initApplicationEventMulticaster();

            //子类重写这个方法,在容器刷新的时候可以自定义逻辑;如创建Tomcat,Jetty等WEB服务器
            onRefresh();

            //注册应用的监听器。就是注册实现了ApplicationListener接口的监听器bean,这些监听器是注册到ApplicationEventMulticaster中的
            registerListeners();

            //初始化所有剩下的非懒加载的单例bean
            finishBeanFactoryInitialization(beanFactory);

            //完成context的刷新。主要是调用LifecycleProcessor的onRefresh()方法,并且发布事件(ContextRefreshedEvent)
            finishRefresh();
        }

        ......
}
2. finishBeanFactoryInitialization
finishBeanFactoryInitialization方法
实例化BeanFactory中已经被注册但是未实例化的所有实例(懒加载的不需要实例化)。

比如invokeBeanFactoryPostProcessors方法中根据各种注解解析出来的类,在这个时候都会被初始化。

实例化的过程各种BeanPostProcessor开始起作用。

该方法会实例化所有剩余的非懒加载单例 bean。除了一些内部的 bean、实现了 BeanFactoryPostProcessor 接口的 bean、实现了 BeanPostProcessor 接口的 bean,其他的非懒加载单例 bean 都会在这个方法中被实例化,并且 BeanPostProcessor 的触发也是在这个方法中。
org.springframework.context.support.AbstractApplicationContext#finishBeanFactoryInitialization
protected void finishBeanFactoryInitialization(ConfigurableListableBeanFactory beanFactory) {

    // 1.初始化此上下文的转换服务
    if (beanFactory.containsBean(CONVERSION_SERVICE_BEAN_NAME) &&
            beanFactory.isTypeMatch(CONVERSION_SERVICE_BEAN_NAME, ConversionService.class)) {
        beanFactory.setConversionService(
                beanFactory.getBean(CONVERSION_SERVICE_BEAN_NAME, ConversionService.class));
    }

    // 2.如果beanFactory之前没有注册嵌入值解析器,则注册默认的嵌入值解析器:主要用于注解属性值的解析
    if (!beanFactory.hasEmbeddedValueResolver()) {
        beanFactory.addEmbeddedValueResolver(strVal -> getEnvironment().resolvePlaceholders(strVal));
    }

    // 3.初始化LoadTimeWeaverAware Bean实例对象
    String[] weaverAwareNames = beanFactory.getBeanNamesForType(LoadTimeWeaverAware.class, false, false);
    for (String weaverAwareName : weaverAwareNames) {
        getBean(weaverAwareName);
    }

    beanFactory.setTempClassLoader(null);

    // 4.冻结所有bean定义,注册的bean定义不会被修改或进一步后处理,因为马上要创建 Bean 实例对象了
    beanFactory.freezeConfiguration();

    // 5.实例化所有剩余(非懒加载)单例对象
    beanFactory.preInstantiateSingletons();
}
3. preInstantiateSingletons
接口:
org.springframework.beans.factory.config.ConfigurableListableBeanFactory#preInstantiateSingletons
实现:
org.springframework.beans.factory.support.DefaultListableBeanFactory#preInstantiateSingletons
public void preInstantiateSingletons() throws BeansException {

    List<String> beanNames = new ArrayList<>(this.beanDefinitionNames);

    // Trigger initialization of all non-lazy singleton beans...
    //遍历beanNames,触发所有非懒加载单例bean的初始化
    for (String beanName : beanNames) {
        RootBeanDefinition bd = getMergedLocalBeanDefinition(beanName);
        //Bean实例:不是抽象类 && 是单例 && 不是懒加载
        if (!bd.isAbstract() && bd.isSingleton() && !bd.isLazyInit()) {
            //判断beanName对应的bean是否为FactoryBean
            if (isFactoryBean(beanName)) {
                //通过getBean(&beanName)拿到的是FactoryBean本身;通过getBean(beanName)拿到的是FactoryBean创建的Bean实例
                Object bean = getBean(FACTORY_BEAN_PREFIX + beanName);
                if (bean instanceof FactoryBean) {
                    final FactoryBean<?> factory = (FactoryBean<?>) bean;
                    //判断这个FactoryBean是否希望急切的初始化
                    boolean isEagerInit;
                    if (System.getSecurityManager() != null && factory instanceof SmartFactoryBean) {
                        isEagerInit = AccessController.doPrivileged((PrivilegedAction<Boolean>)((SmartFactoryBean<?>) factory)::isEagerInit,
                                getAccessControlContext());
                    }
                    else {
                        isEagerInit = (factory instanceof SmartFactoryBean && ((SmartFactoryBean<?>) factory).isEagerInit());
                    }
                    if (isEagerInit) {
                        getBean(beanName);
                    }
                }
            }
            else {
              //如果beanName对应的bean不是FactoryBean,只是普通Bean,通过beanName获取bean实例
                getBean(beanName);
            }
        }
    }

    ......
}
FactoryBean和Bean的区别
一般情况下,Spring 通过反射机制利用 bean 的 class 属性指定实现类来实例化 bean。而 FactoryBean 是一种特殊的 bean,它是个工厂 bean,可以自己创建 bean 实例,如果一个类实现了 FactoryBean 接口,则该类可以自己定义创建实例对象的方法,只需要实现它的 getObject() 方法。
注:很多中间件都利用 FactoryBean 来进行扩展。
引入了几个重要的缓存:
- mergedBeanDefinitions 缓存:beanName -> 合并的 bean 定义。
- beanDefinitionMap 缓存:beanName -> BeanDefinition。
- singletonObjects 缓存:beanName -> 单例 bean 对象。(一级缓存)
- earlySingletonObjects 缓存:beanName -> 单例 bean 对象,该缓存存放的是早期单例 bean 对象,可以理解成还未进行属性填充、初始化。(二级缓存)
- singletonFactories 缓存:beanName -> ObjectFactory。(三级缓存)
- singletonsCurrentlyInCreation 缓存:当前正在创建单例 bean 对象的 beanName 集合。
4. getBean 和 doGetBean
4.1 getBean
org.springframework.beans.factory.support.AbstractBeanFactory#getBean(java.lang.String)
public Object getBean(String name) throws BeansException {
    return doGetBean(name, null, null, false);
}
4.2 doGetBean
org.springframework.beans.factory.support.AbstractBeanFactory#doGetBean
protected <T> T doGetBean(final String name, @Nullable final Class<T> requiredType, @Nullable final Object[] args, boolean typeCheckOnly) throws BeansException {

    //解析beanName,主要是解析别名、去掉FactoryBean的前缀“&”
    final String beanName = transformedBeanName(name);
    Object bean;

    //尝试从缓存中获取beanName对应的实例,通过缓存解决循环依赖问题
    Object sharedInstance = getSingleton(beanName);
    if (sharedInstance != null && args == null) {
        //返回beanName对应的实例对象(主要用于FactoryBean的特殊处理,普通Bean会直接返回sharedInstance本身)
        bean = getObjectForBeanInstance(sharedInstance, name, beanName, null);
    }

    else {
        // scope为prototype非单例的循环依赖校验:如果beanName已经正在创建Bean实例中,而此时我们又要再一次创建beanName的实例,则代表出现了循环依赖,需要抛出异常。
        // 例子:如果存在A中有B的属性,B中有A的属性,那么当依赖注入的时候,就会产生当A还未创建完的时候因为对于B的创建再次返回创建A,造成循环依赖
        if (isPrototypeCurrentlyInCreation(beanName)) {
            throw new BeanCurrentlyInCreationException(beanName);
        }

        BeanFactory parentBeanFactory = getParentBeanFactory();
        //如果parentBeanFactory存在,并且beanName在当前BeanFactory不存在Bean定义,则尝试从parentBeanFactory中获取bean实例
        if (parentBeanFactory != null && !containsBeanDefinition(beanName)) {
            // Not found -> check parent.
            String nameToLookup = originalBeanName(name);
            if (parentBeanFactory instanceof AbstractBeanFactory) {
                return ((AbstractBeanFactory) parentBeanFactory).doGetBean(nameToLookup, requiredType, args, typeCheckOnly);
            }
            else if (args != null) {
                return (T) parentBeanFactory.getBean(nameToLookup, args);
            }
            else {
                return parentBeanFactory.getBean(nameToLookup, requiredType);
            }
        }

        if (!typeCheckOnly) {
            //如果不是仅仅做类型检测,而是创建bean实例,这里要将beanName放到alreadyCreated缓存
            markBeanAsCreated(beanName);
        }

        try {
            final RootBeanDefinition mbd = getMergedLocalBeanDefinition(beanName);
            checkMergedBeanDefinition(mbd, beanName, args);

            //拿到当前bean依赖的bean名称集合,在实例化自己之前,需要先实例化自己依赖的bean,如使用@DependsOn
            String[] dependsOn = mbd.getDependsOn();
            if (dependsOn != null) {
                for (String dep : dependsOn) {
                    if (isDependent(beanName, dep)) {
                        throw new BeanCreationException(mbd.getResourceDescription(), beanName, "Circular depends-on relationship between '" + beanName + "' and '" + dep + "'");
                    }
                    registerDependentBean(dep, beanName);
                    try {
                        getBean(dep);
                    }
                    catch (NoSuchBeanDefinitionException ex) {
                        throw new BeanCreationException(mbd.getResourceDescription(), beanName, "'" + beanName + "' depends on missing bean '" + dep + "'", ex);
                    }
                }
            }

            if (mbd.isSingleton()) {
                //scope为singleton的bean创建(新建了一个ObjectFactory,并且重写了getObject方法,在里面创建bean
                sharedInstance = getSingleton(beanName, () -> {
                    try {
                        return createBean(beanName, mbd, args);
                    }
                    catch (BeansException ex) {
                        destroySingleton(beanName);
                        throw ex;
                    }
                });
                //返回beanName对应的实例对象
                bean = getObjectForBeanInstance(sharedInstance, name, beanName, mbd);
            }

            //其它非单例的情况,暂不分析
            ......
        }
        catch (BeansException ex) {
            cleanupAfterBeanCreationFailure(beanName);
            throw ex;
        }
    }

    ......
    return (T) bean;
}
4.3 getSingleton
org.springframework.beans.factory.support.DefaultSingletonBeanRegistry#getSingleton(java.lang.String)
public Object getSingleton(String beanName) {
    return getSingleton(beanName, true);
}
org.springframework.beans.factory.support.DefaultSingletonBeanRegistry#getSingleton(java.lang.String, boolean)
protected Object getSingleton(String beanName, boolean allowEarlyReference) {
    //从map中获取bean如果不为空直接返回,不再进行初始化工作
    //讲道理一个程序员提供的对象这里一般都是为空的
    //1.先从一级缓存获取
    Object singletonObject = this.singletonObjects.get(beanName);
    //2.如果没获取到, 且 bean 还在创建中时
    if (singletonObject == null && isSingletonCurrentlyInCreation(beanName)) {
        synchronized (this.singletonObjects) {
            //3.再从二级缓存中获取
            singletonObject = this.earlySingletonObjects.get(beanName);
            //4. 还没获取到, 且允许循环依赖时
            if (singletonObject == null && allowEarlyReference) {
                //5. 最后从三级缓存中获取 对象的工厂, 通过 getObject 来获取对象
                ObjectFactory<?> singletonFactory = this.singletonFactories.get(beanName);
                if (singletonFactory != null) {
                    singletonObject = singletonFactory.getObject();
                    this.earlySingletonObjects.put(beanName, singletonObject);
                    this.singletonFactories.remove(beanName);
                }
            }
        }
    }
    return singletonObject;
}
org.springframework.beans.factory.support.DefaultSingletonBeanRegistry#getSingleton(java.lang.String, org.springframework.beans.factory.ObjectFactory<?>)
public Object getSingleton(String beanName, ObjectFactory<?> singletonFactory) {
	Assert.notNull(beanName, "Bean name must not be null");
	synchronized (this.singletonObjects) {
		//首先检查beanName对应的bean实例是否在缓存中存在,如果已经存在,则直接返回
		Object singletonObject = this.singletonObjects.get(beanName);
		if (singletonObject == null) {
			if (this.singletonsCurrentlyInDestruction) {
				throw new BeanCreationNotAllowedException(beanName, "Singleton bean creation not allowed while singletons of this factory are in destruction " + "(Do not request a bean from a BeanFactory in a destroy method implementation!)");
			}
			//创建单例前的操作,把bean放入正准备创建的一个Set中singletonsCurrentlyInCreation,如果重复会报异常
			//如果存在构造器循环依赖的时候(A(B b),B(C c),C(A a)),会在这点报出异常
			beforeSingletonCreation(beanName);
			boolean newSingleton = false;
			boolean recordSuppressedExceptions = (this.suppressedExceptions == null);
			if (recordSuppressedExceptions) {
				this.suppressedExceptions = new LinkedHashSet<>();
			}
			try {
				//执行singletonFactory的getObject方法获取bean实例,就是执行传入方法createBean
				singletonObject = singletonFactory.getObject();
				newSingleton = true;
			}

			......

			finally {
				if (recordSuppressedExceptions) {
					this.suppressedExceptions = null;
				}
				//创建单例后的操作,在singletonsCurrentlyInCreation中移除
				afterSingletonCreation(beanName);
			}
			if (newSingleton) {
				addSingleton(beanName, singletonObject);
			}
		}
		return singletonObject;
	}
}
5. createBean
5.1 createBean
接口
org.springframework.beans.factory.support.AbstractBeanFactory#createBean
实现
org.springframework.beans.factory.support.AbstractAutowireCapableBeanFactory#createBean(java.lang.String, org.springframework.beans.factory.support.RootBeanDefinition, java.lang.Object[])
protected Object createBean(String beanName, RootBeanDefinition mbd, @Nullable Object[] args) throws BeanCreationException {

    ......

    try {
        //验证及准备覆盖的方法(对override属性进行标记及验证)
        mbdToUse.prepareMethodOverrides();
    } catch (BeanDefinitionValidationException ex) {
        throw new BeanDefinitionStoreException(mbdToUse.getResourceDescription(), beanName, "Validation of method overrides failed", ex);
    }

    try {
      	// 执行 InstantiationAwareBeanPostProcessor.postProcessBeforeInstantiation 方法
        // 实例化前的处理,如果有实现InstantiationAwareBeanPostProcessor的BeanPostProcessor可以直接返回真正的bean实例
        Object bean = resolveBeforeInstantiation(beanName, mbdToUse);
        if (bean != null) {
            return bean;
        }
    } catch (Throwable ex) {
        throw new BeanCreationException(mbdToUse.getResourceDescription(), beanName, "BeanPostProcessor before instantiation of bean failed", ex);
    }

    try {
        //创建Bean实例(一般真正创建Bean的方法)
        Object beanInstance = doCreateBean(beanName, mbdToUse, args);
        return beanInstance;
    }
    ......
}
实例化前的处理,给 InstantiationAwareBeanPostProcessor 一个机会返回代理对象来替代真正的 bean 实例,从而跳过 Spring 默认的实例化过程,达到“短路”效果。会执行 InstantiationAwareBeanPostProcessor 的 postProcessBeforeInstantiation 方法,该方法可以返回 bean 实例的代理,从而跳过 Spring 默认的实例化过程。
AutowiredAnnotationBeanPostProcessor实现了InstantiationAwareBeanPostProcessor接口,因此AutowiredAnnotationBeanPostProcessor的postProcessBeforeInstantiation方法也会在此时执行。
5.2 resolveBeforeInstantiation
org.springframework.beans.factory.support.AbstractAutowireCapableBeanFactory#resolveBeforeInstantiation
protected Object resolveBeforeInstantiation(String beanName, RootBeanDefinition mbd) {
	Object bean = null;
	// //如果beforeInstantiationResolved还没有设置或者是false(说明还没有需要在实例化前执行的操作)
	if (!Boolean.FALSE.equals(mbd.beforeInstantiationResolved)) {
		// 判断是否有注册过InstantiationAwareBeanPostProcessor类型的bean
		if (!mbd.isSynthetic() && hasInstantiationAwareBeanPostProcessors()) {
			Class<?> targetType = determineTargetType(beanName, mbd);
			if (targetType != null) {
				bean = applyBeanPostProcessorsBeforeInstantiation(targetType, beanName);
				if (bean != null) {
					// 直接执行自定义初始化完成后的方法,跳过了其他几个方法
					bean = applyBeanPostProcessorsAfterInitialization(bean, beanName);
				}
			}
		}
		mbd.beforeInstantiationResolved = (bean != null);
	}
	return bean;
}
org.springframework.beans.factory.support.AbstractAutowireCapableBeanFactory#applyBeanPostProcessorsBeforeInstantiation
protected Object applyBeanPostProcessorsBeforeInstantiation(Class<?> beanClass, String beanName) {
	for (BeanPostProcessor bp : getBeanPostProcessors()) {
		if (bp instanceof InstantiationAwareBeanPostProcessor) {
			InstantiationAwareBeanPostProcessor ibp = (InstantiationAwareBeanPostProcessor) bp;
			Object result = ibp.postProcessBeforeInstantiation(beanClass, beanName);
			//只要有一个result不为null;后面的所有 后置处理器的方法就不执行了,直接返回(所以执行顺序很重要)
			if (result != null) {
				return result;
			}
		}
	}
	return null;
}
org.springframework.beans.factory.support.AbstractAutowireCapableBeanFactory#applyBeanPostProcessorsAfterInitialization
@Override
public Object applyBeanPostProcessorsAfterInitialization(Object existingBean, String beanName)
		throws BeansException {

	Object result = existingBean;
	for (BeanPostProcessor processor : getBeanPostProcessors()) {
		result = processor.postProcessAfterInitialization(result, beanName);
		 //如果返回null;后面的所有 后置处理器的方法就不执行,直接返回(所以执行顺序很重要)
		if (result == null) {
			return result;
		}
	}
	return result;
}
代码说明:
- 如果postProcessBeforeInstantiation方法返回了Object是null;那么就直接返回,调用doCreateBean方法();
- 如果postProcessBeforeInstantiation返回不为null;说明修改了bean对象;然后这个时候就立马执行postProcessAfterInitialization方法(注意这个是初始化之后的方法,也就是通过这个方法实例化了之后,直接执行初始化之后的方法;中间的实例化之后 和 初始化之前都不执行);
- 在调用postProcessAfterInitialization方法时候如果返回null;那么就直接返回,调用doCreateBean方法();(初始化之后的方法返回了null,那就需要调用doCreateBean生成对象了)
- 在调用postProcessAfterInitialization时返回不为null;那这个bean就直接返回给ioc容器了初始化之后的操作是这里面最后一个方法了;
6. doCreateBean
6.1 doCreateBean
org.springframework.beans.factory.support.AbstractAutowireCapableBeanFactory#doCreateBean
protected Object doCreateBean(final String beanName, final RootBeanDefinition mbd, final @Nullable Object[] args) throws BeanCreationException {

	BeanWrapper instanceWrapper = null;
	if (mbd.isSingleton()) {
		instanceWrapper = this.factoryBeanInstanceCache.remove(beanName);
	}
	if (instanceWrapper == null) {
		//根据beanName、mbd、args,使用对应的策略创建Bean实例,并返回包装类BeanWrappe
		/**
	     * 创建 bean 实例,并将实例包裹在 BeanWrapper 实现类对象中返回。
	     * createBeanInstance中包含三种创建 bean 实例的方式:
	     *   1. 通过工厂方法创建 bean 实例
	     *   2. 通过构造方法自动注入(autowire by constructor)的方式创建 bean 实例
	     *   3. 通过无参构造方法方法创建 bean 实例
	     *
	     * 若 bean 的配置信息中配置了 lookup-method 和 replace-method,则会使用 CGLIB 增强 bean 实例。
	     */
        instanceWrapper = createBeanInstance(beanName, mbd, args);
	}
	// todo !!!!!!!!这里获取出来的对象是原生对象!!!!!
	final Object bean = instanceWrapper.getWrappedInstance();
	Class<?> beanType = instanceWrapper.getWrappedClass();
	if (beanType != NullBean.class) {
		mbd.resolvedTargetType = beanType;
	}

	synchronized (mbd.postProcessingLock) {
		if (!mbd.postProcessed) {
			try {
                // 执行 MergedBeanDefinitionPostProcessor.postProcessMergedBeanDefinition 方法
                // AutowiredAnnotationBeanPostProcessor implements MergedBeanDefinitionPostProcessor
                //调用属性合并后置处理器, 进行属性合并
                //这里会进行 一些注解 的扫描
                //CommonAnnotationBeanPostProcessor -> @PostConstruct @PreDestroy @Resource
                //AutowiredAnnotationBeanPostProcessor -> @Autowired @Value
                applyMergedBeanDefinitionPostProcessors(mbd, beanType, beanName);
			}
			catch (Throwable ex) {
				throw new BeanCreationException(mbd.getResourceDescription(), beanName,
						"Post-processing of merged bean definition failed", ex);
			}
			mbd.postProcessed = true;
		}
	}

	boolean earlySingletonExposure = (mbd.isSingleton() && this.allowCircularReferences && isSingletonCurrentlyInCreation(beanName));
	if (earlySingletonExposure) {
		//注意这点,曝光beanName的ObjectFactory,用于解决循环引用。 在开始通过doGetBean取值的时候调用了getSingleton就调用到这个工厂来了
		addSingletonFactory(beanName, () -> getEarlyBeanReference(beanName, mbd, bean));
	}

	// Initialize the bean instance.
	Object exposedObject = bean;
	try {
		//todo  对bean进行属性填充;其中,可能存在依赖于其他bean的属性,则会递归初始化依赖的bean实例
		//设置属性,非常重要,比如使用@Autowired注入的值等
		populateBean(beanName, mbd, instanceWrapper);

		// todo 经过AOP处理,原生对象转换成了代理对象,跟进去
		//执行后置处理器,aop就是在这里完成的处理
		exposedObject = initializeBean(beanName, exposedObject, mbd);
	}

	......

	return exposedObject;
}
6.2 applyMergedBeanDefinitionPostProcessors
org.springframework.beans.factory.annotation.AutowiredAnnotationBeanPostProcessor#postProcessMergedBeanDefinition
public void postProcessMergedBeanDefinition(RootBeanDefinition beanDefinition, Class<?> beanType, String beanName) {
    // 找到注入的元数据,第一次是构建,后续可以直接从缓存中拿
    // 注解元数据其实就是当前这个类中的所有需要进行注入的“点”的集合,
    // 注入点(InjectedElement)包含两种,字段/方法
    // 对应的就是AutowiredFieldElement/AutowiredMethodElement
    InjectionMetadata metadata = findAutowiringMetadata(beanName, beanType, null);
    // 排除掉被外部管理的注入点
    metadata.checkConfigMembers(beanDefinition);
}
上面代码的核心逻辑就是
- 找到所有的注入点,其实就是被@Autowired注解修饰的方法以及字段,同时静态的方法以及字段也会被排除
- 排除掉被外部管理的注入点,在后续的源码分析中我们再细说
findAutowiringMetadata
// 这个方法的核心逻辑就是先从缓存中获取已经解析好的注入点信息,很明显,在原型情况下才会使用缓存
// 创建注入点的核心逻辑在buildAutowiringMetadata方法中
private InjectionMetadata findAutowiringMetadata(String beanName, Class<?> clazz, @Nullable PropertyValues pvs) {
    String cacheKey = (StringUtils.hasLength(beanName) ? beanName : clazz.getName());
    InjectionMetadata metadata = this.injectionMetadataCache.get(cacheKey);
    // 可能我们会修改bd中的class属性,那么InjectionMetadata中的注入点信息也需要刷新
    if (InjectionMetadata.needsRefresh(metadata, clazz)) {
        synchronized (this.injectionMetadataCache) {
            metadata = this.injectionMetadataCache.get(cacheKey);
            if (InjectionMetadata.needsRefresh(metadata, clazz)) {
                if (metadata != null) {
                    metadata.clear(pvs);
                }
                // 这里真正创建注入点
                metadata = buildAutowiringMetadata(clazz);
                this.injectionMetadataCache.put(cacheKey, metadata);
            }
        }
    }
    return metadata;
}
buildAutowiringMetadata
// 我们应用中使用@Autowired注解标注在字段上或者setter方法能够完成属性注入
// 就是因为这个方法将@Autowired注解标注的方法以及字段封装成InjectionMetadata
// 在后续阶段会调用InjectionMetadata的inject方法进行注入
private InjectionMetadata buildAutowiringMetadata(final Class<?> clazz) {
    List<InjectionMetadata.InjectedElement> elements = new ArrayList<>();
    Class<?> targetClass = clazz;

    do {
        final List<InjectionMetadata.InjectedElement> currElements = new ArrayList<>();
  // 处理所有的被@AutoWired/@Value注解标注的字段
        ReflectionUtils.doWithLocalFields(targetClass, field -> {
            AnnotationAttributes ann = findAutowiredAnnotation(field);
            if (ann != null) {
                // 静态字段会直接跳过
                if (Modifier.isStatic(field.getModifiers())) {
                    // 省略日志打印
                    return;
                }
                // 得到@AutoWired注解中的required属性
                boolean required = determineRequiredStatus(ann);
                currElements.add(new AutowiredFieldElement(field, required));
            }
        });
  // 处理所有的被@AutoWired注解标注的方法,相对于字段而言,这里需要对桥接方法进行特殊处理
        ReflectionUtils.doWithLocalMethods(targetClass, method -> {
            // 只处理一种特殊的桥接场景,其余的桥接方法都会被忽略
            Method bridgedMethod = BridgeMethodResolver.findBridgedMethod(method);
            if (!BridgeMethodResolver.isVisibilityBridgeMethodPair(method, bridgedMethod)) {
                return;
            }
            AnnotationAttributes ann = findAutowiredAnnotation(bridgedMethod);
            // 处理方法时需要注意,当父类中的方法被子类重写时,如果子父类中的方法都加了@Autowired
            // 那么此时父类方法不能被处理,即不能被封装成一个AutowiredMethodElement
            if (ann != null && method.equals(ClassUtils.getMostSpecificMethod(method, clazz))) {
                if (Modifier.isStatic(method.getModifiers())) {
                    // 省略日志打印
                    return;
                }
                if (method.getParameterCount() == 0) {
                    // 当方法的参数数量为0时,虽然不需要进行注入,但是还是会把这个方法作为注入点使用
                    // 这个方法最终还是会被调用
                    if (logger.isInfoEnabled()) {
                        logger.info("Autowired annotation should only be used on methods with parameters: " +
                                    method);
                    }
                }
                boolean required = determineRequiredStatus(ann);
                // PropertyDescriptor: 属性描述符
                // 就是通过解析getter/setter方法,例如void getA()会解析得到一个属性名称为a
                // readMethod为getA的PropertyDescriptor,
                // 在《Spring官网阅读(十四)Spring中的BeanWrapper及类型转换》文中已经做过解释
                // 这里不再赘述,这里之所以来这么一次查找是因为当XML中对这个属性进行了配置后,
                // 那么就不会进行自动注入了,XML中显示指定的属性优先级高于注解
                PropertyDescriptor pd = BeanUtils.findPropertyForMethod(bridgedMethod, clazz);     // 构造一个对应的AutowiredMethodElement,后续这个方法会被执行
                // 方法的参数会被自动注入,这里不限于setter方法
                currElements.add(new AutowiredMethodElement(method, required, pd));
            }
        });
  // 会处理父类中字段上及方法上的@AutoWired注解,并且父类的优先级比子类高
        elements.addAll(0, currElements);
        targetClass = targetClass.getSuperclass();
    }
    while (targetClass != null && targetClass != Object.class);

    return new InjectionMetadata(clazz, elements);
}
难点代码分析
上面的代码整体来说应该很简单,就如我们之前所说的,处理带有@Autowired注解的字段及方法,同时会过滤掉所有的静态字段及方法。上面复杂的地方在于对桥接方法的处理,可能大部分人都没办法理解这几行代码:
// 第一行
Method bridgedMethod = BridgeMethodResolver.findBridgedMethod(method);

// 第二行
if (!BridgeMethodResolver.isVisibilityBridgeMethodPair(method, bridgedMethod)) {
    return;
}

// 第三行
if (ann != null && method.equals(ClassUtils.getMostSpecificMethod(method, clazz))) {

}
参考文章: Spring杂谈 | 从桥接方法到JVM方法调用
除了在上面的文章中提到的桥接方法外,还有一种特殊的情况
// A类跟B类在同一个包下,A不是public的
class A {
 public void test(){

 }
}

// 在B中会生成一个跟A中的方法描述符(参数+返回值)一模一样的桥接方法
// 这个桥接方法实际上就是调用父类中的方法
// 具体可以参考:https://bugs.java.com/bugdatabase/view_bug.do?bug_id=63424113
public class B extends A {
}
在理解了什么是桥接之后,那么上边的第一行代码你应该就能看懂了,就以上面的代码为例,B中会生成一个桥接方法,对应的被桥接的方法就是A中的test方法。
接着,我们看看第二行代码
public static boolean isVisibilityBridgeMethodPair(Method bridgeMethod, Method bridgedMethod) {
    // 说明这个方法本身就不是桥接方法,直接返回true
    if (bridgeMethod == bridgedMethod) {
        return true;
    }
    // 说明是桥接方法,并且方法描述符一致
    // 当且仅当是上面例子中描述的这种桥接的时候这个判断才会满足
    // 正常来说桥接方法跟被桥接方法的返回值+参数类型肯定不一致
    // 所以这个判断会过滤掉其余的所有类型的桥接方法
    // 只会保留本文提及这种特殊情况下产生的桥接方法
    return (bridgeMethod.getReturnType().equals(bridgedMethod.getReturnType()) &&
            Arrays.equals(bridgeMethod.getParameterTypes(), bridgedMethod.getParameterTypes()));
}
最后,再来看看第三行代码,核心就是这句method.equals(ClassUtils.getMostSpecificMethod(method, clazz)。这句代码的主要目的就是为了处理下面这种情况
@Component
public class D extends C {

 @Autowired
 @Override
 public void setDmzService(DmzService dmzService) {
  dmzService.init();
  this.dmzService = dmzService;
 }
}

// C不是Spring中的组件
public class C {
 DmzService dmzService;
    @Autowired
 public void setDmzService(DmzService dmzService) {
  this.dmzService = dmzService;
 }
}
这种情况下,在处理D中的@Autowired注解时,虽然我们要处理父类中的@Autowired注解,但是因为子类中的方法已经复写了父类中的方法,所以此时应该要跳过父类中的这个被复写的方法,这就是第三行代码的作用。
小结
到这里我们主要分析了applyMergedBeanDefinitionPostProcessors这段代码的作用,它的执行时机是在创建对象之后,属性注入之前。按照官方的定义来说,到这里我们仍然可以使用这个方法来修改bd的定义,那么相对于通过BeanFactoryPostProcessor的方式修改bd,applyMergedBeanDefinitionPostProcessors这个方法影响的范围更小,BeanFactoryPostProcessor影响的是整个Bean的生命周期,而applyMergedBeanDefinitionPostProcessors只会影响属性注入之后的生命周期。
其次,我们分析了Spring中内置的MergedBeanDefinitionPostProcessor,选取了其中两个特殊的后置处理器进行分析,其中ApplicationListenerDetector主要处理内嵌的事件监听器,而AutowiredAnnotationBeanPostProcessor主要用于处理@Autowired注解,实际上我们会发现,到这里还只是完成了@Autowired注解的解析,还没有真正开始进行注入,真正注入的逻辑在后面我们要分析的populateBean方法中,在这个方法中会使用解析好的注入元信息完成真正的属性注入,那么接下来我们就开始分析populateBean这个方法的源码。
6.3 populateBean
org.springframework.beans.factory.support.AbstractAutowireCapableBeanFactory#populateBean
protected void populateBean(String beanName, RootBeanDefinition mbd, @Nullable BeanWrapper bw) {
	// 如果实例对象为空,并且有需要设置的属性值,抛出异常;否则直接返回.
	if (bw == null) {
		if (mbd.hasPropertyValues()) {
			throw new BeanCreationException(mbd.getResourceDescription(), beanName, "Cannot apply property values to null instance");
		} else {
			return;
		}
	}
    // 满足两个条件,不是合成类 && 存在InstantiationAwareBeanPostProcessor
    // 其中InstantiationAwareBeanPostProcessor主要作用就是作为Bean的实例化前后的钩子
    // 外加完成属性注入,对于三个方法就是
    // 1. postProcessBeforeInstantiation  创建对象前调用
    // 2. postProcessAfterInstantiation   对象创建完成,@AutoWired注解解析后调用
    // 3. postProcessPropertyValues(已过期,被postProcessProperties替代) 进行属性注入
    // 下面这段代码的主要作用就是我们可以提供一个InstantiationAwareBeanPostProcessor
    // 提供的这个后置处理如果实现了postProcessAfterInstantiation方法并且返回false
    // 那么可以跳过Spring默认的属性注入,但是这也意味着我们要自己去实现属性注入的逻辑
	// 执行InstantiationAwareBeanPostProcessor.postProcessAfterInstantiation方法
	if (!mbd.isSynthetic() && hasInstantiationAwareBeanPostProcessors()) {
		for (BeanPostProcessor bp : getBeanPostProcessors()) {
			if (bp instanceof InstantiationAwareBeanPostProcessor) {
				InstantiationAwareBeanPostProcessor ibp = (InstantiationAwareBeanPostProcessor) bp;
				if (!ibp.postProcessAfterInstantiation(bw.getWrappedInstance(), beanName)) {
					return;
				}
			}
		}
	}

	// 获取所有待填充属性;这里其实就是判断XML是否提供了属性相关配置
	PropertyValues pvs = (mbd.hasPropertyValues() ? mbd.getPropertyValues() : null);
	// 确认注入模型;
	int resolvedAutowireMode = mbd.getResolvedAutowireMode();
    // 处理按属性名称(AUTOWIRE_BY_NAME)填充和按属性类型(AUTOWIRE_BY_TYPE)填充
    // 默认是AUTOWIRE_NO, 不做处理
    // 主要处理byName跟byType两种注入模型,byConstructor这种注入模型在创建对象的时候已经处理过了
    // 这里都是对自动注入进行处理,byName跟byType两种注入模型均是依赖setter方法
    // byName,根据setter方法的名字来查找对应的依赖,例如setA,那么就是去容器中查找名字为a的Bean
    // byType,根据setter方法的参数类型来查找对应的依赖,例如setXx(A a),就是去容器中查询类型为A的bean
	if (resolvedAutowireMode == AUTOWIRE_BY_NAME || resolvedAutowireMode == AUTOWIRE_BY_TYPE) {
		MutablePropertyValues newPvs = new MutablePropertyValues(pvs);
		// Add property values based on autowire by name if applicable.
		if (resolvedAutowireMode == AUTOWIRE_BY_NAME) {
			autowireByName(beanName, mbd, bw, newPvs);
		}
		// Add property values based on autowire by type if applicable.
		if (resolvedAutowireMode == AUTOWIRE_BY_TYPE) {
			autowireByType(beanName, mbd, bw, newPvs);
		}
        // pvs是XML定义的属性
        // 自动注入后,bean实际用到的属性就应该要替换成自动注入后的属性
		pvs = newPvs;
	}

    // 检查是否有InstantiationAwareBeanPostProcessor
    // 前面说过了,这个后置处理器就是来完成属性注入的
	boolean hasInstAwareBpps = hasInstantiationAwareBeanPostProcessors();
	// 深度引用检查, 引用再引用
    // 是否需要依赖检查,默认是不会进行依赖检查的
	boolean needsDepCheck = (mbd.getDependencyCheck() != AbstractBeanDefinition.DEPENDENCY_CHECK_NONE);

	PropertyDescriptor[] filteredPds = null;
	// 有InstantiationAwareBeanPostProcessors接口
	if (hasInstAwareBpps) {
		if (pvs == null) {
			pvs = mbd.getPropertyValues();
		}
		for (BeanPostProcessor bp : getBeanPostProcessors()) {
			if (bp instanceof InstantiationAwareBeanPostProcessor) {
				InstantiationAwareBeanPostProcessor ibp = (InstantiationAwareBeanPostProcessor) bp;
.
				// 执行InstantiationAwareBeanPostProcessors.postProcessProperties
				// 这里会进行 @Autowired 和 @Resource 的注入工作
				// 这种类型的InstantiationAwareBeanPostProcessor类负责给属性赋值
				// 以AutowiredAnnotationBeanPostProcessor为例,@Autowired注解为属性赋值。
				// 	执行 postProcessProperties
				// 		   ->findAutowiringMetadata
				// 			 ->buildAutowiringMetadata
				// 			   ->findAutowiredAnnotation 获取bean属性上中有@Autowired注解的属性放入InjectionMetadata
				// 				 ->InjectionMetadata.InjectedElement.inject 利用反射赋值
				PropertyValues pvsToUse = ibp.postProcessProperties(pvs, bw.getWrappedInstance(), beanName);
				if (pvsToUse == null) {
					if (filteredPds == null) {
						filteredPds = filterPropertyDescriptorsForDependencyCheck(bw, mbd.allowCaching);
					}
					// 执行InstantiationAwareBeanPostProcessors.postProcessPropertyValues方法
					// 这是一个过时的方法,放到这里就是为了兼容老版本
                    // 在 AutowiredAnnotationBeanPostProcessor 中postProcessPropertyValues直接调用了postProcessProperties方法
					pvsToUse = ibp.postProcessPropertyValues(pvs, filteredPds, bw.getWrappedInstance(), beanName);
					if (pvsToUse == null) {
						return;
					}
				}
				pvs = pvsToUse;
			}
		}
	}
    // 需要进行依赖检查
	if (needsDepCheck) {
		if (filteredPds == null) {
            // 得到需要进行依赖检查的属性的集合
			filteredPds = filterPropertyDescriptorsForDependencyCheck(bw, mbd.allowCaching);
		}
        // 对需要进行依赖检查的属性进行依赖检查
		checkDependencies(beanName, mbd, filteredPds, pvs);
	}

    // 将XML中的配置属性应用到Bean上
	if (pvs != null) {
		applyPropertyValues(beanName, mbd, bw, pvs);
	}
}
上面这段代码主要可以拆分为三个部分
- 处理自动注入
- 处理属性注入(主要指处理@Autowired注解),最重要
- 处理依赖检查
处理自动注入
autowireByName
对应源码如下:
protected void autowireByName(
    String beanName, AbstractBeanDefinition mbd, BeanWrapper bw, MutablePropertyValues pvs) {
    // 得到符合下面条件的属性名称
    // 1.有setter方法
    // 2.需要进行依赖检查
    // 3.不包含在XML配置中
    // 4.不是简单类型(基本数据类型,枚举,日期等)
    // 这里可以看到XML配置优先级高于自动注入的优先级
    // 不进行依赖检查的属性,也不会进行属性注入
    String[] propertyNames = unsatisfiedNonSimpleProperties(mbd, bw);
    for (String propertyName : propertyNames) {
        if (containsBean(propertyName)) {
            // 主要就是通过BeanName去获取Bean
            Object bean = getBean(propertyName);
            // 将自动注入的属性添加到pvs中去
            pvs.add(propertyName, bean);
            // 注册bean之间的依赖关系
            registerDependentBean(propertyName, beanName);
            // 忽略日志
        }
        // 忽略日志
    }
}
autowireByType
protected void autowireByType(String beanName, AbstractBeanDefinition mbd, BeanWrapper bw, MutablePropertyValues pvs)
{
	// 这个类型转换器,主要是在处理@Value时需要使用
	TypeConverter converter = getCustomTypeConverter();
	if(converter == null)
	{
		converter = bw;
	}
	Set < String > autowiredBeanNames = new LinkedHashSet < > (4);
	// 得到符合下面条件的属性名称
	// 1.有setter方法
	// 2.需要进行依赖检查
	// 3.不包含在XML配置中
	// 4.不是简单类型(基本数据类型,枚举,日期等)
	// 这里可以看到XML配置优先级高于自动注入的优先级
	String[] propertyNames = unsatisfiedNonSimpleProperties(mbd, bw);
	for(String propertyName: propertyNames)
	{
		try
		{
			PropertyDescriptor pd = bw.getPropertyDescriptor(propertyName);
			if(Object.class != pd.getPropertyType())
			{
				// 这里获取到的就是setter方法的参数,因为我们需要按照类型进行注入嘛
				MethodParameter methodParam = BeanUtils.getWriteMethodParameter(pd);
				// 如果是PriorityOrdered在进行类型匹配时不会去匹配factoryBean
				// 如果不是PriorityOrdered,那么在查找对应类型的依赖的时候会会去匹factoryBean
				// 这就是Spring的一种设计理念,实现了PriorityOrdered接口的Bean被认为是一种
				// 最高优先级的Bean,这一类的Bean在进行为了完成装配而去检查类型时,
				// 不去检查factoryBean
				// 具体可以参考PriorityOrdered接口上的注释文档
				boolean eager = !(bw.getWrappedInstance() instanceof PriorityOrdered);
				// 将参数封装成为一个依赖描述符
				// 依赖描述符会通过:依赖所在的类,字段名/方法名,依赖的具体类型等来描述这个依赖
				DependencyDescriptor desc = new AutowireByTypeDependencyDescriptor(methodParam, eager);
				// 解析依赖,这里会处理@Value注解
				// 另外,通过指定的类型到容器中查找对应的bean
				Object autowiredArgument = resolveDependency(desc, beanName, autowiredBeanNames, converter);
				if(autowiredArgument != null)
				{
					// 将查找出来的依赖属性添加到pvs中,后面会将这个pvs应用到bean上
					pvs.add(propertyName, autowiredArgument);
				}
				// 注册bean直接的依赖关系
				for(String autowiredBeanName: autowiredBeanNames)
				{
					registerDependentBean(autowiredBeanName, beanName);
					if(logger.isDebugEnabled())
					{
						logger.debug("Autowiring by type from bean name '" + beanName + "' via property '" + propertyName + "' to bean named '" + autowiredBeanName + "'");
					}
				}
				autowiredBeanNames.clear();
			}
		}
		catch(BeansException ex)
		{
			throw new UnsatisfiedDependencyException(mbd.getResourceDescription(), beanName, propertyName, ex);
		}
	}
}
resolveDependency
可以参考**Spring杂谈 | 什么是ObjectFactory?什么是ObjectProvider?**
可以看到,真正做事的方法是doResolveDependency
@Override
public Object resolveDependency(DependencyDescriptor descriptor, String requestingBeanName, Set<String> autowiredBeanNames, @Nullable TypeConverter typeConverter) throws BeansException {
 // descriptor代表当前需要注入的那个字段,或者方法的参数,也就是注入点
    // ParameterNameDiscovery用于解析方法参数名称
    descriptor.initParameterNameDiscovery(getParameterNameDiscoverer());
    // 1. Optional<T>
    if (Optional.class == descriptor.getDependencyType()) {
        return createOptionalDependency(descriptor, requestingBeanName);
    // 2. ObjectFactory<T>、ObjectProvider<T>
    } else if (ObjectFactory.class == descriptor.getDependencyType() ||
             ObjectProvider.class == descriptor.getDependencyType()) {
        return new DependencyObjectProvider(descriptor, requestingBeanName);
    // 3. javax.inject.Provider<T>
    } else if (javaxInjectProviderClass == descriptor.getDependencyType()) {
        return new Jsr330Factory().createDependencyProvider(descriptor, requestingBeanName);
    } else {
        // 4. @Lazy
        Object result = getAutowireCandidateResolver().getLazyResolutionProxyIfNecessary(
            descriptor, requestingBeanName);
        // 5. 正常情况
        if (result == null) {
            result = doResolveDependency(descriptor, requestingBeanName, autowiredBeanNames, typeConverter);
        }
        return result;
    }
}
doResolveDependency
public Object doResolveDependency(DependencyDescriptor descriptor, @Nullable String beanName, @Nullable Set < String > autowiredBeanNames, @Nullable TypeConverter typeConverter) throws BeansException
{
    InjectionPoint previousInjectionPoint = ConstructorResolver.setCurrentInjectionPoint(descriptor);
    try
    {
        Object shortcut = descriptor.resolveShortcut(this);
        if(shortcut != null)
        {
            return shortcut;
        }
        // 依赖的具体类型
        Class <? > type = descriptor.getDependencyType();
        // 处理@Value注解,这里得到的时候@Value中的值
        Object value = getAutowireCandidateResolver().getSuggestedValue(descriptor);
        if(value != null)
        {
            if(value instanceof String)
            {
                // 解析@Value中的占位符
                String strVal = resolveEmbeddedValue((String) value);
                // 获取到对应的bd
                BeanDefinition bd = (beanName != null && containsBean(beanName) ? getMergedBeanDefinition(beanName) : null);
                // 处理EL表达式
                value = evaluateBeanDefinitionString(strVal, bd);
            }
            // 通过解析el表达式可能还需要进行类型转换
            TypeConverter converter = (typeConverter != null ? typeConverter : getTypeConverter());
            return(descriptor.getField() != null ? converter.convertIfNecessary(value, type, descriptor.getField()) : converter.convertIfNecessary(value, type, descriptor.getMethodParameter()));
        }
        // 对map,collection,数组类型的依赖进行处理
        // 最终会根据集合中的元素类型,调用findAutowireCandidates方法
        Object multipleBeans = resolveMultipleBeans(descriptor, beanName, autowiredBeanNames, typeConverter);
        if(multipleBeans != null)
        {
            return multipleBeans;
        }
        // 根据指定类型可能会找到多个bean
        // 这里返回的既有可能是对象,也有可能是对象的类型
        // 这是因为到这里还不能明确的确定当前bean到底依赖的是哪一个bean
        // 所以如果只会返回这个依赖的类型以及对应名称,最后还需要调用getBean(beanName)
        // 去创建这个Bean
        Map < String, Object > matchingBeans = findAutowireCandidates(beanName, type, descriptor);
        // 一个都没找到,直接抛出异常
        if(matchingBeans.isEmpty())
        {
            if(isRequired(descriptor))
            {
                raiseNoMatchingBeanFound(type, descriptor.getResolvableType(), descriptor);
            }
            return null;
        }
        String autowiredBeanName;
        Object instanceCandidate;
        // 通过类型找到了多个
        if(matchingBeans.size() > 1)
        {
            // 根据是否是主Bean
            // 是否是最高优先级的Bean
            // 是否是名称匹配的Bean
            // 来确定具体的需要注入的Bean的名称
            // 到这里可以知道,Spring在查找依赖的时候遵循先类型再名称的原则(没有@Qualifier注解情况下)
            autowiredBeanName = determineAutowireCandidate(matchingBeans, descriptor);
            if(autowiredBeanName == null)
            {
                // 无法推断出具体的名称
                // 如果依赖是必须的,直接抛出异常
                // 如果依赖不是必须的,但是这个依赖类型不是集合或者数组,那么也抛出异常
                if(isRequired(descriptor) || !indicatesMultipleBeans(type))
                {
                    return descriptor.resolveNotUnique(type, matchingBeans);
                }
                // 依赖不是必须的,但是依赖类型是集合或者数组,那么返回一个null
                else
                {
                    return null;
                }
            }
            instanceCandidate = matchingBeans.get(autowiredBeanName);
        }
        else
        {
            // 直接找到了一个对应的Bean
            Map.Entry < String, Object > entry = matchingBeans.entrySet().iterator().next();
            autowiredBeanName = entry.getKey();
            instanceCandidate = entry.getValue();
        }
        if(autowiredBeanNames != null)
        {
            autowiredBeanNames.add(autowiredBeanName);
        }
        // 前面已经说过了,这里可能返回的是Bean的类型,所以需要进一步调用getBean
        if(instanceCandidate instanceof Class)
        {
            instanceCandidate = descriptor.resolveCandidate(autowiredBeanName, type, this);
        }
        // 做一些检查,如果依赖是必须的,查找出来的依赖是一个null,那么报错
        // 查询处理的依赖类型不符合,也报错
        Object result = instanceCandidate;
        if(result instanceof NullBean)
        {
            if(isRequired(descriptor))
            {
                raiseNoMatchingBeanFound(type, descriptor.getResolvableType(), descriptor);
            }
            result = null;
        }
        if(!ClassUtils.isAssignableValue(type, result))
        {
            throw new BeanNotOfRequiredTypeException(autowiredBeanName, type, instanceCandidate.getClass());
        }
        return result;
    }
    finally
    {
        ConstructorResolver.setCurrentInjectionPoint(previousInjectionPoint);
    }
}
findAutowireCandidates
protected Map < String, Object > findAutowireCandidates(@Nullable String beanName, Class <? > requiredType, DependencyDescriptor descriptor)
{
	// 简单来说,这里就是到容器中查询requiredType类型的所有bean的名称的集合
	// 这里会根据descriptor.isEager()来决定是否要匹配factoryBean类型的Bean
	// 如果isEager()为true,那么会匹配factoryBean,反之,不会
	String[] candidateNames = BeanFactoryUtils.beanNamesForTypeIncludingAncestors(this, requiredType, true, descriptor.isEager());
	Map < String, Object > result = new LinkedHashMap < > (candidateNames.length);
	// 第一步会到resolvableDependencies这个集合中查询是否已经存在了解析好的依赖
	// 像我们之所以能够直接在Bean中注入applicationContext对象
	// 就是因为Spring之前就将这个对象放入了resolvableDependencies集合中
	for(Class <? > autowiringType: this.resolvableDependencies.keySet())
	{
		if(autowiringType.isAssignableFrom(requiredType))
		{
			Object autowiringValue = this.resolvableDependencies.get(autowiringType);
			// 如果resolvableDependencies放入的是一个ObjectFactory类型的依赖
			// 那么在这里会生成一个代理对象
			// 例如,我们可以在controller中直接注入request对象
			// 就是因为,容器启动时就在resolvableDependencies放入了一个键值对
			// 其中key为:Request.class,value为:ObjectFactory
			// 在实际注入时放入的是一个代理对象
			autowiringValue = AutowireUtils.resolveAutowiringValue(autowiringValue, requiredType);
			if(requiredType.isInstance(autowiringValue))
			{
				// 这里放入的key不是Bean的名称
				// value是实际依赖的对象
				result.put(ObjectUtils.identityToString(autowiringValue), autowiringValue);
				break;
			}
		}
	}
	// 接下来开始对之前查找出来的类型匹配的所有BeanName进行处理
	for(String candidate: candidateNames)
	{
		// 不是自引用,什么是自引用?
		// 1.候选的Bean的名称跟需要进行注入的Bean名称相同,意味着,自己注入自己
		// 2.或者候选的Bean对应的factoryBean的名称跟需要注入的Bean名称相同,
		// 也就是说A依赖了B但是B的创建又需要依赖A
		// 要符合注入的条件
		if(!isSelfReference(beanName, candidate) && isAutowireCandidate(candidate, descriptor))
		{
			// 调用addCandidateEntry,加入到返回集合中,后文有对这个方法的分析
			addCandidateEntry(result, candidate, descriptor, requiredType);
		}
	}
	// 排除自引用的情况下,没有找到一个合适的依赖
	if(result.isEmpty() && !indicatesMultipleBeans(requiredType))
	{
		// 1.先走fallback逻辑,Spring提供的一个扩展吧,感觉没什么卵用
		// 默认情况下fallback的依赖描述符就是自身
		DependencyDescriptor fallbackDescriptor = descriptor.forFallbackMatch();
		for(String candidate: candidateNames)
		{
			if(!isSelfReference(beanName, candidate) && isAutowireCandidate(candidate, fallbackDescriptor))
			{
				addCandidateEntry(result, candidate, descriptor, requiredType);
			}
		}
		// fallback还是失败
		if(result.isEmpty())
		{
			// 处理自引用
			// 从这里可以看出,自引用的优先级是很低的,只有在容器中真正的只有这个Bean能作为
			// 候选者的时候,才会去处理,否则自引用是被排除掉的
			for(String candidate: candidateNames)
			{
				if(isSelfReference(beanName, candidate) &&
					// 不是一个集合或者
					// 是一个集合,但是beanName跟candidate的factoryBeanName相同
					(!(descriptor instanceof MultiElementDescriptor) || !beanName.equals(candidate)) && isAutowireCandidate(candidate, fallbackDescriptor))
				{
					addCandidateEntry(result, candidate, descriptor, requiredType);
				}
			}
		}
	}
	return result;
}

// candidates:就是findAutowireCandidates方法要返回的候选集合
// candidateName:当前的这个候选Bean的名称
// descriptor:依赖描述符
// requiredType:依赖的类型
private void addCandidateEntry(Map < String, Object > candidates, String candidateName, DependencyDescriptor descriptor, Class <? > requiredType)
{
    // 如果依赖是一个集合,或者容器中已经包含这个单例了
    // 那么直接调用getBean方法创建或者获取这个Bean
    if(descriptor instanceof MultiElementDescriptor || containsSingleton(candidateName))
    {
        Object beanInstance = descriptor.resolveCandidate(candidateName, requiredType, this);
        candidates.put(candidateName, (beanInstance instanceof NullBean ? null : beanInstance));
    }
    // 如果依赖的类型不是一个集合,这个时候还不能确定到底要使用哪个依赖,
    // 所以不能将这些Bean创建出来,所以这个时候,放入candidates是Bean的名称以及类型
    else
    {
        candidates.put(candidateName, getType(candidateName));
    }
}
处理属性注入(@Autowired)
postProcessProperties
// 在applyMergedBeanDefinitionPostProcessors方法执行的时候,
// 已经解析过了@Autowired注解(buildAutowiringMetadata方法)
public PropertyValues postProcessProperties(PropertyValues pvs, Object bean, String beanName) {
    // 这里获取到的是解析过的缓存好的注入元数据
    InjectionMetadata metadata = findAutowiringMetadata(beanName, bean.getClass(), pvs);
    try {
        // 直接调用inject方法
        // 存在两种InjectionMetadata
        // 1.AutowiredFieldElement
        // 2.AutowiredMethodElement
        // 分别对应字段的属性注入以及方法的属性注入
        metadata.inject(bean, beanName, pvs);
    }
    catch (BeanCreationException ex) {
        throw ex;
    }
    catch (Throwable ex) {
        throw new BeanCreationException(beanName, "Injection of autowired dependencies failed", ex);
    }
    return pvs;
}
字段的属性注入
// 最终反射调用filed.set方法
protected void inject(Object bean, @Nullable String beanName, @Nullable PropertyValues pvs) throws Throwable {
    Field field = (Field) this.member;
    Object value;
    if (this.cached) {
        // 第一次注入的时候肯定没有缓存
        // 这里也是对原型情况的处理
        value = resolvedCachedArgument(beanName, this.cachedFieldValue);
    } else {
        DependencyDescriptor desc = new DependencyDescriptor(field, this.required);
        desc.setContainingClass(bean.getClass());
        Set<String> autowiredBeanNames = new LinkedHashSet<>(1);
        Assert.state(beanFactory != null, "No BeanFactory available");
        TypeConverter typeConverter = beanFactory.getTypeConverter();
        try {
            // 这里可以看到,对@Autowired注解在字段上的处理
            // 跟byType下自动注入的处理是一样的,就是调用resolveDependency方法
            value = beanFactory.resolveDependency(desc, beanName, autowiredBeanNames, typeConverter);
        } catch (BeansException ex) {
            throw new UnsatisfiedDependencyException(null, beanName, new InjectionPoint(field), ex);
        }
        synchronized (this) {
            // 没有缓存过的话,这里需要进行缓存
            if (!this.cached) {
                if (value != null || this.required) {
                    this.cachedFieldValue = desc;
                    // 注册Bean之间的依赖关系
                    registerDependentBeans(beanName, autowiredBeanNames);
                    // 如果这个类型的依赖只存在一个的话,我们就能确定这个Bean的名称
                    // 那么直接将这个名称缓存到ShortcutDependencyDescriptor中
                    // 第二次进行注入的时候就可以直接调用getBean(beanName)得到这个依赖了
                    // 实际上正常也只有一个,多个就报错了
                    // 另外这里会过滤掉@Vlaue得到的依赖
                    if (autowiredBeanNames.size() == 1) {
                        String autowiredBeanName = autowiredBeanNames.iterator().next();
                        // 通过resolvableDependencies这个集合找的依赖不满足containsBean条件
                        // 不会进行缓存,因为缓存实际还是要调用getBean,而resolvableDependencies
                        // 是没法通过getBean获取的
                        if (beanFactory.containsBean(autowiredBeanName) &&
                            beanFactory.isTypeMatch(autowiredBeanName, field.getType())) {        // 依赖描述符封装成ShortcutDependencyDescriptor进行缓存
                            this.cachedFieldValue = new ShortcutDependencyDescriptor(
                                desc, autowiredBeanName, field.getType());
                        }
                    }
                } else {
                    this.cachedFieldValue = null;
                }
                this.cached = true;
            }
        }
    }
    if (value != null) {
        // 反射调用Field.set方法
        ReflectionUtils.makeAccessible(field);
        field.set(bean, value);
    }
}
方法的属性注入
// 代码看着很长,实际上逻辑跟字段注入基本一样
protected void inject(Object bean, @Nullable String beanName, @Nullable PropertyValues pvs) throws Throwable {
    // 判断XML中是否配置了这个属性,如果配置了直接跳过
    // 换而言之,XML配置的属性优先级高于@Autowired注解
    if (checkPropertySkipping(pvs)) {
        return;
    }
    Method method = (Method) this.member;
    Object[] arguments;
    if (this.cached) {
        arguments = resolveCachedArguments(beanName);
    } else {
        // 通过方法参数类型构造依赖描述符
        // 逻辑基本一样的,最终也是调用beanFactory.resolveDependency方法
        Class<?>[] paramTypes = method.getParameterTypes();
        arguments = new Object[paramTypes.length];
        DependencyDescriptor[] descriptors = new DependencyDescriptor[paramTypes.length];
        Set<String> autowiredBeans = new LinkedHashSet<>(paramTypes.length);
        Assert.state(beanFactory != null, "No BeanFactory available");
        TypeConverter typeConverter = beanFactory.getTypeConverter();

        // 遍历方法的每个参数
        for (int i = 0; i < arguments.length; i++) {
            MethodParameter methodParam = new MethodParameter(method, i);
            DependencyDescriptor currDesc = new DependencyDescriptor(methodParam, this.required);
            currDesc.setContainingClass(bean.getClass());
            descriptors[i] = currDesc;
            try {
                // 还是要调用这个方法
                Object arg = beanFactory.resolveDependency(currDesc, beanName, autowiredBeans, typeConverter);
                if (arg == null && !this.required) {
                    arguments = null;
                    break;
                }
                arguments[i] = arg;
            } catch (BeansException ex) {
                throw new UnsatisfiedDependencyException(null, beanName, new InjectionPoint(methodParam), ex);
            }
        }
        synchronized (this) {
            if (!this.cached) {
                if (arguments != null) {
                    Object[] cachedMethodArguments = new Object[paramTypes.length];
                    System.arraycopy(descriptors, 0, cachedMethodArguments, 0, arguments.length);
                    // 注册bean之间的依赖关系
                    registerDependentBeans(beanName, autowiredBeans);

                    // 跟字段注入差不多,存在@Value注解,不进行缓存
                    if (autowiredBeans.size() == paramTypes.length) {
                        Iterator<String> it = autowiredBeans.iterator();
                        for (int i = 0; i < paramTypes.length; i++) {
                            String autowiredBeanName = it.next();
                            if (beanFactory.containsBean(autowiredBeanName) &&
                                beanFactory.isTypeMatch(autowiredBeanName, paramTypes[i])) {
                                cachedMethodArguments[i] = new ShortcutDependencyDescriptor(
                                    descriptors[i], autowiredBeanName, paramTypes[i]);
                            }
                        }
                    }
                    this.cachedMethodArguments = cachedMethodArguments;
                } else {
                    this.cachedMethodArguments = null;
                }
                this.cached = true;
            }
        }
    }
    if (arguments != null) {
        try {
            // 反射调用方法
            // 像我们的setter方法就是在这里调用的
            ReflectionUtils.makeAccessible(method);
            method.invoke(bean, arguments);
        } catch (InvocationTargetException ex) {
            throw ex.getTargetException();
        }
    }
}
处理依赖检查
protected void checkDependencies(
    String beanName, AbstractBeanDefinition mbd, PropertyDescriptor[] pds, PropertyValues pvs)
    throws UnsatisfiedDependencyException {

    int dependencyCheck = mbd.getDependencyCheck();
    for (PropertyDescriptor pd : pds) {

        // 有set方法但是在pvs中没有对应属性,那么需要判断这个属性是否要进行依赖检查
        // 如果需要进行依赖检查的话,就需要报错了
        // pvs中保存的是自动注入以及XML配置的属性
        if (pd.getWriteMethod() != null && !pvs.contains(pd.getName())) {

            // 是否是基本属性,枚举/日期等也包括在内
            boolean isSimple = BeanUtils.isSimpleProperty(pd.getPropertyType());

            // 如果DEPENDENCY_CHECK_ALL,对任意属性都开启了依赖检查,报错
            // DEPENDENCY_CHECK_SIMPLE,对基本属性开启了依赖检查并且是基本属性,报错
            // DEPENDENCY_CHECK_OBJECTS,对非基本属性开启了依赖检查并且不是非基本属性,报错
            boolean unsatisfied = (dependencyCheck == AbstractBeanDefinition.DEPENDENCY_CHECK_ALL) ||
                (isSimple && dependencyCheck == AbstractBeanDefinition.DEPENDENCY_CHECK_SIMPLE) ||
                (!isSimple && dependencyCheck == AbstractBeanDefinition.DEPENDENCY_CHECK_OBJECTS);

            if (unsatisfied) {
                throw new UnsatisfiedDependencyException(mbd.getResourceDescription(), beanName, pd.getName(), "Set this property value or disable dependency checking for this bean.");
            }
        }
    }
}
将解析出来的属性应用到Bean上
到这一步解析出来的属性主要有三个来源
- XML中配置的
- 通过byName的方式自动注入的
- 通过byType的方式自动注入的
但是在应用到Bean前还需要做一步类型转换,可以参考**Spring官网阅读(十四)Spring中的BeanWrapper及类型转换**介绍,而且因为XML跟自动注入的方式都不常见,正常@Autowired的方式进行注入的话,这个方法没有什么用,所以本文就不再赘述。
小结
主要分析了Spring在属性注入过程中的相关代码,整个属性注入可以分为两个部分
@Autowired/@Vale的方式完成属性注入- 自动注入(
byType/byName)
完成属性注入的核心方法其实就是doResolveDependency。doResolveDependency这个方法的逻辑简单来说分为两步:
- 通过依赖类型查询到所有的类型匹配的bean的名称
- 如果找到了多个的话,再根据依赖的名称匹配对应的Bean的名称
- 调用getBean得到这个需要被注入的Bean
- 最后反射调用字段的set方法完成属性注入
从上面也可以知道,其实整个属性注入的逻辑是很简单的。
6.4 initializeBean
org.springframework.beans.factory.support.AbstractAutowireCapableBeanFactory#initializeBean
/**
 * 1.先注入Aware接口需要的Bean
 * 2.执行后置处理器的postProcessBeforeInitialization方法
 * 3.执行初始化方法(init-method)
 * 4.执行后置处理器的postProcessAfterInitialization方法
 */
protected Object initializeBean(final String beanName, final Object bean, @Nullable RootBeanDefinition mbd) {
	if (System.getSecurityManager() != null) {
		AccessController.doPrivileged((PrivilegedAction<Object>) () -> {
			invokeAwareMethods(beanName, bean);
			return null;
		}, getAccessControlContext());
	} else {
		// 注入Aware接口, BeanNameAware,BeanClassLoaderAware,BeanFactoryAware
		// ApplicationContextAware不是在这个时候注入的
		invokeAwareMethods(beanName, bean);
	}

	Object wrappedBean = bean;
	// 判断是不是框架自己的Bean,还是用户创建的Bean;
	// [AbstractBeanDefinition]: private boolean synthetic = false;
	// ApplicationContextAware在这个时候注入,由ApplicationContextAwareProcessor注入;
    // 执行Bean后置处理器的postProcessBeforeInitialization,返回结果为所有后置处理器最后一个返回的不为空的结果.
	// 而ApplicationContextAwareProcessor只在AbstractApplicationContext.refresh方法中的prepareBeanFactory(beanFactory);注入的
	// beanFactory.addBeanPostProcessor(new ApplicationContextAwareProcessor(this));
	if (mbd == null || !mbd.isSynthetic()) {
		wrappedBean = applyBeanPostProcessorsBeforeInitialization(wrappedBean, beanName);
	}

	try {
		// 执行初始化方法
		// 先执行InitializingBean.afterPropertiesSet方法,然后执行初始化方法(反射)
		invokeInitMethods(beanName, wrappedBean, mbd);
	} catch (Throwable ex) {
		throw new BeanCreationException((mbd != null ? mbd.getResourceDescription() : null), beanName, "Invocation of init method failed", ex);
	}

	// 判断是不是框架自己的Bean,还是用户创建的Bean;
	// 执行Bean后置处理器的postProcessAfterInitialization,返回结果为所有后置处理器最后一个返回的不为空的结果.
	if (mbd == null || !mbd.isSynthetic()) {
		wrappedBean = applyBeanPostProcessorsAfterInitialization(wrappedBean, beanName);
	}

	return wrappedBean;
}
6.5 postProcessAfterInstantiation
org.springframework.beans.factory.config.InstantiationAwareBeanPostProcessor#postProcessAfterInstantiation
if (!mbd.isSynthetic() && hasInstantiationAwareBeanPostProcessors()) {
    for (BeanPostProcessor bp : getBeanPostProcessors()) {
        if (bp instanceof InstantiationAwareBeanPostProcessor) {
            InstantiationAwareBeanPostProcessor ibp = (InstantiationAwareBeanPostProcessor) bp;
            //如果返回为 false, 则会终止属性注入
            if (!ibp.postProcessAfterInstantiation(bw.getWrappedInstance(), beanName)) {
                return;
            }
        }
    }
}
需要注意一个问题, 如果返回值是 false , 那么此处就回结束属性注入方法: populateBean
这里遍历了容器中的后置处理器, 然后调用满足条件的 postProcessAfterInstantiation() 方法.
boolean postProcessAfterInstantiation(Object bean, String beanName) throws BeansException
通过调试, 很明了的能发现, 有三个后置处理器能满足条件, 调用先后顺序为:
-
ConfigurationClassPostProcessor$ImportAwareBeanPostProcessor
-
CommonAnnotationBeanPostProcessor
-
AutowiredAnnotationBeanPostProcessor
6.5.1 ConfigurationClassPostProcessor$ImportAwareBeanPostProcessor
这里是由其父类来完成的:
org.springframework.beans.factory.config.InstantiationAwareBeanPostProcessorAdapter#postProcessAfterInstantiation
@Override
public boolean postProcessAfterInstantiation(Object bean, String beanName) throws BeansException {
    return true;
}
6.5.2 CommonAnnotationBeanPostProcessor
org.springframework.context.annotation.CommonAnnotationBeanPostProcessor#postProcessAfterInstantiation
@Override
public boolean postProcessAfterInstantiation(Object bean, String beanName) {
    return true;
}
6.5.3 AutowiredAnnotationBeanPostProcessor
org.springframework.beans.factory.config.InstantiationAwareBeanPostProcessorAdapter#postProcessAfterInstantiation
@Override
public boolean postProcessAfterInstantiation(Object bean, String beanName) throws BeansException {
    return true;
}
6.6 postProcessProperties
org.springframework.beans.factory.config.InstantiationAwareBeanPostProcessor#postProcessProperties
代码片段:
org.springframework.beans.factory.support.AbstractAutowireCapableBeanFactory#populateBean
boolean hasInstAwareBpps = hasInstantiationAwareBeanPostProcessors();
//深度引用检查, 引用再引用
boolean needsDepCheck = (mbd.getDependencyCheck() != AbstractBeanDefinition.DEPENDENCY_CHECK_NONE);

PropertyDescriptor[] filteredPds = null;
if (hasInstAwareBpps) {
    if (pvs == null) {
        pvs = mbd.getPropertyValues();
    }
    for (BeanPostProcessor bp : getBeanPostProcessors()) {
        if (bp instanceof InstantiationAwareBeanPostProcessor) {
            InstantiationAwareBeanPostProcessor ibp = (InstantiationAwareBeanPostProcessor) bp;
            //这里也是调用的实例化后的后置处理器, 只是调用的方法不一样       //这里会进行 @Autowired 和 @Resource 的注入工作
            PropertyValues pvsToUse = ibp.postProcessProperties(pvs, bw.getWrappedInstance(), beanName);
            if (pvsToUse == null) {
                if (filteredPds == null) {
                    filteredPds = filterPropertyDescriptorsForDependencyCheck(bw, mbd.allowCaching);
                }
                pvsToUse = ibp.postProcessPropertyValues(pvs, filteredPds, bw.getWrappedInstance(), beanName);
                if (pvsToUse == null) {
                    return;
                }
            }
            pvs = pvsToUse;
        }
    }
}
同样的, 通过调试的方式, 来确定这里使用了那些后置处理器:
-
ConfigurationClassPostProcessor$ImportAwareBeanPostProcessor
-
CommonAnnotationBeanPostProcessor
-
AutowiredAnnotationBeanPostProcessor
6.6.1 ConfigurationClassPostProcessor$ImportAwareBeanPostProcessor
org.springframework.context.annotation.ConfigurationClassPostProcessor.ImportAwareBeanPostProcessor#postProcessProperties
@Override
public PropertyValues postProcessProperties(@Nullable PropertyValues pvs, Object bean, String beanName) {
    // Inject the BeanFactory before AutowiredAnnotationBeanPostProcessor's
    // postProcessProperties method attempts to autowire other configuration beans.
    if (bean instanceof EnhancedConfiguration) {
        ((EnhancedConfiguration) bean).setBeanFactory(this.beanFactory);
    }
    return pvs;
}
这里是对 EnhancedConfiguration 提供支持. 其实他继承了 BeanFactoryAware 接口, 并且什么都没干
public interface EnhancedConfiguration extends BeanFactoryAware {}
EnhancedConfiguration 是 ConfigurationClassEnhancer 的一个内部接口, 是给 spring 自己内部使用的, 开发人员用不了这个, 也没必要.
6.6.2 CommonAnnotationBeanPostProcessor
org.springframework.context.annotation.CommonAnnotationBeanPostProcessor#postProcessProperties
@Override
public PropertyValues postProcessProperties(PropertyValues pvs, Object bean, String beanName) {
    //找出类中标注了@Resource注解的属性和方法
    //else if (field.isAnnotationPresent(Resource.class))
    InjectionMetadata metadata = findResourceMetadata(beanName, bean.getClass(), pvs);
    try {
        metadata.inject(bean, beanName, pvs);
    }
    catch (Throwable ex) {
        throw new BeanCreationException(beanName, "Injection of resource dependencies failed", ex);
    }
    return pvs;
}
这里主要是对 @Resource 进行注入
findResourceMetadata在MergedBeanDefinitionPostProcessor#postProcessMergedBeanDefinition的时候执行过.
所以这里, 大概率是从缓存中拿取结果, 然后进行注入操作. 事实上, 也确实如此.
inject 最终会调用
org.springframework.beans.factory.annotation.InjectionMetadata.InjectedElement#inject 方法
protected void inject(Object target, @Nullable String requestingBeanName, @Nullable PropertyValues pvs)
        throws Throwable {

    if (this.isField) {
        Field field = (Field) this.member;
        ReflectionUtils.makeAccessible(field);
        field.set(target, getResourceToInject(target, requestingBeanName));
    }
    else {
        if (checkPropertySkipping(pvs)) {
            return;
        }
        try {
            Method method = (Method) this.member;
            ReflectionUtils.makeAccessible(method);
            method.invoke(target, getResourceToInject(target, requestingBeanName));
        }
        catch (InvocationTargetException ex) {
            throw ex.getTargetException();
        }
    }
}
这里分两种情况进行处理, 一种是 通过字段注入, 另一种是通过方法注入.
字段注入的方式是比较多见的.
getResourceToInject() 方法是一个被重写了的方法:
org.springframework.context.annotation.CommonAnnotationBeanPostProcessor.ResourceElement#getResourceToInject
是在一个内部类中被重写的方法.
@Override
protected Object getResourceToInject(Object target, @Nullable String requestingBeanName) {
    return (this.lazyLookup ? buildLazyResourceProxy(this, requestingBeanName) :
            getResource(this, requestingBeanName));
}
默认情况下, lazy = false, 所以会走 getResource() 方法
org.springframework.context.annotation.CommonAnnotationBeanPostProcessor#getResource
protected Object getResource(LookupElement element, @Nullable String requestingBeanName)
        throws NoSuchBeanDefinitionException {

    if (StringUtils.hasLength(element.mappedName)) {
        return this.jndiFactory.getBean(element.mappedName, element.lookupType);
    }
    if (this.alwaysUseJndiLookup) {
        return this.jndiFactory.getBean(element.name, element.lookupType);
    }
    if (this.resourceFactory == null) {
        throw new NoSuchBeanDefinitionException(element.lookupType,
                "No resource factory configured - specify the 'resourceFactory' property");
    }
    return autowireResource(this.resourceFactory, element, requestingBeanName);
}
根据设置的不同属性, 进不同的方法, 这里主要看 autowireResource , 因为一般情况是不需要去设置这些属性的
org.springframework.context.annotation.CommonAnnotationBeanPostProcessor#autowireResource
protected Object autowireResource(BeanFactory factory, LookupElement element, @Nullable String requestingBeanName)
        throws NoSuchBeanDefinitionException {

    Object resource;
    Set<String> autowiredBeanNames;
    String name = element.name;

    if (factory instanceof AutowireCapableBeanFactory) {
        AutowireCapableBeanFactory beanFactory = (AutowireCapableBeanFactory) factory;
        DependencyDescriptor descriptor = element.getDependencyDescriptor();
        //优先使用 根据 name 注入, 这个 name 就是 beanName
        //当 beanName 找不到时, 才就会去根据 type 来注入
        //依据是 !factory.containsBean(name)
        if (this.fallbackToDefaultTypeMatch && element.isDefaultName && !factory.containsBean(name)) {
            autowiredBeanNames = new LinkedHashSet<>();
            //根据type(类型)来进行依赖注入
            resource = beanFactory.resolveDependency(descriptor, requestingBeanName, autowiredBeanNames, null);
            if (resource == null) {
                //如果返回时 resource , 则表明, spring容器中找不到, 也创建不了 这个依赖的bean
                throw new NoSuchBeanDefinitionException(element.getLookupType(), "No resolvable resource object");
            }
        }
        else {
            //根据name(名称)来进行依赖注入
            resource = beanFactory.resolveBeanByName(name, descriptor);
            autowiredBeanNames = Collections.singleton(name);
        }
    }
    else {
        resource = factory.getBean(name, element.lookupType);
        autowiredBeanNames = Collections.singleton(name);
    }

    if (factory instanceof ConfigurableBeanFactory) {
        ConfigurableBeanFactory beanFactory = (ConfigurableBeanFactory) factory;
        for (String autowiredBeanName : autowiredBeanNames) {
            if (requestingBeanName != null && beanFactory.containsBean(autowiredBeanName)) {
                beanFactory.registerDependentBean(autowiredBeanName, requestingBeanName);
            }
        }
    }

    return resource;
}
都说, @Resource 在不设置 name 和 type 的情况下, 是优先使用 name 去 获取/创建 依赖的 bean , 如果name找不到, 才会使用 type.
这段代码, 就是支撑的依据.
6.6.3 AutowiredAnnotationBeanPostProcessor
org.springframework.beans.factory.annotation.AutowiredAnnotationBeanPostProcessor#postProcessProperties
@Override
public PropertyValues postProcessProperties(PropertyValues pvs, Object bean, String beanName) {
    InjectionMetadata metadata = findAutowiringMetadata(beanName, bean.getClass(), pvs);
    try {
        metadata.inject(bean, beanName, pvs);
    }
    catch (BeanCreationException ex) {
        throw ex;
    }
    catch (Throwable ex) {
        throw new BeanCreationException(beanName, "Injection of autowired dependencies failed", ex);
    }
    return pvs;
}
这里主要是对 @Autowired 和 @Value 进行注入的. findAutowiringMetadata
findAutowiringMetadata在MergedBeanDefinitionPostProcessor#postProcessMergedBeanDefinition的时候执行过.
所以此处, 是从缓存中拿取结果, 然后进行注入操作.
最终会调用本类中的方法:
org.springframework.beans.factory.annotation.AutowiredAnnotationBeanPostProcessor.AutowiredFieldElement#inject
@Override
protected void inject(Object bean, @Nullable String beanName, @Nullable PropertyValues pvs) throws Throwable {
    Field field = (Field) this.member;
    Object value;
    if (this.cached) {
        value = resolvedCachedArgument(beanName, this.cachedFieldValue);
    }
    else {
        DependencyDescriptor desc = new DependencyDescriptor(field, this.required);
        desc.setContainingClass(bean.getClass());
        Set<String> autowiredBeanNames = new LinkedHashSet<>(1);
        Assert.state(beanFactory != null, "No BeanFactory available");
        TypeConverter typeConverter = beanFactory.getTypeConverter();
        try {
            //先根据 type 进行匹配, 当有多个type时, 在根据name进行匹配, 如果匹配不上则抛出异常
            value = beanFactory.resolveDependency(desc, beanName, autowiredBeanNames, typeConverter);
        }
        catch (BeansException ex) {
            throw new UnsatisfiedDependencyException(null, beanName, new InjectionPoint(field), ex);
        }
        synchronized (this) {
            if (!this.cached) {
                if (value != null || this.required) {
                    this.cachedFieldValue = desc;
                    registerDependentBeans(beanName, autowiredBeanNames);
                    if (autowiredBeanNames.size() == 1) {
                        String autowiredBeanName = autowiredBeanNames.iterator().next();
                        if (beanFactory.containsBean(autowiredBeanName) &&
                                beanFactory.isTypeMatch(autowiredBeanName, field.getType())) {
                            this.cachedFieldValue = new ShortcutDependencyDescriptor(
                                    desc, autowiredBeanName, field.getType());
                        }
                    }
                }
                else {
                    this.cachedFieldValue = null;
                }
                this.cached = true;
            }
        }
    }
    if (value != null) {
        ReflectionUtils.makeAccessible(field);
        field.set(bean, value);
    }
}
二、BeanPostProcessor
1. 接口介绍
源码:
package org.springframework.beans.factory.config;

import org.springframework.beans.BeansException;
import org.springframework.lang.Nullable;

public interface BeanPostProcessor {

	/**
	 * 一般用于通过标记接口填充Bean或者类似功能
	 */
	// 在doCreateBean --> initializeBean方法中调用
	@Nullable
	default Object postProcessBeforeInitialization(Object bean, String beanName) throws BeansException {
		return bean;
	}

	/**
	 * 一般用户封装代理Bean
	 */
	// 在doCreateBean --> initializeBean方法中调用
	@Nullable
	default Object postProcessAfterInitialization(Object bean, String beanName) throws BeansException {
		return bean;
	}

}
2. 方法介绍
2.1 postProcessBeforeInitialization
会在Bean的初始化方法之前调用
2.2 postProcessAfterInitialization
会在Bean的初始化方法之后调用
3. 常见的BeanPostProcessor
- ApplicationContextAwareProcessor
- InitDestroyAnnotationBeanPostProcessor
- DestructionAwareBeanPostProcessor
- InstantiationAwareBeanPostProcessor
- SmartInstantiationAwareBeanPostProcessor
- MergedBeanDefinitionPostProcessor
3.1 ApplicationContextAwareProcessor
class ApplicationContextAwareProcessor implements BeanPostProcessor {

	private final ConfigurableApplicationContext applicationContext;

	private final StringValueResolver embeddedValueResolver;

	/**
	 * Create a new ApplicationContextAwareProcessor for the given context.
	 */
	public ApplicationContextAwareProcessor(ConfigurableApplicationContext applicationContext) {
		this.applicationContext = applicationContext;
		this.embeddedValueResolver = new EmbeddedValueResolver(applicationContext.getBeanFactory());
	}


	@Override
	@Nullable
	public Object postProcessBeforeInitialization(Object bean, String beanName) throws BeansException {
		if (!(bean instanceof EnvironmentAware || bean instanceof EmbeddedValueResolverAware ||
				bean instanceof ResourceLoaderAware || bean instanceof ApplicationEventPublisherAware ||
				bean instanceof MessageSourceAware || bean instanceof ApplicationContextAware)){
			return bean;
		}

		AccessControlContext acc = null;

		if (System.getSecurityManager() != null) {
			acc = this.applicationContext.getBeanFactory().getAccessControlContext();
		}

		if (acc != null) {
			AccessController.doPrivileged((PrivilegedAction<Object>) () -> {
				invokeAwareInterfaces(bean);
				return null;
			}, acc);
		}
		else {
			invokeAwareInterfaces(bean);
		}

		return bean;
	}

	private void invokeAwareInterfaces(Object bean) {
		if (bean instanceof EnvironmentAware) {
			((EnvironmentAware) bean).setEnvironment(this.applicationContext.getEnvironment());
		}
		if (bean instanceof EmbeddedValueResolverAware) {
			((EmbeddedValueResolverAware) bean).setEmbeddedValueResolver(this.embeddedValueResolver);
		}
		if (bean instanceof ResourceLoaderAware) {
			((ResourceLoaderAware) bean).setResourceLoader(this.applicationContext);
		}
		if (bean instanceof ApplicationEventPublisherAware) {
			((ApplicationEventPublisherAware) bean).setApplicationEventPublisher(this.applicationContext);
		}
		if (bean instanceof MessageSourceAware) {
			((MessageSourceAware) bean).setMessageSource(this.applicationContext);
		}
		if (bean instanceof ApplicationContextAware) {
			((ApplicationContextAware) bean).setApplicationContext(this.applicationContext);
		}
	}

}
3.2 InitDestroyAnnotationBeanPostProcessor
继承关系:
public class InitDestroyAnnotationBeanPostProcessor
		implements DestructionAwareBeanPostProcessor, MergedBeanDefinitionPostProcessor, PriorityOrdered, Serializable {
	......
}
继承图:
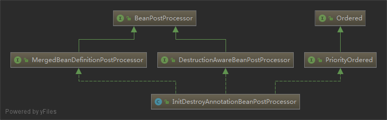
InitDestroyAnnotationBeanPostProcessor后置处理器是用来处理自定义的初始化方法和销毁方法。Spring中提供了3种自定义初始化和销毁方法:
- 通过@Bean指定init-method和destroy-method属性
- Bean实现InitializingBean(定义初始化逻辑),DisposableBean(定义销毁逻辑);
- @PostConstruct:在bean创建完成并且属性赋值完成;来执行初始化方法@PreDestroy:在容器销毁bean之前通知我们进行清理工作
InitDestroyAnnotationBeanPostProcessor的作用就是让第3种方式生效。
InitDestroyAnnotationBeanPostProcessor会在Bean创建的时候通过反射的方式查找包含@PostConstruct和@PreDestroy注解的方法,然后再通过反射执行方法。
public Object postProcessBeforeInitialization(Object bean, String beanName) throws BeansException {
    // 获取bean的metadata
    LifecycleMetadata metadata = findLifecycleMetadata(bean.getClass());
    try {
        // 执行@PostConstruct指定的init方法
        metadata.invokeInitMethods(bean, beanName);
    }
    catch (InvocationTargetException ex) {
        throw new BeanCreationException(beanName, "Invocation of init method failed", ex.getTargetException());
    }
    catch (Throwable ex) {
        throw new BeanCreationException(beanName, "Failed to invoke init method", ex);
    }
    return bean;
}
4. 关于BeanPostProcessor中各个回调调用的顺序
1、InstantiationAwareBeanPostProcessor.postProcessBeforeInstantiation(beanClass, beanName)
该方法在创建对象之前会先掉用,如果有返回实例则直接使用不会去走下面创建对象的逻辑,并在之后执行
BeanPostProcessor.postProcessAfterInitialization(result, beanName)
2、SmartInstantiationAwareBeanPostProcessor.determineCandidateConstructors(beanClass, beanName)
如果需要的话,会在实例化对象之前执行
3、MergedBeanDefinitionPostProcessor.postProcessMergedBeanDefinition(mbd, beanType, beanName)
在对象实例化完毕 初始化之前执行
4、InstantiationAwareBeanPostProcessor.postProcessAfterInstantiation(bw.getWrappedInstance(), beanName)
在bean创建完毕初始化之前执行
5、InstantiationAwareBeanPostProcessor.postProcessPropertyValues(pvs, filteredPds, bw.getWrappedInstance(), beanName)
在bean的property属性注入完毕 向bean中设置属性之前执行
6、BeanPostProcessor.postProcessBeforeInitialization(result, beanName)
在bean初始化(自定义init或者是实现了InitializingBean.afterPropertiesSet())之前执行
7、BeanPostProcessor.postProcessAfterInitialization(result, beanName)
在bean初始化(自定义init或者是实现了InitializingBean.afterPropertiesSet())之后执行
8、其中DestructionAwareBeanPostProcessor方法的postProcessBeforeDestruction(Object bean, String beanName)会在销毁对象前执行
DestructionAwareBeanPostProcessor 中的requiresDestruction(Object bean)是用来判断是否属于当前processor处理的bean
SmartInstantiationAwareBeanPostProcessor中的predictBeanType(Class<?> beanClass, String beanName)是用来预判类型的
SmartInstantiationAwareBeanPostProcessor.getEarlyBeanReference(exposedObject, beanName)
这个方法仅仅是在这一步是作为一个ObjectFactory封装起来放到singletonFactories中的,
仅在并发情况下 刚好在当前对象设置进去,而另一个bean创建需要getBean获取时才会立即执行
因此这一步的顺序是不一定的,有可能永远不会执行(无并发循坏依赖对象创建的场景)
可能在3之后对象实例化完毕执行addSingleton(beanName, singletonObject);之前执行到
因此这三个方法没有严格的顺序意义
三、InstantiationAwareBeanPostProcessor
1. 接口介绍
先来看下接口的源代码:
package org.springframework.beans.factory.config;

import java.beans.PropertyDescriptor;

import org.springframework.beans.BeansException;
import org.springframework.beans.PropertyValues;
import org.springframework.lang.Nullable;

public interface InstantiationAwareBeanPostProcessor extends BeanPostProcessor {

	// 在createBean --> resolveBeforeInstantiation方法中调用
	@Nullable
	default Object postProcessBeforeInstantiation(Class<?> beanClass, String beanName) throws BeansException {
		return null;
	}

	// 在doCreateBean --> populateBean方法中调用
	default boolean postProcessAfterInstantiation(Object bean, String beanName) throws BeansException {
		return true;
	}

	// 在doCreateBean --> populateBean方法中调用
	@Nullable
	default PropertyValues postProcessProperties(PropertyValues pvs, Object bean, String beanName) throws BeansException {
		return null;
	}

	// 在doCreateBean --> populateBean方法中调用
	@Deprecated
	@Nullable
	default PropertyValues postProcessPropertyValues(PropertyValues pvs, PropertyDescriptor[] pds, Object bean, String beanName) throws BeansException {
		return pvs;
	}

}
从源码中我们可以获知的信息是该接口除了具有父接口中的两个方法以外还自己额外定义了三个方法。所以该接口一共定义了5个方法,这5个方法的作用分别是:
| 方法 | 描述 |
|---|---|
| postProcessBeforeInitialization | BeanPostProcessor接口中的方法, 在Bean的自定义初始化方法之前执行 |
| postProcessAfterInitialization | BeanPostProcessor接口中的方法 在Bean的自定义初始化方法执行完成之后执行 |
| postProcessBeforeInstantiation | 自身方法,是最先执行的方法,它在目标对象实例化之前调用,该方法的返回值类型是Object,我们可以返回任何类型的值。由于这个时候目标对象还未实例化,所以这个返回值可以用来代替原本该生成的目标对象的实例(比如代理对象)。如果该方法的返回值代替原本该生成的目标对象,后续只有postProcessAfterInitialization方法会调用,其它方法不再调用;否则按照正常的流程走 |
| postProcessAfterInstantiation | 在目标对象实例化之后调用,这个时候对象已经被实例化,但是该实例的属性还未被设置,都是null。因为它的返回值是决定要不要调用postProcessPropertyValues方法的其中一个因素(因为还有一个因素是mbd.getDependencyCheck());如果该方法返回false,并且不需要check,那么postProcessPropertyValues就会被忽略不执行;如果返回true,postProcessPropertyValues就会被执行 |
| postProcessPropertyValues | 对属性值进行修改,如果postProcessAfterInstantiation方法返回false,该方法可能不会被调用。可以在该方法内对属性值进行修改 |
注意两个单词
| 单词 | 含义 |
|---|---|
| Instantiation | 表示实例化,对象还未生成 |
| Initialization | 表示初始化,对象已经生成 |
2. 方法介绍
2.1 postProcessBeforeInstantiation
该方法返回的结果如果为null,后面的方法都正常执行了,但是如果该方法返回了实例对象了呢?我们来看下
/**
 * InstantiationAwareBeanPostProcessor中自定义的方法 在方法实例化之前执行 Bean对象还没有
 */
@Override
public Object postProcessBeforeInstantiation(Class<?> beanClass, String beanName) throws BeansException {
	System.out.println("--->postProcessBeforeInstantiation");
	// 利用cglib动态代理生成对象返回
	if (beanClass == User.class) {
		Enhancer e = new Enhancer();
		e.setSuperclass(beanClass);
		e.setCallback(new MethodInterceptor() {
			@Override
			public Object intercept(Object obj, Method method, Object[] objects, MethodProxy methodProxy) throws Throwable {

				System.out.println("目标方法执行前:" + method + "\n");
				Object object = methodProxy.invokeSuper(obj, objects);
				System.out.println("目标方法执行后:" + method + "\n");
				return object;
			}
		});
		User user = (User) e.create();
		// 返回代理类
		return user;
	}
	return null;
}
测试输出结果:
容器开始初始化....
--->postProcessBeforeInstantiation
User 被实例化
<<postProcessAfterInitialization
容器初始化结束....
通过数据结果我们发现,postProcessBeforeInstantiation方法返回实例对象后跳过了对象的初始化操作,直接执行了postProcessAfterInitialization(该方法在自定义初始化方法执行完成之后执行),跳过了postProcessAfterInstantiation,postProcessPropertyValues以及自定义的初始化方法(start方法),为什么会这样呢?我们要来查看下源代码。
在AbstractBeanFactory中的对InstantiationAwareBeanPostProcessor实现该接口的BeanPostProcessor 设置了标志
@Override
public void addBeanPostProcessor(BeanPostProcessor beanPostProcessor) {
	Assert.notNull(beanPostProcessor, "BeanPostProcessor must not be null");
	this.beanPostProcessors.remove(beanPostProcessor);
	this.beanPostProcessors.add(beanPostProcessor);
	if (beanPostProcessor instanceof InstantiationAwareBeanPostProcessor) {
		this.hasInstantiationAwareBeanPostProcessors = true;
	}
	if (beanPostProcessor instanceof DestructionAwareBeanPostProcessor) {
		this.hasDestructionAwareBeanPostProcessors = true;
	}
}
在AbstractAutowireCapableBeanFactory类中有个createBean方法
protected Object createBean(String beanName, RootBeanDefinition mbd, Object[] args) throws BeanCreationException {
       // ... 省略
	try {
		// Give BeanPostProcessors a chance to return a proxy instead of the target bean instance.
		Object bean = resolveBeforeInstantiation(beanName, mbdToUse);
		if (bean != null) {
				return bean;
		}
       // ... 省略
	Object beanInstance = doCreateBean(beanName, mbdToUse, args);
	if (logger.isDebugEnabled()) {
		logger.debug("Finished creating instance of bean '" + beanName + "'");
	}
	return beanInstance;
}
Object bean = resolveBeforeInstantiation(beanName, mbdToUse);这行代码之后之后根据bean判断如果不为空null就直接返回了,而不执行doCreateBean()方法了,而该方法是创建Bean对象的方法。
protected Object resolveBeforeInstantiation(String beanName, RootBeanDefinition mbd) {
	Object bean = null;
	// //如果beforeInstantiationResolved还没有设置或者是false(说明还没有需要在实例化前执行的操作)
	if (!Boolean.FALSE.equals(mbd.beforeInstantiationResolved)) {
		// 判断是否有注册过InstantiationAwareBeanPostProcessor类型的bean
		if (!mbd.isSynthetic() && hasInstantiationAwareBeanPostProcessors()) {
			Class<?> targetType = determineTargetType(beanName, mbd);
			if (targetType != null) {
				bean = applyBeanPostProcessorsBeforeInstantiation(targetType, beanName);
				if (bean != null) {
					// 直接执行自定义初始化完成后的方法,跳过了其他几个方法
					bean = applyBeanPostProcessorsAfterInitialization(bean, beanName);
				}
			}
		}
		mbd.beforeInstantiationResolved = (bean != null);
	}
	return bean;
}
protected Object applyBeanPostProcessorsBeforeInstantiation(Class<?> beanClass, String beanName) {
	for (BeanPostProcessor bp : getBeanPostProcessors()) {
		if (bp instanceof InstantiationAwareBeanPostProcessor) {
			InstantiationAwareBeanPostProcessor ibp = (InstantiationAwareBeanPostProcessor) bp;
			Object result = ibp.postProcessBeforeInstantiation(beanClass, beanName);
			//只要有一个result不为null;后面的所有 后置处理器的方法就不执行了,直接返回(所以执行顺序很重要)
			if (result != null) {
				return result;
			}
		}
	}
	return null;
}
@Override
public Object applyBeanPostProcessorsAfterInitialization(Object existingBean, String beanName)
		throws BeansException {

	Object result = existingBean;
	for (BeanPostProcessor processor : getBeanPostProcessors()) {
		result = processor.postProcessAfterInitialization(result, beanName);
		 //如果返回null;后面的所有 后置处理器的方法就不执行,直接返回(所以执行顺序很重要)
		if (result == null) {
			return result;
		}
	}
	return result;
}
代码说明:
- 如果postProcessBeforeInstantiation方法返回了Object是null;那么就直接返回,调用doCreateBean方法();
- 如果postProcessBeforeInstantiation返回不为null;说明修改了bean对象;然后这个时候就立马执行postProcessAfterInitialization方法(注意这个是初始化之后的方法,也就是通过这个方法实例化了之后,直接执行初始化之后的方法;中间的实例化之后 和 初始化之前都不执行);
- 在调用postProcessAfterInitialization方法时候如果返回null;那么就直接返回,调用doCreateBean方法();(初始化之后的方法返回了null,那就需要调用doCreateBean生成对象了)
- 在调用postProcessAfterInitialization时返回不为null;那这个bean就直接返回给ioc容器了初始化之后的操作是这里面最后一个方法了;
2.2 postProcessAfterInstantiation
protected void populateBean(String beanName, RootBeanDefinition mbd, BeanWrapper bw) {
	// 省略 。。
	boolean continueWithPropertyPopulation = true;

	if (!mbd.isSynthetic() && hasInstantiationAwareBeanPostProcessors()) {
		for (BeanPostProcessor bp : getBeanPostProcessors()) {
			if (bp instanceof InstantiationAwareBeanPostProcessor) {
				InstantiationAwareBeanPostProcessor ibp = (InstantiationAwareBeanPostProcessor) bp;
				// 此处执行 postProcessAfterInstantiation方法
				if (!ibp.postProcessAfterInstantiation(bw.getWrappedInstance(), beanName)) {
					// postProcessAfterInstantiation 返回true与false决定
					// continueWithPropertyPopulation
					continueWithPropertyPopulation = false;
					break;
				}
			}
		}
	}
	// postProcessAfterInstantiation false
	// continueWithPropertyPopulation 就为false 然后该方法就结束了!!!
	if (!continueWithPropertyPopulation) {
		return;
	}
	// 省略 ...
	boolean hasInstAwareBpps = hasInstantiationAwareBeanPostProcessors();
	boolean needsDepCheck = (mbd.getDependencyCheck() != RootBeanDefinition.DEPENDENCY_CHECK_NONE);

	if (hasInstAwareBpps || needsDepCheck) {
		PropertyDescriptor[] filteredPds = filterPropertyDescriptorsForDependencyCheck(bw, mbd.allowCaching);
		if (hasInstAwareBpps) {
			for (BeanPostProcessor bp : getBeanPostProcessors()) {
				if (bp instanceof InstantiationAwareBeanPostProcessor) {
					InstantiationAwareBeanPostProcessor ibp = (InstantiationAwareBeanPostProcessor) bp;
					// 调用 postProcessPropertyValues方法
					pvs = ibp.postProcessPropertyValues(pvs, filteredPds, bw.getWrappedInstance(), beanName);
					if (pvs == null) {
						return;
					}
				}
			}
		}
		if (needsDepCheck) {
			checkDependencies(beanName, mbd, filteredPds, pvs);
		}
	}
	// 真正设置属性的方法。
	applyPropertyValues(beanName, mbd, bw, pvs);
}
这个postProcessAfterInstantiation返回值要注意,因为它的返回值是决定要不要调用postProcessPropertyValues方法的其中一个因素(因为还有一个因素是mbd.getDependencyCheck());如果该方法返回false,并且不需要check,那么postProcessPropertyValues就会被忽略不执行;如果返true,postProcessPropertyValues就会被执行
2.3 postProcessPropertyValues
在populateBean方法中我们已经看到了postProcessPropertyValues执行的位置了。我们来看下postProcessPropertyValues的效果.
/**
 * InstantiationAwareBeanPostProcessor中自定义的方法 可以用来修改Bean中属性的内容
 */
@Override
public PropertyValues postProcessPropertyValues(PropertyValues pvs, PropertyDescriptor[] pds, Object bean,
		String beanName) throws BeansException {
	System.out.println("<---postProcessPropertyValues--->");
	if(bean instanceof User){
		PropertyValue value = pvs.getPropertyValue("name");
		System.out.println("修改前name的值是:"+value.getValue());
		value.setConvertedValue("bobo");
	}
	return pvs;
}
配置文件中设值注入name属性
<?xml version="1.0" encoding="UTF-8"?>
<beans xmlns="http://www.springframework.org/schema/beans"
	xmlns:xsi="http://www.w3.org/2001/XMLSchema-instance"
	xsi:schemaLocation="http://www.springframework.org/schema/beans
 http://www.springframework.org/schema/beans/spring-beans.xsd">

	<bean class="com.dpb.pojo.User" id="user" init-method="start">
		<property name="name" value="波波烤鸭"></property>
	</bean>

	<!-- 注册InstantiationAwareBeanPostProcessor对象 -->
	<bean class="com.dpb.processor.MyInstantiationAwareBeanPostProcessor"></bean>
</beans>
测试看输出
--->postProcessBeforeInstantiation
User 被实例化
<---postProcessAfterInstantiation
<---postProcessPropertyValues--->
修改前name的值是:TypedStringValue: value [波波烤鸭], target type [null]
设置:bobo
>>postProcessBeforeInitialization
自定义初始化的方法....
<<postProcessAfterInitialization
User [id=0, name=bobo, beanName=null]
容器初始化结束....
name的属性值被修改了。该方法执行的条件要注意postProcessAfterInstantiation返回true且postProcessBeforeInstantiation返回null。
3. 总结
- InstantiationAwareBeanPostProcessor接口继承BeanPostProcessor接口,它内部提供了3个方法,再加上BeanPostProcessor接口内部的2个方法,所以实现这个接口需要实现5个方法。InstantiationAwareBeanPostProcessor接口的主要作用在于目标对象的实例化过程中需要处理的事情,包括实例化对象的前后过程以及实例的属性设置
- postProcessBeforeInstantiation方法是最先执行的方法,它在目标对象实例化之前调用,该方法的返回值类型是Object,我们可以返回任何类型的值。由于这个时候目标对象还未实例化,所以这个返回值可以用来代替原本该生成的目标对象的实例(比如代理对象)。如果该方法的返回值代替原本该生成的目标对象,后续只有postProcessAfterInitialization方法会调用,其它方法不再调用;否则按照正常的流程走
- postProcessAfterInstantiation方法在目标对象实例化之后调用,这个时候对象已经被实例化,但是该实例的属性还未被设置,都是null。因为它的返回值是决定要不要调用postProcessPropertyValues方法的其中一个因素(因为还有一个因素是mbd.getDependencyCheck());如果该方法返回false,并且不需要check,那么postProcessPropertyValues就会被忽略不执行;如果返回true, postProcessPropertyValues就会被执行
- postProcessPropertyValues方法对属性值进行修改(这个时候属性值还未被设置,但是我们可以修改原本该设置进去的属性值)。如果postProcessAfterInstantiation方法返回false,该方法可能不会被调用。可以在该方法内对属性值进行修改
- 父接口BeanPostProcessor的2个方法postProcessBeforeInitialization和postProcessAfterInitialization都是在目标对象被实例化之后,并且属性也被设置之后调用的
四、MergedBeanDefinitionPostProcessor
源码:
package org.springframework.beans.factory.support;

import org.springframework.beans.factory.config.BeanPostProcessor;

public interface MergedBeanDefinitionPostProcessor extends BeanPostProcessor {

	void postProcessMergedBeanDefinition(RootBeanDefinition beanDefinition, Class<?> beanType, String beanName);

	default void resetBeanDefinition(String beanName) {
	}

}
五、CommonAnnotationBeanPostProcessor
1. 接口介绍
类继承关系:
public class CommonAnnotationBeanPostProcessor extends InitDestroyAnnotationBeanPostProcessor
		implements InstantiationAwareBeanPostProcessor, BeanFactoryAware, Serializable {
	......
}
类UML图
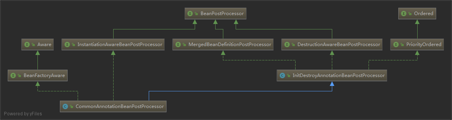
2. 分析
方法入口:
org.springframework.beans.factory.support.AbstractAutowireCapableBeanFactory#doCreateBean
protected void applyMergedBeanDefinitionPostProcessors(RootBeanDefinition mbd, Class<?> beanType, String beanName) {
    for (BeanPostProcessor bp : getBeanPostProcessors()) {
        if (bp instanceof MergedBeanDefinitionPostProcessor) {
            MergedBeanDefinitionPostProcessor bdp = (MergedBeanDefinitionPostProcessor) bp;
            bdp.postProcessMergedBeanDefinition(mbd, beanType, beanName);
        }
    }
}
CommonAnnotationBeanPostProcessor的postProcessMergedBeanDefinition处理
@Override
public void postProcessMergedBeanDefinition(RootBeanDefinition beanDefinition, Class<?> beanType, String beanName) {
    super.postProcessMergedBeanDefinition(beanDefinition, beanType, beanName);
    InjectionMetadata metadata = findResourceMetadata(beanName, beanType, null);
    metadata.checkConfigMembers(beanDefinition);
}
InitDestroyAnnotationBeanPostProcessor的处理
这个主要是生命周期的一些回调函数的注册,比如PostConstruct和PreDestroy注解的方法。
@Override
public void postProcessMergedBeanDefinition(RootBeanDefinition beanDefinition, Class<?> beanType, String beanName) {
    LifecycleMetadata metadata = findLifecycleMetadata(beanType);//找到生命周期方法
    metadata.checkConfigMembers(beanDefinition);//注册初始化和销毁的回调方法
}
findLifecycleMetadata寻找生命周期元数据
private LifecycleMetadata findLifecycleMetadata(Class<?> clazz) {
    if (this.lifecycleMetadataCache == null) {
        // Happens after deserialization, during destruction...
        return buildLifecycleMetadata(clazz);
    }
    // Quick check on the concurrent map first, with minimal locking.//双重检测,尽可能少的用锁
    LifecycleMetadata metadata = this.lifecycleMetadataCache.get(clazz);
    if (metadata == null) {
        synchronized (this.lifecycleMetadataCache) {
            metadata = this.lifecycleMetadataCache.get(clazz);
            if (metadata == null) {
                metadata = buildLifecycleMetadata(clazz);
                this.lifecycleMetadataCache.put(clazz, metadata);//放入缓存
            }
            return metadata;
        }
    }
    return metadata;
}
buildLifecycleMetadata构建生命周期元数据
一般来说都是要经过这步的,因为都需要经过注册,除非是第二次来,有缓存了。
其实就是检测clazz以及父类的所有的方法,看是不是有PostConstruct和PreDestroy注解,有的话就把方法封装成LifecycleElement加入对应的集合:
private LifecycleMetadata buildLifecycleMetadata(final Class<?> clazz) {
    if (!AnnotationUtils.isCandidateClass(clazz, Arrays.asList(this.initAnnotationType, this.destroyAnnotationType))) {
        return this.emptyLifecycleMetadata;
    }

    List<LifecycleElement> initMethods = new ArrayList<>();
    List<LifecycleElement> destroyMethods = new ArrayList<>();
    Class<?> targetClass = clazz;

    do {
        final List<LifecycleElement> currInitMethods = new ArrayList<>();
        final List<LifecycleElement> currDestroyMethods = new ArrayList<>();
        //如果有PostConstruct和PreDestroy注解的方法就添加到currInitMethods和currDestroyMethods里,包括父类,因为可能CGLIB动态代理
        ReflectionUtils.doWithLocalMethods(targetClass, method -> {
            if (this.initAnnotationType != null && method.isAnnotationPresent(this.initAnnotationType)) {
                LifecycleElement element = new LifecycleElement(method);
                currInitMethods.add(element);
                if (logger.isTraceEnabled()) {
                    logger.trace("Found init method on class [" + clazz.getName() + "]: " + method);
                }
            }
            if (this.destroyAnnotationType != null && method.isAnnotationPresent(this.destroyAnnotationType)) {
                currDestroyMethods.add(new LifecycleElement(method));
                if (logger.isTraceEnabled()) {
                    logger.trace("Found destroy method on class [" + clazz.getName() + "]: " + method);
                }
            }
        });
        //加入相应的声明周期方法里
        initMethods.addAll(0, currInitMethods);
        destroyMethods.addAll(currDestroyMethods);
        targetClass = targetClass.getSuperclass();
    }
    while (targetClass != null && targetClass != Object.class);
    //有一个不为空就封装一个LifecycleMetadata返回,否则就返回空的emptyLifecycleMetadata
    return (initMethods.isEmpty() && destroyMethods.isEmpty() ? this.emptyLifecycleMetadata :
            new LifecycleMetadata(clazz, initMethods, destroyMethods));
}
emptyLifecycleMetadata都是空方法
如果没有注解的话会返回一个空的emptyLifecycleMetadata 。
private final transient LifecycleMetadata emptyLifecycleMetadata =
    new LifecycleMetadata(Object.class, Collections.emptyList(), Collections.emptyList()) {
    @Override
    public void checkConfigMembers(RootBeanDefinition beanDefinition) {
    }
    @Override
    public void invokeInitMethods(Object target, String beanName) {
    }
    @Override
    public void invokeDestroyMethods(Object target, String beanName) {
    }
    @Override
    public boolean hasDestroyMethods() {
        return false;
    }
};
LifecycleMetadata的checkConfigMembers
会将初始化和销毁的回调方法注册到beanDefinition中,并且标记已经检查过的方法,放入checkedInitMethods 和checkedDestroyMethods 方法集合。
public void checkConfigMembers(RootBeanDefinition beanDefinition) {
    Set<LifecycleElement> checkedInitMethods = new LinkedHashSet<>(this.initMethods.size());
    for (LifecycleElement element : this.initMethods) {
        String methodIdentifier = element.getIdentifier();
        if (!beanDefinition.isExternallyManagedInitMethod(methodIdentifier)) {
            beanDefinition.registerExternallyManagedInitMethod(methodIdentifier);//注册初始化调用方法
            checkedInitMethods.add(element);
            if (logger.isTraceEnabled()) {
                logger.trace("Registered init method on class [" + this.targetClass.getName() + "]: " + element);
            }
        }
    }
    Set<LifecycleElement> checkedDestroyMethods = new LinkedHashSet<>(this.destroyMethods.size());
    for (LifecycleElement element : this.destroyMethods) {
        String methodIdentifier = element.getIdentifier();
        if (!beanDefinition.isExternallyManagedDestroyMethod(methodIdentifier)) {
            beanDefinition.registerExternallyManagedDestroyMethod(methodIdentifier);//注册销毁调用方法
            checkedDestroyMethods.add(element);
            if (logger.isTraceEnabled()) {
                logger.trace("Registered destroy method on class [" + this.targetClass.getName() + "]: " + element);
            }
        }
    }
    this.checkedInitMethods = checkedInitMethods;
    this.checkedDestroyMethods = checkedDestroyMethods;
}
findResourceMetadata的处理
跟上面一样的结构,主要是解析Resource注解啦。
private InjectionMetadata findResourceMetadata(String beanName, final Class<?> clazz, @Nullable PropertyValues pvs) {
    // Fall back to class name as cache key, for backwards compatibility with custom callers.
    String cacheKey = (StringUtils.hasLength(beanName) ? beanName : clazz.getName());
    // Quick check on the concurrent map first, with minimal locking.
    InjectionMetadata metadata = this.injectionMetadataCache.get(cacheKey);
    if (InjectionMetadata.needsRefresh(metadata, clazz)) {
        synchronized (this.injectionMetadataCache) {
            metadata = this.injectionMetadataCache.get(cacheKey);
            if (InjectionMetadata.needsRefresh(metadata, clazz)) {
                if (metadata != null) {
                    metadata.clear(pvs);
                }
                metadata = buildResourceMetadata(clazz);//创建Resource注解注入元数据
                this.injectionMetadataCache.put(cacheKey, metadata);
            }
        }
    }
    return metadata;
}
buildResourceMetadata构建Resource元数据
别看好像那么长,其实跟前面差不多,这次是会看是否有webService,ejb,Resource的属性注解和方法注解,有的话也封装成注入元数据InjectionMetadata返回。
private InjectionMetadata buildResourceMetadata(final Class<?> clazz) {
    if (!AnnotationUtils.isCandidateClass(clazz, resourceAnnotationTypes)) {
        return InjectionMetadata.EMPTY;
    }

    List<InjectionMetadata.InjectedElement> elements = new ArrayList<>();
    Class<?> targetClass = clazz;

    do {
        final List<InjectionMetadata.InjectedElement> currElements = new ArrayList<>();
        //查询是否有webService,ejb,Resource的属性注解,但是不支持静态属性
        ReflectionUtils.doWithLocalFields(targetClass, field -> {
            if (webServiceRefClass != null && field.isAnnotationPresent(webServiceRefClass)) {
                if (Modifier.isStatic(field.getModifiers())) {
                    throw new IllegalStateException("@WebServiceRef annotation is not supported on static fields");
                }
                currElements.add(new WebServiceRefElement(field, field, null));
            }
            else if (ejbRefClass != null && field.isAnnotationPresent(ejbRefClass)) {
                if (Modifier.isStatic(field.getModifiers())) {
                    throw new IllegalStateException("@EJB annotation is not supported on static fields");
                }
                currElements.add(new EjbRefElement(field, field, null));
            }
            else if (field.isAnnotationPresent(Resource.class)) {
                if (Modifier.isStatic(field.getModifiers())) {
                    throw new IllegalStateException("@Resource annotation is not supported on static fields");
                }
                if (!this.ignoredResourceTypes.contains(field.getType().getName())) {
                    currElements.add(new ResourceElement(field, field, null));
                }
            }
        });
        //处理方法,桥接方法可以理解为解决老版本的类型转换问题,这里你就理解成就是普通方法
        ReflectionUtils.doWithLocalMethods(targetClass, method -> {
            Method bridgedMethod = BridgeMethodResolver.findBridgedMethod(method);
            if (!BridgeMethodResolver.isVisibilityBridgeMethodPair(method, bridgedMethod)) {
                return;
            }
            if (method.equals(ClassUtils.getMostSpecificMethod(method, clazz))) {
                if (webServiceRefClass != null && bridgedMethod.isAnnotationPresent(webServiceRefClass)) {
                    if (Modifier.isStatic(method.getModifiers())) {
                        throw new IllegalStateException("@WebServiceRef annotation is not supported on static methods");
                    }
                    if (method.getParameterCount() != 1) {
                        throw new IllegalStateException("@WebServiceRef annotation requires a single-arg method: " + method);
                    }
                    PropertyDescriptor pd = BeanUtils.findPropertyForMethod(bridgedMethod, clazz);
                    currElements.add(new WebServiceRefElement(method, bridgedMethod, pd));
                }
                else if (ejbRefClass != null && bridgedMethod.isAnnotationPresent(ejbRefClass)) {
                    if (Modifier.isStatic(method.getModifiers())) {
                        throw new IllegalStateException("@EJB annotation is not supported on static methods");
                    }
                    if (method.getParameterCount() != 1) {
                        throw new IllegalStateException("@EJB annotation requires a single-arg method: " + method);
                    }
                    PropertyDescriptor pd = BeanUtils.findPropertyForMethod(bridgedMethod, clazz);
                    currElements.add(new EjbRefElement(method, bridgedMethod, pd));
                }
                else if (bridgedMethod.isAnnotationPresent(Resource.class)) {
                    if (Modifier.isStatic(method.getModifiers())) {//静态不行
                        throw new IllegalStateException("@Resource annotation is not supported on static methods");
                    }
                    Class<?>[] paramTypes = method.getParameterTypes();
                    if (paramTypes.length != 1) {//需要有一个参数
                        throw new IllegalStateException("@Resource annotation requires a single-arg method: " + method);
                    }
                    if (!this.ignoredResourceTypes.contains(paramTypes[0].getName())) {
                        PropertyDescriptor pd = BeanUtils.findPropertyForMethod(bridgedMethod, clazz);
                        currElements.add(new ResourceElement(method, bridgedMethod, pd));
                    }
                }
            }
        });

        elements.addAll(0, currElements);
        targetClass = targetClass.getSuperclass();
    }
    while (targetClass != null && targetClass != Object.class);

    return InjectionMetadata.forElements(elements, clazz);
}
InjectionMetadata的checkConfigMembers
这个也是一样,把元素注册进beanDefinition里。
public void checkConfigMembers(RootBeanDefinition beanDefinition) {
    Set<InjectedElement> checkedElements = new LinkedHashSet<>(this.injectedElements.size());
    for (InjectedElement element : this.injectedElements) {
        Member member = element.getMember();
        if (!beanDefinition.isExternallyManagedConfigMember(member)) {
            beanDefinition.registerExternallyManagedConfigMember(member);
            checkedElements.add(element);
            if (logger.isTraceEnabled()) {
                logger.trace("Registered injected element on class [" + this.targetClass.getName() + "]: " + element);
            }
        }
    }
    this.checkedElements = checkedElements;
}
参考
- spring容器的refresh方法分析
- spring的finishBeanFactoryInitialization方法分析
- Spring之InstantiationAwareBeanPostProcessor接口介绍
- Bean后置处理器 - MergedBeanDefinitionPostProcessor
- MergedBeanDefinitionPostProcessor和@Autowired,@Value的关系
- Bean后置处理器 - InstantiationAwareBeanPostProcessor#postProcessAfterInstantiation
- Bean后置处理器 - InstantiationAwareBeanPostProcessor#postProcessProperties
- 这篇文章,我们来谈一谈Spring中的属性注入


 4539
4539


 被折叠的 条评论
为什么被折叠?
被折叠的 条评论
为什么被折叠?
 到【灌水乐园】发言


