


本文同步发表于我的微信公众号,微信搜索 程语新视界 即可关注,每个工作日都有文章更新
鸿蒙开发中,通过 updateManager 模块实现的更新功能会在下载完成后自动触发安装流程,这与自定义 OTA 方式不同。
一、updateManager 的安装流程(自动安装)
1. updateManager 更新流程
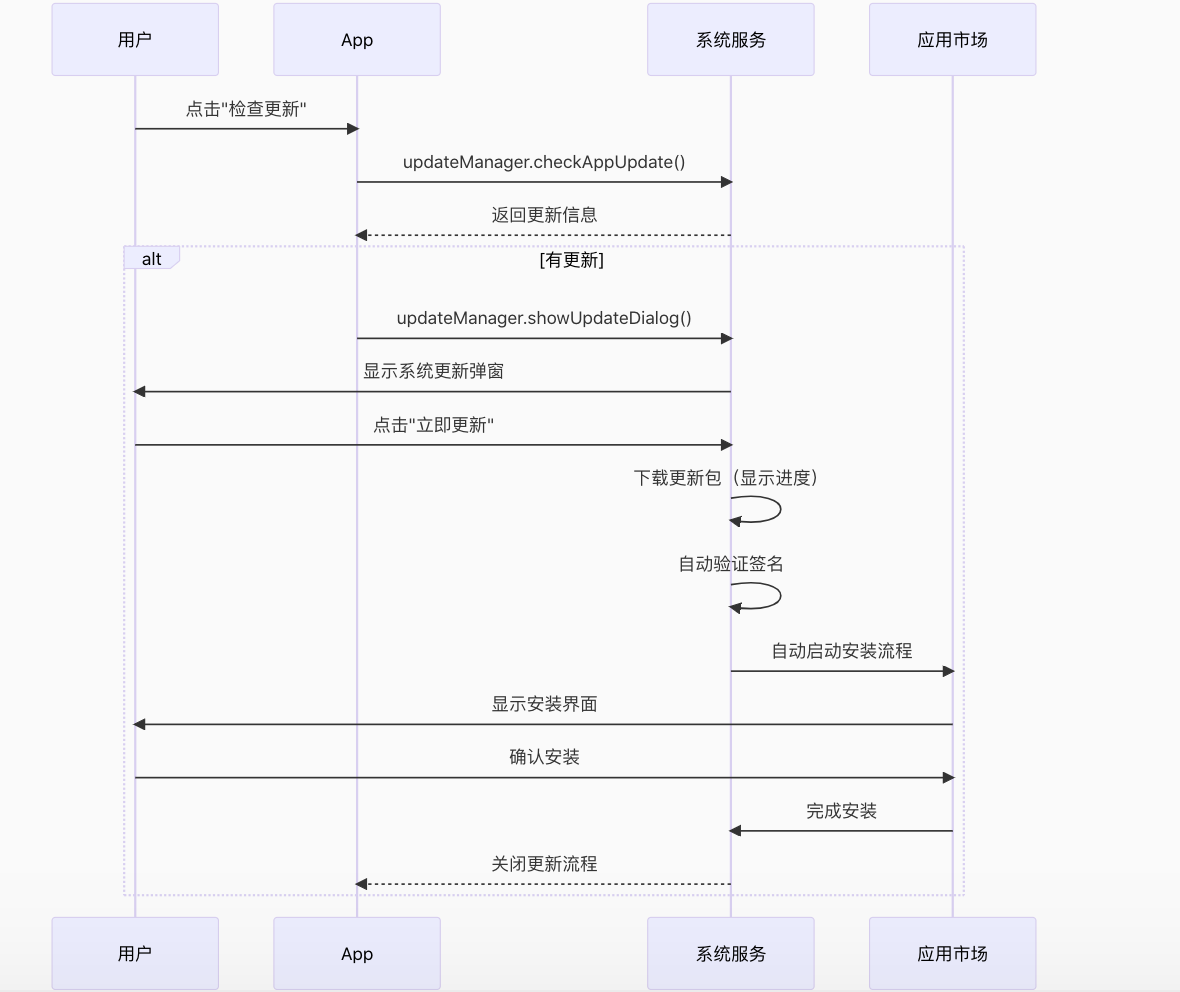
2. 关键特性
- 无需额外权限:不需要
INSTALL_BUNDLE权限 - 自动处理下载和安装:系统完成所有步骤
- 跳转到应用市场:安装过程在应用市场进行
- 标准化流程:用户体验统一
3. 示例代码
import updateManager from '@ohos.updateManager';
import common from '@ohos.app.ability.common';

@Entry
@Component
struct UpdatePage {
  @State message: string = '点击检查更新';
  private context: common.UIAbilityContext = getContext(this) as common.UIAbilityContext;

  // 检查更新
  async checkUpdate() {
    try {
      this.message = '检查更新中...';
      const result = await updateManager.checkAppUpdate(this.context);

      if (result.hasUpdate) {
        this.message = `发现新版本 ${result.newVersion}`;
        // 显示系统更新弹窗
        await updateManager.showUpdateDialog(this.context);
      } else {
        this.message = '已是最新版本';
      }
    } catch (error) {
      this.message = `更新失败: ${error.message}`;
      console.error('检查更新出错:', error);
    }
  }

  build() {
    Column() {
      Text(this.message)
        .fontSize(20)
        .margin(20)

      Button('检查更新')
        .onClick(() => this.checkUpdate())
        .width('60%')
        .height(50)
    }
    .width('100%')
    .height('100%')
    .justifyContent(FlexAlign.Center)
  }
}
二、自定义 OTA 安装方式(手动安装)
与传统 OTA 方式的对比
| 特性 | updateManager | 自定义 OTA |
|---|---|---|
| 安装权限 | 无需 | 需要 INSTALL_BUNDLE 权限 |
| 安装位置 | 应用市场 | 应用内直接安装 |
| 用户交互 | 跳转到应用市场 | 应用内完成所有流程 |
| 流程控制 | 系统控制 | 开发者完全控制 |
| 适用场景 | 应用市场分发 | 企业内部分发/热更新 |
自定义 OTA 安装实现
import installer from '@ohos.bundle.installer';
import fs from '@ohos.file.fs';
import abilityAccessCtrl from '@ohos.abilityAccessCtrl';

class CustomOtaInstaller {
  async installHap(hapPath: string) {
    const context = getContext();

    // 1. 检查文件是否存在
    if (!fs.accessSync(hapPath)) {
      throw new Error('HAP文件不存在');
    }

    // 2. 请求安装权限
    if (!await this.requestInstallPermission()) {
      throw new Error('用户拒绝安装权限');
    }

    // 3. 执行安装
    const bundleInstaller = await installer.getBundleInstaller();
    const installParam = {
      installFlag: installer.InstallFlag.REPLACE_EXISTING,
      userId: 100
    };

    return new Promise<void>((resolve, reject) => {
      bundleInstaller.install(hapPath, installParam, (err) => {
        if (err) {
          reject(new Error(`安装失败 [${err.code}]: ${err.message}`));
        } else {
          resolve();
        }
      });
    });
  }

  // 请求安装权限
  private async requestInstallPermission(): Promise<boolean> {
    const atManager = abilityAccessCtrl.createAtManager();
    try {
      const grantStatus = await atManager.requestPermissionsFromUser(
        getContext(),
        ['ohos.permission.INSTALL_BUNDLE']
      );
      return grantStatus.authResults[0] === abilityAccessCtrl.GrantStatus.PERMISSION_GRANTED;
    } catch (err) {
      console.error('权限请求失败:', err);
      return false;
    }
  }
}

// 使用示例
@Component
struct OtaInstallDemo {
  private installer = new CustomOtaInstaller();

  async installUpdate() {
    const hapPath = '/data/storage/el2/base/cache/update.hap';

    try {
      await this.installer.installHap(hapPath);
      console.log('安装成功!');
      // 提示用户重启应用
      AlertDialog.show({ message: '安装成功,请重启应用' });
    } catch (error) {
      console.error('安装失败:', error.message);
      AlertDialog.show({ message: `安装失败: ${error.message}` });
    }
  }

  build() {
    Button('安装更新')
      .onClick(() => this.installUpdate())
  }
}
三、混合解决示例(推荐)
结合两种方式的优势:
import updateManager from '@ohos.updateManager';
import installer from '@ohos.bundle.installer';

class SmartUpdater {
  async smartUpdate() {
    const context = getContext();

    try {
      // 1. 首先尝试使用系统更新
      const hasSystemUpdate = await updateManager.checkAppUpdate(context);
      if (hasSystemUpdate) {
        await updateManager.showUpdateDialog(context);
        return;
      }

      // 2. 系统无更新,检查自定义更新
      const hasCustomUpdate = await this.checkCustomUpdate();
      if (hasCustomUpdate) {
        await this.installCustomUpdate();
      }
    } catch (error) {
      console.error('智能更新失败:', error);
    }
  }

  private async checkCustomUpdate(): Promise<boolean> {
    // 自定义更新检查逻辑
    const serverUrl = 'https://your-update-server.com/check-update';
    const response = await fetch(serverUrl);
    const data = await response.json();
    return data.hasUpdate;
  }

  private async installCustomUpdate() {
    // 下载并安装自定义更新包
    const hapPath = await this.downloadUpdatePackage();
    await this.installHap(hapPath);
  }

  private async installHap(hapPath: string) {
    // 同上文自定义安装逻辑
  }
}
四、两种方式的区别
1. 权限管理
updateManager:
// 无需声明安装权限自定义OTA:
// module.json5
"requestPermissions": [
  {
    "name": "ohos.permission.INSTALL_BUNDLE",
    "reason": "用于应用内更新"
  }
]
2. 安装触发方式
updateManager:
// 系统自动触发安装
await updateManager.showUpdateDialog(context);自定义OTA:
// 需要手动调用安装
bundleInstaller.install(hapPath, installParam, callback);
3. 错误处理对比
updateManager 错误处理:
try {
  await updateManager.showUpdateDialog(context);
} catch (error) {
  // 系统级错误代码
  if (error.code === 18000001) {
    console.error('网络不可用');
  }
}
自定义OTA 错误处理:
bundleInstaller.install(hapPath, installParam, (err) => {
  if (err) {
    switch (err.code) {
      case 201:
        console.error('安装包不存在');
        break;
      case 202:
        console.error('安装包验证失败');
        break;
      // ...其他错误代码
    }
  }
});
五、企业级实现
1. 安全增强方案
class SecureInstaller {
  async safeInstall(hapPath: string) {
    // 1. 验证签名
    const isValid = await this.verifySignature(hapPath);
    if (!isValid) throw new Error('签名验证失败');

    // 2. 检查包名匹配
    const packageInfo = await this.extractPackageInfo(hapPath);
    if (packageInfo.bundleName !== getBundleName()) {
      throw new Error('包名不匹配');
    }

    // 3. 执行安装
    return this.installHap(hapPath);
  }

  private async verifySignature(hapPath: string): Promise<boolean> {
    // 实现签名验证逻辑
    return true;
  }
}
2. 安装后验证
async function verifyAfterInstall() {
  const bundleManager = bundle.getBundleManager();
  const bundleName = getBundleName();

  const bundleInfo = await bundleManager.getBundleInfo(bundleName, 0);
  const installedVersion = bundleInfo.versionName;

  // 比对安装的版本是否符合预期
  if (installedVersion !== expectedVersion) {
    throw new Error('版本验证失败');
  }

  // 检查签名证书
  const certValid = verifyCertificate(bundleInfo.signature);
  if (!certValid) {
    throw new Error('证书验证失败');
  }
}
3. 用户体验优化
@Component
struct UpdateProgressView {
  @State progress: number = 0;
  @State status: string = '准备中';

  build() {
    Column() {
      Text(this.status)
        .fontSize(18)

      Progress({ value: this.progress, total: 100 })
        .width('80%')
        .margin(20)

      if (this.status.includes('失败')) {
        Button('重试')
          .onClick(() => this.startUpdate())
      }
    }
  }
}
总结
-
updateManager 方式:
- 下载后自动跳转到应用市场安装
- 无需处理安装权限和细节
- 标准化流程,用户体验一致
- 适合通过应用市场分发的标准应用
-
自定义 OTA 方式:
- 应用内直接完成安装
- 需要申请安装权限
- 完全控制安装流程
- 适合企业内部分发或特殊场景
-
选择建议:
- 优先使用
updateManager标准更新流程 - 特殊需求(如企业内部分发)使用自定义 OTA
- 大型应用可结合两种方式实现混合更新
- 优先使用
在实际开发中,推荐使用官方的 updateManager 作为首选方案,除非有特殊需求才考虑自定义 OTA 安装方案。


 481
481

 被折叠的 条评论
为什么被折叠?
被折叠的 条评论
为什么被折叠?
 到【灌水乐园】发言


