


ps:学习Spring框架,由于学习的前两个都忘了,所以记录一下。
一、IoC(控制反转)
1.导入jar
Spring需要4+1个jar: 4个核心(bean,core,context,expression) + 1个依赖(common-loggins)
2入门案例
之前学习时,直接new一个对象即可。
使用spring ,可以通过spring创建对象实例,-> IoC(Inverse of Control)
将实现类的全限定名称配置到xml文件中,可以从spring工厂中获得实例
实现类:
/**
 * @author: RookieWangZhiWei
 * @date:2018-3-5 上午10:39:05
 * @version :
 *
 */
public interface UserService {
	public void addUser();
}
/**
 * @author: RookieWangZhiWei
 * @date:2018-3-5 上午10:39:41
 * @version :
 *
 */
public class UserServiceImpl implements UserService	{
	public void addUser(){
		System.out.println("a_ioc add User");
	}
}
xml文件:
<?xml version="1.0" encoding="UTF-8"?>
<beans xmlns="http://www.springframework.org/schema/beans"
       xmlns:xsi="http://www.w3.org/2001/XMLSchema-instance"
       xsi:schemaLocation="http://www.springframework.org/schema/beans
       					   http://www.springframework.org/schema/beans/spring-beans.xsd">

<bean id = "userServiceId" class = "spring.a_ioc.UserServiceImpl"></bean>


</beans>
xml所需的约束文件如下:
<beans xmlns="http://www.springframework.org/schema/beans"
       xmlns:xsi="http://www.w3.org/2001/XMLSchema-instance"
       xsi:schemaLocation="http://www.springframework.org/schema/beans
       					   http://www.springframework.org/schema/beans/spring-beans.xsd">
</beans> <bean> 是自己配置的service:
id : 用于之后从spring工厂中获得实例时使用的
class :需要创建实例的全限定类名
二、DI(依赖注入)
依赖:一个对象需要使用另一个对象
注入:通过setter方法进行另一个对象实例设置
例如:
接口 = 实现类(service 和 dao 耦合)
public class UserServiceImpl 	{
	private UserDao userDao = new UserDao();
}
使用spring之后(解耦:service不在使用dao接口)
public class UserServiceImpl 	{
	private UserDao userDao;
	setter方法;

}
模拟spring执行过程:
1、创建service实例 :UserService userSerivce = new UserServiceImpl(); (这是IoC)
2、创建dao实例: UserDao userDao = new UserDaoImpl(); (这是IoC)
3、将dao通过setter方法设置给service :userService.setUserDao(); (这是DI)
案例:
Dao:
public interface UserDao {
	 public void addUser();
}


public class UserDaoImpl implements UserDao {

	public void addUser() {
		// TODO Auto-generated method stub
		System.out.println("add User");
	}

}
Service:
public interface UserService {
	public void addUser();
}


public class UserServiceImpl implements UserService 	{
	private UserDao userDao;

	public void setUserDao(UserDao userDao) {
		this.userDao = userDao;
	}
	@Override
	public void addUser() {
		// TODO Auto-generated method stub
			this.userDao.addUser();
	}

}
xml 文件:
<bean id = "userServiceId" class = "spring.a_ioc.UserServiceImpl">
	<property name="userDao" ref = "userDaoId"></property>
</bean>

<!--创建dao实例-->
<bean id = "userDaoId" class = "spring.a_ioc.UserDaoImpl"></bean>
<property>用于属性注入:
name:bean的属性名,通过setter方法获得
setterUserDao >> UserDao >> userDao
ref :另一个bean的id值的引用
三、装配Bean基于XML
三种bean实例化方式:默认构造,静态工厂,实例工厂
1、默认构造
<bean id = "" class = ""></bean>2、静态工厂
用于生成实例对象,所有的方法必须是static
<bean id="" class="工厂全限定类名" factory-method="静态方法">工厂类:
public class MyBeanFactory {
	public static UserService createUserService(){
		return new UserServiceImpl();
	}
}
xml文件:
<bean id = "userServiceId" class = "spring.a_ioc.MyBeanFactory" factory-method = "createUserService"></bean>3、实例工厂
必须先有工厂实例对象,通过实例对象创建对象。提供的所有方法都是 非静态的
工厂类:
public class MyBeanFactory {
	public static UserService createUserService(){
		return new UserServiceImpl();
	}
}
xml文件:
<!-- 创建工厂实例 -->
<bean id = "myBeanFactoryId" class = "spring.a_ioc.MyBeanFactory"></bean>
<!-- 获得userService
	factory-bean 确定工厂实例
	factory-method 确定普通方法
	 -->
<bean id = "userServiceId" factory-bean="myBeanFactoryId" factory-method="createUserService"></bean>
四、作用域
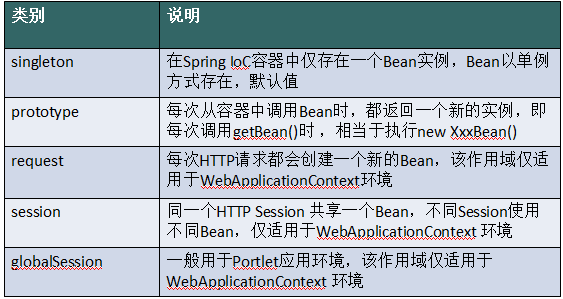
案例:
<bean id = "userServiceId" class = "spring.a_ioc.UserServiceImpl" scope = "prototype"></bean>五、生命周期
1、初始化和销毁
<bean id="" class="" init-method="初始化方法名称" destroy-method="销毁的方法名称">2、BeanPostProcessor 后处理Bean
待补充,不太会
六、属性依赖注入
1、构造方法
目标类
public class User {
	private Integer uid;
	private String username;
	private Integer age;
	public User(Integer uid, String username) {
		super();
		this.uid = uid;
		this.username = username;
	}
	public User(String username,Integer uid) {
		super();
		this.uid = uid;
		this.username = username;
	}
}
xml配置
<!-- 构造方法注入
	<constructor-arg>用于配置构造方法一个参数argument
	name:参数的名称
	value:设置普通数据
	ref:引用数据 ,一般是另一个bean的id值

	index:参数的索引号 ,从0开始,和构造方法的顺序有关
	type:确定参数类型
	 -->


<!-- 使用name -->
<bean id = "userId" class = "spring.a_ioc.User" >
	<constructor-arg name = "username" value = "tom"></constructor-arg>
	<constructor-arg name = "age" value = "15"></constructor-arg>

</bean>


<!-- 使用索引 -->
<bean id = "userId" class = "spring.a_ioc.User" >
	<constructor-arg index = "0" type = "java.lang.String" value = "1"></constructor-arg>
	<constructor-arg index = "1" type = "java.lang.Integer" value = "2"></constructor-arg>


</bean>
2、setter方法
<!-- setter方法注入
	普通数据
	<property name = "" value  = " " />
	等价于
	<property name = "">
		<value></value>
	</property>


	引用数据
	<property name = "" ref = "" />
	等价于
	<property name  = "">
		<ref bean = "" />
	</property>
 -->

<bean id = "userId" class = "spring.a_ioc.User" >
	<property name = "username" value = "tom"></property>
	<property name = "age">
		<value>18</value>
	</property>
	<property name = "uid" ref = "otherId"></property>
	<!--
		<property name = "uid">
			<ref bean = "otherId" />
		</property>
	 -->
</bean>
3、集合注入
<!--
		集合的注入都是给<property>添加子标签
			数组:<array>
			List:<list>
			Set:<set>
			Map:<map> ,map存放k/v 键值对,使用<entry>描述
			Properties:<props>  <prop key=""></prop>  【】

		普通数据:<value>
		引用数据:<ref>
	-->

	<bean id = "userId" class = "spring.a_ioc.User" >
		<property name = "arrayData">
			<array>
				<value>1</value>
				<value>2</value>
				<value>3</value>
				<value>4</value>
			</array>
		</property>


		<property name = "listData">
			<list>
				<value>1</value>
				<value>2</value>
				<value>3</value>
				<value>4</value>
			</list>
		</property>


		<property name  = "setData">
			<set>
				<value>1</value>
				<value>2</value>
				<value>3</value>
				<value>4</value>
			</set>

		</property>


		<property name = "mapData">

			<map>
				<entry key = "jack" value = "tom"></entry>

				<entry>
					<key><value>jack</value></key>
					<value>tom</value>
				</entry>
			</map>
		</property>


		<property name = "props">

			<props>
				<prop key = "1">1</prop>
				<prop key = "2">2</prop>
				<prop key = "3">3</prop>
			</props>
		</property>
	</bean>


 被折叠的 条评论
为什么被折叠?
被折叠的 条评论
为什么被折叠?
 到【灌水乐园】发言


