


 本文讲述了工程师在升级ShardingSphere版本过程中遇到的配置问题,涉及从4.1.1升级到5.1.2时,关于数据源配置、分表策略以及与MybatisPlus和Nacos集成的挑战,最终通过简化配置和调整分表策略找到并解决了问题。
作为工程师都希望自己的产品能够大卖,而项目开发中使用的技术不可能所有都是自己写的,使用到的开源组件例如shardingsphere这样好的组件,也会随着用户量的增加而需要升级,没必要非得像hutool那样非得自己写一边,当然hutool很优秀。
原先产品中使用的是4.1.1版本,这是2020年的版本,今年是2024年,已经过去了4年,可以升级了。升级之前先看了,shardingsphere升级至5.1.2配置遇坑
1 Consider defining a bean named ‘shardingDataSource’ in your configuration.
Parameter 0 of method sqlSessionFactory in com.baomidou.mybatisplus.autoconfigure.MybatisPlusAutoConfiguration required a bean named 'shardingDataSource' that could not be found.

The injection point has the following annotations:
	- @org.springframework.beans.factory.annotation.Autowired(required=true)
Action:

Consider defining a bean named 'shardingDataSource' in your configuration.
下图进去了,好像也不会影响,因为4.1.1版本也是为空,但执行这一步后会从nacos中获取sharding的配置,但升级后却没有加载,这是为什么呢?
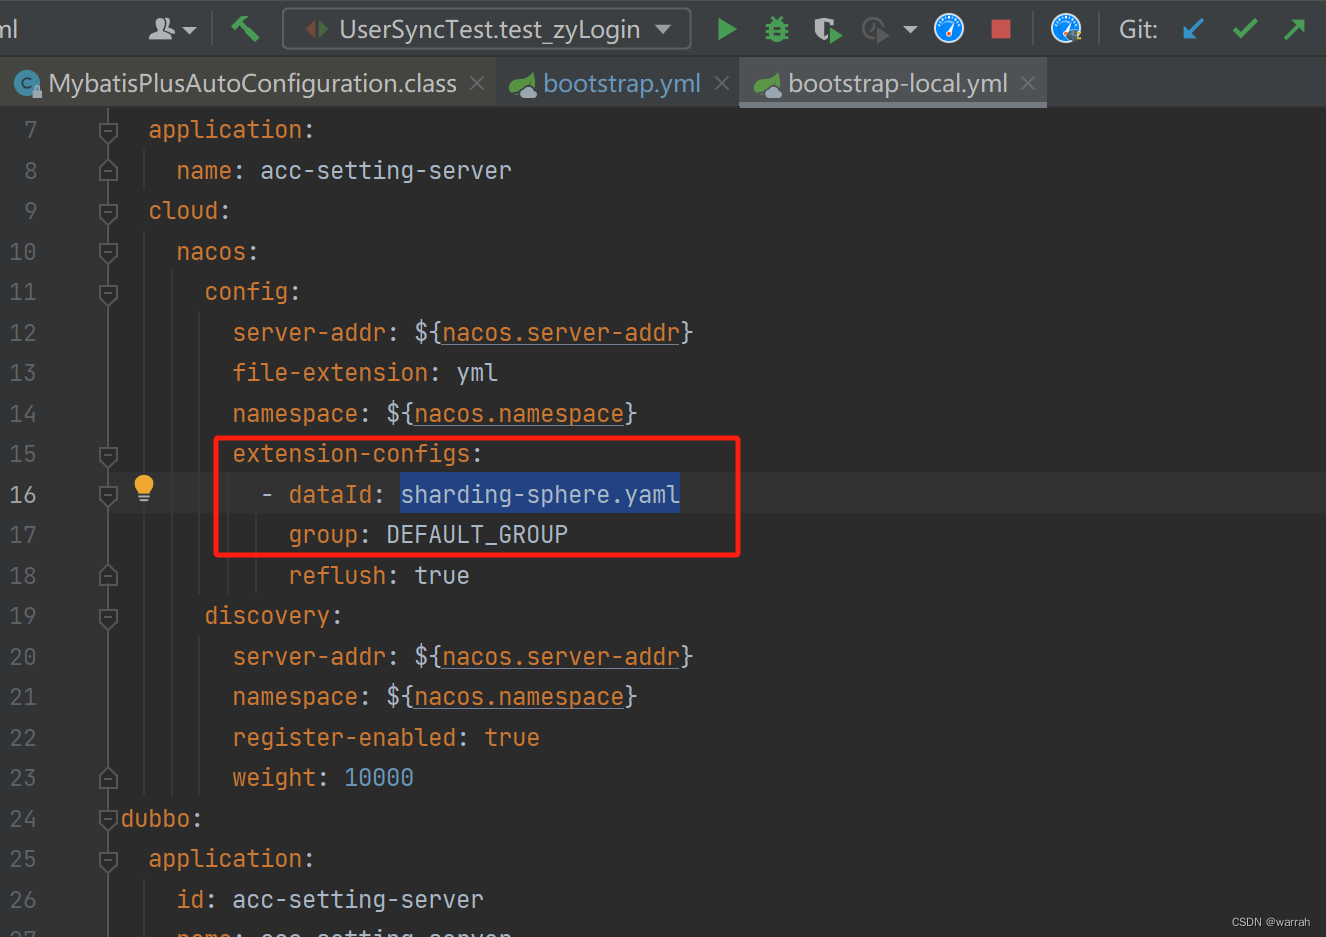
查看mybatis-plus的配置,这里是加载了nacos的配置

但我的分表配置是按照下方模式加载进来的,那么sharding-sphere.yaml是如何被sharding识别的呢?
ShardingSphere5.x.x(最新版)配置MySQL读写分离,我使用的spring版本是2.7.9,因此使用5.2.1就可以,不需要再往上升级,这个也是使用jdk1.8的需要.问题应该是出在程序没有加载到nacos中的配置,但这是为什么呢?这个问题还真不知道从哪里下牙。当我看到5.2.1的文档时,
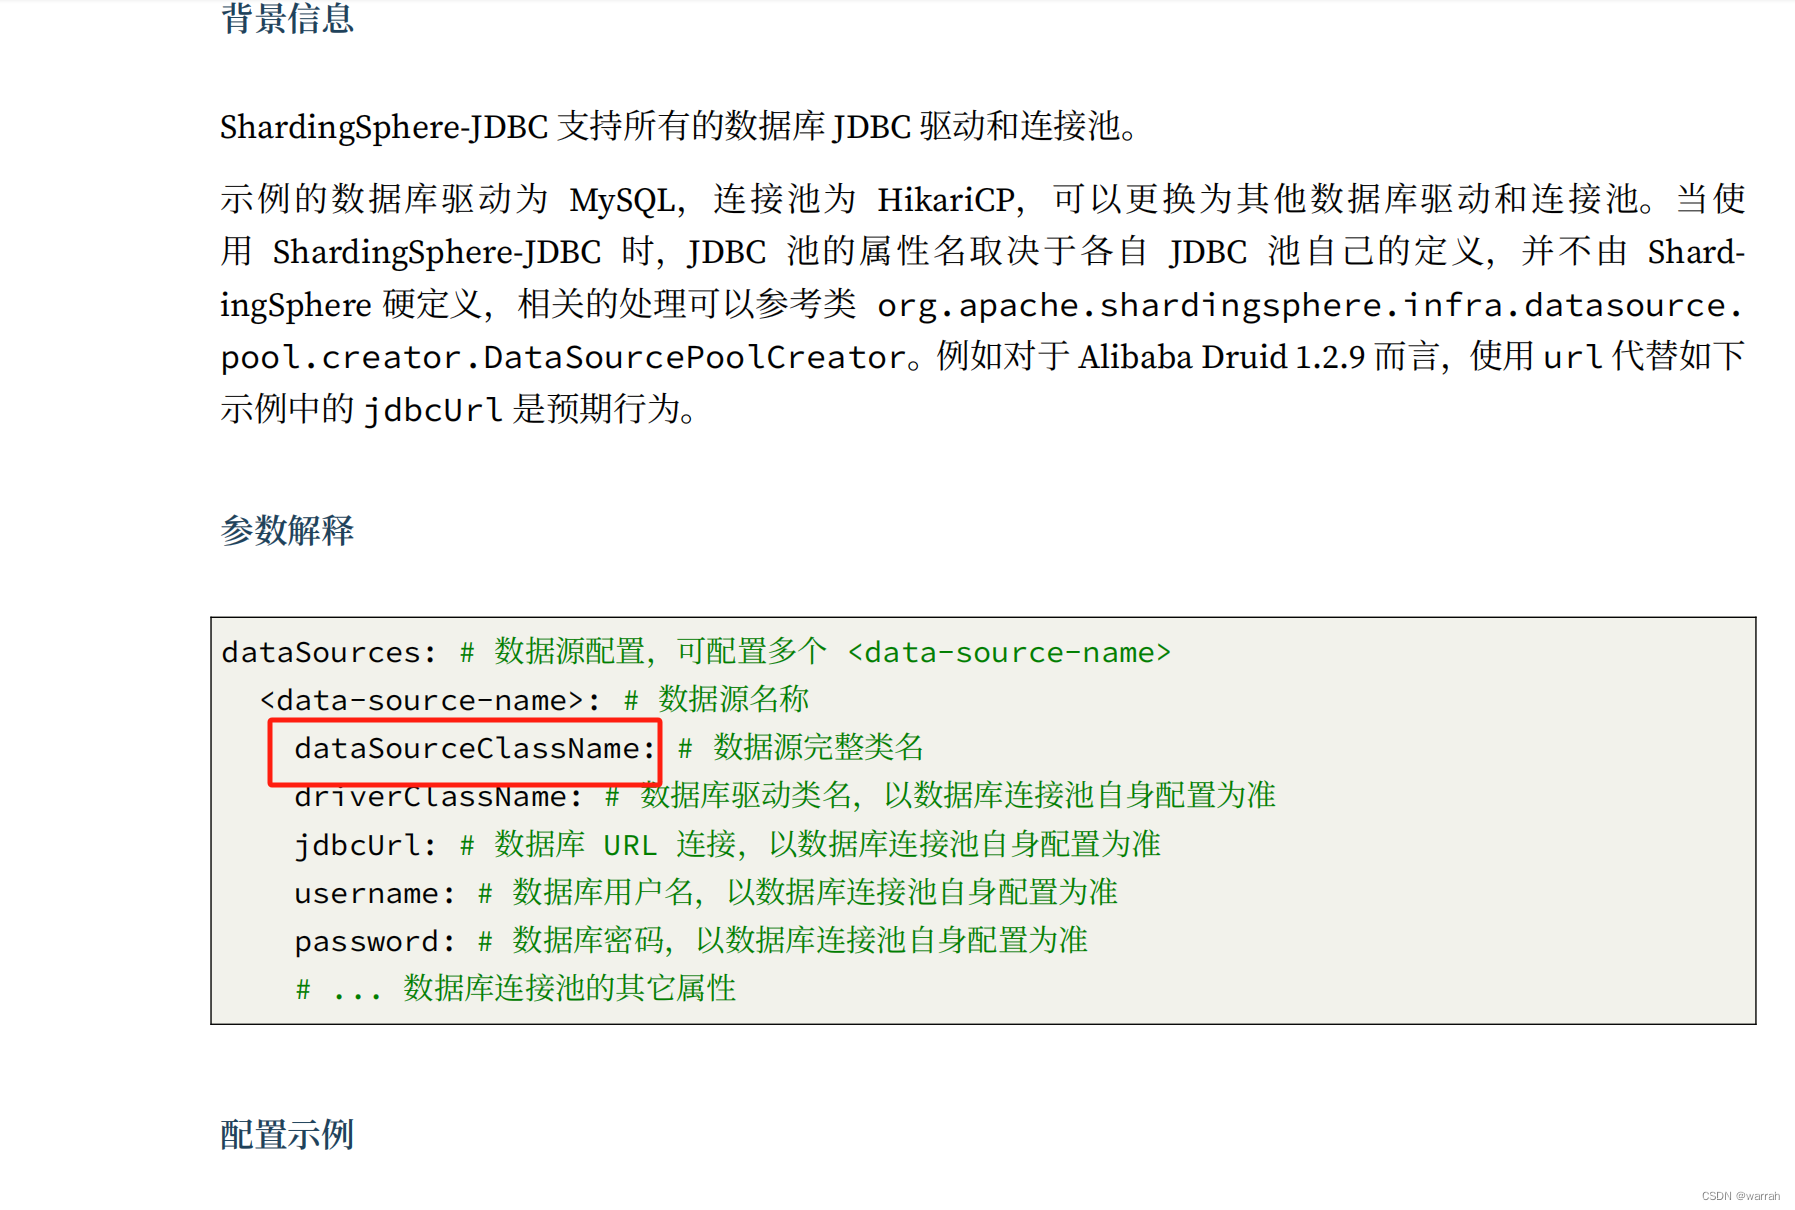
将type变更为data-source-class-name
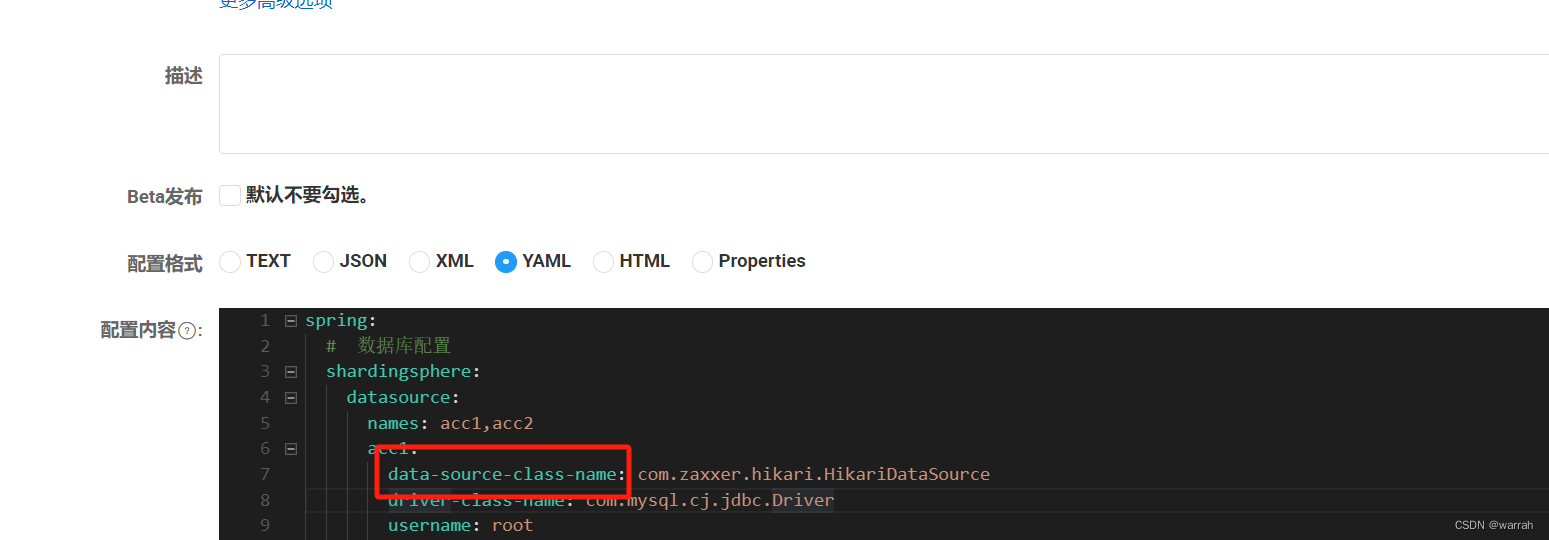
结果出现了下面的异常,那是不是说配置读取到了
Caused by: java.lang.NullPointerException: null
	at org.apache.shardingsphere.spring.boot.datasource.DataSourceMapSetter.getDataSource(DataSourceMapSetter.java:90)
	at org.apache.shardingsphere.spring.boot.datasource.DataSourceMapSetter.getDataSourceMap(DataSourceMapSetter.java:65)
	at org.apache.shardingsphere.spring.boot.ShardingSphereAutoConfiguration.setEnvironment(ShardingSphereAutoConfiguration.java:120)
调试看,果然配置读取到了。
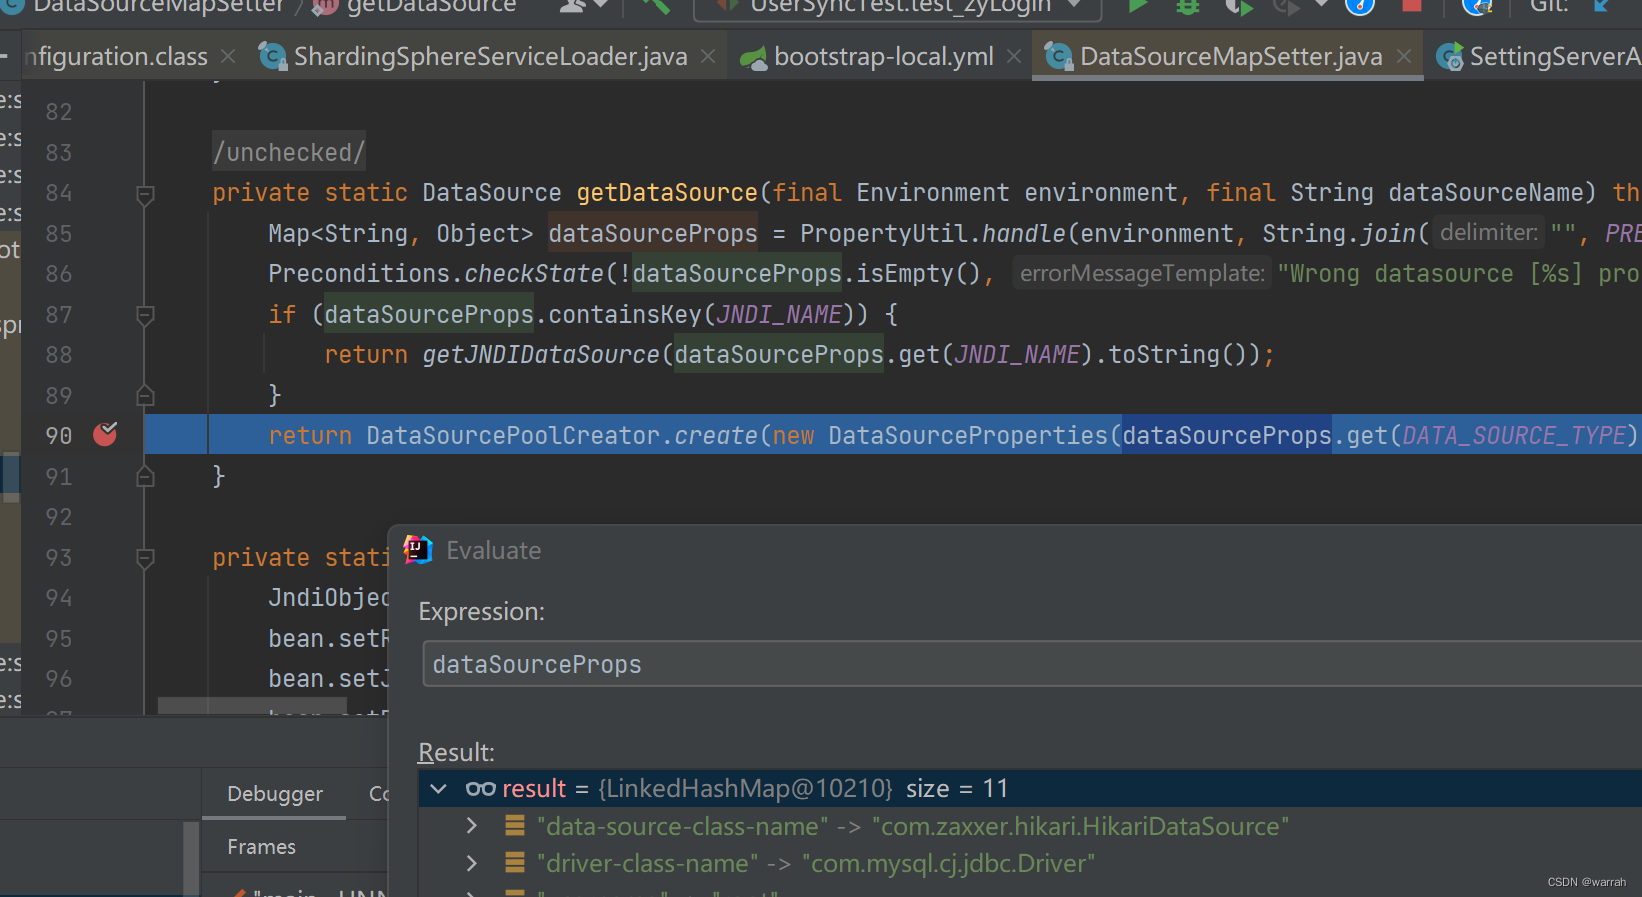
改回type后,可以看到配置,那么到底是什么导致mybatplus报错呢?
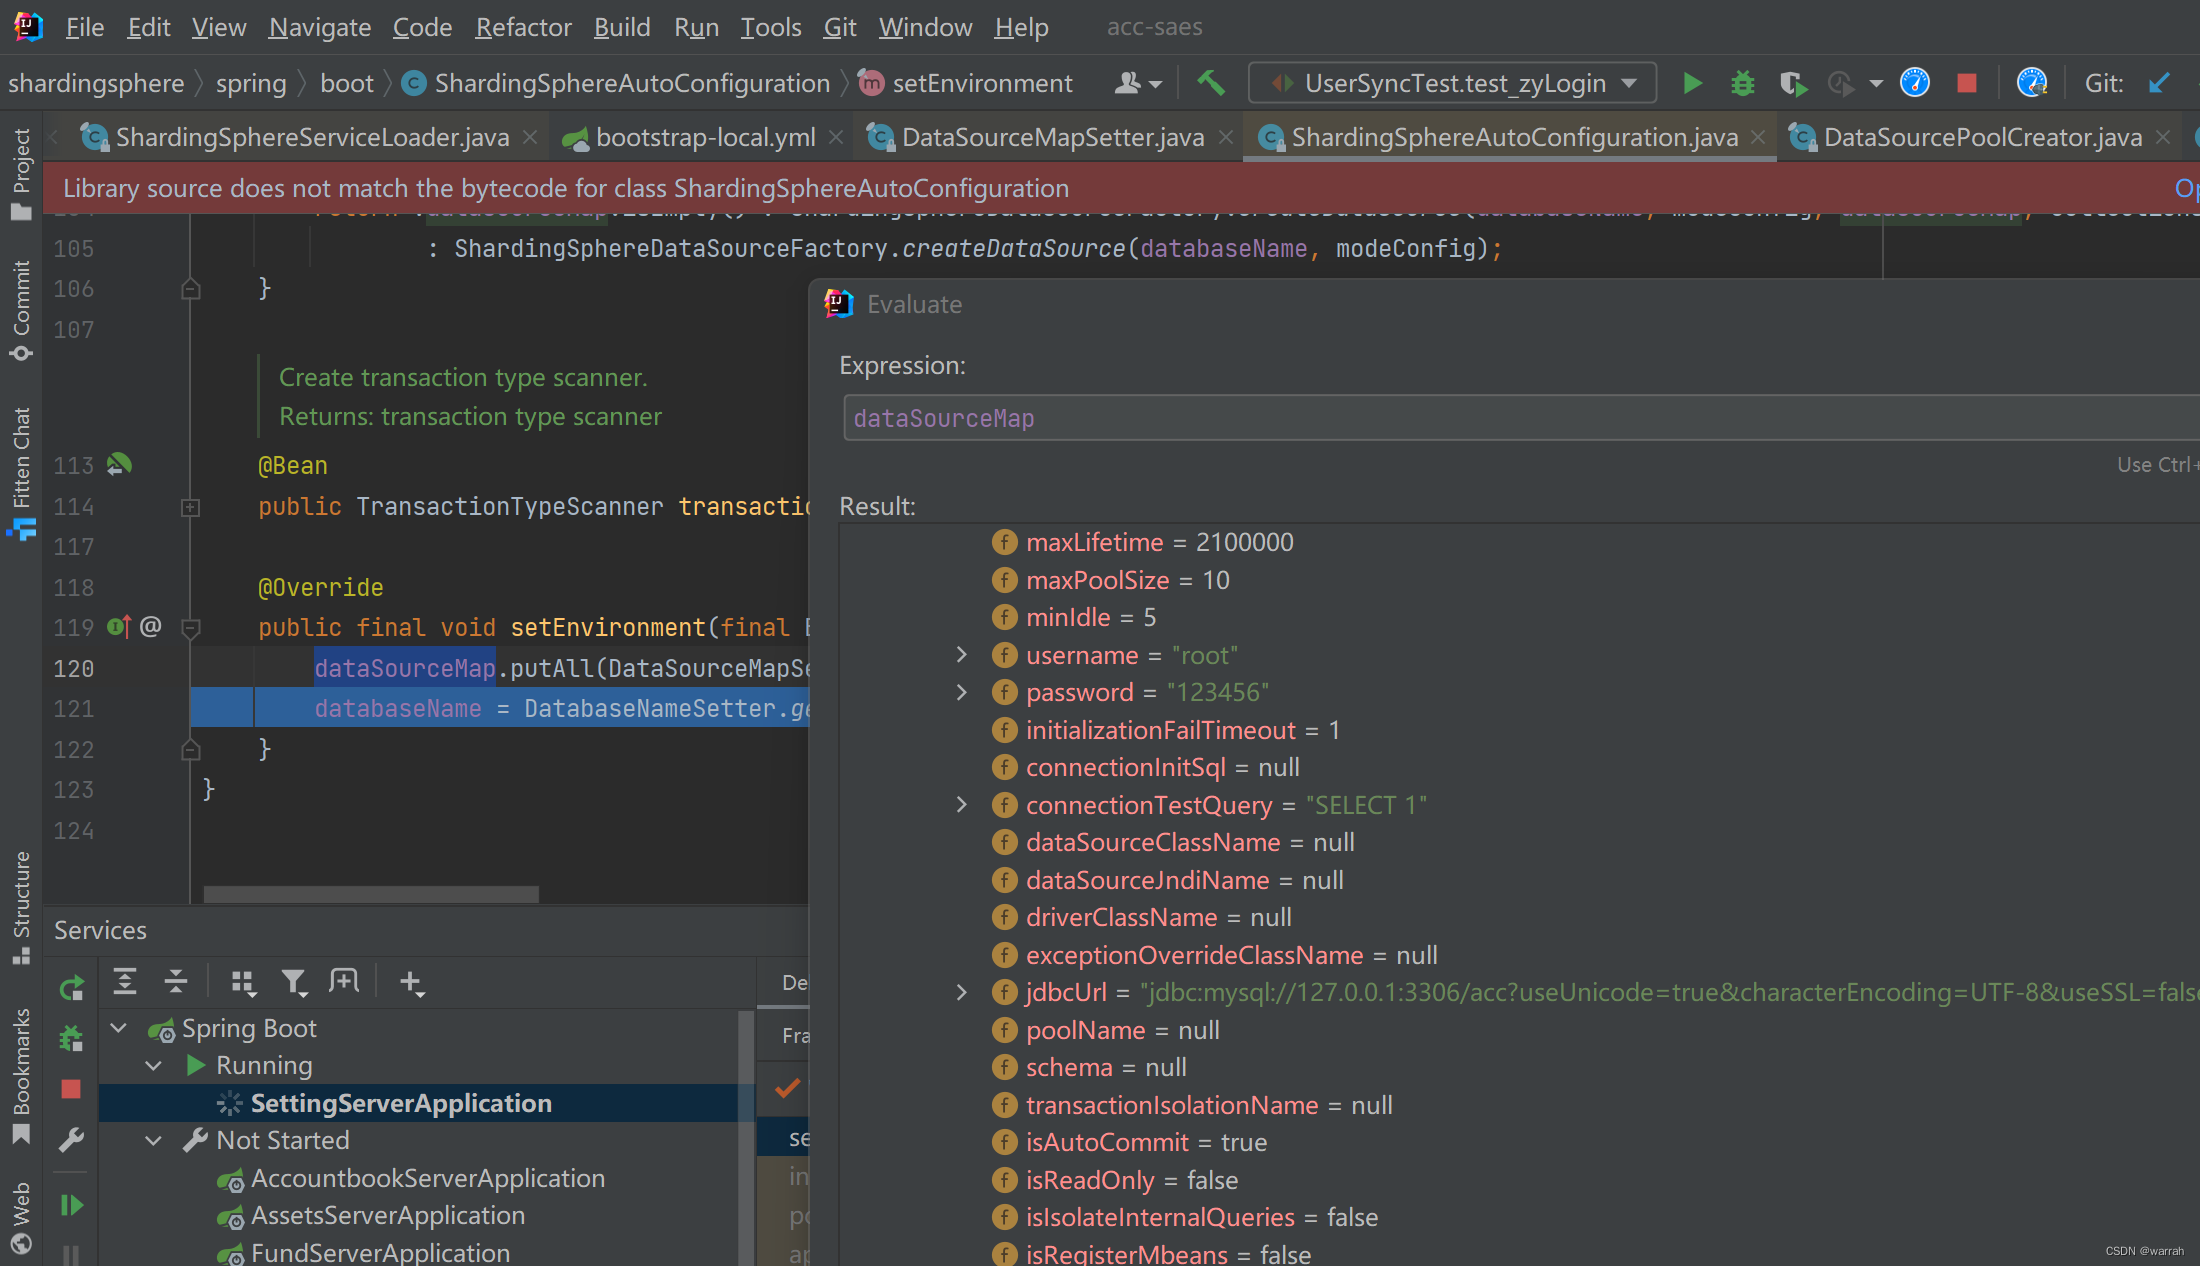
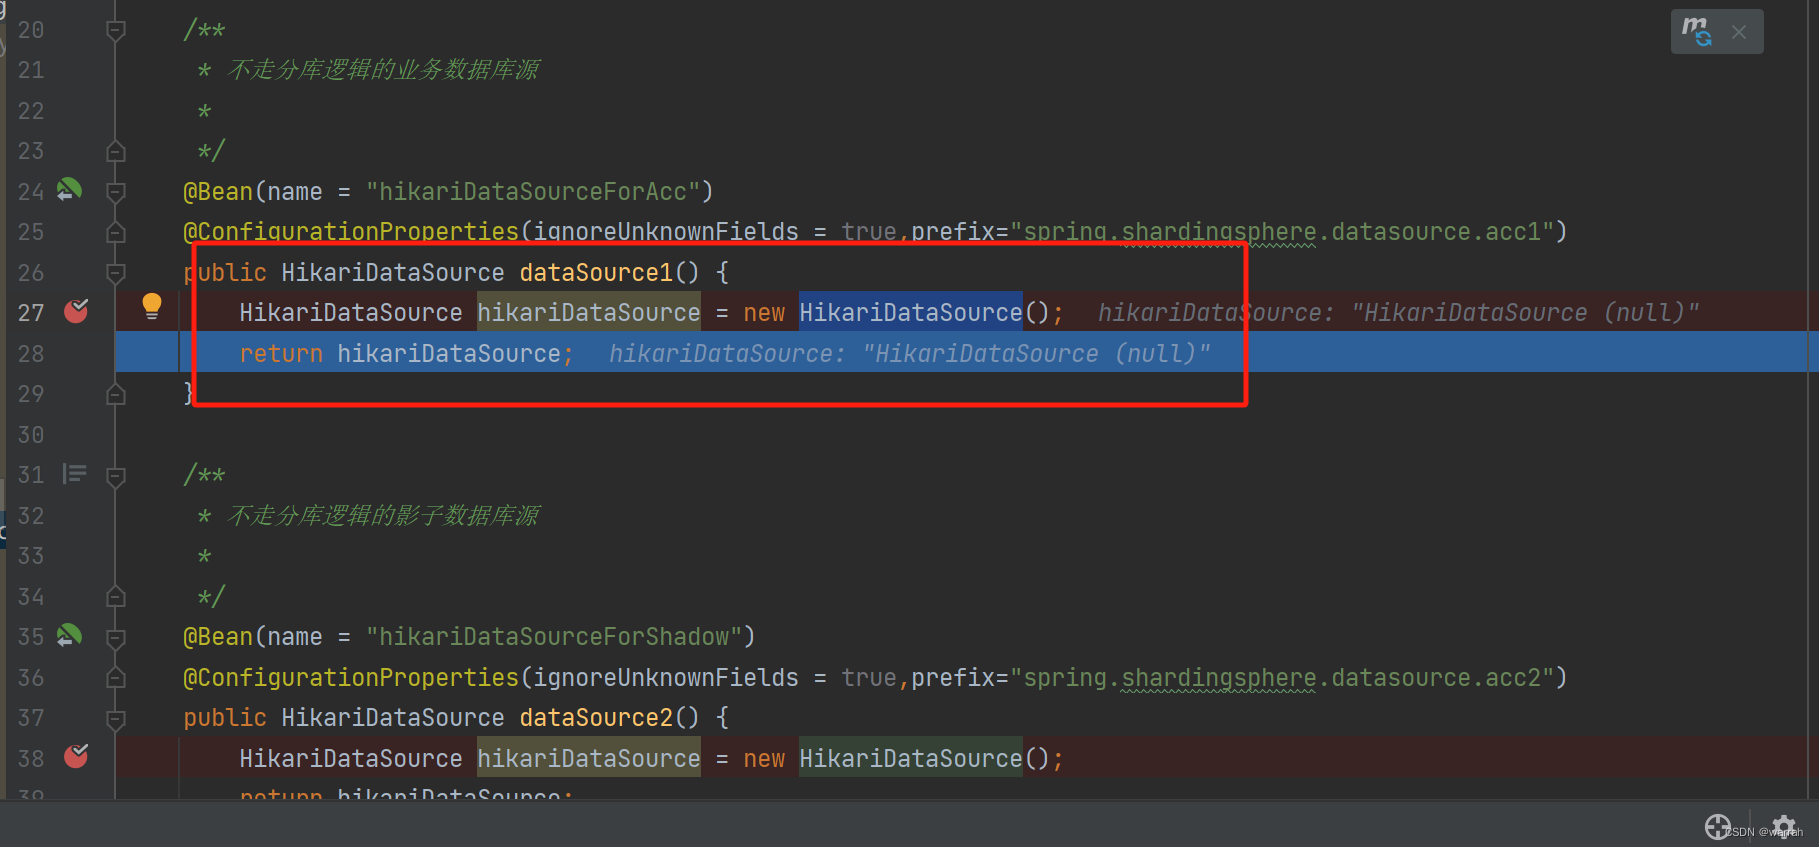
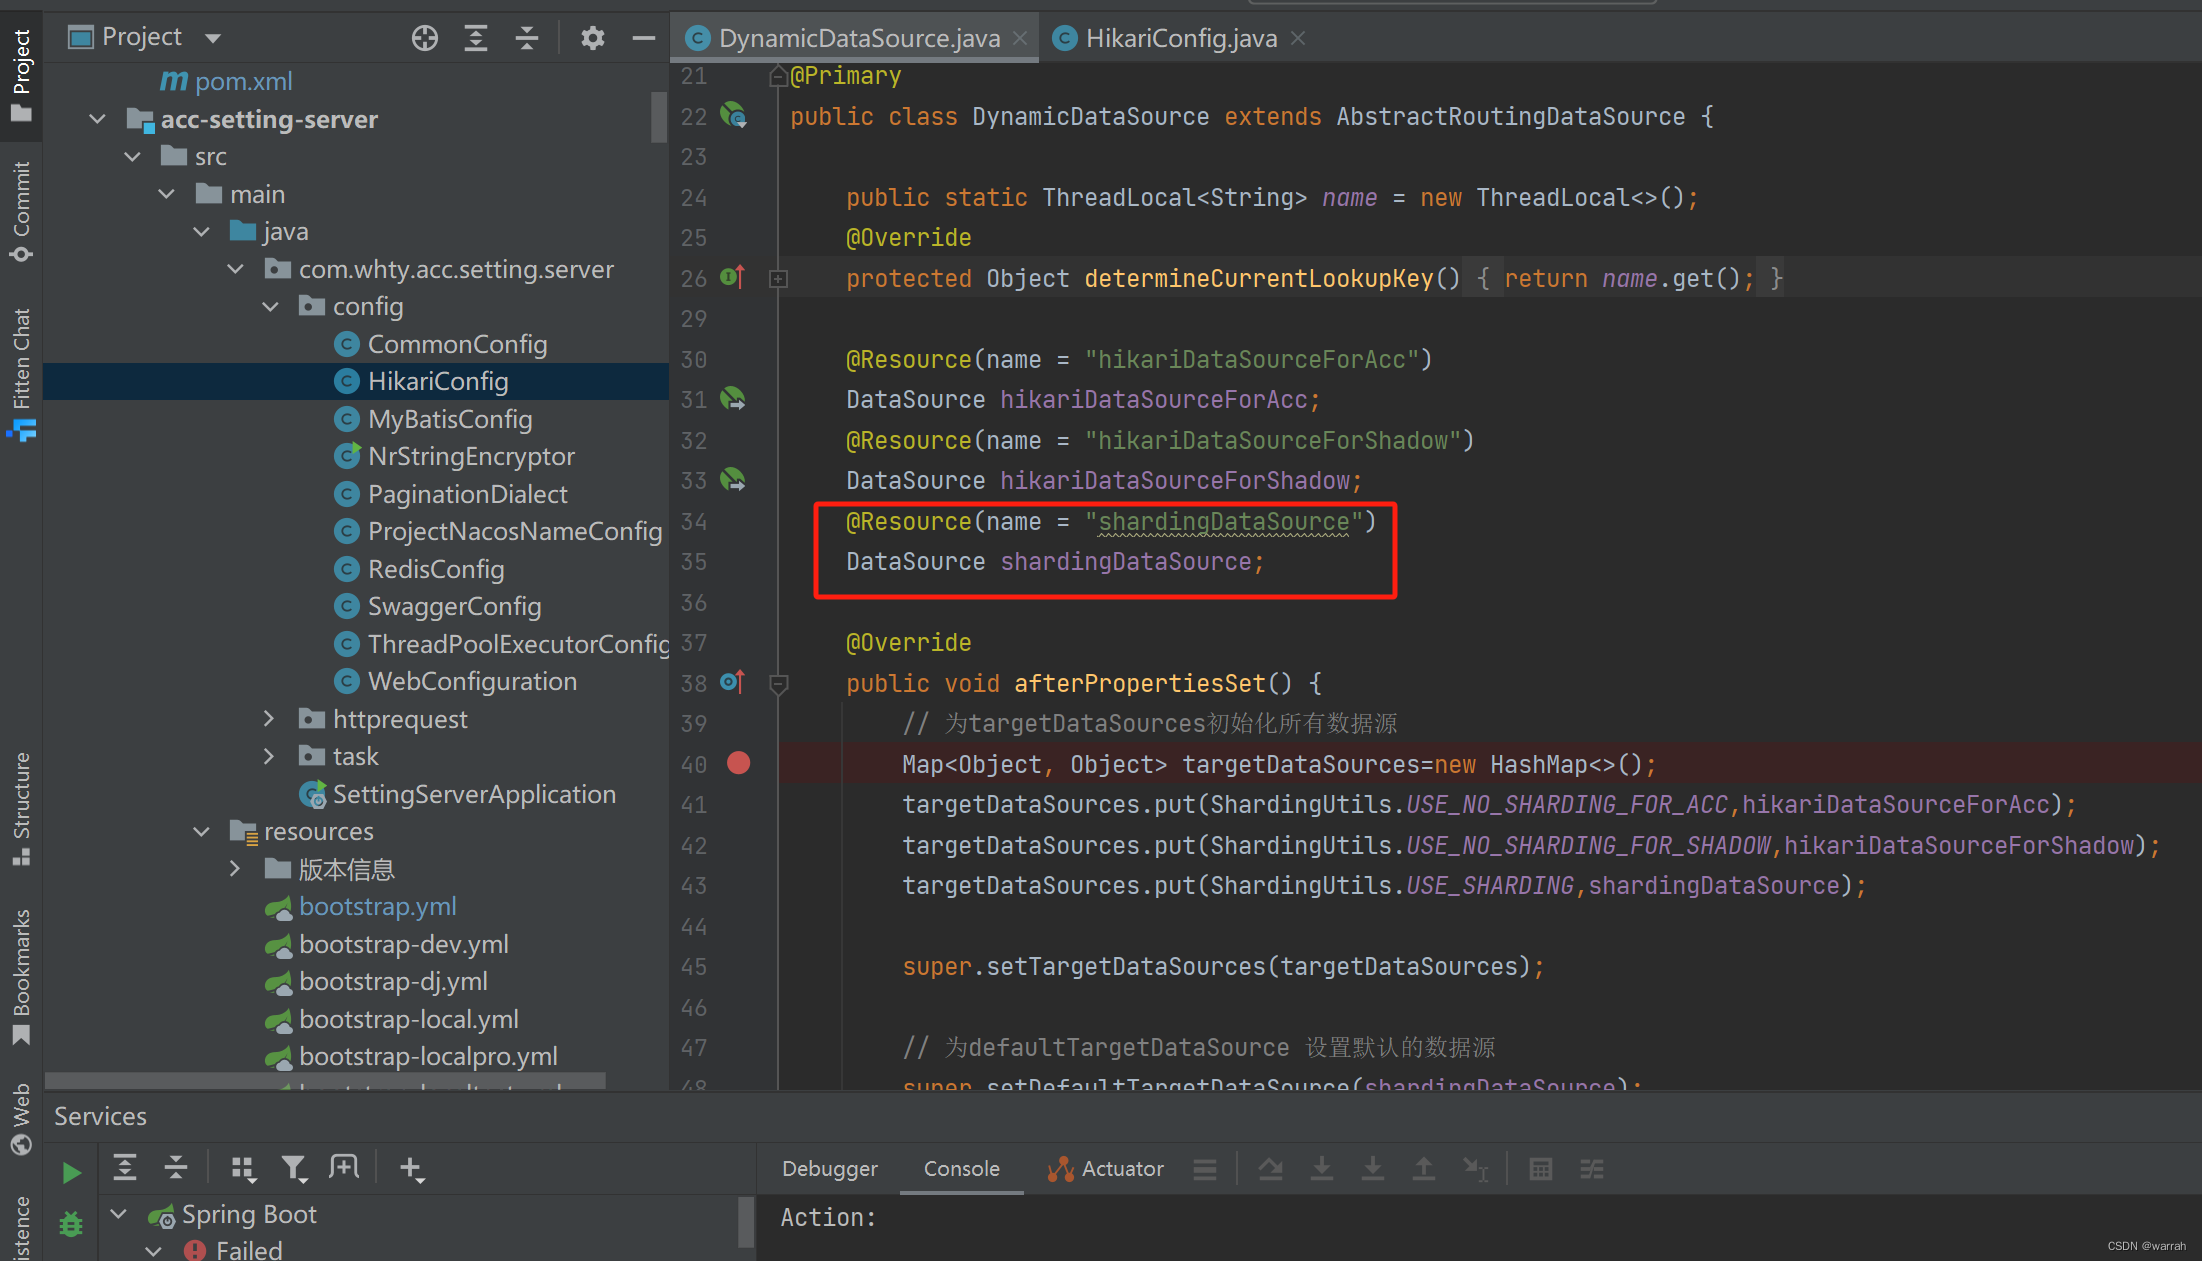
主库和影子库都可以读取到对应的配置
但是动态数据源却找不到shardingDataSource,那么这个shardingDataSource是从哪里配置的呢?没有地方给他初始化,直接使用肯定会报错,但为什么4.1.1没有这个问题呢?
下载4.1.1和5.2.1的源码可以看到差异

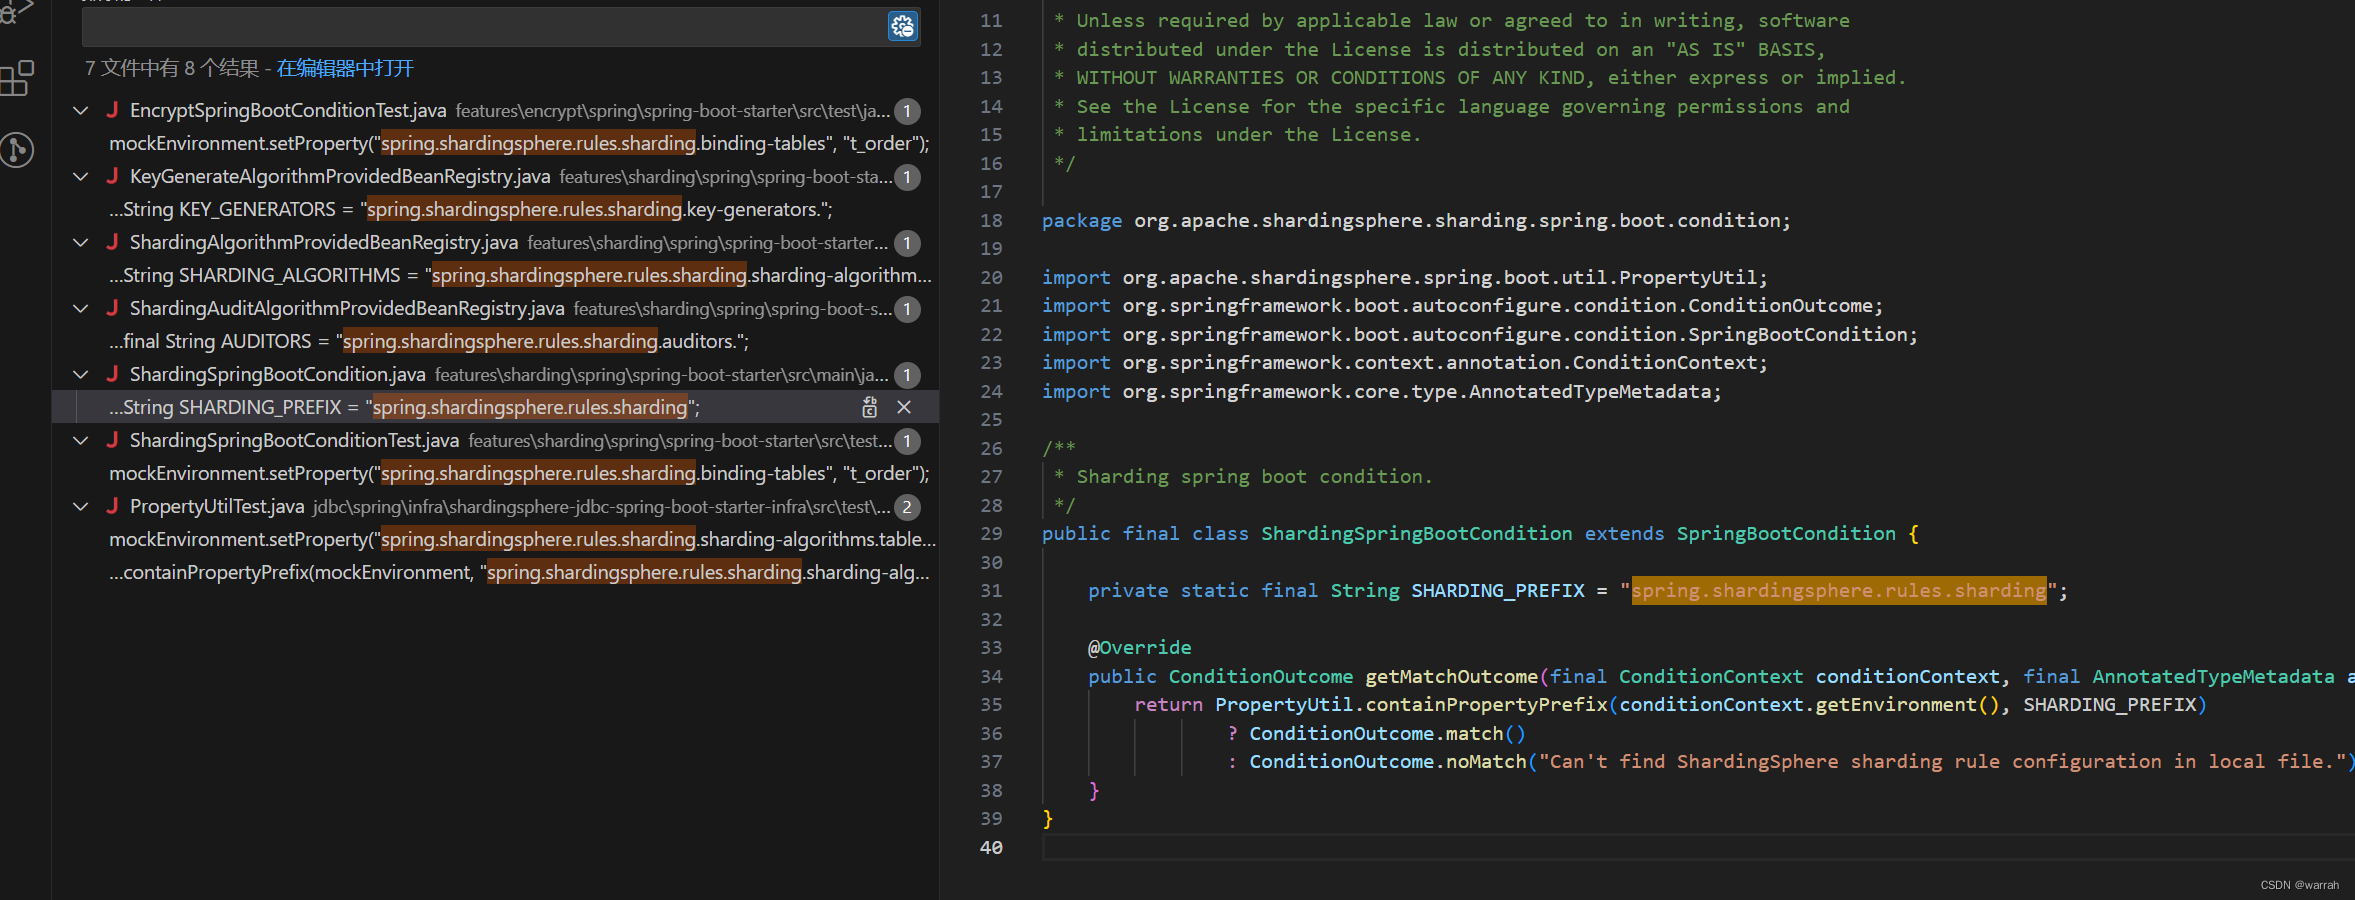
SHARDING_PREFIX调整为从spring.shardingsphere.sharding调整为spring.shardingsphere.rules.sharding
那么是否改配置就可以了呢?事实上还是没有解决问题,还需继续跟踪,4.1.1存在default-data-source-name,但是在5.2.1中,这个配置没有了
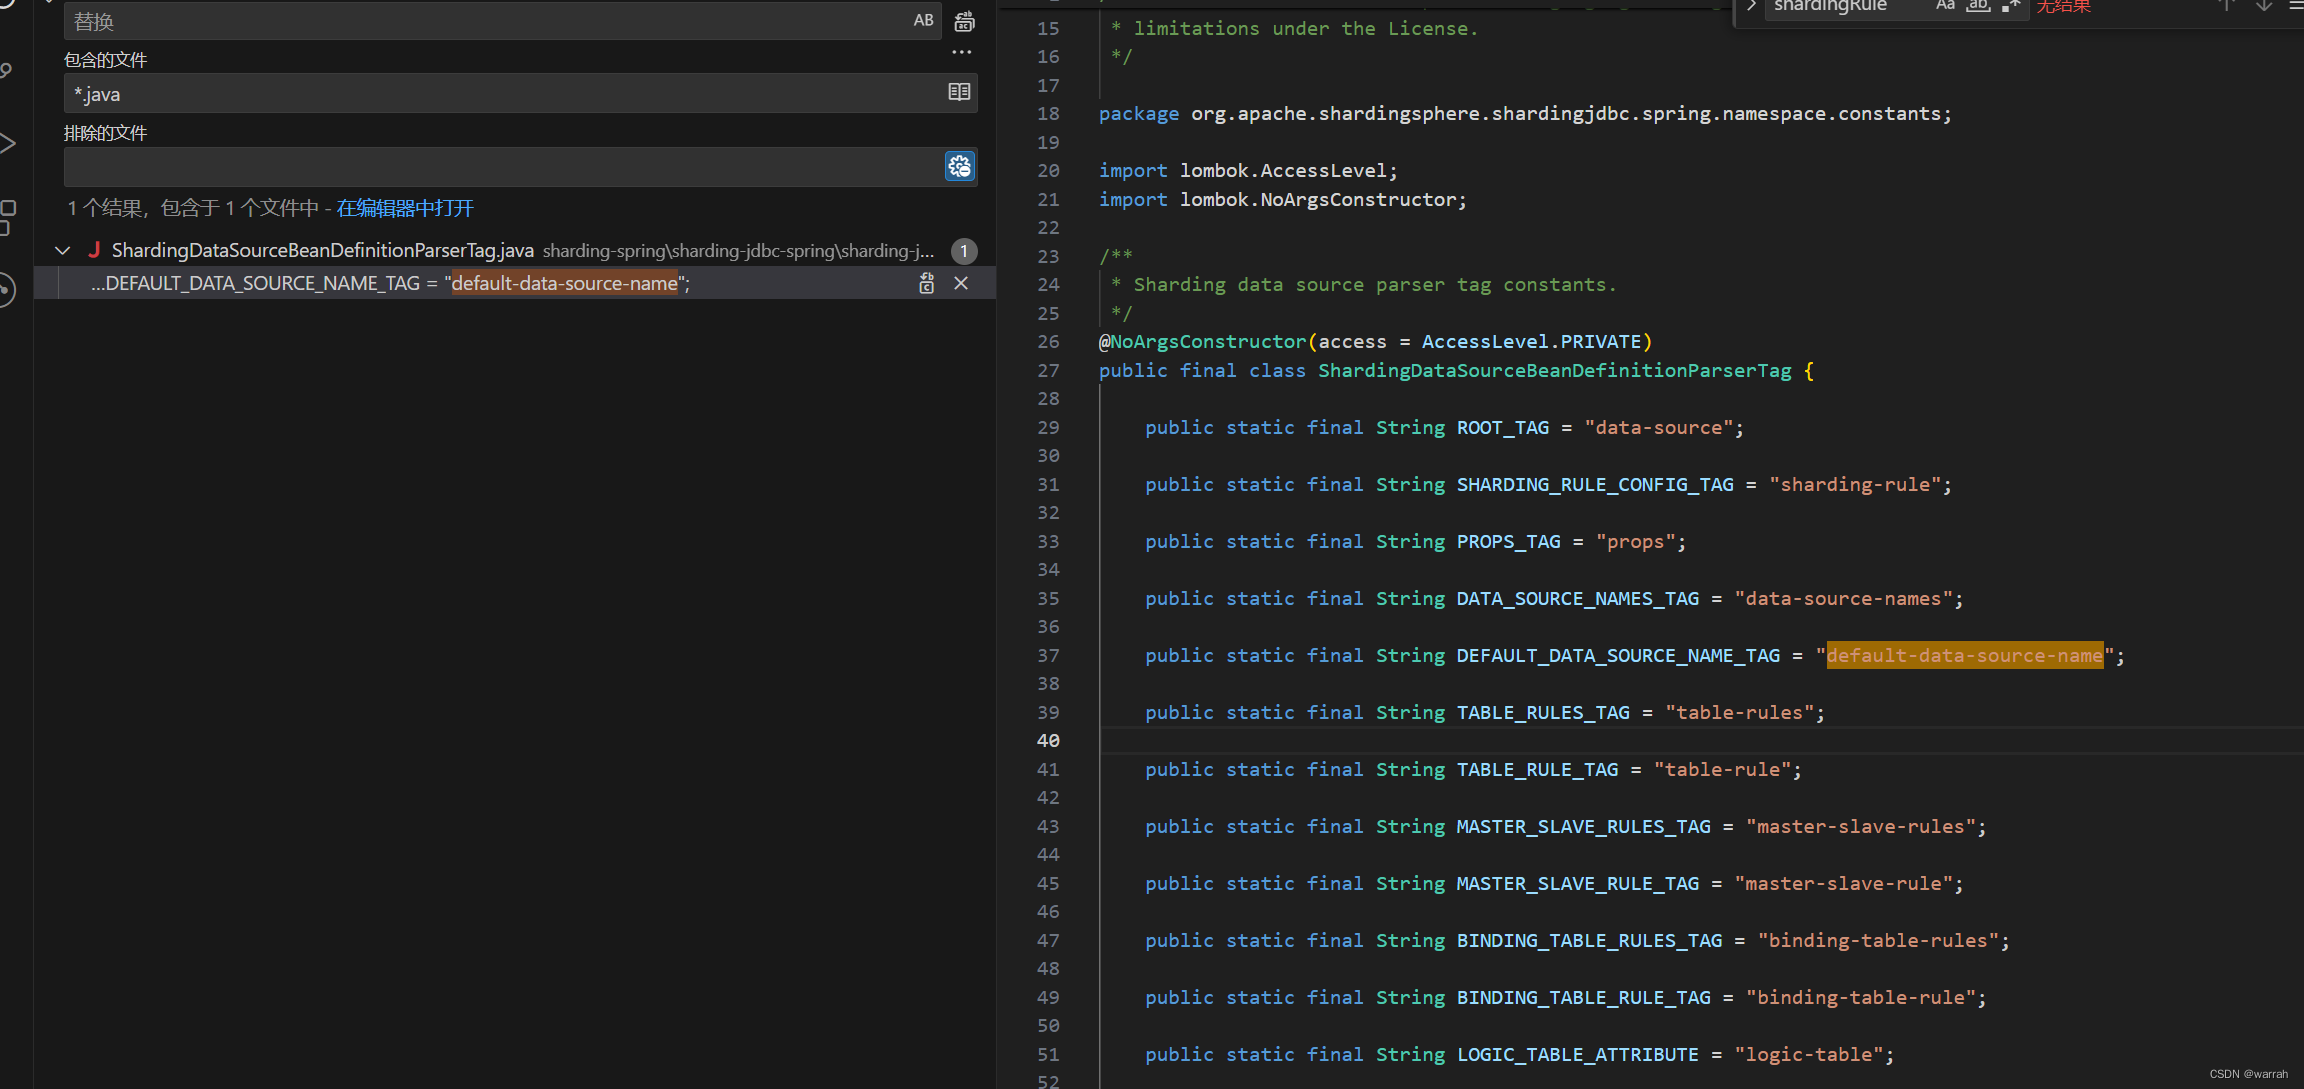
所以在4.1.1的环境中,才可以找到默认的数据配置,看来最终的问题转换为默认数据源了
接着查看ShardingSphere5.x分库分表使用,他采用的是5.1.1,但是下图5.2.1位置应该是获取不到dataSource.getContextManager()
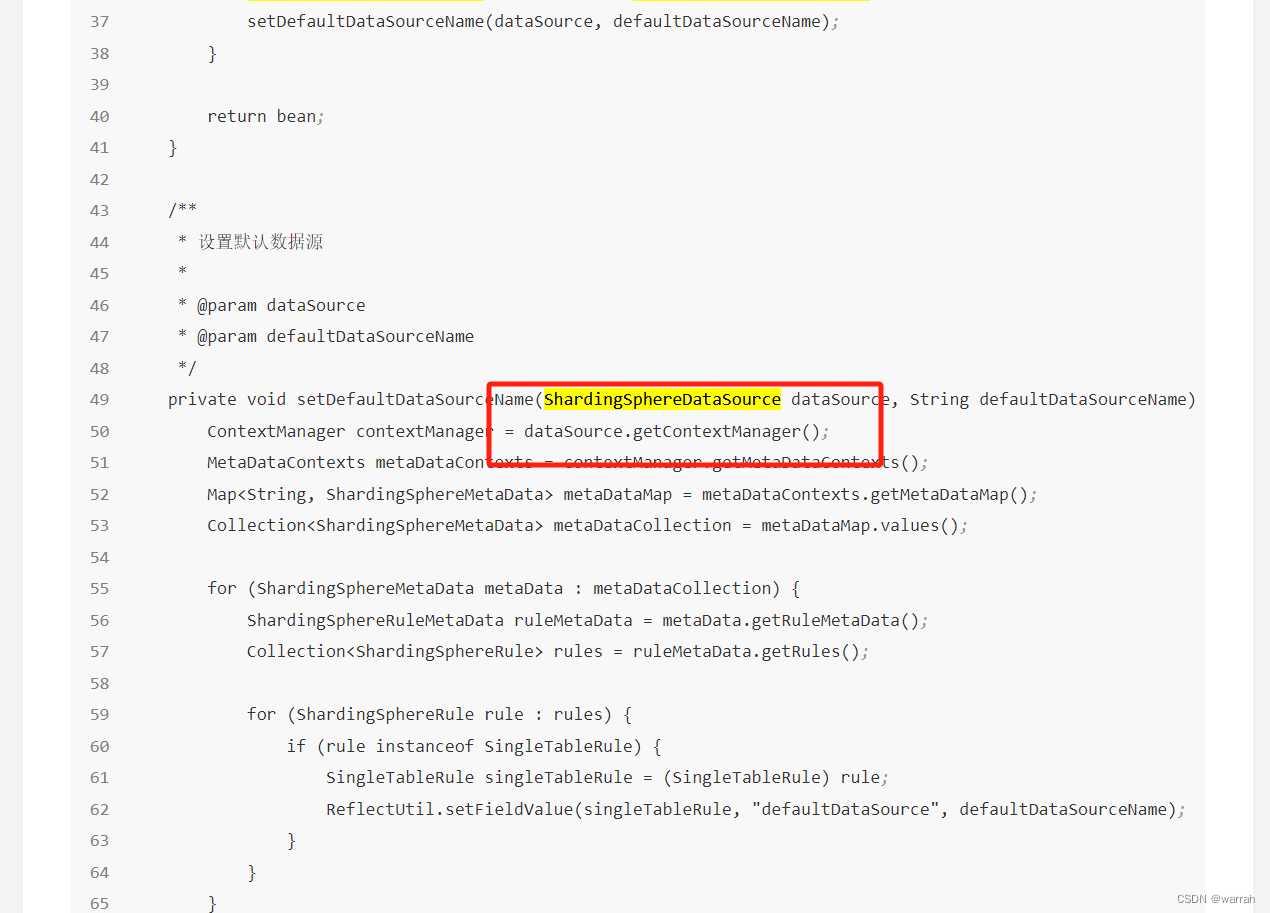
从git上下载源码,查看得到5.1.0
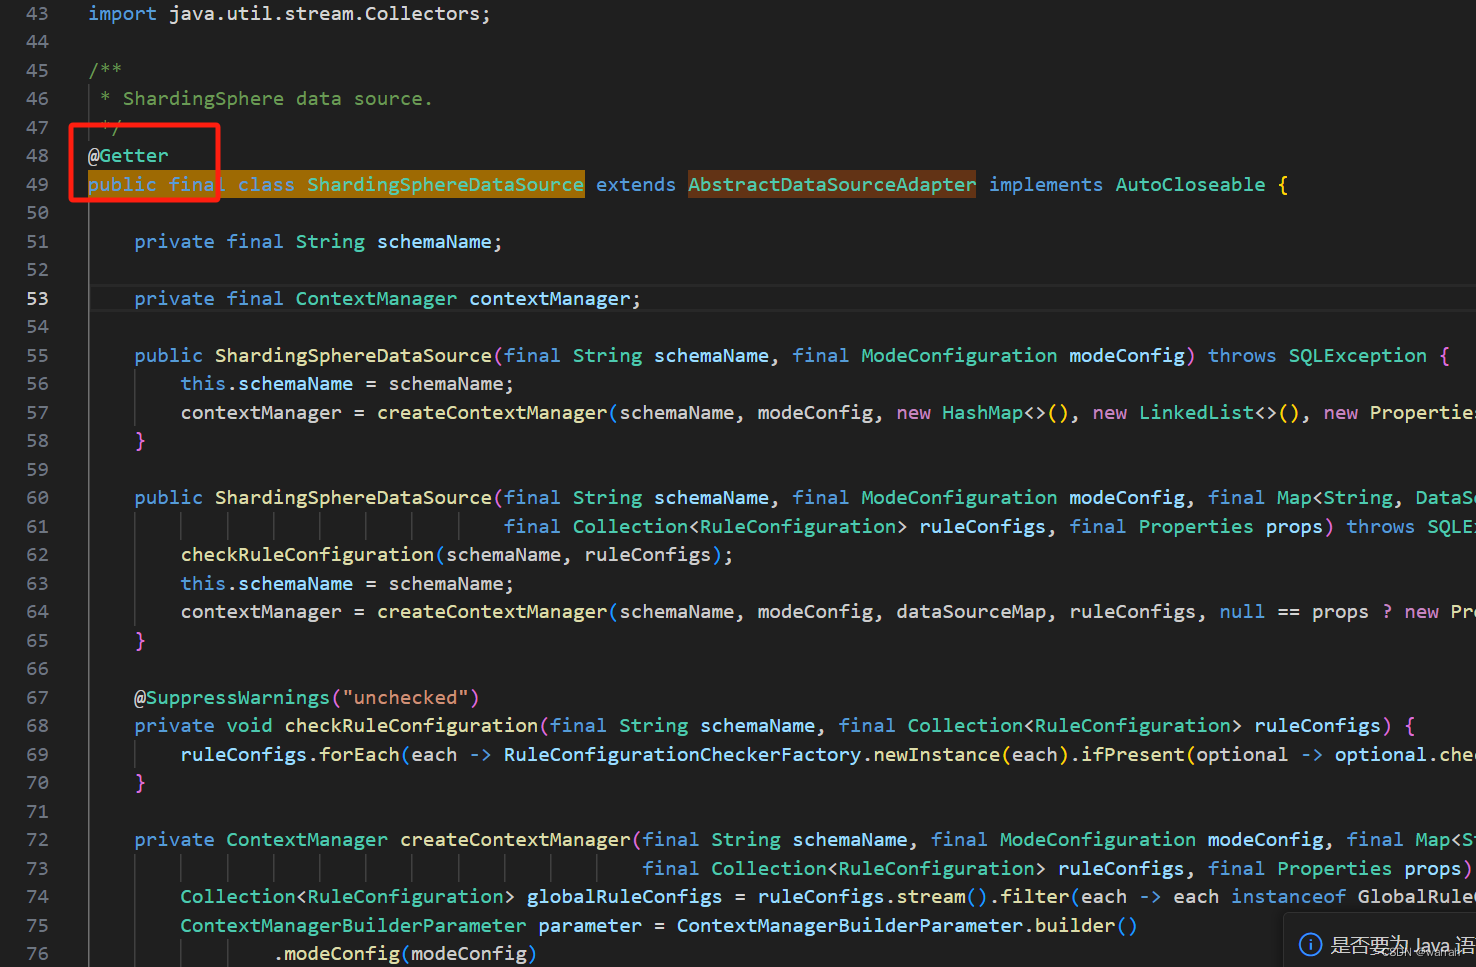
但是到了5.2.1,@Getter没有了

    jar:file:/E:/repository/org/apache/shardingsphere/shardingsphere-infra-util/5.2.1/shardingsphere-infra-util-5.2.1.jar!/org/apache/shardingsphere/infra/util/yaml/constructor/ShardingSphereYamlConstructor$1.class

The called method's class hierarchy was loaded from the following locations:

    null: file:/E:/repository/org/apache/shardingsphere/shardingsphere-infra-util/5.2.1/shardingsphere-infra-util-5.2.1.jar
    org.yaml.snakeyaml.LoaderOptions: file:/E:/repository/org/yaml/snakeyaml/1.30/snakeyaml-1.30.jar
出现上面的问题是因为版本兼容的问题
<snakeyaml.version>1.33</snakeyaml.version>

 <dependency>
            <groupId>org.yaml</groupId>
            <artifactId>snakeyaml</artifactId>
            <version>${snakeyaml.version}</version>
        </dependency>
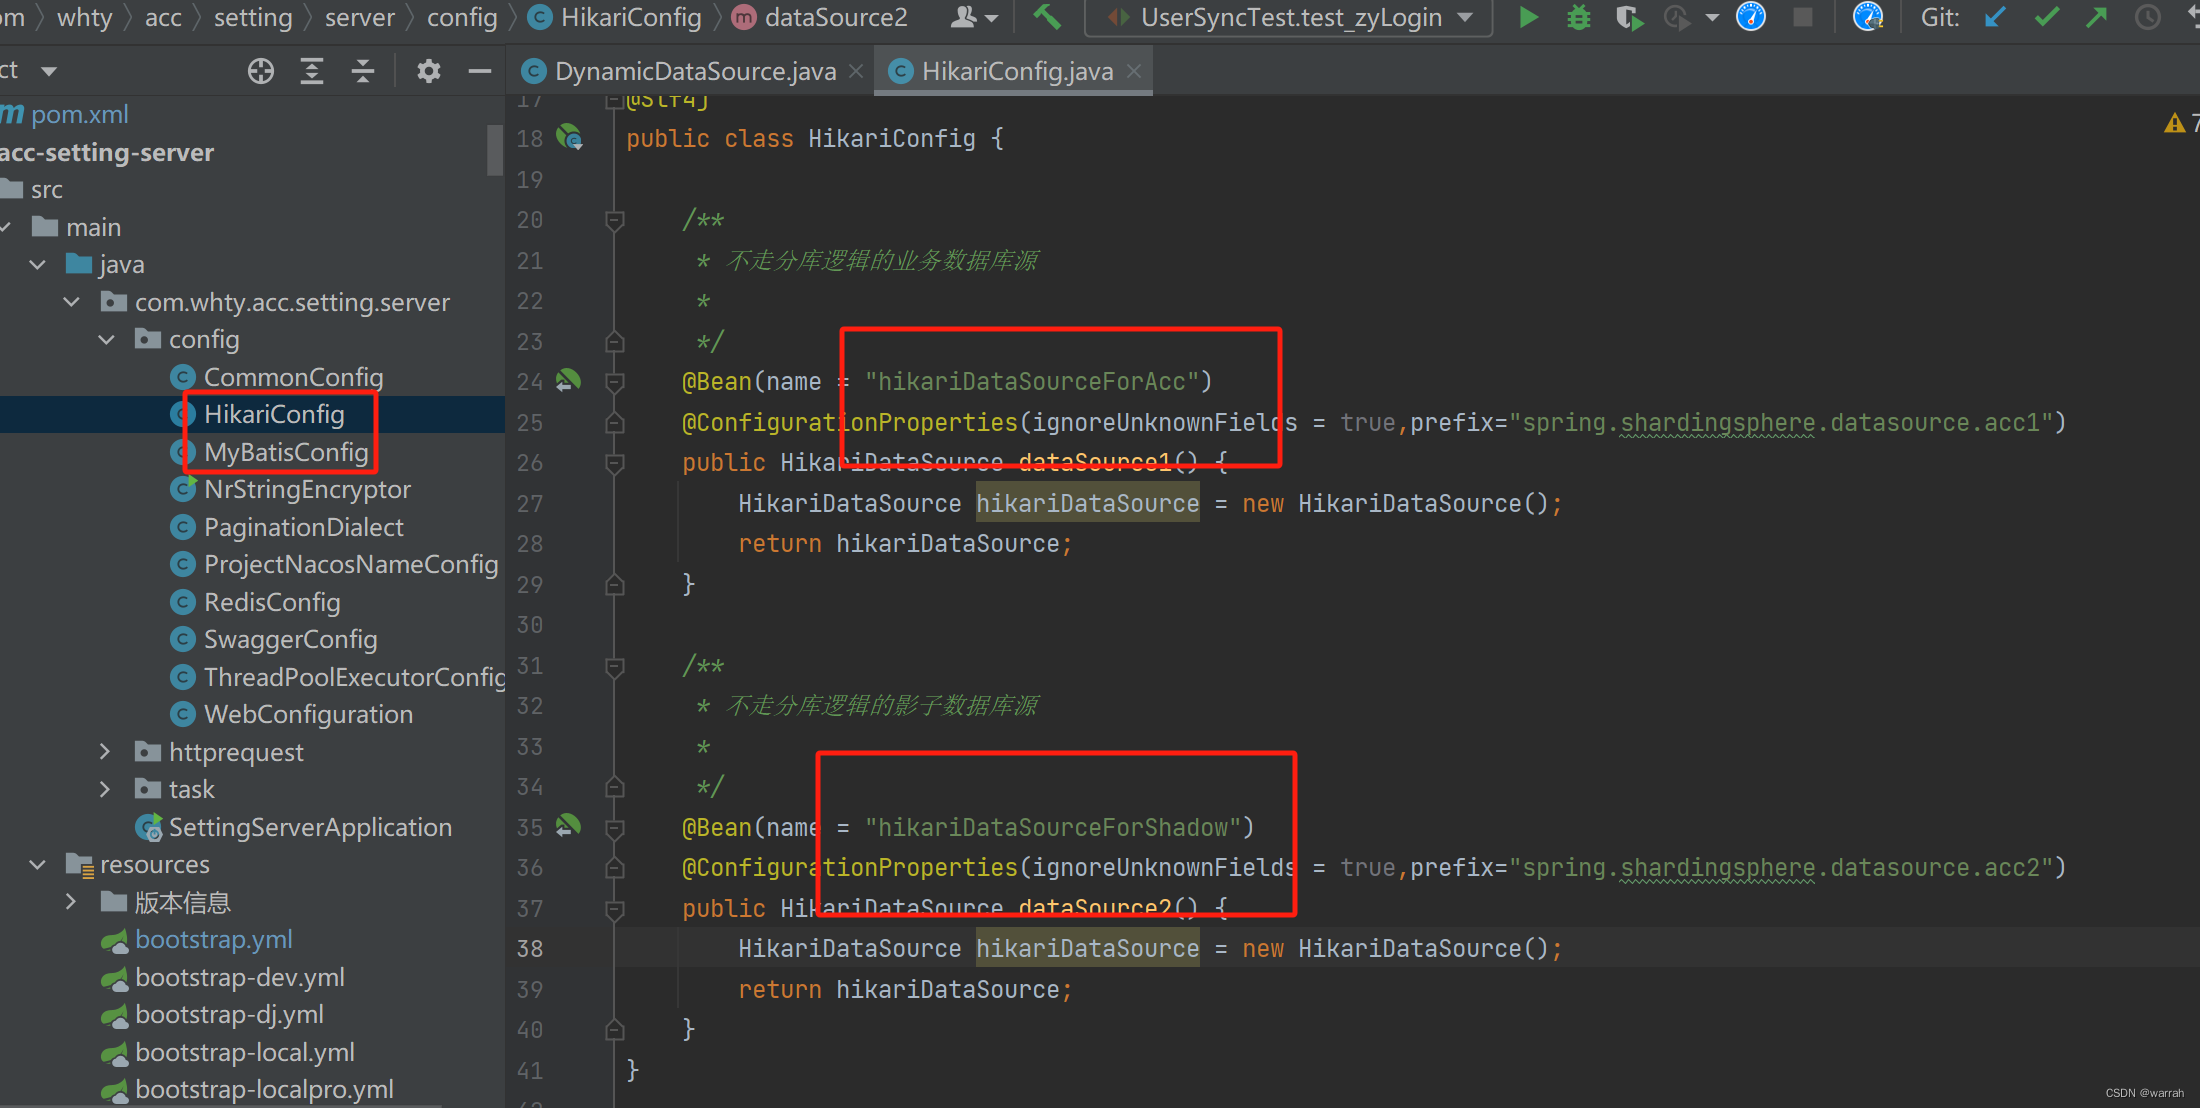
之所以搞那么麻烦,是因为不是按照官方来配置影子库,这样后期其他人接手后,想升级真是不知道问题在哪里。
所以第一步,先做简化,先只做分表,不用影子库,让系统能够运行并升级到新版本
spring:
  #  数据库配置
  shardingsphere:
    mode:
      type: Standalone
      repository:
        type: JDBC
    datasource:
      names: acc1
      acc1:
        type: com.zaxxer.hikari.HikariDataSource
        driver-class-name: com.mysql.cj.jdbc.Driver
        username: root
        password: ENC(xxx)
        jdbcUrl: jdbc:mysql://127.0.0.1:3306/acc?useUnicode=true&characterEncoding=UTF-8&useSSL=false&serverTimezone=Asia/Shanghai&allowMultiQueries=true
        pool-name: Retail_HikariCP #连接池名称
        minimum-idle: 5 #最小空闲连接数量
        #idle-timeout: 600000 #空闲连接存活最大时间,默认600000(10分钟)
        maximum-pool-size: 10 #连接池最大连接数,默认是10
        auto-commit: true  #此属性控制从池返回的连接的默认自动提交行为,默认值:true
        #max-lifetime: 600000 #此属性控制池中连接的最长生命周期,值0表示无限生命周期,默认1800000即30分钟
        connection-timeout: 300000 #数据库连接超时时间,默认30秒,即30000
        connection-test-query: SELECT 1
    props:
      sql:
        show: true
    rules:
      sharding:
        tables:
          # 科目
          acc_account_subject:
            actual-data-nodes: acc1.acc_account_subject_$->{0..49}
            table-strategy:
              inline:
                sharding-column: as_id
                algorithm-expression: acc_account_subject_$->{as_id%50}
          # 科目余额
          acc_account_balance:
            actual-data-nodes: acc1.acc_account_balance_$->{0..49}
            table-strategy:
              inline:
                sharding-column: as_id
                algorithm-expression: acc_account_balance_$->{as_id%50}
          # 期初
          acc_initial_balance:
            actual-data-nodes: acc1.acc_initial_balance_$->{0..49}
            table-strategy:
              inline:
                sharding-column: as_id
                algorithm-expression: acc_initial_balance_$->{as_id%50}
          # 凭证
          acc_voucher:
            actual-data-nodes: acc1.acc_voucher_$->{0..49}
            table-strategy:
              inline:
                sharding-column: as_id
                algorithm-expression: acc_voucher_$->{as_id%50}
          # 凭证分录
          acc_voucher_entry:
            actual-data-nodes: acc1.acc_voucher_entry_$->{0..49}
            table-strategy:
              inline:
                sharding-column: as_id
                algorithm-expression: acc_voucher_entry_$->{as_id%50}
          bindingTables:
            - acc_account_subject,acc_account_balance,acc_initial_balance,acc_voucher,acc_voucher_entry
配置后,执行写入操作检验正确性
Caused by: java.sql.SQLException: Unknown exception: Insert statement does not support sharding table routing to multiple data nodes.
	at org.apache.shardingsphere.infra.util.exception.external.sql.ShardingSphereSQLException.toSQLException(ShardingSphereSQLException.java:54)
	at org.apache.shardingsphere.dialect.SQLExceptionTransformEngine.toSQLException(SQLExceptionTransformEngine.java:62)
	at org.apache.shardingsphere.driver.jdbc.core.statement.ShardingSpherePreparedStatement.execute(ShardingSpherePreparedStatement.java:409)
	at sun.reflect.GeneratedMethodAccessor259.invoke(Unknown Source)
	at sun.reflect.DelegatingMethodAccessorImpl.invoke(DelegatingMethodAccessorImpl.java:43)
	at java.lang.reflect.Method.invoke(Method.java:498)
	at org.apache.ibatis.logging.jdbc.PreparedStatementLogger.invoke(PreparedStatementLogger.java:59)
	at com.sun.proxy.$Proxy405.execute(Unknown Source)
看来写法还是按照sphere的官方配置来,这样会少走弯路。按照下面的配置,将分表算法与表 配置分开即可
spring:
  datasource:
    dynamic:
      hikari: # 全局hikariCP参数
        pool-name: Retail_HikariCP #连接池名称
        minimum-idle: 5 #最小空闲连接数量
        idle-timeout: 120000 #空闲连接存活最大时间,默认600000(10分钟)
        maximum-pool-size: 10 #连接池最大连接数,默认是10
        auto-commit: true  #此属性控制从池返回的连接的默认自动提交行为,默认值:true
        max-lifetime: 1800000 #此属性控制池中连接的最长生命周期,值0表示无限生命周期,默认1800000即30分钟
        connection-timeout: 30000 #数据库连接超时时间,默认30秒,即30000
        connection-test-query: SELECT 1
      datasource:
        master:
          type: com.zaxxer.hikari.HikariDataSource
          driver-class-name: com.mysql.cj.jdbc.Driver
          username: root
          password: ENC(xxx)
          url: jdbc:mysql://127.0.0.1:3306/acc?useUnicode=true&characterEncoding=UTF-8&useSSL=false&serverTimezone=Asia/Shanghai&allowMultiQueries=true
  #  数据库配置
  shardingsphere:
    mode:
      type: Standalone
      repository:
        type: JDBC
    datasource:
      names: acc1
      acc1:
        type: com.zaxxer.hikari.HikariDataSource
        driver-class-name: com.mysql.cj.jdbc.Driver
        username: root
        password: ENC(xxx)
        jdbcUrl: jdbc:mysql://127.0.0.1:3306/acc?useUnicode=true&characterEncoding=UTF-8&useSSL=false&serverTimezone=Asia/Shanghai&allowMultiQueries=true
        pool-name: Retail_HikariCP #连接池名称
        minimum-idle: 5 #最小空闲连接数量
        #idle-timeout: 600000 #空闲连接存活最大时间,默认600000(10分钟)
        maximum-pool-size: 10 #连接池最大连接数,默认是10
        auto-commit: true  #此属性控制从池返回的连接的默认自动提交行为,默认值:true
        #max-lifetime: 600000 #此属性控制池中连接的最长生命周期,值0表示无限生命周期,默认1800000即30分钟
        connection-timeout: 300000 #数据库连接超时时间,默认30秒,即30000
        connection-test-query: SELECT 1
    props:
      sql-show: true
    rules:
      sharding:
        tables:
          # 科目
          acc_account_subject:
            actual-data-nodes: acc1.acc_account_subject_$->{0..49}
            table-strategy:
              standard:
                sharding-column: as_id
                sharding-algorithm-name: acc_account_subject-inline
          # 科目余额
          acc_account_balance:
            actual-data-nodes: acc1.acc_account_balance_$->{0..49}
            table-strategy:
              standard:
                sharding-column: as_id
                sharding-algorithm-name: acc_account_balance-inline
          # 期初
          acc_initial_balance:
            actual-data-nodes: acc1.acc_initial_balance_$->{0..49}
            table-strategy:
              standard:
                sharding-column: as_id
                sharding-algorithm-name: acc_initial_balance-inline
          # 凭证
          acc_voucher:
            actual-data-nodes: acc1.acc_voucher_$->{0..49}
            table-strategy:
              standard:
                sharding-column: as_id
                sharding-algorithm-name: acc_voucher-inline
          # 凭证分录
          acc_voucher_entry:
            actual-data-nodes: acc1.acc_voucher_entry_$->{0..49}
            table-strategy:
              standard:
                sharding-column: as_id
                sharding-algorithm-name: acc_voucher_entry-inline
        bindingTables:
          - acc_account_subject,acc_account_balance,acc_initial_balance,acc_voucher,acc_voucher_entry
        sharding-algorithms:
          acc_account_subject-inline:
            type: inline
            props:
              algorithm-expression: acc_account_subject_$->{as_id%50}
          acc_account_balance-inline:
            type: inline
            props:
              algorithm-expression: acc_account_balance_$->{as_id%50}
          acc_initial_balance-inline:
            type: inline
            props:
              algorithm-expression: acc_initial_balance_$->{as_id%50}
          acc_voucher-inline:
            type: inline
            props:
              algorithm-expression: acc_voucher_$->{as_id%50}
          acc_voucher_entry-inline:
            type: inline
            props:
              algorithm-expression: acc_voucher_entry_$->{as_id%50}
至此分表终于成功。


 1357
1357

 被折叠的 条评论
为什么被折叠?
被折叠的 条评论
为什么被折叠?
 到【灌水乐园】发言


