


There are only two security guarantees after a successful installation of Reporting Services:
1) The Report Manager web application, where you can browse and view reports, will require Windows to authenticate all clients. 2) The only users authorized to use the Report Manager application will be members of the server’s Administrators group (BUILTIN/Administrators). If you want to get your reporting project off the ground and allow other people in your organization to view reports, you’ll need to add additional groups and users into roles. In this article, we will highlight some basic features of Reporting Services role-based security. Reporting Services Roles Reporting Services ships with 6 built-in roles: System Administrator, System User, Browser, Content Manager, My Reports, and Publisher. Placing a Windows user into one of these roles will give the user authorization to perform specific actions with the report manager. For example, a user in the role of Browser can view folders and reports, but not publish new reports. A user in the role of Publisher can create, view, and delete reports, but cannot create new roles. These are the default settings of Reporting Services, which a user in the System Administrator role can modify.System Administrators
As mentioned earlier, the Reporting Services setup will place the local machine’s Administrators group into the System Administrators role. Since this role is an all-powerful role, you’ll want take care with any modifications you make. A true system administrator will probably also need admin privileges on the server to take care of tasks such as starting and stopping services, so consider adding the person or group into the local administrators group of the server (but think of the ramifications first). If you want to add additional users or groups to the System Administrators role without adding to the local administrators group, you’ll need to go into the System Role Assignments page. To do this interactively you can navigate to the report manager (http://reportserver/reports, for instance) and click Site Settings in the upper right hand of the screen. Towards the bottom of the Site Settings screen you’ll find three links under a security heading. Click on ‘Configure site-wide security’ to bring yourself to the following screen: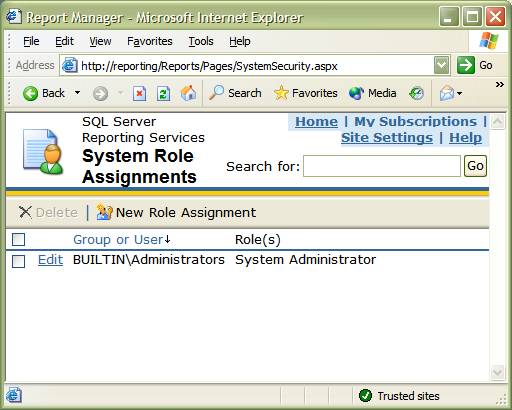 Click on “New Role Assignment” to move to the next screen:
 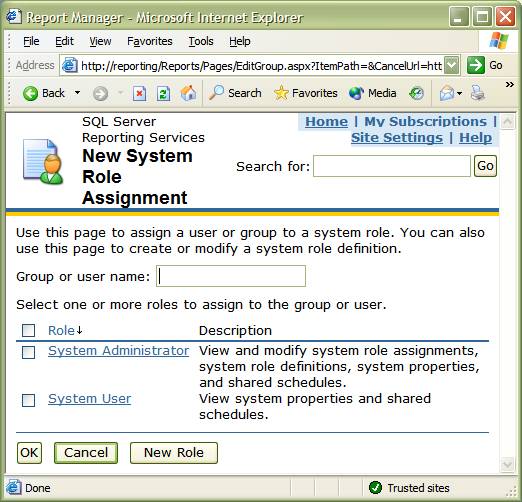 From here you can enter a username, or a group name into the textbox. For machines in a domain, you can prefix the name with the domain name, (DOMAIN/scott, for example). Reporting Services will verify the entry, so don’t worry about spelling mistakes. Select the checkboxes for the role you want to assign. Notice you can also create a new system role, though we will not cover the topic in this article.
Item Level Security
A more common task will be adding users and groups into roles to view reports, or create and manage reports. To perform this task you will first want to navigate to the top most level of the area you want to administer. For example, to give access to the SampleReports folder and all reports underneath SampleReports, navigate to the SampleReports folder (http://reporting/Reports/Pages/Folder.aspx?ItemPath=%2fSampleReports, for example). Click on the Properties tab along the top, then click on the Security link along the side. You should now see a screen similar to the following:

Click “New role assignment”, and enter a group or user name into the textbox shown below:

You can select from the built-in roles shown above, or create a new role. Using the UI you can view the tasks each role has permissions to perform. The security settings you set will flow downwards, that is any folders and reports underneath the SampleReports folder will inherit these settings, so you do not need to repeat this step for each report in the folder. You can break the inheritance by defining a new security policy for a child item.
Conclusion
I hope that this article will give you a jumpstart on managing roles for Reporting Services. I recommend you go to the official documentation for additional reading, as this article serves as only a brief introduction to role-based security in Reporting Services.
By K. Scott Allen
Additional Resources
More SQL Server Reporting Services articles
Using Role-Based Security


 7412
7412

 被折叠的 条评论
为什么被折叠?
被折叠的 条评论
为什么被折叠?
 到【灌水乐园】发言


