


Android UI 控件二
一、EditText输入文本控件
除了TextView控件之外的属性,还可以实现输入文本内容
1.输入表情图像
实现案例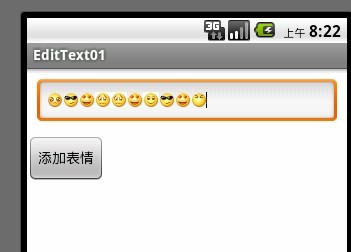
public class MainActivity extends Activity {

	private EditText et1;
	private Button btn;

	@Override
	protected void onCreate(Bundle savedInstanceState) {
		super.onCreate(savedInstanceState);
		setContentView(R.layout.main);

		et1 = (EditText) findViewById(R.id.eedittext01);
		btn = (Button) findViewById(R.id.button);

		btn.setOnClickListener(new OnClickListener() {
			public void onClick(View arg0) {
				int randomId = new Random().nextInt(9) + 1;
				try {
					Field filed = R.drawable.class.getField("face" + randomId);
					int resourceId = Integer.parseInt(filed.get(null)
							.toString());
					// 在android中显示图片信息
					Bitmap bitmap = BitmapFactory.decodeResource(
							getResources(), resourceId);
					// 使用图片代替文字
					ImageSpan imageSpan = new ImageSpan(MainActivity.this,
							bitmap);
					SpannableString spannableString = new SpannableString(
							"face");
					spannableString.setSpan(imageSpan, 0, 4,
							Spanned.SPAN_EXCLUSIVE_EXCLUSIVE);

					et1.append(spannableString);
				} catch (Exception e) {
				}
			}
		});
	}

}
<LinearLayout xmlns:android="http://schemas.android.com/apk/res/android"
xmlns:tools="http://schemas.android.com/tools"
android:layout_width="match_parent"
android:layout_height="match_parent"
android:orientation="vertical" >
<EditText
android:id="@+id/eedittext01"
android:layout_width="match_parent"
android:layout_height="wrap_content"
android:layout_margin="10dp" />
<Button
android:id="@+id/button"
android:layout_width="wrap_content"
android:layout_height="wrap_content"
android:text="添加表情" />
</LinearLayout>2. 输入特定的字符,实现校验功能
实现案例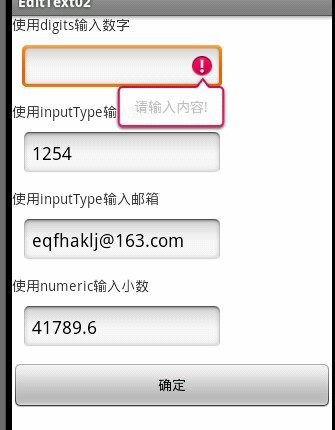
public class MainActivity extends Activity {

	private EditText et1;
	private Button btn;

	@Override
	protected void onCreate(Bundle savedInstanceState) {
		super.onCreate(savedInstanceState);
		setContentView(R.layout.main);

		et1 = (EditText) findViewById(R.id.edittext01);
		btn = (Button) findViewById(R.id.button);

		btn.setOnClickListener(new OnClickListener() {
			public void onClick(View v) {
				String editText = et1.getText().toString();
				if (editText == null || editText.trim().equals("")) {
					et1.setError("请输入内容!");
				}
			}
		});
	}

}
<LinearLayout xmlns:android="http://schemas.android.com/apk/res/android"
xmlns:tools="http://schemas.android.com/tools"
android:layout_width="match_parent"
android:layout_height="match_parent"
android:orientation="vertical" >
<TextView
android:layout_width="match_parent"
android:layout_height="wrap_content"
android:text="使用digits输入数字" />
<EditText
android:id="@+id/edittext01"
android:layout_width="200dp"
android:layout_height="wrap_content"
android:layout_margin="10dp"
android:digits="0123456789" />
<TextView
android:layout_width="match_parent"
android:layout_height="wrap_content"
android:text="使用inputType输入数字" />
<EditText
android:layout_width="200dp"
android:layout_height="wrap_content"
android:layout_margin="10dp"
android:inputType="number|textCapCharacters" />
<TextView
android:layout_width="match_parent"
android:layout_height="wrap_content"
android:text="使用inputType输入邮箱" />
<EditText
android:layout_width="200dp"
android:layout_height="wrap_content"
android:layout_margin="10dp"
android:inputType="textEmailAddress" />
<TextView
android:layout_width="match_parent"
android:layout_height="wrap_content"
android:text="使用numeric输入小数" />
<EditText
android:layout_width="200dp"
android:layout_height="wrap_content"
android:layout_margin="10dp"
android:numeric="decimal" />
<Button
android:id="@+id/button"
android:layout_width="match_parent"
android:layout_height="wrap_content"
android:text="确定" />
</LinearLayout>二、AutoCompleteTextView自动完成输入内容的控件
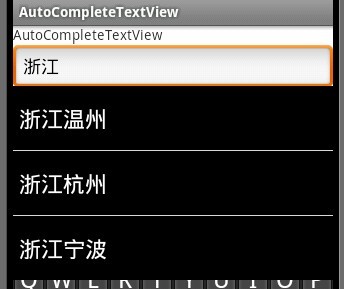
1.城市名称的模糊查询
实现案例
public class MainActivity extends Activity {
private AutoCompleteTextView auto;
private MultiAutoCompleteTextView mul;
@Override
protected void onCreate(Bundle savedInstanceState) {
super.onCreate(savedInstanceState);
setContentView(R.layout.main);
auto = (AutoCompleteTextView) findViewById(R.id.autocompletetextview01);
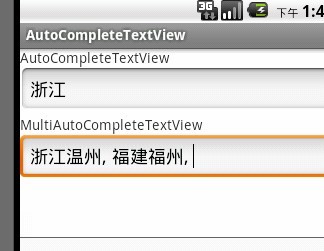
String[] city = new String[] { "浙江温州", "浙江杭州", "浙江宁波", "福建厦门", "福建福州" };
ArrayAdapter<String> adapter = new ArrayAdapter<String>(
MainActivity.this, android.R.layout.simple_dropdown_item_1line,
city);
auto.setDropDownBackgroundResource(R.color.black);
auto.setTextColor(Color.BLACK);
auto.setThreshold(1);
auto.setAdapter(adapter);
mul = (MultiAutoCompleteTextView) findViewById(R.id.multiautocompletetextview01);
mul.setDropDownBackgroundResource(R.color.black);
mul.setTextColor(Color.BLACK);
mul.setThreshold(1);
mul.setAdapter(adapter);
// 完成对选项的拆分功能,以逗号进行拆分
mul.setTokenizer(new MultiAutoCompleteTextView.CommaTokenizer());
}
}<LinearLayout xmlns:android="http://schemas.android.com/apk/res/android"
xmlns:tools="http://schemas.android.com/tools"
android:layout_width="match_parent"
android:layout_height="match_parent"
android:orientation="vertical" >
<TextView
android:layout_width="match_parent"
android:layout_height="wrap_content"
android:text="AutoCompleteTextView" />
<AutoCompleteTextView
android:id="@+id/autocompletetextview01"
android:layout_width="match_parent"
android:layout_height="wrap_content" />
<TextView
android:layout_width="match_parent"
android:layout_height="wrap_content"
android:text="MultiAutoCompleteTextView" />
<MultiAutoCompleteTextView
android:id="@+id/multiautocompletetextview01"
android:layout_width="match_parent"
android:layout_height="wrap_content" />
</LinearLayout>三、Button普通按钮控件
Button控件的基本用法和TextView、EditText相似,最常用的是按钮单击事件
1.按钮的焦点变化
实现案例

public class MainActivity extends Activity implements OnClickListener,
		OnTouchListener, OnFocusChangeListener, OnKeyListener {

	private Button commonBtn, imageBtn;
	private int value = 1;

	protected void onCreate(Bundle savedInstanceState) {
		super.onCreate(savedInstanceState);
		setContentView(R.layout.main);

		commonBtn = (Button) findViewById(R.id.button01);
		imageBtn = (Button) findViewById(R.id.button02);
		commonBtn.setOnClickListener(this);
		imageBtn.setOnClickListener(this);
		imageBtn.setOnTouchListener(this);
		imageBtn.setOnFocusChangeListener(this);
		imageBtn.setOnKeyListener(this);
	}

	public void onClick(View v) {
		Button button = (Button) v;
		if (value == 1
				&& button.getWidth() == getWindowManager().getDefaultDisplay()
						.getWidth()) {
			value = -1;
		} else if (value == -1 && button.getWidth() < 50) {
			value = 1;
		}
		button.setWidth(button.getWidth() + (int) (button.getWidth() * 0.1)
				* value);
		button.setHeight(button.getHeight() + (int) (button.getHeight() * 0.1)
				* value);
	}

	public boolean onKey(View v, int keyCode, KeyEvent event) {
		if (KeyEvent.ACTION_DOWN == event.getAction()) {
			v.setBackgroundResource(R.drawable.button2);
		} else if (KeyEvent.ACTION_UP == event.getAction()) {
			v.setBackgroundResource(R.drawable.button3);
		}
		return false;
	}

	public void onFocusChange(View v, boolean hasFocus) {
		if (hasFocus) {
			imageBtn.setBackgroundResource(R.drawable.button4);
		} else {
			imageBtn.setBackgroundResource(R.drawable.button1);
		}
	}

	public boolean onTouch(View v, MotionEvent event) {
		if (MotionEvent.ACTION_UP == event.getAction()) {
			v.setBackgroundResource(R.drawable.button1);
		} else if (MotionEvent.ACTION_DOWN == event.getAction()) {
			v.setBackgroundResource(R.drawable.button2);
		}
		return false;
	}

}
<LinearLayout xmlns:android="http://schemas.android.com/apk/res/android"
xmlns:tools="http://schemas.android.com/tools"
android:layout_width="match_parent"
android:layout_height="match_parent"
android:orientation="vertical" >
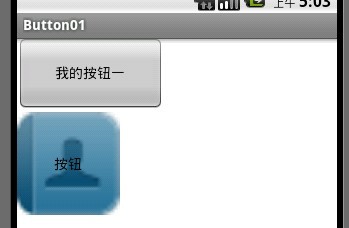
<Button
android:id="@+id/button01"
android:layout_width="wrap_content"
android:layout_height="wrap_content"
android:text="我的按钮一" />
<Button
android:id="@+id/button02"
android:layout_width="wrap_content"
android:layout_height="wrap_content"
android:background="@drawable/button1"
android:gravity="center"
android:text="按钮" />
</LinearLayout>2. 图文混排的按钮
实现案例
public class MainActivity extends Activity {

	private Button btn;

	protected void onCreate(Bundle savedInstanceState) {
		super.onCreate(savedInstanceState);
		setContentView(R.layout.main);
		btn = (Button) findViewById(R.id.button);

		SpannableString spannableStringLeft = new SpannableString("left");
		Bitmap bitmapLeft = BitmapFactory.decodeResource(getResources(),
				R.drawable.left_1);
		ImageSpan imageSpanLeft = new ImageSpan(bitmapLeft);
		spannableStringLeft.setSpan(imageSpanLeft, 0, 4,
				Spanned.SPAN_EXCLUSIVE_EXCLUSIVE);

		SpannableString spannableStringRight = new SpannableString("Right");
		Bitmap bitmapRight = BitmapFactory.decodeResource(getResources(),
				R.drawable.right_2);
		ImageSpan imageSpanRight = new ImageSpan(bitmapRight);
		spannableStringRight.setSpan(imageSpanRight, 0, 5,
				Spanned.SPAN_EXCLUSIVE_EXCLUSIVE);

		btn.append(spannableStringLeft);
		btn.append("我的按钮");
		btn.append(spannableStringRight);

	}
}
<LinearLayout xmlns:android="http://schemas.android.com/apk/res/android"
xmlns:tools="http://schemas.android.com/tools"
android:layout_width="match_parent"
android:layout_height="match_parent"
android:orientation="vertical" >
<LinearLayout
android:layout_width="match_parent"
android:layout_height="120dp"
android:orientation="horizontal" >
<Button
android:layout_width="wrap_content"
android:layout_height="wrap_content"
android:drawableTop="@drawable/b2"
android:text="按钮一" />
<Button
android:layout_width="wrap_content"
android:layout_height="wrap_content"
android:drawablePadding="30dp"
android:drawableTop="@drawable/b2"
android:text="按钮二" />
<Button
android:layout_width="wrap_content"
android:layout_height="wrap_content"
android:drawableRight="@drawable/b2"
android:drawableTop="@drawable/b2"
android:text="按钮三" />
<Button
android:layout_width="wrap_content"
android:layout_height="wrap_content"
android:drawablePadding="30dp"
android:drawableRight="@drawable/b2"
android:text="按钮三" />
</LinearLayout>
<Button
android:id="@+id/button"
android:layout_width="200dp"
android:layout_height="200dp"
android:layout_marginTop="10dp" />
</LinearLayout>


 819
819


 被折叠的 条评论
为什么被折叠?
被折叠的 条评论
为什么被折叠?
 到【灌水乐园】发言


