


概述
关于Retrofit,Rxjava,MVP等的使用现在已经成为了Android项目开发的标配,而Clean架构都能很好的兼顾这些方面,使得代码结构清晰,
而且在一般在项目开发中多少都会用到缓存,但是我们知道OkHttp只支持GET缓存,
而我们很多时候需要使用POST请求并缓存数据.那么这时候我们就需要考虑手动来实现POST缓存了,而Clean architecture也考虑到了这一个方面
原理
说到手动缓存,那么就需要判断是否存在缓存,缓存是否过期和在请求之前判断是否有网络连接等判断,进而对相关需要缓存的请求数据进行缓存下来
Clean就是在请求之前通过判断来创建不同的layer获取数据达到了这个效果,关于清晰架构的介绍Architecting Android…The evolution.
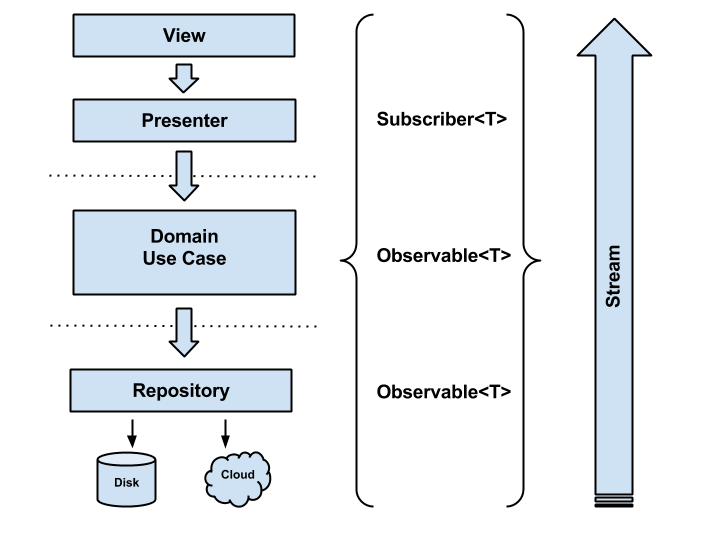
在清晰架构的实现中,既用到了上面提到的一些技术,同时也很好的处理了缓存的问题.作者在[Module/data]中实现了网络及缓存相关.在[Module/domain]中主要包含了一些 UseCase,而在[Module/presentation]中包含了一些Presenter操作
下面原文中的一张图可以很好的说明问题.
流程解析
首先在Clean架构中有一个叫做UseCase的接口承载着相当重要的作用,其下是更加细粒度的数据请求操作,比如原项目中的结构
UseCase (abstract) --------------- abstract buildUseCaseObservable();
    |
    |-----GetUserList|GetUserDetails(impl)
              |
              |---UserRepository(interface)
                       |
                       |-----UserDataRepository(impl)
                                      |
                                      |---------UserDataStoreFactory(创建工厂,根据不同的情况创建不同的UserDataStore(Disk或者Cloud))
                                                        |
                                                        |-----------DiskUserDataStore(从UserCache中获取数据)
                                                        |
|-----------CloudUserDataStore(从api中获取数据并存入UserCache中)从上面的流程分析图和源码中,我们可以看到UserRepository与UserDataStore两个接口非常的相似,一个是获取数据的interface,一个是保存数据的interface.
中间再经过转换完成,而在实际开发中我们的接口可能达到好几百个,并非Demo中的两个接口,那么用这种方式写起来就会显得有些吃力不讨好的样子,同时这里的UseCase接口的excute方法需要传入一个Subscriber,但是里面只是做了线程切换的操作
貌似并没有发挥其作用.
public interface UserRepository {

  Observable<List<User>> users();

  Observable<User> user(final int userId);
}

public interface UserDataStore {

  Observable<List<UserEntity>> userEntityList();

  Observable<UserEntity> userEntityDetails(final String userId);
}
public abstract class UseCase {
//...
protected abstract Observable buildUseCaseObservable();
@SuppressWarnings("unchecked")
public void execute(Subscriber useCaseSubscriber) {
this.subscription = this.buildUseCaseObservable()
.subscribeOn(Schedulers.from(threadExecutor))
.observeOn(postExecutionThread.getScheduler())
.subscribe(useCaseSubscriber);
}
//...
}同时UserRepository会调用工厂类来创建UserDataStore实例来获取数据,而UserDataStore的两层中的逻辑也十分的相似,CloudUserDataStore中获取到网络数据后保存到UserCache中
而DiskUserDataStore则直接从UserCache中获取数据.
@Singleton
public class UserDataRepository implements UserRepository {

  private final UserDataStoreFactory userDataStoreFactory;
  //通过工厂创建UserDataStore,通过UserDataStore获取数据
  @Override public Observable<List<User>> users() {
      //we always get all users from the cloud
      final UserDataStore userDataStore = this.userDataStoreFactory.createCloudDataStore();
      return userDataStore.userEntityList().map(this.userEntityDataMapper::transform);
  }

  @Override public Observable<User> user(int userId) {
    final UserDataStore userDataStore =
        this.userDataStoreFactory.create(String.valueOf(userId), false);
    return userDataStore.userEntityDetails(String.valueOf(userId)).map(this.userEntityDataMapper::transform);
  }
}
class CloudUserDataStore implements UserDataStore {
private final RestApi restApi;
private final UserCache userCache;
//将保存到UserCache中
private final Action1<UserEntity> saveToCacheAction = userEntity -> {
if (userEntity != null) {
CloudUserDataStore.this.userCache.put(userEntity);
}
};
CloudUserDataStore(RestApi restApi, UserCache userCache) {
this.restApi = restApi;
this.userCache = userCache;
}
@Override public Observable<List<UserEntity>> userEntityList() {
return this.restApi.userEntityList();
}
@Override public Observable<UserEntity> userEntityDetails(final int userId) {
return this.restApi.userEntityById(userId).doOnNext(saveToCacheAction);
}class DiskUserDataStore implements UserDataStore {
private final UserCache userCache;
DiskUserDataStore(UserCache userCache) {
this.userCache = userCache;
}
@Override public Observable<List<UserEntity>> userEntityList() {
//TODO: implement simple cache for storing/retrieving collections of users.
throw new UnsupportedOperationException("Operation is not available!!!");
}
//从UserCache中获取数据,这里以userId作键
@Override public Observable<UserEntity> userEntityDetails(final int userId) {
return this.userCache.get(userId);
}
}改造
为了便于实际开发使用,并针对如上问题,我的做法是会免去定义两个接口的方式,直接存储请求下来的数据,这样的话在获取缓存后,也不需要再次转换为请求的数据,当然作者只是个示例
其次这个接口不能包含我们所有的请求api,虽然我们可以复用retrofit的Api,但这些实现类中的逻辑都是一样的,都是获取数据和保存数据,实现类似的逻辑显得非常的不优雅
那么我们的上层接口就呼之欲出了,就是返回数据一个方法,具体的layer具体的实现.
/**
 * Interface that represents a Repository for getting {@link Wrapper} related data.
 */
public interface Repository {
  /**
   * Get an {@link rx.Observable} which will emit a {@link T}.
   */
  <T> Observable<T> request(final Wrapper<T> _wrapper);
}这里有一个T泛型的包装类,其中包装了请求相关方法,参数,数据存储类型等,源代码如下
public class Wrapper<T> {

  private boolean refresh = true;//是否请求最新数据
  private final T t;//请求数据的类型,和返回的Observable<T>中的T一样
  private final Type typeOfT;// Gson实例化数据用到的,避免TypeToken的泛型类型丢失问题
  private final Class<?>[] paramsType;//请求数据的的参数类型
  private final Object[] params;//请求的参数
  private final String methodName;// Retrofit接口中定义的方法名,供请求调用
  private final Builder mBuilder;// Wrapper的构建起builder

  public Wrapper(boolean _refresh, T _t, Type _typeOfT, Class<?>[] _paramsType, Object[] _params,
      String _methodName, Builder _builder) {
    this.refresh = _refresh;
    this.t = _t;
    this.typeOfT = _typeOfT;
    this.paramsType = _paramsType;
    this.params = _params;
    this.methodName = _methodName;
    this.mBuilder = _builder;
  }

  public Builder getBuilder() {
    return mBuilder;
  }

  public boolean isRefresh() {
    return refresh;
  }

  public T getT() {
    return t;
  }

  public Type getTypeOfT() {
    return typeOfT;
  }

  public String getMethodName() {
    return methodName;
  }

  public Object[] getParams() {
    return params;
  }

  public Class<?>[] getParamsType() {
    return paramsType;
  }

  public String getUnique() {
    Object[] params = getParams();

    String result = getMethodName();

    if (null != params && params.length > 0) {
      for (Object o : params) {
        result += o.toString();
      }
    }
    return result;
  }

  public static Builder builder() {
    return new Builder();
  }

  public static class Builder<T> {

    private boolean refresh = true;

    private T t;

    private Type typeOfT;

    private Object[] params;

    private Class<?>[] paramsType;

    private String methodName;

    public Builder T(T _t) {
      t = _t;
      return this;
    }

    public Builder typeOfT(Type typeOfT) {
      this.typeOfT = typeOfT;
      return this;
    }

    public Builder method(String method) {
      methodName = method;
      return this;
    }

    public Builder params(Object[] params) {
      this.params = params;
      return this;
    }

    public Builder paramsType(Class<?>[] _paramsType) {
      this.paramsType = _paramsType;
      return this;
    }

    public Builder isRefresh(boolean isRefresh) {
      this.refresh = isRefresh;
      return this;
    }

    public Wrapper<T> build() {
      return new Wrapper<T>(refresh, t, typeOfT, paramsType, params, methodName, this);
    }
  }
}而我们的DataRepository,DiskDataStore,CloudDataStore实现了上述接口,其中DataRepository依旧是调用工厂来获取不同的Repository
@Singleton public class DataRepository implements Repository {

  private final DataStoreFactory userDataStoreFactory;

  @Inject public DataRepository(DataStoreFactory dataStoreFactory) {
    this.userDataStoreFactory = dataStoreFactory;
  }

  @Override public <T> Observable<T> request(Wrapper<T> _wrapper) {
    final Repository userDataStore =
        this.userDataStoreFactory.create(_wrapper);

    return userDataStore.request(_wrapper);
  }
}而DataStoreFactory中的逻辑也非常的简单.
 public <T> Repository create(Wrapper<T> _wrapper) {
    Repository dataStore;

    //是否有网络
    if (!isThereInternetConnection()) {
    //缓存是否可用
      if (cacheExpired(_wrapper)) {
        dataStore = new DiskDataStore(this.userCache);
      } else {
        dataStore = createCloudDataStore();
      }
    } else {
    //是否需要最新数据
      if (!_wrapper.isRefresh() && cacheExpired(_wrapper)) {
        dataStore = new DiskDataStore(this.userCache);
      } else {
        dataStore = createCloudDataStore();
      }
    }

    return dataStore;
  }
 //是否有缓存,并且缓存是否过期
  private <T> boolean cacheExpired(Wrapper<T> _wrapper) {
    return !this.userCache.isExpired() && this.userCache.isCached(_wrapper.getUnique());
}其余两层DataStore则更加的简单了
 DiskDataStore(UserCache userCache) {
    this.userCache = userCache;
  }

  @Override public <T> Observable<T> request(Wrapper<T> _wrapper) {
    return this.userCache.<T>get(_wrapper);
  }
CloudDataStore(YaoduApi restApi, UserCache userCache) {
this.restApi = restApi;
this.userCache = userCache;
}
@SuppressWarnings("unchecked") @TargetApi(Build.VERSION_CODES.KITKAT) @Override
public <T> Observable<T> request(Wrapper<T> _wrapper) {
Object[] params = _wrapper.getParams();
Class<?>[] paramsType = _wrapper.getParamsType();
String methodName = _wrapper.getMethodName();
try {
Method method = restApi.getClass().getMethod(methodName, paramsType);//反射获取方法
Observable<T> observable = (Observable<T>) method.invoke(restApi, params);//发射调用方法
return observable.doOnNext(_t -> {
Wrapper build = _wrapper.getBuilder().T(_t).typeOfT(_t.getClass()).build();
CloudDataStore.this.userCache.put(build);
});
} catch (NoSuchMethodException | InvocationTargetException | IllegalAccessException _e) {
_e.printStackTrace();
}
return Observable.empty();
}而这里我们的UserCase则不再需要了,虽然用了反射调用.但为在已成型的项目中使用Clean architecture提供了方便.
测试
最后改造完成了,我们需要的是进行测试,看一下,我们的改造是否可用
 Wrapper<List<UserEntity>> wrapper = Wrapper.<List<UserEntity>>builder().method("userEntityList")
        .typeOfT(new TypeToken<List<UserEntity>>() {
        }.getType())
        .build();
    mRepository.request(wrapper)
        .compose(Transformers.switchSchedulers())
        .subscribe(new DefaultSubscriber<List<UserEntity>>() {
          @Override public void onNext(List<UserEntity> _userEntities) {
            super.onNext(_userEntities);
            Toast.makeText(MainActivity.this, _userEntities.toString(), Toast.LENGTH_SHORT).show();
          }
        });
这里直接使用了Retrofit定义的接口复用,是不是也十分的简洁.
完整代码资源: MyCleanArchitecture


 1176
1176

 被折叠的 条评论
为什么被折叠?
被折叠的 条评论
为什么被折叠?
 到【灌水乐园】发言


