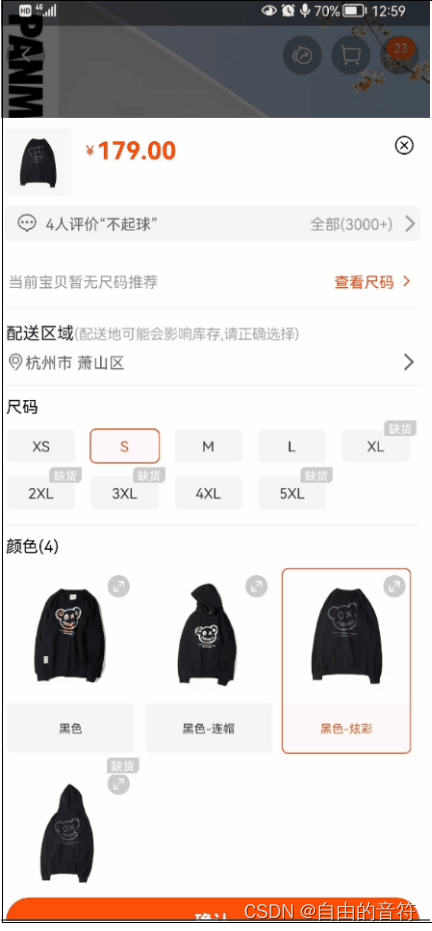
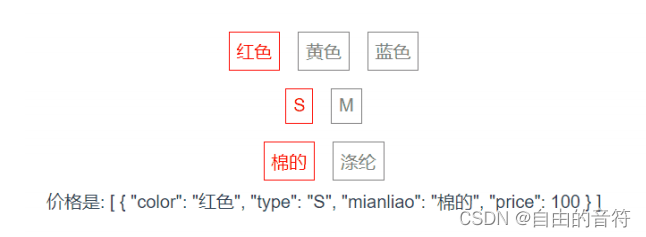
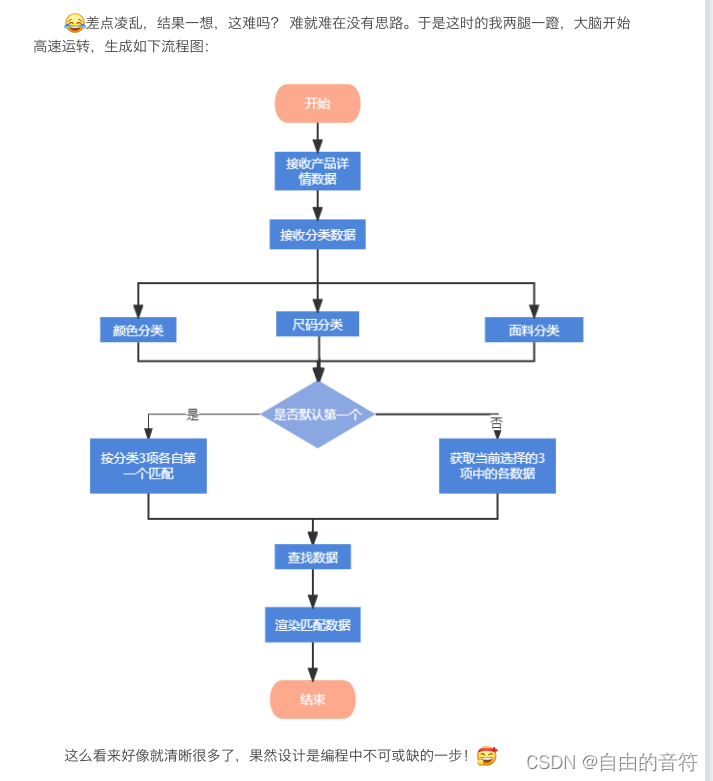
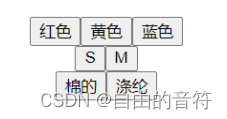
商品属性sku

效果

在这里插入图片描述

思路

在这里插入图片描述

数据格式

{ json1: [ ["红⾊", "黄⾊", "蓝⾊"], ["S", "M"], ["棉的", "涤纶"], ],json2: [ { color: "红⾊", type: "S", mianliao: "棉的", price: 100, },{ color: "红⾊", type: "M", mianliao: "棉的", price: 200, },{ color: "红⾊", type: "S", mianliao: "涤纶", price: 300, },{ color: "红⾊", type: "M", mianliao: "涤纶", price: 300}]}

我们从这个结构不难看出,json2就是具体的数据,⽽json1⾥⾯存放是三个维度的分类,实现效果
在这里插入图片描述

coding

基本结构样式

<div v-for="(rowArr, index) in mockData.json1" :key="index"> 
	<a v-for="(item, i) in rowArr" :key="i" @click="changeData(index,item)"> 
</div>
<style>
	#app a {
	 text-decoration: none; 
	 border: 1px solid grey;  
	 margin: 8px;  
	 padding: 6px;  
	 display: inline-block; 
	 color: grey;  
	}  
	#app a.active {
	  border: 1px solid red;
	  color: red;  
	}
</style>

在这里插入图片描述

逻辑处理及代码优化

⾯试官在告知我需求的时候,强调⼜强调数据不能写死,聪明的我当然明⽩,意思就是要尽可能 让我们的前端代码有更⾼的复⽤性,说⽩了就是可能会匹配颜⾊、尺码、⾯料,也可能会⽤⾦额、风 格来匹配。

设计⼀个万能属性匹配器

可以想象,不管他是什么属性,但只要是【条件对象】的abc属性,与【数据对象】的abc属性 ⼀致,我就可以认为筛选出来的就是这个对象,因此不要在乎abc这个名,岂不就通⽤性很⾼啦。接 着我们在data下声明⼀个condition对象来存储当前选中的各项属性,再给他默认值。

data() {  
	return {  
		types:[], // 保存从json2中获取的动态属性名称  
		condition: {}, // 有json1.length个属性,分别是前三项color、type、mianliao 
		mockData: { 
		 json1: [ 
		  ["红⾊", "黄⾊", "蓝⾊"], 
		  ["S", "M"], 
		  ["棉的", "涤纶"], 
		 ], 
		 json2: [
		 	{ 
		  		color: "红⾊", 
		  		type: "S", 
		  		mianliao: "棉的", 
		 		price: 100,
		 	} 
		  /*....省略数据*/ 
		 ] 
		}
	} 
}
模拟created中动态获取,并动态⽣成types和condition
created(){ 
 this.types = Object.keys(this.mockData.json2[0]); 
  for (let i = 0; i < this.types.length; i ++) { 
   // 由于分类有可能没有数据的属性多,所以判断⼀下
    if (!this.mockData.json1[i])return; 
     let propName = this.types[i]; 
     this.$set(this.condition,propName,this.mockData.json1[i][0]); 
   } 
 },

注意注意
a. 第2⾏是讲具体商品数据中的所有属性名存储到数组中
b. 第7⾏则是动态添加响应式属性,这是Vue2中动态添加属性必须要做的,vue2使用的是Object.definePrroperty来拦截各个属性的getter和setter,来发布消息给订阅者,进行监听,并且它监听不到对象属性的添加与删除
否则更改数据页⾯那个属性不变化,Vue3这个问题使用Proxy已经解决
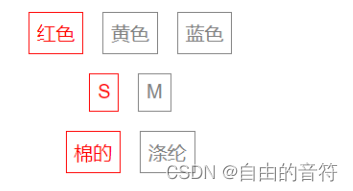
点中后的激活效果
<a :class="{ active: condition[types[index]] === item }" 
 href="#" 
  v-for="(item, i) in rowArr" 
   :key="i" 
 >
 {{ item }}
 </a>
核⼼代码(过滤数据)
  1. ⾸先我们给a标签添加点击事件,点了那项,就更改其中颜⾊或者尺码或者⾯料的值,因此相同 函数我们必须要知道点了哪个类别,这⾥我们可以⽤【外层的index】做区分,给a标签加上事件
<a @click="changeData(types[index], item)" a>{{item}}</a>
  1. 保存这个数据变化
changeData(prop, data) {
  let self = this; 
  self.condition[prop] = data; 
}
  1. 有了数据,就可以做过滤显⽰了,computed是最佳⼈选
computed: { 
	showGoodsInfo() { 
		return his.mockData.json2.filter((e) => { 
			return diffObjectByKeys(this.condition, e); 
		}); 
	}, 
}
  1. 核⼼的⼯具函数,对⽐两个对象的函数还没实现,我们去实现它,这个函数接收俩对象,对⽐其 属性值,全都相同,返回true,否则false。
 function diffObjectByKeys(obj1, obj2) { 
 	let isEqual = true; 
 	for (let key in obj1) { 
 		let v = obj1[key]; 
 		if (obj2[key] && obj2[key] === v) { 
 			continue; 
 		} else return false;
 	} 
 	return isEqual; 
}
  1. 使⽤这个计算属性:
价格是: {{ showGoodsInfo }}

效果

在这里插入图片描述

  • 0
    点赞
  • 1
    收藏
    觉得还不错? 一键收藏
  • 0
    评论
好的,这里是一个完整的示例代码,可以帮助您更好地理解如何使用vuedraggable新增sku并进行拖拽添加商品属性: ```html <template> <div> <div class="sku-item" v-for="(sku, index) in skus" :key="sku.id"> <div class="sku-header"> SKU {{ index + 1 }} <button @click="removeSku(index)">删除</button> </div> <div class="sku-attributes"> <div class="attribute-item" v-for="(attribute, i) in sku.attributes" :key="attribute.id"> {{ attribute.name }} <span class="drag-handle" v-if="i !== 0" @mousedown="startDragging(sku, i)">☰</span> <button @click="removeAttribute(sku, i)">删除</button> </div> <div class="add-attribute" @click="addAttribute(sku)">添加属性</div> </div> </div> <div class="add-sku" @click="addSku">添加SKU</div> </div> </template> <script> import draggable from 'vuedraggable'; export default { components: { draggable, }, data() { return { skus: [ { id: 1, attributes: [ { id: 1, name: '颜色', value: '红色' }, { id: 2, name: '尺码', value: 'L' }, ], }, { id: 2, attributes: [ { id: 1, name: '颜色', value: '蓝色' }, { id: 2, name: '尺码', value: 'M' }, ], }, ], dragging: null, }; }, methods: { addSku() { const newSku = { id: this.skus.length + 1, attributes: [ { id: 1, name: '颜色', value: '' }, { id: 2, name: '尺码', value: '' }, ], }; this.skus.push(newSku); }, removeSku(index) { this.skus.splice(index, 1); }, addAttribute(sku) { const newAttribute = { id: sku.attributes.length + 1, name: '', value: '', }; sku.attributes.push(newAttribute); }, removeAttribute(sku, index) { sku.attributes.splice(index, 1); }, startDragging(sku, index) { this.dragging = { sku, index }; }, endDragging() { this.dragging = null; }, handleDrop(sku, attributeIndex) { if (this.dragging) { const { sku: sourceSku, index: sourceIndex } = this.dragging; const attribute = sourceSku.attributes.splice(sourceIndex, 1)[0]; sku.attributes.splice(attributeIndex, 0, attribute); } }, }, }; </script> <style> .sku-item { margin-bottom: 20px; border: 1px solid #ddd; } .sku-header { background-color: #f0f0f0; padding: 10px; display: flex; justify-content: space-between; align-items: center; } .sku-attributes { padding: 10px; } .attribute-item { display: flex; justify-content: space-between; align-items: center; margin-bottom: 10px; } .drag-handle { cursor: move; margin-right: 10px; } .add-attribute { cursor: pointer; color: blue; } .add-sku { cursor: pointer; color: blue; margin-top: 20px; } </style> ``` 在这个示例中,我们使用了vuedraggable来实现拖放操作。我们为每个sku元素添加了一个drag-handle类,以便指定可拖动的元素。我们还为每个sku元素中的每个属性元素添加了一个@mousedown事件,以便在拖动属性时设置dragging变量。在方法中,我们使用addSku方法来添加新的sku,使用removeSku方法来删除sku,使用addAttribute方法来添加属性,使用removeAttribute方法来删除属性,使用startDragging方法来在属性拖动时设置dragging变量,使用endDragging方法来在拖放操作完成后重置dragging变量,使用handleDrop方法来处理拖放操作的逻辑。我们还使用了CSS来美化页面。

“相关推荐”对你有帮助么?

  • 非常没帮助
  • 没帮助
  • 一般
  • 有帮助
  • 非常有帮助
提交
评论
添加红包

请填写红包祝福语或标题

红包个数最小为10个

红包金额最低5元

当前余额3.43前往充值 >
需支付:10.00
成就一亿技术人!
领取后你会自动成为博主和红包主的粉丝 规则
hope_wisdom
发出的红包
实付
使用余额支付
点击重新获取
扫码支付
钱包余额 0

抵扣说明:

1.余额是钱包充值的虚拟货币,按照1:1的比例进行支付金额的抵扣。
2.余额无法直接购买下载,可以购买VIP、付费专栏及课程。

余额充值