


预备知识:
关于http 协议的基础请参考这里。
关于socket 基础函数请参考这里。
关于python 网络编程基础请参考这里。
一、python socket 实现的简单http服务器
废话不多说,前面实现过使用linux c 或者python 充当客户端来获取http 响应,也利用muduo库实现过一个简易http服务器,现在来实现一个python版
的简易http服务器,代码改编自 http://www.cnblogs.com/vamei/ and http://www.liaoxuefeng.com/
httpServer.py
|
1
2 3 4 5 6 7 8 9 10 11 12 13 14 15 16 17 18 19 20 21 22 23 24 25 26 27 28 29 30 31 32 33 34 35 36 37 38 39 40 41 42 43 44 45 46 47 48 49 50 51 52 53 54 55 56 57 58 59 60 61 62 63 64 65 66 67 68 69 70 71 72 73 74 75 76 77 78 79 80 81 82 83 84 85 86 87 88 89 90 91 92 93 94 95 96 |
#!/usr/bin/env python #coding=utf-8 import socket import re HOST = '' PORT = 8000 #Read index.html, put into HTTP response data index_content = ''' HTTP/ 1.x 200 ok Content-Type: text/html ''' file = open( 'index.html', 'r') index_content += file. read() file. close() #Read reg.html, put into HTTP response data reg_content = ''' HTTP/ 1.x 200 ok Content-Type: text/html ''' file = open( 'reg.html', 'r') reg_content += file. read() file. close() #Read picture, put into HTTP response data file = open( 'T-mac.jpg', 'rb') pic_content = ''' HTTP/ 1.x 200 ok Content-Type: image/jpg ''' pic_content += file. read() file. close() #Configure socket sock = socket.socket(socket.AF_INET, socket.SOCK_STREAM) sock.bind((HOST, PORT)) sock.listen( 100) #infinite loop while True: # maximum number of requests waiting conn, addr = sock.accept() request = conn.recv( 1024) method = request. split( ' ')[ 0] src = request. split( ' ')[ 1] print 'Connect by: ', addr print 'Request is:\n', request #deal wiht GET method if method == 'GET': if src == '/index.html': content = index_content elif src == '/T-mac.jpg': content = pic_content elif src == '/reg.html': content = reg_content elif re.match( '^/\?.*$', src): entry = src. split( '?')[ 1] # main content of the request content = 'HTTP/1.x 200 ok\r\nContent-Type: text/html\r\n\r\n' content += entry content += '<br /><font color="green" size="7">register successs!</p>' else: continue #deal with POST method elif method == 'POST': form = request. split( '\r\n') entry = form[- 1] # main content of the request content = 'HTTP/1.x 200 ok\r\nContent-Type: text/html\r\n\r\n' content += entry content += '<br /><font color="green" size="7">register successs!</p>' ###### # More operations, such as put the form into database # ... ###### else: continue conn.sendall(content) #close connection conn. close() |
chmod +x httpServer.py, 并运行./httpServer.py
使用浏览器当做客户端访问服务器
在httpServer.py 所在目录有index.html, reg.html, T-mac.jpg
1、访问目录: http://192.168.56.188:8000/index.html
服务器输出:
Connect by: ('192.168.56.1', 6274)
Request is:
GET /index.html HTTP/1.1
Host: 192.168.56.188:8000
Connection: keep-alive
Accept: text/html,application/xhtml+xml,application/xml;q=0.9,image/webp,*/*;q=0.8
User-Agent: Mozilla/5.0 (Windows NT 6.1) AppleWebKit/537.36 (KHTML, like Gecko)
Chrome/33.0.1750.146 Safari/537.36
Accept-Encoding: gzip,deflate,sdch
Accept-Language: zh-CN,zh;q=0.8,en;q=0.6,zh-TW;q=0.4
回顾代码可知我们给客户端的响应是头部+index.html, index.html如下:
|
1
2 3 4 5 6 7 8 9 10 |
<html>
<head> <title>Jinan University </title> </head> <body> <p>Python HTTP Server </p> <img src= "T-mac.jpg" /> </body> </html> |
进而进一步访问T-mac.jpg,由于我们在实现服务器时使用短连接,即响应一次就关掉连接,所以客户端会再发起一次连接,如下:
Connect by: ('192.168.56.1', 6275)
Request is:
GET /T-mac.jpg HTTP/1.1
Host: 192.168.56.188:8000
Connection: keep-alive
Accept: image/webp,*/*;q=0.8
User-Agent: Mozilla/5.0 (Windows NT 6.1) AppleWebKit/537.36 (KHTML, like Gecko)
Chrome/33.0.1750.146 Safari/537.36
Referer: http://192.168.56.188:8000/index.html
Accept-Encoding: gzip,deflate,sdch
Accept-Language: zh-CN,zh;q=0.8,en;q=0.6,zh-TW;q=0.4
同样地,服务器响应头部+图片的二进制数据,如下图所示:

当然你也可以直接访问 http://192.168.56.188:8000/T-mac.jpg
2、访问目录:http://192.168.56.188:8000/reg.html
服务器输出:
Connect by: ('192.168.56.1', 6282)
Request is:
GET /reg.html HTTP/1.1
Host: 192.168.56.188:8000
Connection: keep-alive
Accept: text/html,application/xhtml+xml,application/xml;q=0.9,image/webp,*/*;q=0.8
User-Agent: Mozilla/5.0 (Windows NT 6.1) AppleWebKit/537.36 (KHTML, like Gecko)
Chrome/33.0.1750.146 Safari/537.36
Accept-Encoding: gzip,deflate,sdch
Accept-Language: zh-CN,zh;q=0.8,en;q=0.6,zh-TW;q=0.4
同样地,我们把头部+reg.html 响应过去,reg.html 是注册表单如下:
|
1
2 3 4 5 6 7 8 9 10 11 12 13 14 15 16 17 18 19 20 21 22 23 24 25 26 27 28 29 30 31 32 33 34 35 36 37 38 39 40 41 42 43 44 45 46 47 48 49 50 51 52 53 54 55 56 57 58 59 60 61 62 63 64 65 |
<!DOCTYPE
HTML
PUBLIC
"-//W3C//DTD HTML 4.01//EN"
"http://www.w3.org/TR/html4/strict.dtd"
>
<html> <head> <meta http-equiv= "Content-Type" content= "text/html; charset=GBK" > <!--meta http-equiv="refresh" content="3;url=http://www.sina.com.cn" /--> <title>register page </title> </head> <body> <form action= "http://192.168.56.188:8000" method= "post" > <table border= "1" bordercolor= "#0000ff" cellpadding= 10 cellspacing= 0 width= 600 > <tr> <th colspan= "2" >注册表单 </th> </tr> <tr> <td>用户名称: </td> <td><input type= "text" name= "user" /></td> </tr> <tr> <td>输入密码: </td> <td><input type= "password" name= "psw" /></td> </tr> <tr> <td>确认密码: </td> <td><input type= "password" name= "repsw" /></td> </tr> <tr> <td>选择性别: </td> <td> <input type= "radio" name= "sex" value= "nan" />男 <input type= "radio" name= "sex" value= "nv" />女 </td> </tr> <tr> <td>选择技术: </td> <td> <input type= "checkbox" name= "tech" value= "java" />JAVA <input type= "checkbox" name= "tech" value= "html" />HTML <input type= "checkbox" name= "tech" value= "css" />CSS </td> </tr> <tr> <td>选择国家: </td> <td> <select name= "country" > <option value= "none" >--选择国家-- </option> <option value= "usa" >--美国-- </option> <option value= "en" >--英国-- </option> <option value= "cn" >--中国-- </option> </select> </td> </tr> <tr> <th colspan= "2" > <input type= "reset" value= "清除数据" /> <input type= "submit" value= "提交数据" /> </th> </tr> </table> </form> </body> </html> |
我们随便填一些信息上去然后点击提交数据,如下图:

此时浏览器会访问 http://192.168.56.188:8000/
服务器输出为:
Connect by: ('192.168.56.1', 6578)
Request is:
POST / HTTP/1.1
Host: 192.168.56.188:8000
Connection: keep-alive
Content-Length: 59
Cache-Control: max-age=0
Accept: text/html,application/xhtml+xml,application/xml;q=0.9,image/webp,*/*;q=0.8
Origin: http://192.168.56.188:8000
User-Agent: Mozilla/5.0 (Windows NT 6.1) AppleWebKit/537.36 (KHTML, like Gecko)
Chrome/33.0.1750.146 Safari/537.36
Content-Type: application/x-www-form-urlencoded
Referer: http://192.168.56.188:8000/reg.html
Accept-Encoding: gzip,deflate,sdch
Accept-Language: zh-CN,zh;q=0.8,en;q=0.6,zh-TW;q=0.4
user=simba&psw=1990&repsw=1990&sex=nan&tech=java&country=cn
注意:即表单中的name=value,以&分隔。
回顾代码,我们只是将浏览器提交的数据体直接发回去,再输出register success! 浏览器输出如下图:

如果我们把 表单中的 <form action="http://192.168.56.188:8000" method="post"> method 改成get,会是怎样的呢?
此时浏览器会访问 http://192.168.56.188:8000/?user=simba&psw=1990&repsw=1990&sex=nan&tech=java&country=cn
服务器输出为:
Connect by: ('192.168.56.1', 6382)
Request is:
GET /?user=simba&psw=1990&repsw=1990&sex=nan&tech=java&country=cn HTTP/1.1
Host: 192.168.56.188:8000
Connection: keep-alive
Accept: text/html,application/xhtml+xml,application/xml;q=0.9,image/webp,*/*;q=0.8
User-Agent: Mozilla/5.0 (Windows NT 6.1) AppleWebKit/537.36 (KHTML, like Gecko)
Chrome/33.0.1750.146 Safari/537.36
Referer: http://192.168.56.188:8000/reg.html
Accept-Encoding: gzip,deflate,sdch
Accept-Language: zh-CN,zh;q=0.8,en;q=0.6,zh-TW;q=0.4
因为我们应答回去的数据跟post一致,故浏览器看到的输出也是一样的。
在这里可以总结一下post 跟 get 提交的一些区别:
get提交,提交的信息都显示在地址栏中;对于敏感数据不安全;由于地址栏存储体积有限而不能提交大容量数据;将信息封装到了请求消息的请求行
中,而post 提交将信息封装到了请求体中。
二、CGIHTTPServer:使用静态文件或者CGI来回应请求

先看看什么是CGI (Common Gateway Interface)。CGI是服务器和应用脚本之间的一套接口标准。它的功能是当客户端访问cgi脚本文件时让服务
器程序运行此脚本程序,将程序的输出作为response发送给客户。总体的效果,是允许服务器动态的生成回复内容,而不必局限于静态文件。
支持CGI的服务器程序接收到客户的请求,根据请求中的URL,运行对应的脚本文件。服务器会将HTTP请求的信息通过环境变量的方式传递给脚本文
件,并等待脚本的输出。脚本的输出封装成合法的HTTP回复,发送给客户。CGI可以充分发挥服务器的可编程性,让服务器变得“更聪明”。服务器和
CGI 脚本之间的通信要符合CGI标准。CGI的实现方式有很多,比如说使用Apache 服务器与Perl 写的CGI脚本,或者Python 服务器与shell写的
CGI 脚本。
为了使用CGI,我们需要使用 BaseHTTPServer 包中的 HTTPServer 类来构建服务器。
# Written by Vamei
# A messy HTTP server based on TCP socket

import BaseHTTPServer
import CGIHTTPServer

HOST = ''
PORT = 8000

# Create the server, CGIHTTPRequestHandler is pre-defined handler
server = BaseHTTPServer.HTTPServer((HOST, PORT), CGIHTTPServer.CGIHTTPRequestHandler)
# Start the server
server.serve_forever()
CGIHTTPRequestHandler 默认当前目录下的cgi-bin和ht-bin文件夹中的文件为CGI脚本,而存放于其他地方的文件被认为是静态文件。因此需要
修改一下index.html,将其中form元素指向的action改为cgi-bin/post.py。
<head>
<title>WOW</title>
</head>
<html>
<p>Wow, Python Server</p>
<IMG src="test.jpg"/>
<form name="input" action="cgi-bin/post.py" method="post">
First name:<input type="text" name="firstname"><br>
<input type="submit" value="Submit">
</form>
</html>
创建一个cgi-bin的文件夹,并在cgi-bin中放入如下post.py文件,也就是 CGI脚本:
#!/usr/bin/env python
# Written by Vamei
import cgi
form = cgi.FieldStorage()

# Output to stdout, CGIHttpServer will take this as response to the client
print "Content-Type: text/html"     # HTML is following
print                               # blank line, end of headers
print "<p>Hello world!</p>"         # Start of content
print "<p>" +  repr(form['firstname']) + "</p>"
(注意:post.py 需要有可执行权限)
第一行说明了脚本所使用的语言,即Python。 cgi包用于提取请求中包含的表格信息。脚本只负责将所有的结果输出到标准输出(使用print)。
CGIHTTPRequestHandler 会收集这些输出,封装成HTTP回复,传送给客户端。
对于POST 方法的请求,它的URL需要指向一个CGI脚本(也就是在cgi-bin或者ht-bin中的文件)。CGIHTTPRequestHandler 继承自
SimpleHTTPRequestHandler,所以也可以处理GET方法和HEAD方法的请求。此时,如果URL指向CGI脚本时,服务器将脚本的运行结果传送到客户
端;当此时URL指向静态文件时,服务器将文件的内容传送到客户端。更进一步,我可以让CGI脚本执行数据库操作,比如将接收到的数据放入到数据
库中以及更丰富的程序操作,相关内容从略。
三、python 中的 WSGI
WSGI, Web Server Gateway Interface。WSGI 是Python 对CGI 进行的一种包装,核心使用Python实现,具体实现通常来说也需要使用Python,目前Django 等web框架都实现了WSGI。
WSGI 接口定义非常简单,它只要求Web 开发者实现一个函数,就可以响应HTTP请求。来看一个最简单的Web版本的“Hello, web!”:
def application(environ, start_response):
start_response('200 OK', [('Content-Type', 'text/html')])
return '<h1>Hello, web!</h1>'
上面的application()函数就是符合WSGI标准的一个HTTP处理函数,它接收两个参数:
-
environ:一个包含所有HTTP请求信息的
dict对象; -
start_response:一个发送HTTP响应的函数。
在application()函数中,调用:
start_response('200 OK', [('Content-Type', 'text/html')])
就发送了HTTP响应的Header,注意Header只能发送一次,也就是只能调用一次start_response()函数。start_response()函数接收两个参数,一个是HTTP响应码,一个是一组list表示的HTTP头部,每个Header用一个包含两个str的tuple表示。
Python内置了一个WSGI 服务器,这个模块叫 wsgiref,它是用纯 Python 编写的WSGI 服务器的参考实现。所谓“参考实现”是指该实现完全符合WSGI 标准,但是不考虑任何运行效率,仅供开发和测试使用。
运行WSGI服务
我们先编写hello.py,实现Web应用程序的WSGI 处理函数:
# hello.py

def application(environ, start_response):
    start_response('200 OK', [('Content-Type', 'text/html')])
return '<h1>Hello, %s!</h1>' % (environ['PATH_INFO'][1:] or 'web')然后,再编写一个server.py,负责启动WSGI服务器,加载application()函数:
# server.py
# 从wsgiref模块导入:
from wsgiref.simple_server import make_server
# 导入我们自己编写的application函数:
from hello import application

# 创建一个服务器,IP地址为空,端口是8000,处理函数是application:
httpd = make_server('', 8000, application)
print "Serving HTTP on port 8000..."
# 开始监听HTTP请求:
httpd.serve_forever()
访问 http://localhost:8000/simba 会打印 Hello, simba!
四、MVC:Model-View-Controller

(一)中我们需要自己监听端口,接收http 请求,解析 http 请求,发送http 响应(包括静态文件和访问 cgi),就好象实现了一个极简版的
apache/lighttpd/nginx;
(二/三)中利用已有的 cgi/wsgi 服务器,我们只需要实现如何响应http 请求即可。
但如上的方式需要对每一个不同的请求(参数)都实现一个函数来响应,作为真正的web 后台实现来说肯定是不适用的,我们需要将同个目录的请求
统一处理。比如一些python web 框架如 web.py 会自己实现一个 wsgi 服务器,并留出接口,让开发者更好地实现 web 应用的功能,将 url 映射
到各个不同的 python class,在 class 内会定义 GET/POST 方法,用户访问url 则由对应的 class 类来处理,如下所示。当然具体展示给用户的html 肯
定是根据得到的变量值替换而成,即模板化,不同模板有不同的语法。在Jinja2 模板中,用{{ name }}表示一个需要替换的变量;很多时候,
还需要循环、条件判断等指令语句,在Jinja2中用{% ... %}表示指令。
|
1
2 3 4 5 6 7 8 9 10 11 12 13 14 15 16 17 |
urls = (
"/index", ViewIndex, "/help", ViewHelp, '/authority/manager', ViewAuthorityView, '/authority/edit', ViewAuthorityEdit, '/authority/delete', ViewAuthorityDelete, '/rule/view', ViewRuleView, '/rule/result', ViewRuleResult, '/rule/edit', ViewRuleEdit, '/rule/edit_advanced', ViewRuleEditAdvanced, '/rule/manager', ViewRuleManager, '/rule/delete', ViewRuleDelete, '/rule/operator', ViewRuleOperator, '/module/show', ViewModuleShow, '/.*', ViewIndex, ) |
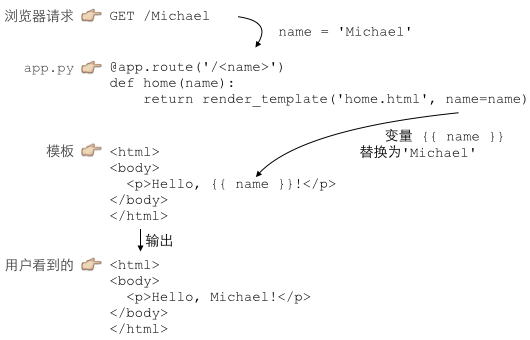
这就是传说中的MVC:Model-View-Controller,中文名“模型-视图-控制器”。
Python 处理URL的函数就是C:Controller,Controller 负责业务逻辑,比如检查用户名是否存在,取出用户信息等等;
包含变量{{ name }}的模板就是V:View,View 负责显示逻辑,通过简单地替换一些变量,View最终输出的就是用户看到的HTML。
MVC 中的Model在哪?Model是用来传给View 的,这样View 在替换变量的时候,就可以从Model 中取出相应的数据。
上面的例子中,Model 就是一个dict:
{ 'name': 'Michael' }dict
作为Model。
在实际应用中往往也会把数据库表的操作认为是Model,通过从请求获取的信息,进而在库表查询出需要替换url 的变量值。
注意:一般一个表一个Model,而且把表操作函数中的表名写死,这样如果表有字段变动,只需改动此Model,而无需修改其他调用此表操作
的地方。此外,在一个Web App 中,有多个用户会同时访问,假设以多线程模式来处理每个用户的请求,每个线程在访问数据库时都必须创建仅属于
自身的连接,对别的线程不可见,否则就会造成数据库操作混乱,此时可能需要用到 threading.local 对象。


 2464
2464


 被折叠的 条评论
为什么被折叠?
被折叠的 条评论
为什么被折叠?
 到【灌水乐园】发言


