


4 OMAP3630 I2C device驱动
在Linux内核中,I2C device驱动位于drivers/i2c/chips目录下,可以看到该目录下有很多相关的device驱动,这里以xxxx项目的mma7455为例介绍device驱动的注册过程,对应的device驱动程序为mma7455.c。
既然有device驱动,那么必定有相应的device,I2C的device是什么呢?其实就是我们在1.3节中提到的i2c_client,所以在device驱动注册之前先来了解下i2c_client的注册过程。
4.1 Mma7455 device注册
Mma7455 device即i2c_client的创建以及注册分为两步。
4.1.1 将mma7455设备信息加入到设备链表
在板级初始化时将I2C device的名称,地址和相关的信息加入到链表__i2c_board_list中,该链表记录了具体开发板上的I2C设备信息。
在board-xxxx.c中,定义了mma7455的设备信息定义如下:
- static struct i2c_board_info __initdata xxxx_i2c_bus3_info[] = {
- ……
- #ifdef CONFIG_SENSORS_MMA7455
- {
- I2C_BOARD_INFO("mma7455", 0x1D),
- .platform_data = &xxxx_mma7455_platform_data,
- },
- #endif
- };
Mma7455加入到设备链表__i2c_board_list的流程图如下图:
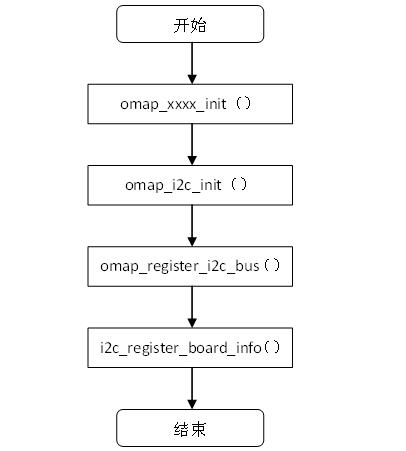
图4.1 mma7455加入到I2C设备链表的过程
i2c_register_board_info()函数的定义如下:
- int __init i2c_register_board_info(int busnum,
- struct i2c_board_info const *info, unsigned len)
- {
- ……
- for (status = 0; len; len--, info++) {
- struct i2c_devinfo *devinfo;
- devinfo = kzalloc(sizeof(*devinfo), GFP_KERNEL);
- ……
- devinfo->busnum = busnum;
- devinfo->board_info = *info;
- list_add_tail(&devinfo->list, &__i2c_board_list);
- }
- ……
- }
4.1.2 创建并注册i2c_client
i2c_client的创建和注册在I2C adapter驱动注册过程中完成,I2C adapter驱动的注册可以参考3.2.2节,i2c_add_numbered_adapter()函数在注册I2C adapter驱动的同时会扫描4.1.1中提到的I2C设备链表__i2c_board_list,如果该总线上有对应的I2C设备,则创建相应的i2c_client,并将其注册到I2C core中。流程图如下所示:

图4.2创建并注册i2c_client
相应的代码位于i2c-core.c如下:
- static void i2c_scan_static_board_info(struct i2c_adapter *adapter)
- {
- ……
- list_for_each_entry(devinfo, &__i2c_board_list, list) {
- if (devinfo->busnum == adapter->nr
- && !i2c_new_device(adapter,
- &devinfo->board_info))
- ……
- }
- ……
- }
在i2c_scan_static_board_info()函数中遍历I2C设备链表__i2c_board_list,设备的总线号和adapter的总线号相等,则使用函数i2c_new_device()创建该设备。
- struct i2c_client *
- i2c_new_device(struct i2c_adapter *adap, struct i2c_board_info const *info)
- {
- ……
- client = kzalloc(sizeof *client, GFP_KERNEL);
- if (!client)
- return NULL;
- client->adapter = adap;
- client->dev.platform_data = info->platform_data;
- if (info->archdata)
- client->dev.archdata = *info->archdata;
- client->flags = info->flags;
- client->addr = info->addr;
- client->irq = info->irq;
- strlcpy(client->name, info->type, sizeof(client->name));
- ……
- status = i2c_attach_client(client);
- ……
- }
在函数i2c_new_device()中创建一个i2c_client,初始化该结构体的adapter,addr,name等变量,这里的client->name被初始化为info->type,在4.1.1中,info->type初始化为“mma7455”, client->name后面会用于I2C device和I2C driver匹配时使用,最后调用i2c_attach_client()将该client注册到I2C core。
- int i2c_attach_client(struct i2c_client *client)
- {
- struct i2c_adapter *adapter = client->adapter;
- ……
- client->dev.parent = &client->adapter->dev;
- client->dev.bus = &i2c_bus_type;
- ……
- res = device_register(&client->dev);
- ……
- }
函数i2c_attach_client()进一步初始化i2c_client结构体,将该设备的总线初始化为i2c_bus_type,说明该设备被放在I2C总线上,用于后面跟I2C driver匹配时使用,最后使用device_register(&client->dev)注册该i2c_client设备。
4.2 Mma7455 device驱动注册
在mma7455.c中,定义了mma7455的device驱动,代码如下:
- static struct i2c_driver mma7455_driver = {
- .driver = {
- .name = "mma7455",
- },
- .class = I2C_CLASS_HWMON,
- .probe = mma7455_probe,
- .remove = mma7455_remove,
- .id_table = mma7455_id,
- ……
- };
注册的简要示意图如下:

图4.3 device驱动的注册
相应的代码位于mma7455.c和i2c-core.c。
- static int __init init_mma7455(void)
- {
- ……
- res = i2c_add_driver(&mma7455_driver);
- ……
- return (res);
- }
在模块加载的时候首先调用init_mma7455(),然后init_mma7455()调用函数i2c_add_driver()注册mma7455_driver结构体。
- int i2c_register_driver(struct module *owner, struct i2c_driver *driver)
- {
- …….
- /* add the driver to the list of i2c drivers in the driver core */
- driver->driver.owner = owner;
- driver->driver.bus = &i2c_bus_type;
- ……
- res = driver_register(&driver->driver);
- if (res)
- return res;
- ……
- }
函数i2c_register_driver()初始化该驱动的总线为i2c_bus_type,然后使用函数driver_register(&driver->driver)注册该驱动,因此内核会在I2C总线上遍历所有I2C设备,由于该mma7455 device驱动的匹配因子name变量为“mma7455”,因此正好和在4.1.2里创建的name也为“mma7455”的i2c client匹配。因此总线的probe函数将会被调用,I2C总线的probe函数为i2c_device_probe(),具体代码如下:
- static int i2c_device_probe(struct device *dev)
- {
- struct i2c_client *client = to_i2c_client(dev);
- struct i2c_driver *driver = to_i2c_driver(dev->driver);
- int status;
- if (!driver->probe || !driver->id_table)
- return -ENODEV;
- client->driver = driver;
- …….
- status = driver->probe(client, i2c_match_id(driver->id_table, client));
- ……
- return status;
- }
在i2c_device_probe()函数中,语句client->driver = driver将I2C device和I2C driver绑定,然后直接调用具体设备的probe函数,这里即mma7455的probe函数mma7455_probe()。
在mma7455_probe()函数会完成一些具体I2C设备相关的初始化等操作,这边就不再详述。
5 用户空间的支持
图1.1Linux I2C的架构图中的i2c-dev部份是一个通用的I2C设备的驱动程序,通过一个带有操作集file_operations的标准字符设备驱动为用户空间提供了访问接口,使用户空间可以通过I2C core,进而访问I2C adapter。
5.1 I2c-dev的注册
该部分的源代码位于drivers/i2c/i2c-dev.c,首先定义了I2C device驱动i2cdev_driver:
- static struct i2c_driver i2cdev_driver = {
- .driver = {
- .name = "dev_driver",
- },
- .attach_adapter = i2cdev_attach_adapter,
- .detach_adapter = i2cdev_detach_adapter,
- };
i2cdev_driver注册代码如下:
- static int __init i2c_dev_init(void)
- {
- ……
- res = register_chrdev(I2C_MAJOR, "i2c", &i2cdev_fops);
- ……
- i2c_dev_class = class_create(THIS_MODULE, "i2c-dev");
- ……
- res = i2c_add_driver(&i2cdev_driver);
- ……
- }
首先注册了一个主设备号为I2C_MAJOR,操作集为i2cdev_fops,名字为“i2c”的字符设备。在文件drivers/i2c/i2c-dev.h中,I2C_MAJOR被定义为89。在i2c-dev.c中i2cdev_fops的定义如下:
- static const struct file_operations i2cdev_fops = {
- .owner = THIS_MODULE,
- .llseek = no_llseek,
- .read = i2cdev_read,
- .write = i2cdev_write,
- .unlocked_ioctl = i2cdev_ioctl,
- .open = i2cdev_open,
- .release = i2cdev_release,
- };
该操作集是用户空间访问该字符设备的接口。
然后调用函数i2c_add_driver(&i2cdev_driver)将i2cdev_driver驱动注册到i2c core中,i2cdev_driver驱动注册的流程图如下:

图5.1 i2cdev_driver注册过程
注册i2c_driver时,会将驱动和adapter绑定起来,然后将调用i2c_driver 的attach_adapter 方法,即i2cdev_attach_adapter()函数,建立dev设备节点,每个adapter都会对应一个dev设备节点,并维护了一个i2c_dev链表保存设备节点和adapter的关系。
i2cdev_attach_adapter()函数的代码如下:
- static int i2cdev_attach_adapter(struct i2c_adapter *adap)
- {
- ……
- /* register this i2c device with the driver core */
- i2c_dev->dev = device_create(i2c_dev_class, &adap->dev,
- MKDEV(I2C_MAJOR, adap->nr), NULL,
- "i2c-%d", adap->nr);
- ……
- res = device_create_file(i2c_dev->dev, &dev_attr_name);
- ……
- }
以I2C_MAJOR和adap->nr为主从设备号创建并注册设备节点,如果系统有udev或者是hotplug,那么就会在/dev下自动创建相关的设备节点了。
5.2 I2c-dev的打开
I2c-dev的open函数如下:
- static int i2cdev_open(struct inode *inode, struct file *file)
- {
- ……
- i2c_dev = i2c_dev_get_by_minor(minor);
- if (!i2c_dev) {
- ret = -ENODEV;
- goto out;
- }
- adap = i2c_get_adapter(i2c_dev->adap->nr);
- ……
- client = kzalloc(sizeof(*client), GFP_KERNEL);
- if (!client) {
- i2c_put_adapter(adap);
- ret = -ENOMEM;
- goto out;
- }
- snprintf(client->name, I2C_NAME_SIZE, "i2c-dev %d", adap->nr);
- client->driver = &i2cdev_driver;
- client->adapter = adap;
- file->private_data = client;
- ……
- }
Open操作是用户空间程序和内核驱动交换的第一步,最终返回给用户空间的就是struct file结构体。对于I2C 驱动来说,用户空间所获得的就是client这个关键信息,在其中可以找到所有有关的信息如client所在的adapter及i2c_driver。
用open函数将i2c-dev设备打开以后,就可以通过ioctl函数的各种命令来设定要访问从设备的地址,I2C设备读写等操作,也可以通过 read和write函数完成对I2C设备的读写。
对I2C设备的具体操作在这里不再具体阐述,可以参看i2c-dev.c源代码。
6 I2C数据收发的框架
I2C架构的读写支持两种协议类型,I2C协议与SMBUS协议。
I2C协议和SMBUS协议不完成等同,SMBUS是I2C的子集,SMBUS由I2C衍生而来。SMBUS总线上传输的数据一定是I2C的格式的,但是SMBUS上传输的数据不一定能满足具体某个I2C从设备的通信要求。
6.1 SMBUS协议的数据收发
如果控制器不支持SMBUS协议,框架层可以用i2c_transfer模拟SMBUS协议的实现,系统默认的I2C传输函数一般都是基于I2C模拟的SMBUS方法传输的,如i2c_smbus_write_byte_data(),i2c_smbus_read_byte_data()等。
在设备mma7455的驱动程序中,使用了SMBUS协议,而OMAP3630控制器使用的是I2C协议,因此在mma7455的驱动程序中就用到了基于I2C模拟的SMBUS方法。
下面以函数i2c_smbus_write_byte_data()为例来说明SMBUS协议下的数据发送的过程。
在i2c-core.c中,函数i2c_smbus_write_byte_data()的定义如下:
- /**
- * i2c_smbus_write_byte_data - SMBus "write byte" protocol
- * @client: Handle to slave device
- * @command: Byte interpreted by slave
- * @value: Byte being written
- *
- * This executes the SMBus "write byte" protocol, returning negative errno
- * else zero on success.
- */
- s32 i2c_smbus_write_byte_data(struct i2c_client *client, u8 command, u8 value)
- {
- union i2c_smbus_data data;
- data.byte = value;
- return i2c_smbus_xfer(client->adapter,client->addr,client->flags,
- I2C_SMBUS_WRITE,command,
- I2C_SMBUS_BYTE_DATA,&data);
- }
函数i2c_smbus_write_byte_data()的调用流程图如下:

图6.1 SMBUS协议下的数据发送过程
从图6.1可以看到,走哪条分支取决于I2C控制器的i2c_algorithm算法,当定义了方法smbus_xfer,则直接调用该方法,如果没有则通过先调用i2c_smbus_xfer_emulated(),进而通过i2c_transfer()最终调用I2C协议下的master_xfer方法,所以我们说SMBUS总线上传输的数据一定是I2C的格式的。
6.2 I2C协议的数据收发
I2C协议下的数据收发函数就是常用的I2C传输函数:i2c_master_send()和i2c_master_recv()。
下面以函数i2c_master_send ()为例来说明I2C协议下的数据发送的过程。
在i2c-core.c中,函数i2c_master_send()定义如下:
- /**
- * i2c_master_send - issue a single I2C message in master transmit mode
- * @client: Handle to slave device
- * @buf: Data that will be written to the slave
- * @count: How many bytes to write
- *
- * Returns negative errno, or else the number of bytes written.
- */
- int i2c_master_send(struct i2c_client *client,const char *buf ,int count)
- {
- int ret;
- struct i2c_adapter *adap=client->adapter;
- struct i2c_msg msg;
- msg.addr = client->addr;
- msg.flags = client->flags & I2C_M_TEN;
- msg.len = count;
- msg.buf = (char *)buf;
- ret = i2c_transfer(adap, &msg, 1);
- /* If everything went ok (i.e. 1 msg transmitted), return #bytes
- transmitted, else error code. */
- return (ret == 1) ? count : ret;
- }
从源代码中可以看出,函数i2c_master_send()先构造i2c_msg结构体,然后直接调用函数i2c_transfer。简单的示意图如下:

图6-2 I2C协议下的数据发送过程


 336
336

 被折叠的 条评论
为什么被折叠?
被折叠的 条评论
为什么被折叠?
 到【灌水乐园】发言


