


我们在安卓开发中安卓自带的控件满足不了我们的需求,因此我们就需要用到自定义View来满足我们的需求,在这里我要讲解的是自定义View实现选座功能,在安卓中一个会使用自定义View的人一定会开发出与众不同以及美观的项目
首先,我展示一下效果
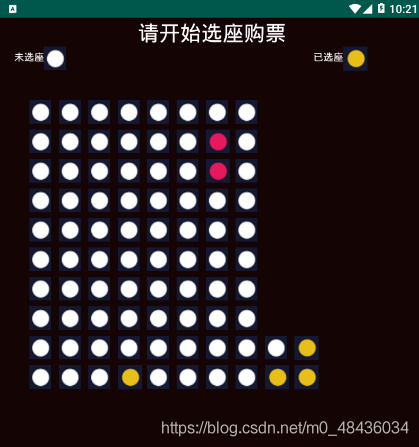
以上主要就是我们需要创建一个我们自己的View继承自Viewgroup控件并实现onMeasure以及onDraw方法
具体的代码是这样的
public class SearView extends ViewGroup {
private Context context;
public SearView(@NonNull Context context) {
super(context);
}
public SearView(@NonNull Context context, @Nullable AttributeSet attrs) {
super(context, attrs);
this.context=getContext();
}
public SearView(@NonNull Context context, @Nullable AttributeSet attrs, int defStyleAttr) {
super(context, attrs, defStyleAttr);
}
@Override
protected void onLayout(boolean changed, int l, int t, int r, int b) {
}
@Override
protected void onMeasure(int widthMeasureSpec, int heightMeasureSpec) {
super.onMeasure(widthMeasureSpec, heightMeasureSpec);
}
private ArrayList mlist;
public void setData(ArrayList list){
this.mlist = list;
invalidate();
}
@Override
protected void onDraw(Canvas canvas) {
super.onDraw(canvas);
if (mlist != null && mlist.size() > 0) {
for (int i = 0; i < mlist.size(); i++) {
SeatinfoBean.ResultBean resultBean = mlist.get(i);
resultBean.draw(canvas,context);
}
}
}
@Override
public boolean onTouchEvent(MotionEvent event) {
switch (event.getAction()){
case MotionEvent.ACTION_DOWN:
break;
case MotionEvent.ACTION_MOVE:
break;
case MotionEvent.ACTION_UP:
float x = event.getX();
float y = event.getY();
completeByXY(x,y);
break;
}
return true;
}
public void completeByXY(float x,float y){
for (int i=0;i
SeatinfoBean.ResultBean resultBean1 = mlist.get(i);
int left = resultBean1.getLeft();
int right = resultBean1.getRight();
int bottom = resultBean1.getBottom();
int top = resultBean1.getTop();
if (x>=left&&x=top&&y<=bottom){
clickedSeat.clickedSeat(resultBean1);
int status = resultBean1.getStatus();
if (status==1){
status=3;
resultBean1.setStatus(status);
}else if (status==3){
status=1;
resultBean1.setStatus(status);
}
break;
}
}
postInvalidate();
}
public interface ClickedSeat{
void clickedSeat(SeatinfoBean.ResultBean resultBean);
}
private ClickedSeat clickedSeat;
public void setClickedSeat(ClickedSeat clickedSeat) {
this.clickedSeat = clickedSeat;
}
}
以上的resultBean是我们根据选座接口中的返回值判断座位是否已经被选,大家可以参考一下我的Bean类,但具体的做法还要以自己的接口文件为主
public static class ResultBean {
/**
* row : 1
* seat : 1
* status : 2
*/
private String row;
private String seat;
private int status;
private int left;
private int top;
private int right;
private int bottom;
private Context context;
private boolean ist = false;
public String getRow() {
return row;
}
public void setRow(String row) {
this.row = row;
}
public String getSeat() {
return seat;
}
public void setSeat(String seat) {
this.seat = seat;
}
public int getStatus() {
return status;
}
public void setStatus(int status) {
this.status = status;
}
public int getLeft() {
return left;
}
public void setLeft(int left) {
this.left = left;
}
public int getTop() {
return top;
}
public void setTop(int top) {
this.top = top;
}
public int getRight() {
return right;
}
public void setRight(int right) {
this.right = right;
}
public int getBottom() {
return bottom;
}
public void setBottom(int bottom) {
this.bottom = bottom;
}
public Context getContext() {
return context;
}
public void setContext(Context context) {
this.context = context;
}
public boolean isIst() {
return ist;
}
public void setIst(boolean ist) {
this.ist = ist;
}
public void draw(Canvas canvas,Context context){
if (status==2){
BitmapDrawable drawable = (BitmapDrawable) context.getResources().getDrawable(R.drawable.xuan);
Bitmap bitmap = drawable.getBitmap();
int width = bitmap.getWidth();
int height = bitmap.getHeight();
int row = Integer.parseInt(getRow());
int seat = Integer.parseInt(getSeat());
row = row*50;
seat = seat*50;
canvas.drawBitmap(bitmap,seat,row,new Paint());
left = seat;
top = row;
right = seat+width;
bottom = row+height;
}
if (status==1){
BitmapDrawable drawable = (BitmapDrawable) context.getResources().getDrawable(R.drawable.xuan1);
Bitmap bitmap = drawable.getBitmap();
int width = bitmap.getWidth();
int height = bitmap.getHeight();
int row = Integer.parseInt(getRow());
int seat = Integer.parseInt(getSeat());
row = row*50;
seat = seat*50;
canvas.drawBitmap(bitmap,seat,row,new Paint());
left = seat;
top = row;
right = seat+width;
bottom = row+height;
}
if (status==3){
BitmapDrawable drawable = (BitmapDrawable) context.getResources().getDrawable(R.drawable.xuan3);
Bitmap bitmap = drawable.getBitmap();
int width = bitmap.getWidth();
int height = bitmap.getHeight();
int row = Integer.parseInt(getRow());
int seat = Integer.parseInt(getSeat());
row = row*50;
seat = seat*50;
canvas.drawBitmap(bitmap,seat,row,new Paint());
left = seat;
top = row;
right = seat+width;
bottom = row+height;
}
}
}
}
最后,我们需要在布局文件里进行调用,我的布局文件是这样的
xmlns:app="http://schemas.android.com/apk/res-auto"
xmlns:tools="http://schemas.android.com/tools"
android:layout_width="match_parent"
android:layout_height="match_parent"
tools:context=".activity.XuanZuoActivity"
android:orientation="vertical">
android:id="@+id/xuanzuotext"
android:layout_width="match_parent"
android:layout_height="wrap_content"
android:text="请开始选座购票"
android:background="#140404"
android:gravity="center"
android:textSize="@dimen/permission_dp_30"
android:textColor="#fff"/>
android:layout_width="match_parent"
android:layout_height="wrap_content"
android:orientation="horizontal"
android:background="#140404">
android:id="@+id/weixuan"
android:layout_width="wrap_content"
android:layout_height="wrap_content"
android:text="未选座"
android:textColor="#fff"
android:layout_marginLeft="@dimen/permission_dp_20"
android:layout_marginTop="@dimen/dp_3"/>
android:layout_width="wrap_content"
android:layout_height="wrap_content"
android:src="@drawable/xuan1"/>
android:id="@+id/weixuan2"
android:layout_width="wrap_content"
android:layout_height="wrap_content"
android:text="已选座"
android:textColor="#fff"
android:layout_marginLeft="@dimen/dp_210"
android:layout_marginTop="@dimen/dp_3"/>
android:layout_width="wrap_content"
android:layout_height="wrap_content"
android:src="@drawable/xuan"/>
android:id="@+id/xuanzuo"
android:background="#140404"
android:layout_width="match_parent"
android:layout_height="@dimen/dp_0"
android:layout_weight="6"
/>
android:id="@+id/button_xuanzuo"
android:layout_width="match_parent"
android:layout_height="@dimen/dp_0"
android:layout_weight="0.5"
android:text="立即支付"
android:background="#E91E63"/>
以上就是我的选座功能实现的全过程,欢迎大家提问
总结
到此这篇关于Android自定义View实现选座功能的文章就介绍到这了,更多相关android自定义view选座内容请搜索脚本之家以前的文章或继续浏览下面的相关文章希望大家以后多多支持脚本之家!


 690
690


 被折叠的 条评论
为什么被折叠?
被折叠的 条评论
为什么被折叠?
 到【灌水乐园】发言


