


 本文介绍了如何在Google Colab上利用YOLOv4算法,轻松训练针对交通标志的自定义数据集。通过翻译一篇教程,详细阐述了在colab环境中设置和执行深度学习模型的过程。
colab 数据集

大纲 (Outline)
一,引言 (I. Introduction)
A while ago, I wrote a tutorial on training YOLOv3 with a custom dataset (gun detection) using the free GPU provided by Google Colab. After publishing the tutorial, many people emailed me asking about problems they faced during their training process. What I noticed is that the majority of those issues come from modifying inappropriate layer architecture, running cells in incorrect directory paths or missing one/some of the required configuration steps. I also realized that the setting up process might take time and often can be quite confusing.
前一段时间,我写了一个教程,介绍如何使用Google Colab提供的免费GPU使用自定义数据集(枪支检测)训练 YOLOv3。 发布教程后,许多人给我发了电子邮件,询问他们在培训过程中遇到的问题。 我注意到的是,大多数问题来自修改不合适的层体系结构,在错误的目录路径中运行单元或缺少一个/某些必需的配置步骤。 我还意识到设置过程可能会花费一些时间,并且常常会造成混乱。
For those reasons, I have came up with a new approach in which most of the setting up steps are automated with a python script (Colab allows you modifying and running python script directly on its environment). With this new procedure, the only thing you need to perform locally is to prepare your custom dataset following YOLO format, while all of the remains would be executed in Colab environment.
出于这些原因,我想出了一种新方法,其中大多数设置步骤都是使用python脚本自动化的(Colab允许您直接在其环境中修改和运行python脚本)。 使用此新过程,您只需在本地执行的操作就是按照YOLO格式准备自定义数据集,而所有其余数据都将在Colab环境中执行。
二。 为什么选择YOLOv4? (II. Why YOLOv4?)
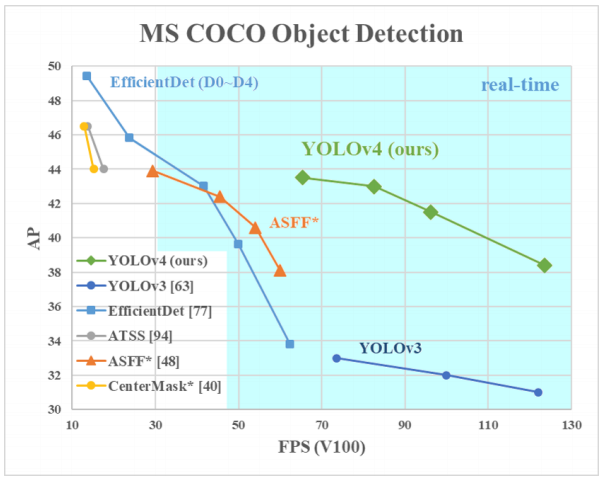
YOLOv4 was developed by Alexey Bochkovskiy, Chien-Yao Wang, and Hong-Yuan Mark Liao. It was released in April 2020 and claimed as one of the state-of-the-art real-time object detectors at the time. According to its paper, YOLOv4 is 12% faster and 10% more accurate compare to YOLOv3. The new architecture of YOLOV4 is built with CSPDarknet54 as a backbone, which promotes the learning capability of CNN. Furthermore, the implement of universal features includes Weighted-Residual-Connections (WRC), Cross-Stage-Partial-connections (CSP), Cross mini-Batch Normalization (CmBN), Self-adversarial-training (SAT) and Mish-activation help YOLOv4 obtain a very impressive results. To get more details about YOLOv4, you can refer to the original paper here. [1]
YOLOv4由Alexey Bochkovskiy,Chien-Yao Wang和Hong-Yuan Mark Liao开发。 它于2020年4月发布,被称为当时最先进的实时物体检测器之一。 根据其论文,YOLOv4比YOLOv3快12%,准确度高10%。 YOLOV4的新体系结构以CSPDarknet54为骨干构建,从而提高了CNN的学习能力。 此外,通用功能的实现还包括加权残差连接(WRC),跨阶段部分连接(CSP),跨小批量标准化(CmBN),自对抗训练(SAT)和Mish激活帮助YOLOv4获得了非常令人印象深刻的结果。 要获取有关YOLOv4的更多详细信息,您可以在此处参考原始文件。 [1]
三, 数据集准备 (III. Dataset Preparation)
To be able to train our custom dataset with YOLOv4, it is mandatory that our dataset follows the YOLO format. Each image from the dataset would associate with a .txt file having the same name, which contains the object classes and their coordinate following this syntax: <object-class> <x_center> <y_center> <width> <height>
为了能够使用YOLOv4训练我们的自定义数据集,必须使我们的数据集遵循YOLO格式。 数据集中的每个图像都将与一个具有相同名称的.txt文件相关联,该文件包含对象类及其遵循以下语法的坐标: <对象类> <x_center> <y_center> <width> <height>
There are many open-source GUI tools which can help you easily generate label file from image such as Yolo_label, OpenLabeling, Yolo_mark, BBox-Label-Tool, etc. Just simply drag and drop your mouse to create a bounding box around your objects, then the tool would generate the label file automatically.
有许多开源的GUI工具可以帮助您轻松地从图像生成标签文件,例如Yolo_label , OpenLabeling , Yolo_mark , BBox-Label-Tool等。只需拖放鼠标即可在对象周围创建边框,然后该工具将自动生成标签文件。
Next, you need to create 3 files: classes.names, train.txt and test.txt. The classes.names contains the names of your objects following format:
接下来,您需要创建3个文件: classes.names , train.txt和test.txt 。 classes.names包含以下格式的对象名称:
object1_name
object2_name
object3_name
...objectn_name
Make sure that the index of your <object-class> from label file .txt is corresponded to the index of your classes name, e.g, <object-class> of object1_name, object2_name, object3_name are 0, 1, 2 respectively.
确保名.txt相当于你的类名的索引你的<object类>的指数从标签文件,例如,<对象的类> object1_name,object2_name 的 ,object3_name是0,1,2分别。
train.txt and test.txt contains file paths of your training images and testing images. The idea is that you split your dataset into training set and test sets so that you will train your model on the training set and validate it on the test set. If the loss on your training set is high, it means your model is underfitting and you will need to train longer. If the loss is low on your training set and high on your test set, it means your model is overfitting and you will need to add more data. Depending on the number of images in your dataset that your validation set can be extracted from around 5% (small dataset) to 30% (large dataset) of the total dataset. These two files share the same format syntax as data/<image_path>.
train.txt和test.txt包含您的训练图像和测试图像的文件路径。 想法是将数据集分为训练集和测试集,以便在训练集上训练模型并在测试集上对其进行验证。 如果训练集上的损失很大,则意味着您的模型不适合 ,您将需要进行更长的训练。 如果损失在训练集上低而在测试集上高,则意味着模型过度拟合,您将需要添加更多数据。 根据数据集中图像的数量,可以从总数据集的大约5%(小数据集)到30%(大数据集)中提取验证集。 这两个文件与data / <image_path>共享相同的格式语法。
In this tutorial, I will use the Traffic Signs Dataset in YOLO format from Kaggle. You don’t have to download it now since we will directly download it from Colab environment later. Examples of some of its images and labels can be seen as below (notice that one image can have multiple objects):
在本教程中,我将使用Kaggle 中YOLO格式的交通标志数据集 。 您现在不必下载它,因为稍后我们将直接从Colab环境中下载它。 某些图像和标签的示例如下所示(请注意,一个图像可以有多个对象):
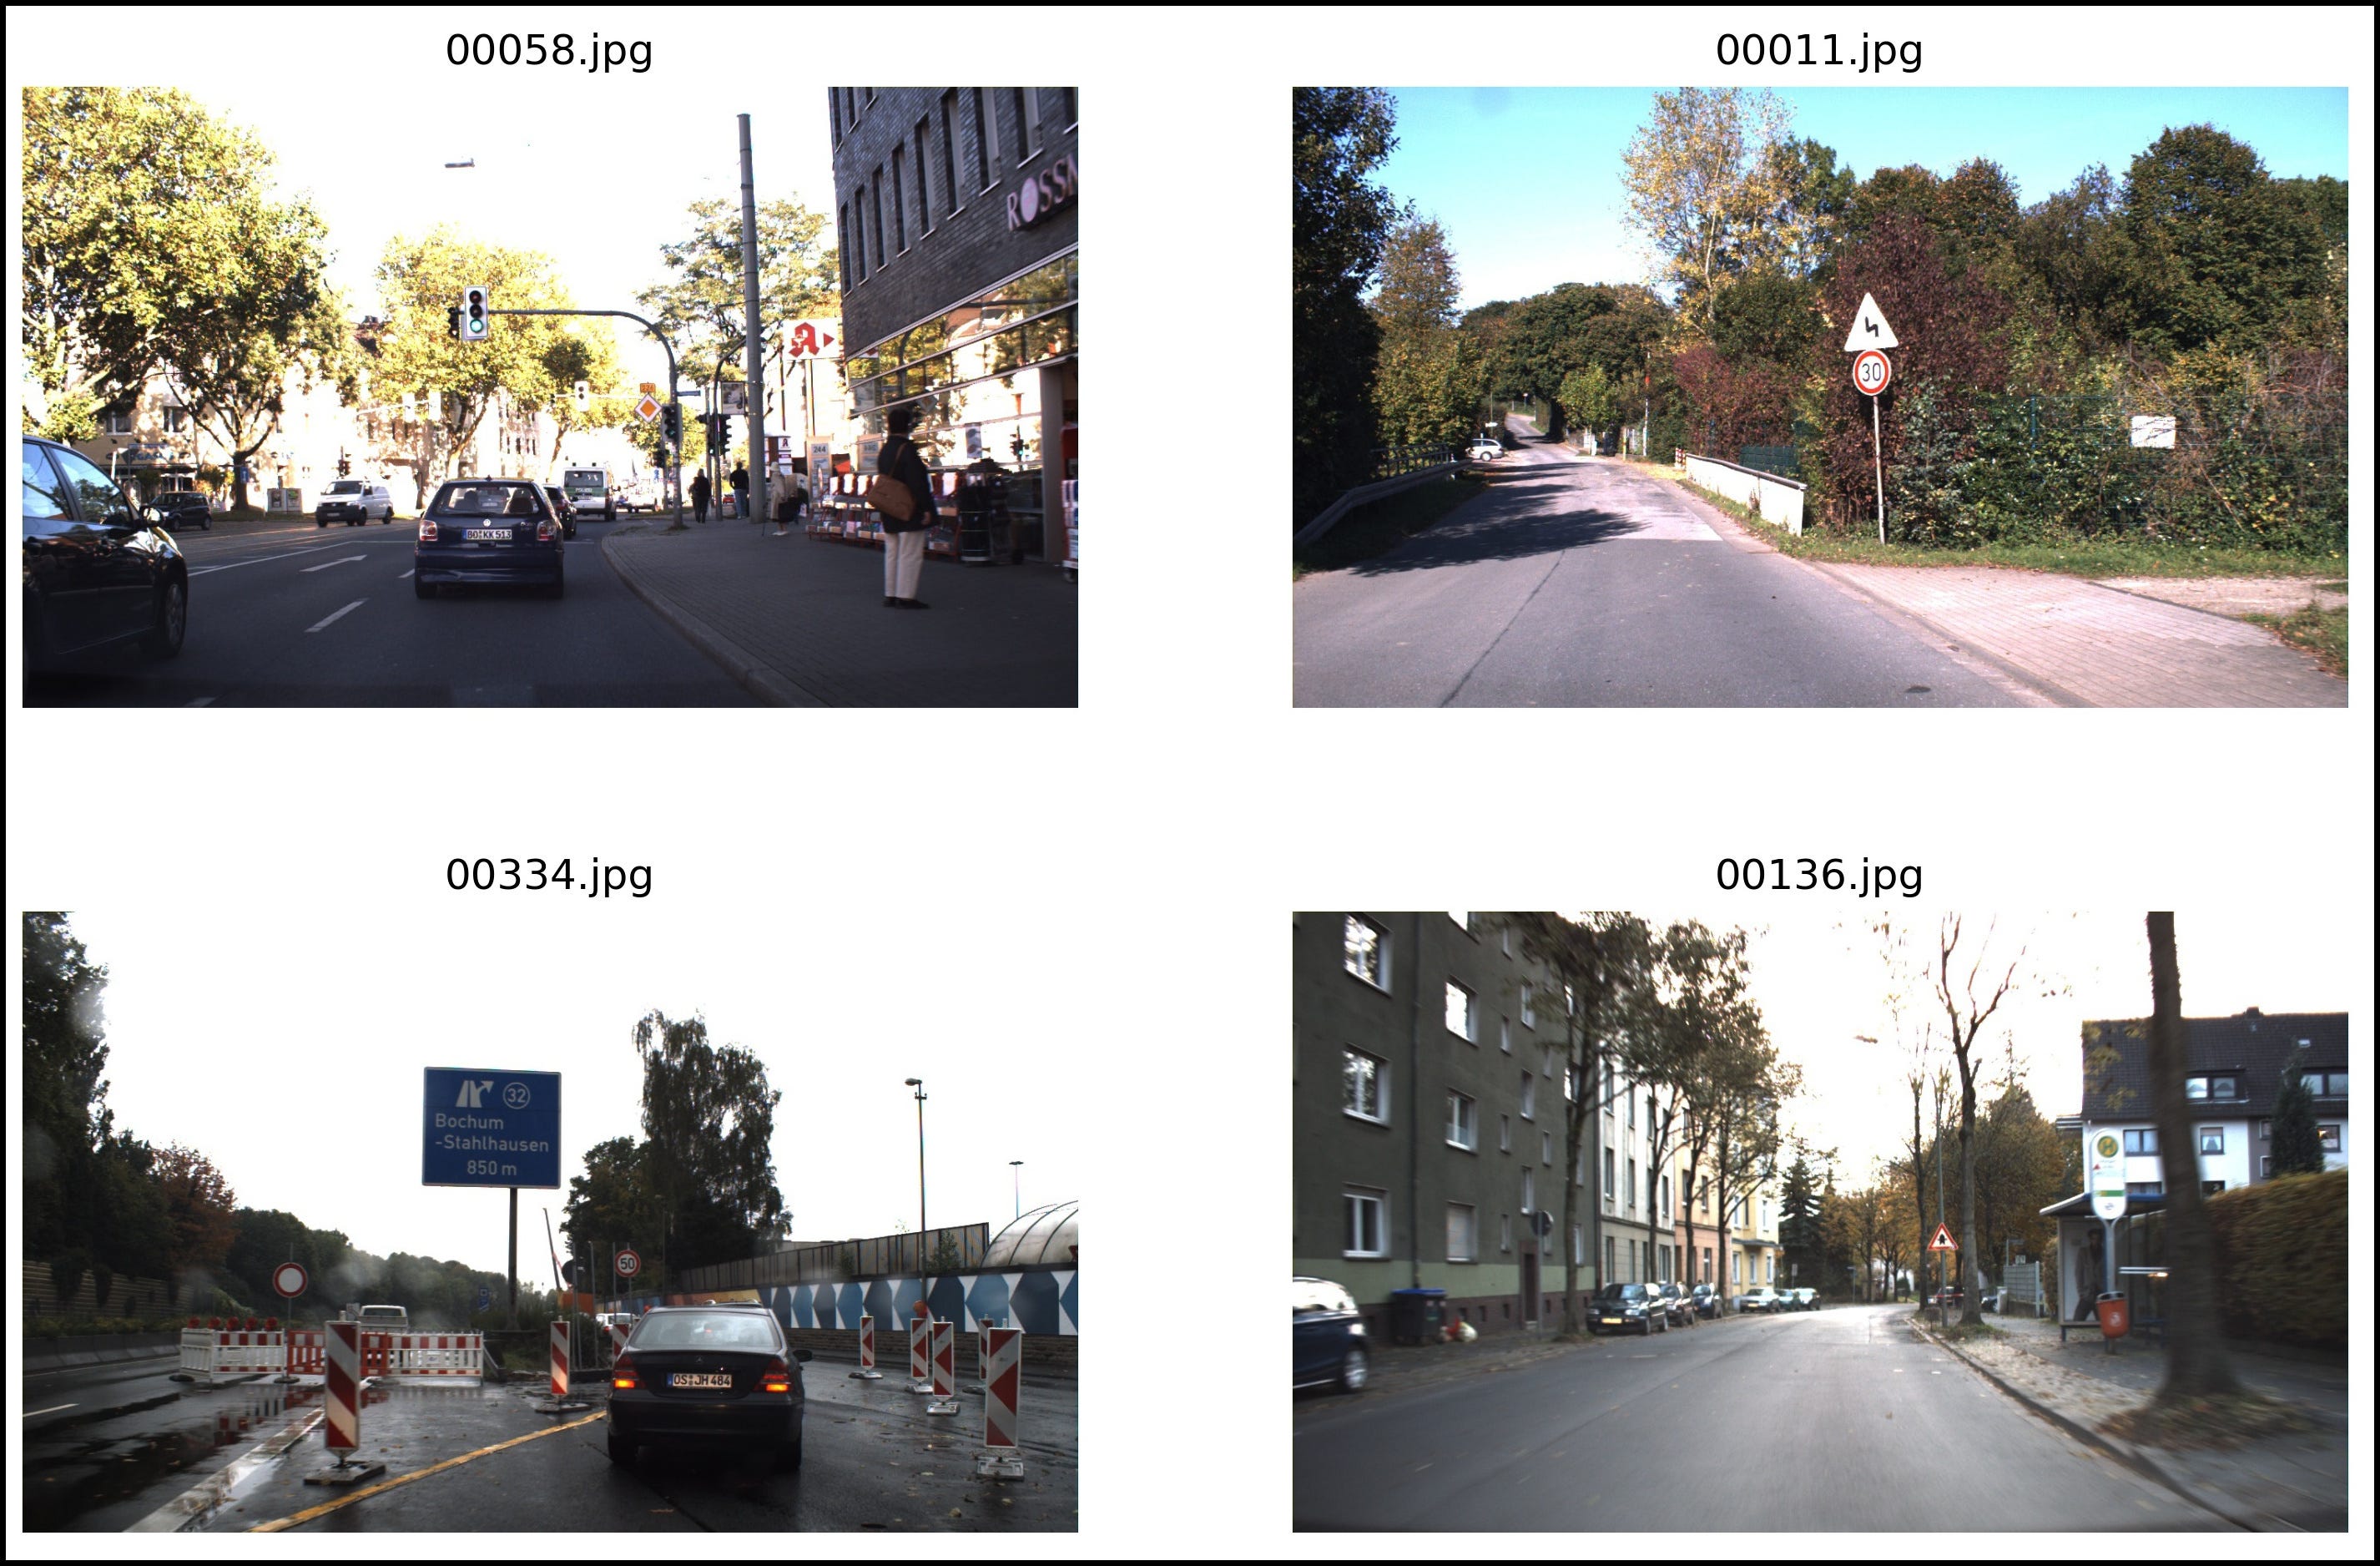
00058.txt: 3 0.5919117647058824 0.518125 0.027941176470588237 0.05125 00011.txt: 0 0.5477941176470589 0.46 0.03676470588235294 0.075 1 0.5477941176470589 0.379375 0.051470588235294115 0.09625 00334.txt: 0 0.25441176470588234 0.59375 0.033823529411764704 0.0575 0 0.5724264705882353 0.566875 0.027205882352941177 0.04625 00136.txt: 1 0.6150735294117647 0.52375 0.030147058823529412 0.045In summary, the traffic sign dataset which we would use in this tutorial would be:
总而言之,我们将在本教程中使用的交通标志数据集为:
|- ts/
|   |- |   |-
|   |- ...
|- classes.names
|- train.txt
|- test.txt
IV。 用Colab进行培训 (IV. Training with Colab)
For who is already familiar with Colab, you can jump right in my Colab notebook here and start playing around with it. However, make sure that you enable GPU in advance by select Runtime -> Change runtime type>Hardware accelerator>GPU, create directory YOLOv4_weight/backup in your Google Drive and mount Drive with Colab environment.
对于已经熟悉Colab的人,您可以在这里跳到我的Colab笔记本中并开始使用它。 但是,请确保通过选择运行时->更改运行时类型>硬件加速器 > GPU预先启用GPU,在Google Drive中创建目录YOLOv4_weight / backup并在Colab环境中安装Drive 。
As mentioned before, I have implemented some modifications which help the training process more straightforward:
如前所述,我已经进行了一些修改,以帮助简化培训过程:
assert function: a function that checks whether you’re running the cell in the correct directory path. If you’re in the wrong directory, it will give you a hint to which directory you should be. In case you don’t know how to change the directory, please refer to this cd command in Linux terminal.
assert function :一个函数,用于检查您是否在正确的目录路径中运行单元。 如果您在错误的目录中,它将提示您应该在哪个目录中。 如果您不知道如何更改目录,请在Linux terminal中参考此cd命令 。
darknet_for_colab: darknet folder which was modified specifically to adapt with Colab environment (no MAKEFILE change necessary).
darknet_for_colab : Darknet文件夹,专门针对Colab环境进行了修改(无需更改MAKEFILE)。
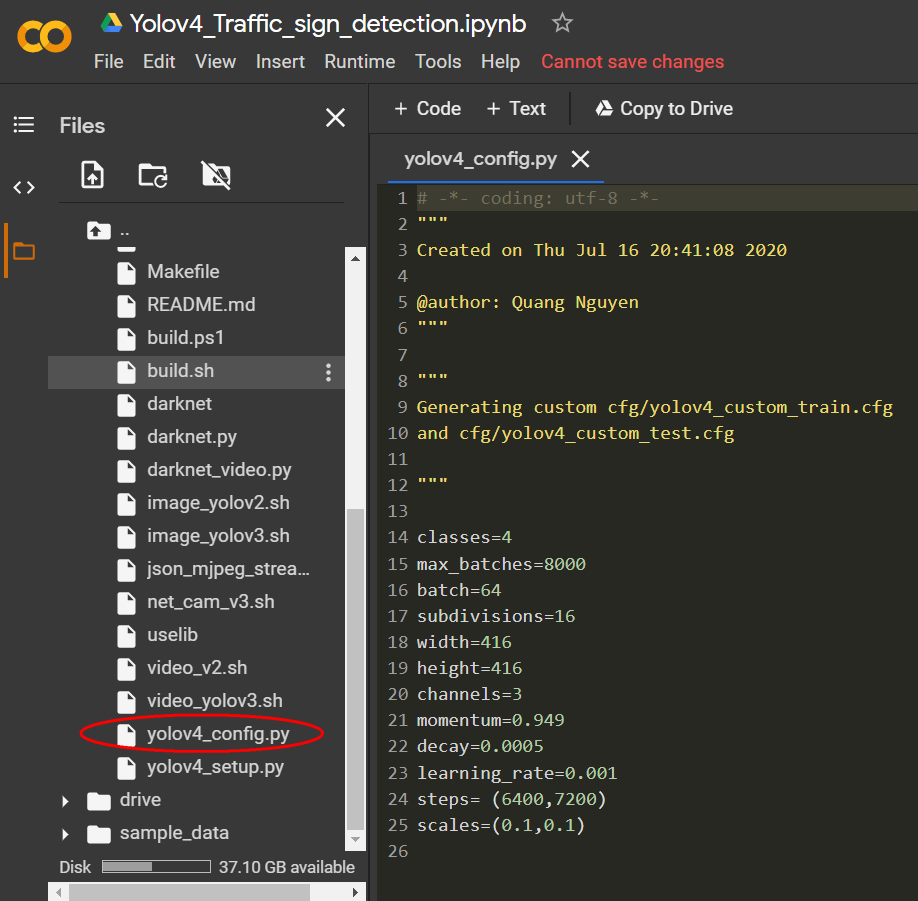
yolov4_config.py: Taking the advantage of the direct python editing feature on Colab, you can now define training parameters just by double click on yolov4_config.py and edit it (Figure 1). For example, I will set my classes=4 (our traffic sign dataset has 4 classes), max_batches=8000 (number of training iterations), batch=64 (number of samples in one batch), subdivisions=16 (number of mini_batches in one batch), etc. You can refer this page to find more details about the meaning of each parameter.
yolov4_config.py :利用Colab上的直接python编辑功能,您现在只需双击yolov4_config.py并对其进行编辑即可定义训练参数( 图1 )。 例如,我将设置我的类别= 4 (我们的交通标志数据集有4个类别), max_batches = 8000 (训练迭代数), batch = 64 (一批中的样本数), 细分= 16 (其中mini_batches数)一批)等。您可以参考此页面以找到有关每个参数含义的更多详细信息。
yolov4_setup.py (cell [6]): a python script which automatically generates YOLOv4 architecture config files (yolov4_custom_train.cfg and yolov4_custom_test.cfg) based on user-input parameters in yolov4_config.py.
yolov4_setup.py(单元格[6]):一个python脚本,它根据yolov4_config.py中的用户输入参数自动生成YOLOv4体系结构配置文件( yolov4_custom_train.cfg和yolov4_custom_test.cfg) 。
The notebook below demonstrates the pipeline of YOLOv4 training procedure on Colab. I will recommend you to take a look at my Colab Notebook to see what kind of output of each cell you should expect.
下面的笔记本演示了在Colab上YOLOv4培训过程的流程。 我建议您看一下我的Colab笔记本 ,看看您应该期望每个单元格的输出是什么。
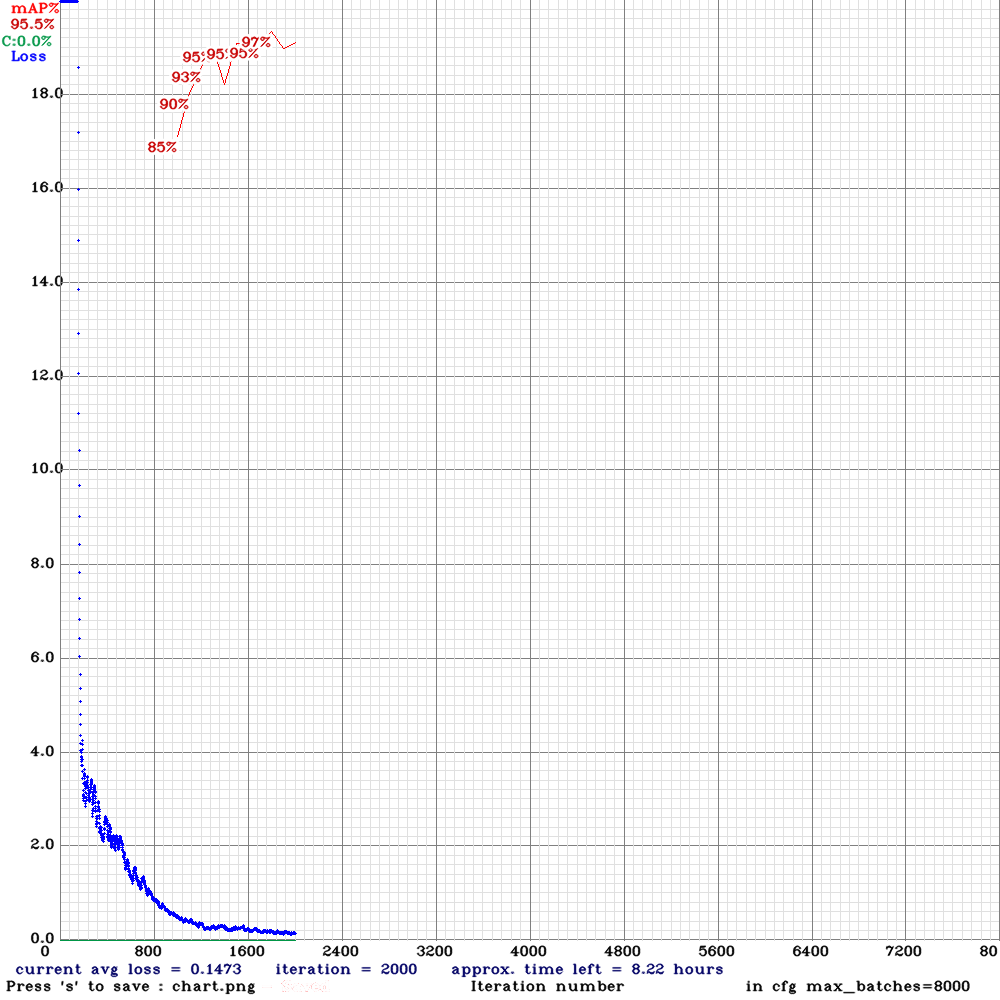
Although I did define my max_batches=8000, both accuracy and loss from training result didn’t improve much after 2000 iterations (Figure 2). The number of iterations might increase if you train with more classes or harder-to-learn dataset. Make sure that you monitor the loss and accuracy by double click on file chart.png or just simply look at the training statistic from the output cell.
尽管我确实定义了max_batches = 8000 ,但是经过2000次迭代后,准确性和训练结果的损失都没有太大改善( 图2 )。 如果您使用更多的类或较难学习的数据集进行训练,则迭代次数可能会增加。 通过双击文件chart.png来确保您监视损失和准确性,或者仅查看输出单元格中的训练统计信息即可。
V.使用YOLOv4进行预测 (V. Predict with YOLOv4)
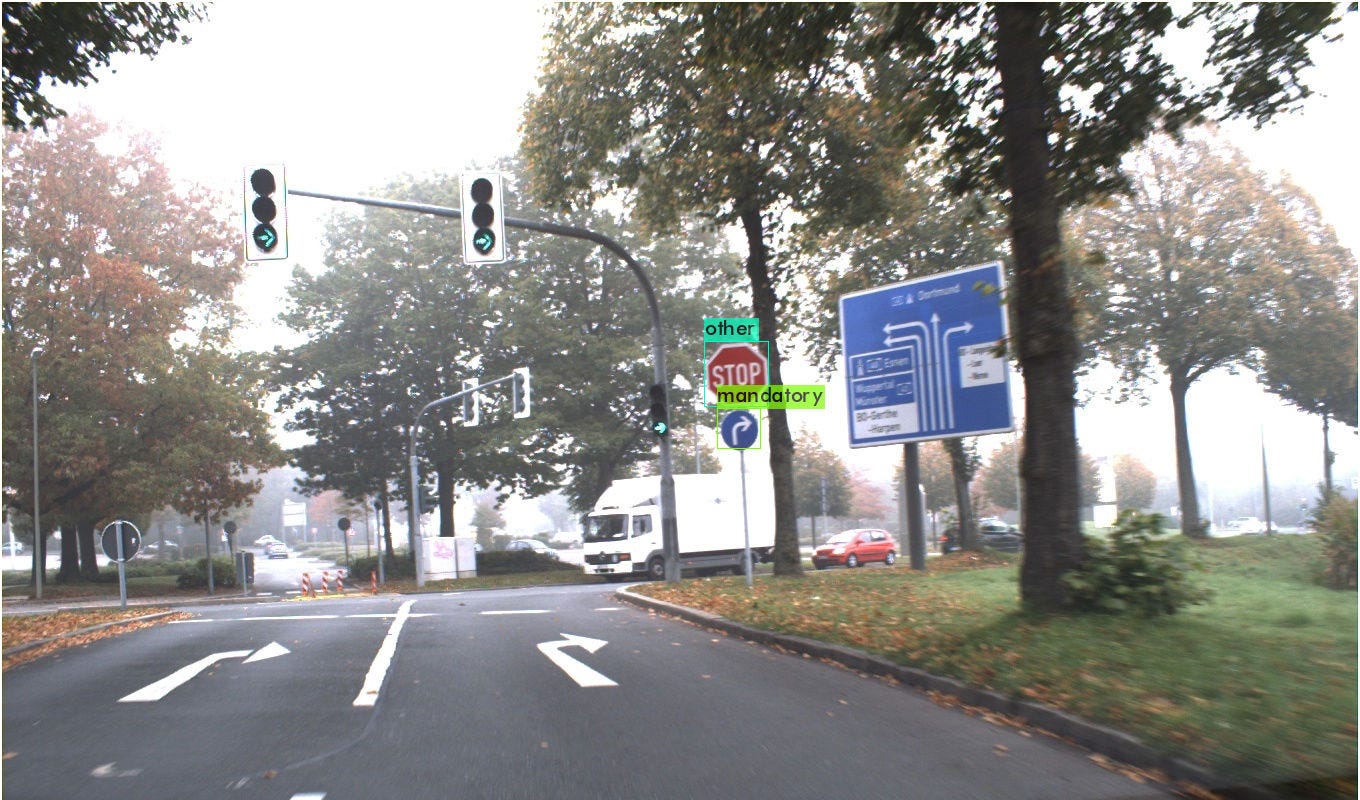
After obtain the training weights, there are several ways to deploy YOLOv4 with third-party frameworks including OpenCV, Keras, Pytorch, etc. However, those are beyond the scope of this tutorial. You can predict an image or video using the same Colab working space which you’ve used for training process (Figure 3 and Figure 4). Cell 13 and 15 gives you an explicit way to predict an image and video respectively. By default, the predicted image is saved at predictions.jpg while the predicted video would be saved at output.mp4.
获得训练权重后,有几种方法可以与第三方框架,包括部署YOLOv4 OpenCV , Keras , Pytorch等,但这些都超出了本教程的范围。 您可以使用与训练过程相同的Colab工作空间来预测图像或视频( 图3和图4 )。 单元格13和15为您提供了一种明确的方式分别预测图像和视频。 默认情况下,预测图像将保存在predictions.jpg中,而预测视频将保存在output.mp4中。
VI。 结论 (VI. Conclusion)
This tutorial has introduced a new approach which allows you training your custom dataset with YOLOv4 on Google Colab with ease. All modifications relating to neural network architecture and training parameters are automated and can be performed within Colab environment, while unit tests are integrated to debug common compiling errors.
本教程介绍了一种新方法,使您可以轻松地在Google Colab上使用YOLOv4训练自定义数据集。 与神经网络体系结构和训练参数有关的所有修改都是自动化的,可以在Colab环境中执行,而单元测试已集成为调试常见的编译错误。
However, I would like to point out that using an automated tool has its own price. The fact that you have no idea what is happening behind might be disturbing, especially people who want to have a better intuition about YOLOv4 architecture. In that case, you can refer to the original GitHub repository of YOLOv4 or read my article on training YOLOv3 on Colab.
但是,我想指出的是,使用自动化工具需要付出一定的代价。 您不知道背后发生了什么,这一事实可能会令人不安,尤其是那些希望对YOLOv4架构有更好的直觉的人。 在这种情况下,您可以参考YOLOv4的原始GitHub存储库,或阅读有关在Colab上培训YOLOv3的文章 。
资源资源 (Resources)
Train YOLOv4 on Colab notebook
YOLOv4 weights for traffic sign detection (2000 iterations)
colab 数据集


 被折叠的 条评论
为什么被折叠?
被折叠的 条评论
为什么被折叠?
 到【灌水乐园】发言


