


react组件单元测试
In this tutorial, we will be writing unit test for a basic todo application using Jest and React.
在本教程中,我们将使用Jest和React为基本的todo应用程序编写单元测试。
Let’s get started!
让我们开始吧!
笑话 (Jest)
Jest is a JavaScript testing framework designed to ensure correctness of any JavaScript codebase. It allows you to write tests with an approachable, familiar and feature-rich API that gives you results quickly.
Jest是一个JavaScript测试框架,旨在确保任何JavaScript代码库的正确性。 它使您可以使用易于接近,熟悉且功能丰富的API编写测试,从而快速获得结果。
Jest is well-documented, requires little configuration and can be extended to match your requirements. For more information on Jest checkout its official documentation. https://jestjs.io/docs/en/getting-started
Jest有据可查,没有任何配置,可以扩展以满足您的需求。 有关Jest的更多信息,请查看其官方文档。 https://jestjs.io/docs/zh-CN/getting-started
酵素 (Enzyme)
Enzyme is a JavaScript Testing utility for React that makes it easier to test your React Components’ output. You can also manipulate, traverse, and in some ways simulate runtime given the output. For more information checkout Enzyme official documentation.
Enzyme是用于ReactJavaScript测试实用程序,可以更轻松地测试React组件的输出。 您还可以根据给定的输出进行操作,遍历并以某种方式模拟运行时。 有关更多信息,请查看酶官方文档。
https://enzymejs.github.io/enzyme/
https://enzymejs.github.io/enzyme/
建立 (Setup)
In this tutorial we will make use of the create-react-app CLI tool to setting up our project. So go to a directory where you will store this project and type the following in the terminal
在本教程中,我们将使用create-react-app CLI工具来设置我们的项目。 因此,转到要存储此项目的目录,然后在终端中键入以下内容
create-react-app note-redux-appIf you don’t have create-react-app install type the following command in the terminal to install it globally.
如果您没有create-react-app安装,请在终端中键入以下命令以进行全局安装。
npm install -g create-react-app安装酶 (Install Enzyme)
npm install --save-dev enzyme enzyme-adapter-react-16 enzyme-to-jsonThe Jest testing framework is by default bundled into create-react-app.
Jest测试框架默认捆绑在create-react-app中。
In the src folder, create a tempPolyfills.js file with following content. This is necessary for testing on older browsers.
在src文件夹中,创建具有以下内容的tempPolyfills.js文件。 这是在较旧的浏览器上进行测试所必需的。
const raf = global.requestAnimationFrame = (cb) => {
  setTimeout(cb, 0);
};export default raf;
In the src folder, create a setupTests.js file with following content:
在src文件夹中,创建具有以下内容的setupTests.js文件:
import raf from './tempPolyfills'
import Enzyme  from 'enzyme';
import Adapter from 'enzyme-adapter-react-16';
Enzyme.configure({ adapter: new Adapter() });
For the styling of our todo application, we will make use of the semantic ui library. In the index.html file of our project, we will add the Semantic UI library using the CDN link.
对于我们的todo应用程序的样式,我们将使用语义ui库。 在我们项目的index.html文件中,我们将使用CDN链接添加语义UI库。
In the app.js file, add the following code snippet:
在app.js文件中,添加以下代码段:
import React from 'react';
class App extends React.Component {
  render() {
    return(
      <div
        className='ui text container'
        id='app'
      >
        <table className='ui selectable structured large table'>
          <thead>
            <tr>
              <th>Items</th>
            </tr>
          </thead>
          <tbody>
            items
          </tbody>
          <tfoot>
            <tr>
              <th>
                <form
                  className='ui form'
                >
                <div className='field'>
                  <input
                    className='prompt'
                    type='text'
                    placeholder='Add item...'
                  />
                </div>
                <button
                  className='ui button'
                  type='submit'
                >
                  Add item
                </button>
                </form>
              </th>
            </tr>
          </tfoot>
        </table>
      </div>
    )
  }
}
export default App;
With this we can view the static version of our todo app.
这样,我们可以查看待办事项应用程序的静态版本。

Let’s make our todo app reactive with the following code snippet
让我们用下面的代码片段使待办事项应用程序具有响应性
First, our todo app needs a state to store the todo items and a todo item.
首先,我们的待办事项应用程序需要一个状态来存储待办事项和待办事项。
The following piece of code should be added to app.js:
以下代码应添加到app.js中 :
state = {
    items: [],
    item: '',
};
Next we will bind the input to the item property of our state. Hence the input tag in app.js should be updated as follows:
接下来,我们将输入绑定到状态的item属性。 因此, app.js中的输入标签应按以下方式更新:
<input
    className='prompt'
    type='text'
    placeholder='Add item...'
    value={this.state.item}
    onChange={this.onItemChange}
/>
Since the onChange event is bound to the onItemChange method, in order to update the item property in our state with the value of the input field. The onItemChange method should be as the following:
由于onChange事件绑定到onItemChange方法,因此要使用input字段的值来更新我们状态下的item属性。 onItemChange方法应如下所示:
onItemChange = (e) => {
    this.setState({
      item: e.target.value,
    });
  };
提交表格 (Submitting the Form)
If the input field is empty the submit button is disabled. For this feature, add the code snippet below immediately after the render method:
如果输入字段为空,则提交按钮被禁用。 为此功能,请在render方法之后立即在下面添加代码段:
const submitDisabled = !this.state.item;Our add item button should be updated as the following:
我们的添加项按钮应更新如下:
<button
  className='ui button'
  type='submit'
  disabled={submitDisabled}
>
To submit our todo item, we will add an onSubmit event listener to our form which will trigger the execution of the addItem function.
要提交待办事项,我们将在表单上添加onSubmit事件侦听器,这将触发addItem函数的执行。
An onsubmit event should be added to the form tag as the following:
应该将onsubmit事件添加到form标记中,如下所示:
onSubmit={this.addItem}The addItem function should be as the following:
addItem函数应如下所示:
addItem = (e) => {
    e.preventDefault();
    this.setState({
      items: this.state.items.concat(
        this.state.item
      ),
      item: '',
    });
  };
列出所有待办事项 (Listing all To-Do Items)
To list all the todo items we need to iterate over each todo item in the items array.
要列出所有待办事项,我们需要遍历items数组中的每个待办事项。
<tbody>
  {
    this.state.items.map((item, idx) => (
      <tr
        key={idx}
      >
        <td>{item}</td>
      </tr>
    ))
  }
</tbody>
Finally, our todo app should be as the following code snippet.
最后,我们的待办事项应用程序应为以下代码段。
import React from 'react';
class App extends React.Component {
  state = {
    items: [],
    item: '',
  };
  onItemChange = (e) => {
    this.setState({
      item: e.target.value,
    });
  };
  addItem = (e) => {
    e.preventDefault();
    this.setState({
      items: this.state.items.concat(
        this.state.item
      ),
      item: '',
    });
  };
  render() {
    const submitDisabled = !this.state.item;
    return(
      <div
        className='ui text container'
        id='app'
      >
        <table className='ui selectable structured large table'>
          <thead>
            <tr>
              <th>Items</th>
            </tr>
          </thead>
          <tbody>
            {
              this.state.items.map((item, idx) => (
                <tr
                  key={idx}
                >
                  <td>{item}</td>
                </tr>
              ))
            }
          </tbody>
          <tfoot>
            <tr>
              <th>
                <form
                  className='ui form'
                  onSubmit={this.addItem}
                >
                <div className='field'>
                  <input
                    className='prompt'
                    type='text'
                    placeholder='Add item...'
                    value={this.state.item}
                    onChange={this.onItemChange}
                  />
                </div>
                <button
                  className='ui button'
                  type='submit'
                  disabled={submitDisabled}
                >
                  Add item
                </button>
                </form>
              </th>
            </tr>
          </tfoot>
        </table>
      </div>
    )
  }
}
export default App;
用Jest和酶测试我们的待办应用 (Testing our To-Do App with Jest and Enzyme)
create-react-app sets up a dummy test for us in the app.test.js file. Let’s execute the initial test for our project with the following command in our project folder.
create-react-app在app.test.js文件中为我们设置了一个虚拟测试。 让我们在项目文件夹中使用以下命令对项目执行初始测试。
npm test
npm test

Open up App.test.js and clear out the file. At the top of that file, we first import the React component that we want to test, import React from react and shallow() from Enzyme. The shallow() function will be used to shallow render components during test.
打开App.test.js并清除文件。 在该文件的顶部,我们首先导入要测试的React组件,从react导入React,从Enzyme导入shallow() 。 测试期间,将使用shallow()函数来浅化渲染组件。
In our first test case, we will assert that our table should render with a header of ‘items’. In order to write this assertion, we’ll need to:
在第一个测试用例中,我们将断言我们的表应使用“ items”的标题进行呈现。 为了编写此断言,我们需要:
• Shallow render the component• Traverse the virtual DOM, picking out the first th element• Assert that the th element encloses a text value of “Items”
•浅呈现组件•导线虚拟DOM,挑选出第一th元素•断言th元素封闭“的文本价值Items ”
import App from './App';
import React from 'react';
import { shallow } from 'enzyme';
describe('App', () => {
  it('should have the `th` "Items"', () => {
    const wrapper = shallow(
      <App />
    );
    expect(
      wrapper.contains(<th>Items</th>)
    ).toBe(true);
  });
});
The shallow() function returns what Enzyme calls a wrapper object, Shallow Wrapper. This wrapper contains the shallow-rendered component. The wrapper object that Enzyme provides us with has loads of useful methods that we can use to write our assertions. In general, these helper methods help us traverse and select elements on the virtual DOM. One of the helper method is contains(). It is used to assert the presence of an elements on the virtual DOM.
shallow()函数返回Enzyme所谓的wrapper对象Shallow Wrapper。 该包装器包含浅层渲染的组件。 Enzyme为我们提供的包装对象具有许多有用的方法,可用于编写断言。 通常,这些辅助方法可帮助我们遍历和选择虚拟DOM上的元素 。 辅助方法之一是contains() 。 它用于声明虚拟DOM上元素的存在。
contains() accepts a React Element, in this case JSX representing an HTML element. It returns a boolean, indicating whether or not the rendered component contains that HTML.
contains()接受一个React元素,在这种情况下,JSX代表一个HTML元素。 它返回一个布尔值,指示所呈现的组件是否包含该HTML。
With our first Enzyme spec written, let’s verify everything works. SaveApp.test.js and run the test command from the console using the following command:
编写我们的第一个酶规范后,让我们验证一切正常。 SaveApp.test.js并使用以下命令从控制台运行测试命令:
npm testNext, let’s assert that the component contains a button element that says “Add item.”
接下来,让我们断言该组件包含一个按钮元素,上面写着“添加项目”。
Add the code snippet below after the previous it block
在前一个it块之后,在下面添加代码段
it('should have a `button` element', () => {
    const wrapper = shallow(
      <App />
    );
    expect(
      wrapper.containsMatchingElement(
        <button>Add item</button>
      )
    ).toBe(true);
  });
Noticed something new? Instead of using the contains() Enzyme Wrapper method we just used the containsMatchingElement Enzyme Wrapper method. If we use contains, we need to pass contains() a ReactElement that has the exact same set of attributes. But usually this is excessive. For this spec, it’s sufficient to just assert that the button is on the page.We can use Enzyme’s containsMatchingElement() method. This will check if anything in the component’s output looks like the expected element.
注意到新东西了吗? 与其使用contains()酶包装方法,不如使用containsMatchingElement酶包装方法。 如果使用contains,则需要传递contains()一个具有完全相同的属性集的ReactElement。 但是通常这是过度的。 对于此规范,只需断言按钮在页面上就足够了。我们可以使用Enzyme的containsMatchingElement()方法。 这将检查组件输出中是否有任何东西看起来像预期的元素。
We don’t have to match attribute-for attribute using the containsMatchingElement() method.
我们不必使用containsMatchingElement()方法来匹配attribute-for属性。
Next, we’ll assert that the input field is present as well:
接下来,我们将断言输入字段也存在:
it('should have an `input` element', () => {
    const wrapper = shallow(
      <App />
    );
    expect(
      wrapper.containsMatchingElement(
        <input />
      )
    ).toBe(true);
  });
Next, we will assert that the button element is disabled:
接下来,我们将断言button元素已禁用:
it('`button` should be disabled', () => {
    const wrapper = shallow(
      <App />
    );
    const button = wrapper.find('button').first();
    expect(
      button.props().disabled
    ).toBe(true);
  });
The find() method is another Enzyme Wrapper method. It expects an Enzyme selector as an argument. The selector in this case is a CSS selector, ‘button’. A CSS selector is just one supported type of Enzyme selector. For more info on Enzyme selectors, see the Enzyme docs. We used first to return the first matching element. To read the disabled attribute or any other attribute on the button, we use props(). props() returns an object that specifies either the attributes on an HTML element or the props set on a React component.
find()方法是另一种酶包装方法。 它需要一个酶选择器作为参数。 在这种情况下,选择器是CSS选择器“按钮”。 CSS选择器只是一种受支持的酶选择器类型。 有关酶选择器的更多信息,请参见酶文档。 我们使用first返回第一个匹配元素。 要读取按钮上的disabled属性或其他任何属性,我们使用props() 。 props()返回一个对象,该对象指定HTML元素上的属性或React组件上设置的props。
使用beforeEach (Using beforeEach)
In all popular JavaScript test frameworks, there’s a function we can use to aid in test setup: beforeEach. beforeEach is a block of code that will run before each it block. We can use this function to render our component before each spec.
在所有流行JavaScript测试框架中,有一个函数可用于协助测试设置:beforeEach。 beforeEach是一个代码块,它将在每个it块之前运行。 我们可以使用此功能在每个规格之前渲染组件。
At this point, our test suite has some repetitious code. In our previous assertions, we shallow rendered the component in each it block. To avoid these repetitions, we will refactor our assertion. We will just shallow render the component at the top of our describe block:
在这一点上,我们的测试套件具有一些重复的代码。 在前面的断言中,我们浅化了每个it块中的组件。 为了避免这些重复,我们将重构我们的断言。 我们描述块的顶部,我们将只浅呈现组件:
Our refactored test suit should look like the following:
我们的重构测试服应如下所示:
describe('App', () => {
  let wrapper;
  beforeEach(() => {
    wrapper = shallow(
      <App />
    );
  });
  it('should have the `th` "Items"', () => {
    expect(
      wrapper.contains(<th>Items</th>)
    ).toBe(true);
  });
  it('should have a `button` element', () => {
    expect(
      wrapper.containsMatchingElement(
        <button>Add item</button>
      )
    ).toBe(true);
  });
  it('should have an `input` element', () => {
    expect(
      wrapper.containsMatchingElement(
        <input />
      )
    ).toBe(true);
  });
  it('`button` should be disabled', () => {
    const button = wrapper.find('button').first();
    expect(
      button.props().disabled
    ).toBe(true);
  });
});
测试用户互动 (Testing for User Interactions)
The first interaction the user can have with our app is filling out the input field for adding a new item. We will declare another describe block inside of our current one in order to group the test suits for the user interactions. describe blocks are how we“group” specs that all require the same context.
用户可以与我们的应用进行的首次互动是填写用于添加新商品的输入字段。 我们将在当前块中声明另一个describe块,以将测试用例分组以进行用户交互。 describe块是我们如何“分组”所有需要相同上下文的规范。
The beforeEach that we write for our inner describe will be run after the before Each declared in the outer context. Therefore, the wrapper will already be shallow rendered by the time this beforeEach runs. As expected, this beforeEach will only be run for it blocks inside our inner describe block.
我们为内部描述编写的beforeEach将在外部上下文中声明的before Each 之后运行。 因此,在运行此beforeEach ,包装器将已经很浅。 不出所料,仅在内部内部describe块中对其运行该beforeEach块。
We will use the simulate method to simulate user interactions.
我们将使用模拟方法来模拟用户交互。
The simulate method accepts two arguments:
模拟方法接受两个参数:
- The event to simulate (such as ‘change’ or ‘click’). This determines which event handler to use (such as onChange or onClick). 要模拟的事件(例如“更改”或“点击”)。 这确定要使用的事件处理程序(例如onChange或onClick)。
- The event object (optional) 事件对象(可选)
Notice that in our todo app, when the user has just populated the input field the button is no longer disabled.
请注意,在我们的todo应用程序中,当用户刚刚填充输入字段时,该按钮将不再被禁用。
So, we can now write specs related to the context where the user has just populated the input field. We’ll write two specs:
因此,我们现在可以编写与用户刚刚填充输入字段的上下文相关的规范。 我们将编写两个规范:
That the state property item was updated to match the input field. That the button is no longer disabled.
状态属性项已更新,以匹配输入字段。 该按钮不再被禁用。
describe('the user populates the input', () => {
    const item = 'Laundry';
    beforeEach(() => {
      const input = wrapper.find('input').first();
      input.simulate('change', {
        target: { value: item }
      })
    });
    it('should update the state property `item`', () => {
      expect(
        wrapper.state().item
      ).toEqual(item);
    });
    it('should enable `button`', () => {
      const button = wrapper.find('button').first();
      expect(
        button.props().disabled
      ).toBe(false);
    });
  });
In the first spec, we used wrapper.state() to grab the state object. We use the state() method which retrieves the state property from the component.In the second, we used props() again to read the disabled attribute on the button.
在第一个规范中,我们使用wrapper.state()来获取状态对象。 我们使用state()方法从组件中检索state属性。在第二种方法中,我们再次使用props()来读取按钮上的disabled属性。
After the user has filled in the input field, There are two actions the user can take from here that we can write specs for:
在用户填写了输入字段之后,用户可以从此处执行以下两项操作,我们可以为它们编写规格:
- The user clears the input field 用户清除输入字段
- The user clicks the “Add item” button 用户单击“添加项目”按钮
清除输入字段 (Clearing the input field)
When the user clears the input field, we expect the button to become disabled again. We will build on our existing context for the describe “the user populates the input” by nesting our new describe inside of it:
当用户清除输入字段时,我们希望该按钮再次被禁用。 我们将通过在我们的现有上下文中嵌套新的describe来构建该描述的“用户填充输入”的现有上下文:
describe('and then clears the input', () => {
  beforeEach(() => {
    const input = wrapper.find('input').first();
    input.simulate('change', {
      target: { value: '' }
    })
  });
  it('should disable `button`', () => {
    const button = wrapper.find('button').first();
    expect(
      button.props().disabled
    ).toBe(true);
  });
});
We used beforeEach to simulate a change event again, this time setting value to a blank string.We’ll write one assertion: that the button is disabled again.When ever the field is empty the button should be disabled.
我们使用beforeEach再次模拟更改事件,这次将值设置为空白字符串。我们将写一个断言:再次禁用该按钮。无论何时该字段为空,都应禁用该按钮。
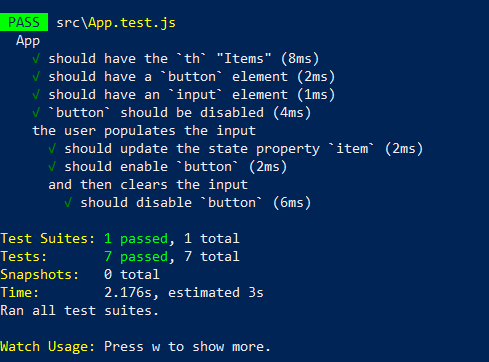
Now, we can verify that all our tests pass.
现在,我们可以验证所有测试都通过了。
Next, we’ll simulate the user submitting the form.
接下来,我们将模拟用户提交表单。
模拟表单提交 (Simulating a form submission)
After the user has submitted the form, We’ll assert that:
用户提交表单后,我们将断言:
1. The new item is in state (items)
1.新项目处于状态(项目)
2. The new item is inside the rendered table
2.新项目在渲染表中
3. The input field is empty
3.输入字段为空
4. The “Add item” button is disabled
4.“添加项目”按钮被禁用
So we’ll write our describe block inside “the user populates the input” as a sibling to “and then clears the input”:
因此,我们将“ describe”块写在“用户填充输入”作为“然后清除输入”的同级内容中:
describe('and then submits the form', () => {
      beforeEach(() => {
        const form = wrapper.find('form').first();
        form.simulate('submit', {
          preventDefault: () => {},
        });
      });
      it('should add the item to state', () => {      });
      it('should render the item in the table', () => {      });
      it('should clear the input field', () => {      });
      it('should disable `button`', () => {      });
    });
Our beforeEach will simulate a form submission. Recall that addItem expects an object that has a method preventDefault().We’ll simulate an event type of submit, passing in an object that has the shape that addItem expects. We will just set preventDefault to an empty function:
我们的beforeEach将模拟表单提交。 回想一下addItem期望一个带有preventDefault()方法的对象,我们将模拟一个事件类型的Submit,传入一个具有addItem期望形状的对象。 我们只是将preventDefault设置为一个空函数:
With our beforeEach() function in place, we first assert that the new item is in state:
有了beforeEach()函数,我们首先断言新项处于状态:
it('should add the item to state', () => {
  expect(
    wrapper.state().items
  ).toContain(item);
});
Jest comes with a few special matchers for working with arrays. We use the matcher toContain()to assert that the array items contains item.
Jest附带了一些用于处理数组的特殊匹配器。 我们使用匹配器toContain()断言数组项包含item。
Next, let’s assert that the item is inside the table.
接下来,让我们断言该项目在表内部。
it('should render the item in the table', () => {
  expect(
    wrapper.containsMatchingElement(
      <td>{item}</td>
    )
  ).toBe(true);
});
Next, we’ll assert that the input field has been cleared.
接下来,我们断言输入字段已清除。
it('should clear the input field', () => {
  const input = wrapper.find('input').first();
  expect(
    input.props().value
  ).toEqual('');
});
Finally, we’ll assert that the button is again disabled:
最后,我们断言该按钮再次被禁用:
it('should disable `button`', () => {
  const button = wrapper.find('button').first();
  expect(
    button.props().disabled
  ).toBe(true);
});
Finally, our app.test.js file should contain the following
最后,我们的app.test.js文件应包含以下内容
import App from './App';
import React from 'react';
import { shallow } from 'enzyme';
describe('App', () => {
  let wrapper;
  beforeEach(() => {
    wrapper = shallow(
      <App />
    );
  });
  it('should have the `th` "Items"', () => {
    expect(
      wrapper.contains(<th>Items</th>)
    ).toBe(true);
  });
  it('should have a `button` element', () => {
    expect(
      wrapper.containsMatchingElement(
        <button>Add item</button>
      )
    ).toBe(true);
  });
  it('should have an `input` element', () => {
    expect(
      wrapper.containsMatchingElement(
        <input />
      )
    ).toBe(true);
  });
  it('`button` should be disabled', () => {
    const button = wrapper.find('button').first();
    expect(
      button.props().disabled
    ).toBe(true);
  });
  describe('the user populates the input', () => {
    const item = 'Vancouver';
    beforeEach(() => {
      const input = wrapper.find('input').first();
      input.simulate('change', {
        target: { value: item }
      });
    });
    it('should update the state property `item`', () => {
      expect(
        wrapper.state().item
      ).toEqual(item);
    });
    it('should enable `button`', () => {
      const button = wrapper.find('button').first();
      expect(
        button.props().disabled
      ).toBe(false);
    });
    describe('and then clears the input', () => {
      beforeEach(() => {
        const input = wrapper.find('input').first();
        input.simulate('change', {
          target: { value: '' }
        })
      });
      it('should disable `button`', () => {
        const button = wrapper.find('button').first();
        expect(
          button.props().disabled
        ).toBe(true);
      });
    });
    describe('and then submits the form', () => {
      beforeEach(() => {
        const form = wrapper.find('form').first();
        form.simulate('submit', {
          preventDefault: () => {},
        });
      });
      it('should add the item to state', () => {
        expect(
          wrapper.state().items
        ).toContain(item);
      });
      it('should render the item in the table', () => {
        expect(
          wrapper.containsMatchingElement(
            <td>{item}</td>
          )
        ).toBe(true);
      });
      it('should clear the input field', () => {
        const input = wrapper.find('input').first();
        expect(
          input.props().value
        ).toEqual('');
      });
      it('should disable `button`', () => {
        const button = wrapper.find('button').first();
        expect(
          button.props().disabled
        ).toBe(true);
      });
    });
  });
});
Now, we can verify that all our tests pass.
现在,我们可以验证所有测试都通过了。
在寻找React Dashboard吗? (Looking for React Dashboard?)
Try our React Dashboard and create stunning web applications for unlimited client projects and personal projects.
试试我们的React Dashboard ,为无限的客户项目和个人项目创建出色的Web应用程序。
Start building web applications and products using our Free React Templates without any investment.
无需任何投资即可开始使用我们的免费React模板构建Web应用程序和产品。
结论 (Conclusion)
In total, so far we’ve learn how to organize our test code in a behavioural-driven manner, shallow rendering with Enzyme. How to use the shallow Wrapper methods for traversing the virtual DOM, how to use Jest matchers for writing different kinds of assertions (such as toContain() for arrays). Finally, we saw how we can use a behavioural-driven approach to drive the composition of a test suite in react using Jest and Enzyme test frameworks.
总的来说,到目前为止,我们已经学习了如何以行为驱动的方式组织测试代码,并使用Enzyme进行浅层渲染。 如何使用浅Wrapper方法遍历虚拟DOM,如何使用Jest匹配器编写不同类型的断言(例如,数组的toContain() )。 最后,我们看到了如何使用行为驱动的方法来驱动测试套件的组成,以使用Jest和Enzyme测试框架进行React。
react组件单元测试


 515
515


 被折叠的 条评论
为什么被折叠?
被折叠的 条评论
为什么被折叠?
 到【灌水乐园】发言


