


 本文展示了如何在React和D3中实现从HTML拖放到SVG的拖放功能。详细介绍了创建可拖动组件、保存拖动数据、SVG组件、删除拖动组件等步骤,以及在拖放过程中处理坐标转换和SVG绘制节点的操作。
When creating a topology builder (or any type of graph\layout that is based on a group of nodes that are drawn on one canvas), one of the most common operations will be to drag a node from a list of building blocks and drop it onto that canvas.
创建拓扑构建器(或基于在一个画布上绘制的一组节点的任何类型的graph \ layout)时,最常见的操作之一是将节点从构建块列表中拖放在那张画布上。
We can drop a node on to the canvas itself and it will be drawn based on the dropped [x,y] position, or we can drop it in a specific drop point, or even inside another node.
我们可以在画布上放置一个节点,然后根据放置的[x,y]位置对其进行绘制,也可以将其放置在特定的放置点,甚至放置在另一个节点内。
I have implemented such a system a few times in the past, and it always came to a point where I needed the building blocks (list of nodes that I drag into the canvas) to be regular HTML nodes and not SVG. The main reason was that I wanted them to be a part of the app framework and be able to interact with the app itself. For example, They are generated from some list I already have in my models, there are some more operations on the nodes (like settings\edit) or they need to behave like DOM behaves (for example, change of layout because of screen-size or listen to some DOM events), etc.
过去,我已经实现了这样的系统几次,总到了我需要将构建块(拖放到画布中的节点列表)作为常规HTML节点而不是SVG的地步。 主要原因是我希望它们成为应用程序框架的一部分,并能够与应用程序本身进行交互。 例如,它们是从模型中已经存在的一些列表中生成的,在节点上还有更多的操作(例如settings \ edit),或者它们需要表现得像DOM一样(例如,由于屏幕尺寸而导致的布局更改)或听一些DOM事件),等等。
Defining drag and drop relation in SVG is pretty straight forward, and defining drag and drop relation in HTML is pretty simple as well. However, combining the two is a bit tricky.
在SVG中定义拖放关系非常简单,在HTML中定义拖放关系也非常简单。 但是,将两者结合起来会有些棘手。
I will demonstrate how to implement this using React and D3, and I assume that you are somewhat familiar with them both.
我将演示如何使用React和D3来实现这一点,并且假定您对这两者都有些熟悉。
可拖动组件 (The Draggable component)
We will start by defining the Draggable component. The Draggable component can wrap any component and will add to it the drag and drop capabilities.
我们将从定义Draggable组件开始。 Draggable组件可以包装任何组件,并将添加拖放功能。
const Draggable = ({ children, dragObject, onDragStart, onDragEnd }) => {
  const onDragStarting = (e) => {
    // Get the block coordinates
    let currentTargetRect = e.currentTarget.getBoundingClientRect();
    // Find the offset of the mouse from those coordinates
    const offset = [
      e.clientX - currentTargetRect.left,
      e.clientY - currentTargetRect.top
    ];


    // Pass the drag data
    onDragStart({ dragObject, offset });
  };


  const onDragEnding = (e) => {
    e.stopPropagation();
    onDragEnd();
  };


  return (
    <div draggable={true} onDragStart={onDragStarting} onDragEnd={onDragEnding}>
      {children}
    </div>
  );
};
Each Draggable has a drag object. The drag object is the data that is related to the block we are wrapping. For example, if I create drag objects out of a list of employees (boring example, I know…) then the drag object will be the employee data. Based on this data we will draw the block. Let's say we draw a circle and inside it the employee’s name, and an icon representing the department she belongs to.
每个Draggable都有一个拖动对象。 拖动对象是与我们要包装的块相关的数据。 例如,如果我从员工列表中创建拖动对象(无聊的例子,我知道...),则拖动对象将是员工数据。 基于此数据,我们将绘制块。 假设我们绘制了一个圆圈,并在其中绘制了员工的名字,以及一个代表她所属部门的图标。
In our example, the drag object will have a name and a color.
在我们的示例中,拖动对象将具有名称和颜色。
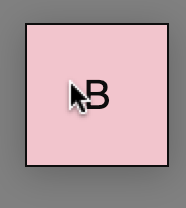
In addition to the drag object, we will also want to save the offset of the mouse cursor from the edge of the drag object. As seen from the screenshot, when you grab an object and start dragging it, the cursor is somewhere inside the dragged component. When we will drop it, we will want to have the coordinates of the top\left corner of the dragged object. However, the drag events always relate to the mouse location and not to the drag object location. We will calculate this offset and use it later to calculate the correct drop point.
除了拖动对象之外,我们还将要保存鼠标光标与拖动对象边缘的偏移量。 从屏幕截图中可以看到,当您抓取一个对象并开始拖动它时,光标就在被拖动的组件内。 当我们将其放下时,我们将希望具有所拖动对象的上\左角的坐标。 但是,拖动事件始终与鼠标位置有关,而与拖动对象位置无关。 我们将计算此偏移量,并在以后使用它来计算正确的下降点。
To calculate the offset we will first use getBoundingClientRect from the current target. We will simply reduce the left from the event current X position - e.clientX and the top from the current Y position - e.clientY.
要计算偏移量,我们将首先使用当前目标的getBoundingClientRect 。 我们将简单地从事件当前X位置-e.clientX减少左边,并从当前Y位置-e.clientY减少顶端 。
Please note that if you have margins on that block you will need to reduce the margin size from the calculation (e.g. e.clientX-currentTargetRect.left-5)
请注意,如果该块上有边距,则需要从计算中减小边距大小(例如e.clientX-currentTargetRect.left-5 )
For the drag wrapper we will define two event handlers:
对于拖动包装,我们将定义两个事件处理程序:
onDragStart:
onDragStart:
Runs when we start the drag operations. In this callback, we want to save our drag data. We will later use this drag data when dropping the node so we can draw it properly. The drag data will consist of the drag object and the offset that we described above. The data will be saved by our passed handler onDragStart which we call at the end of the method.
当我们开始拖动操作时运行。 在此回调中,我们要保存拖动数据。 稍后我们将在拖放节点时使用此拖动数据,以便我们可以正确地绘制它。 拖动数据将由我们上面描述的拖动对象和偏移量组成。 数据将由我们在方法末尾调用的onDragStart处理程序保存。
onDragEnd:
onDragEnd:
In this callback, we will simply disable propagation to enable drop. We will also call the caller’s callback for onDragEnd.
在此回调中,我们将仅禁用传播以启用丢弃。 我们还将调用onDragEnd的调用者的回调。
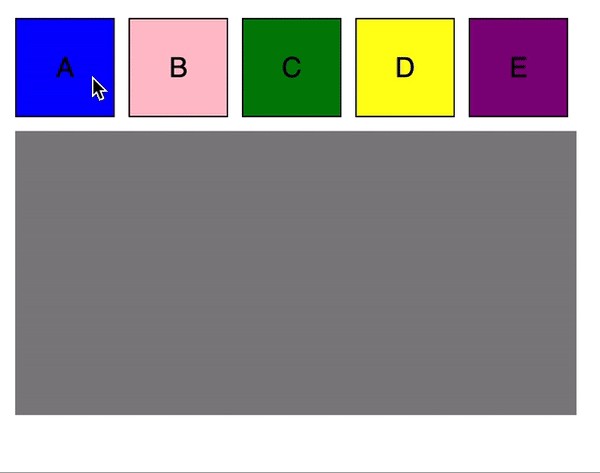
可拖动的块 (The Draggable blocks)
We will define a list of blocks that we want to drag and use the Draggable wrapper for each of them. We will give each block color and text (e.g. the drag object):
我们将定义一个要拖动的块列表,并为每个块使用Draggable包装器。 我们将为每个块提供颜色和文本(例如拖动对象):
const blocks = [
  { name: "A", color: "blue" },
  { name: "B", color: "pink" },
  { name: "C", color: "green" },
  { name: "D", color: "yellow" },
  { name: "E", color: "purple" }
];


const DraggableBlocks = ({ setDragData }) => {
  const onDragStart = (dragData) => {
    setDragData(dragData);
  };


  const onDragEnd = () => {};


  return (
    <div className="dragging-blocks">
      {blocks.map((b) => (
        <Draggable
          key={b.name}
          dragObject={b}
          onDragStart={(dragData) => onDragStart(dragData)}
          onDragEnd={() => onDragEnd()}
        >
          <div className="block" style={{ backgroundColor: b.color }}>
            {b.name}
          </div>
        </Draggable>
      ))}
    </div>
  );
};
As you can see the DraggableBlocks are simply a list of draggable components. We use a list of blocks data and iterate on them in order to render it. Each draggable maps to one draggable object from the data list.
如您所见,DraggableBlocks只是可拖动组件的列表。 我们使用块数据列表并对其进行迭代以进行渲染。 每个可拖动对象都映射到数据列表中的一个可拖动对象。
Please note that on a real system, this data list will probably come from an API or configuration.
请注意,在实际系统上,此数据列表可能来自API或配置。
Our callback for onDragStart will just call the setDragObject callback that we got. This callback will make sure to save the drag object so we can use it later when dropping.
我们对onDragStart的回调将只调用我们得到的setDragObject回调。 此回调将确保保存拖动对象,以便我们稍后在放置时可以使用它。
保存拖动数据 (Saving the drag data)
On a real system, we will probably use some models to save our data. It can be Mobx, Redux, or any other model of your choice.
在真实的系统上,我们可能会使用一些模型来保存数据。 它可以是Mobx,Redux或您选择的任何其他模型。
For the sake of this example, I will simplify things by saving it directly on the App.js state. I will “bubble” it up the components tree using the appropriate callback and eventually will save it on the main app component.
为了这个示例,我将通过直接将其保存在App.js状态来简化事情。 我将使用适当的回调将其“冒泡”到组件树中,并最终将其保存在主应用程序组件中。
The drag data will be then passed to the SVG container so it can get the correct drop information when a dragged component is dropped in the SVG container.
然后将拖动数据传递到SVG容器,以便在将拖动的组件放置在SVG容器中时可以获取正确的放置信息。
The App.js component looks like this:
App.js组件如下所示:
const App = () => {
  const [draggedData, setDragData] = useState(null);
  return (
    <div className="App">
      <DraggableBlocks setDragData={(dragData) => setDragData(dragData)} />
      <SVGArea draggedData={draggedData} />
    </div>
  );
};
SVG组件 (The SVG Component)
Now let’s add our SVG container. We will later want to be able to drop those blocks inside the SVG container and let the SVG draw the blocks exactly where it was dropped.
现在,让我们添加我们的SVG容器。 稍后,我们将希望能够将这些块拖放到SVG容器中,并让SVG精确地将其绘制到放置块的位置。
const SVGArea = ({ draggedData }) => {
  const onDragOver = (e) => {
    e.preventDefault();
    d3.select("svg").classed("drag-over", true);
  };


  const onDragLeave = () => {
    d3.select("svg").classed("drag-over", false);
  };
  const onDrop = (e) => {
    e.stopPropagation();
    d3.select("svg").classed("drag-over", false);


    return false;
  };


  return (
    <div
      className="svgContainer"
      onDrop={(e) => onDrop(e)}
      onDragLeave={(e) => onDragLeave(e)}
      onDragOver={(e) => onDragOver(e)}
    >
      <svg></svg>
    </div>
  );
};
The SVG is our drop area. We will define some drop callbacks to handle the drag and drop operation. Currently, we will add\remove a “drag-over” class on the SVG container when a dragged object is dragged over the SVG (onDragOver) and will remove it when the block exits the SVG container (onDragLeave) or when its dropped (onDrop).
SVG是我们的放置区域。 我们将定义一些放置回调来处理拖放操作。 当前,当将拖动的对象拖到SVG上时(onDragOver),我们将在SVG容器上添加\删除“拖放”类,并在块退出SVG容器(onDragLeave)或将其放下(onDrop)时将其删除。 )。
In this example, this class will add\remove a dashed red border to the SVG container. Usually, this is used to give the user some feedback on the validity of the drop point. It can be by the border color, by container color, or even by adding some text saying “Drop Here”.
在此示例中,此类将在SVG容器中添加\删除红色的虚线边框。 通常,这用于为用户提供有关落点有效性的一些反馈。 可以是边框颜色,容器颜色,甚至可以添加一些文字“ Drop Here”。

删除拖动的组件 (Dropping the dragged component)
In order to implement the “drop” we will need to first get the drag data, calculate its new location and then add it to the nodes list. Later I will show how we will take this node list and draw it.
为了实现“放置”,我们将需要首先获取拖动数据,计算其新位置,然后将其添加到节点列表中。 稍后,我将展示如何获取该节点列表并绘制它。
Let's look at onDrop:
让我们看一下onDrop:
const nodes = [];


/**
 * Convert DOM coordinates to SVG coordinates based on SVG offset and zoom level
 */
const convertCoordinatesDOMtoSVG = (svg, x, y) => {
  const pt = svg.node().createSVGPoint();


  pt.x = x;
  pt.y = y;
  return pt.matrixTransform(svg.node().getScreenCTM().inverse());
};


const SVGArea = ({ draggedData }) => {
  // ...

  const onDrop = (e) => {
    e.stopPropagation();
    d3.select("svg").classed("drag-over", false);


    // Get the correct coordinates for this node
    const { x, y } = convertCoordinatesDOMtoSVG(
      d3.select("svg"),
      e.clientX - draggedData.offset[0],
      e.clientY - draggedData.offset[1]
    );


    // Add the node to the list of nodes.
    nodes.push({
      id: nodes.length + 1,
      name: draggedData.dragObject.name,
      color: draggedData.dragObject.color,
      x,
      y
    });


    // Redraw the nodes
    SVGDrawer.draw(nodes);


    return false;
  };


  // ...
};
The onDrop callback first calculates the new drop point on the SVG. It uses a helper method to convert the DOM coordinates that we get from the event to SVG coordinates. The reason that we need this is that the SVG has a different coordinate system then the DOM. Moreover, SVGs can be zoomed in and out (I didn't implement it in this example, but its usually an ability that we will want to add to our drawing), and can be “scrolled” — moved from side to side in a drag-like method of the canvas itself.
onDrop回调首先计算SVG上的新放置点。 它使用辅助方法将事件中获得的DOM坐标转换为SVG坐标。 我们之所以需要这样做,是因为SVG与DOM具有不同的坐标系。 此外,SVG可以放大和缩小(在此示例中我没有实现,但通常是我们想要添加到图形中的功能),并且可以“滚动” —在SVG中左右移动画布本身的类似拖动的方法。
I will not elaborate more on convertCoordinatesDOMtoSVG, I will just add that if we have a container inside our SVG that its the scrollable\zoomable container, we will need to change
我将不再详细介绍convertCoordinatesDOMtoSVG,我只是补充说,如果我们在SVG中有一个容器,即它的scrollable \ zoomable容器,则需要进行更改
return pt.matrixTransform(svg.node().getScreenCTM().inverse());to
至
return pt.matrixTransform(container.node().getScreenCTM().inverse());The second thing that onDrop will do is add the new node’s information to the list of nodes, including a generated id (on a real app we will probably use some utility to create a unique UUID), the drag data, and the new location we just calculated.
onDrop要做的第二件事是将新节点的信息添加到节点列表中,包括生成的ID(在实际应用中,我们可能会使用某些实用程序来创建唯一的UUID),拖动数据以及新位置刚刚计算。
What is the list of nodes?
节点列表是什么?
The list of nodes is just an array containing all the nodes we have dropped in the SVG container.
节点列表只是一个数组,其中包含我们放入SVG容器中的所有节点。
On a real app we will probably get some initial list of nodes from an API and have some initial drawing of the nodes, and dragging new nodes will only be for expanding this graph\diagram.
在实际的应用程序中,我们可能会从API获得一些节点的初始列表,并具有一些节点的初始图,而拖动新节点仅是为了扩展此图\图。
Now that we have all the right information about the nodes, we can draw them. In order to draw the nodes on the SVG, I am using another class called SVGDrawer.
现在我们掌握了有关节点的所有正确信息,我们可以绘制它们。 为了在SVG上绘制节点,我使用了另一个名为SVGDrawer的类。
SVGDrawer.draw(nodes)I call this method every time a node is dropped. Also, you will see in the full example, that I will also call it on initial load to draw the nodes I already have in the list — those that in theory I will get from an API.
每次删除节点时,我都会调用此方法。 另外,您将在完整的示例中看到,我还将在初始加载时调用它以绘制列表中已经存在的节点-从理论上讲我将从API中获得的那些节点。
绘制节点: (Drawing the nodes:)
Drawing the nodes is performed using d3. Once we have the coordinates, there is nothing special to do here.
使用d3绘制节点。 一旦有了坐标,就没有什么特别的事情了。
Here is the SVG drawer:
这是SVG抽屉:
/**
 * Draw the nodes.
 * Each time this is called we only draw the added nodes since we are using "enter" only
 */
class SVGDrawer {
  static draw (nodes) {
    d3.select("svg")
      .selectAll(".node")
      .data(nodes, (d) => d.id)
      .join((enter) => {
        // Draw a group node that will contain the squre and the text
        const node = enter
          .append("g")
          .attr("class", "node")
          .attr("transform", (d) => "translate(" + d.x + "," + d.y + ")");

        // Append the squre
        node
          .append("rect")
          .attr("x", 0)
          .attr("y", 0)
          .attr("width", 72)
          .attr("height", 72)
          .attr("fill", (d) => d.color);

        // Append the text
        node
          .append("text")
          .attr("x", 36)
          .attr("y", 36)
          .attr("width", 72)
          .attr("dominant-baseline", "middle")
          .attr("text-anchor", "middle")
          .text((d) => d.name);
      });
  }
}
Please notice the use of ‘enter’ here. When using “join”, the first argument is a callback for ‘enter’ which means all the new nodes matching the criteria (selection + data), the second is ‘update’ and the third is ‘exist’ — delete.
请注意此处使用“输入”。 当使用“ join”时,第一个参数是“ enter”的回调,这意味着所有符合条件(选择+数据)的新节点,第二个是“ update”,第三个是“ exist”(删除)。
When we use enter only, it means that this code will only run on new nodes, meaning it will not re-draw nodes that were already in the list and were drawn before. Let's say I already dropped 10 nodes in the container, and I now add another one. The ‘enter’ will only run on that new added one and will not redraw the first 10 nodes.
当我们仅使用enter时,这意味着该代码将仅在新节点上运行,这意味着它将不会重新绘制列表中已经绘制过的节点。 假设我已经在容器中删除了10个节点,现在又添加了一个。 “输入”将仅在该新添加的节点上运行,并且不会重绘前10个节点。
So this is the final version of SVGArea:
这是SVGArea的最终版本:
const nodes = [];


/**
 * Convert DOM coordinates to SVG coordinates based on SVG offset and zoom level
 */
const convertCoordinatesDOMtoSVG = (svg, x, y) => {
  const pt = svg.node().createSVGPoint();


  pt.x = x;
  pt.y = y;
  return pt.matrixTransform(svg.node().getScreenCTM().inverse());
};


const SVGArea = ({ draggedData }) => {
  useEffect(() => {
    SVGDrawer.draw(nodes);
  }, []);


  const onDragOver = (e) => {
    e.preventDefault();
    d3.select("svg").classed("drag-over", true);
  };


  const onDragLeave = () => {
    d3.select("svg").classed("drag-over", false);
  };


  const onDrop = (e) => {
    e.stopPropagation();
    d3.select("svg").classed("drag-over", false);


    // Get the correct coordinates for this node
    const { x, y } = convertCoordinatesDOMtoSVG(
      d3.select("svg"),
      e.clientX - draggedData.offset[0],
      e.clientY - draggedData.offset[1]
    );


    // Add the node to the list of nodes.
    nodes.push({
      id: nodes.length + 1,
      name: draggedData.dragObject.name,
      color: draggedData.dragObject.color,
      x,
      y
    });


    // Redraw the nodes
    SVGDrawer.draw(nodes);


    return false;
  };


  return (
    <div
      className="svgContainer"
      onDrop={(e) => onDrop(e)}
      onDragLeave={(e) => onDragLeave(e)}
      onDragOver={(e) => onDragOver(e)}
    >
      <svg></svg>
    </div>
  );
};
You can see here that we simply put a <svg> tag, and all the drawing is done in the SVGDrawer class. Notice that I call draw method from two places: onDrop and on initial load (useEffect with [] as the second argument).
您可以在这里看到我们只放置了一个<svg>标记,所有绘制都在SVGDrawer类中完成。 注意,我从两个地方调用了draw方法:onDrop和初始加载时(使用[Effect和[]作为第二个参数])。
全做完了! (All done!)
At this point, we have a working example. We can drag a node, and drop it. The dropped node will be drawn exactly where it was dropped.
至此,我们有了一个可行的例子。 我们可以拖放一个节点。 放置的节点将精确地绘制在放置的位置。
下一步是什么? (What’s next?)
In addition to simply adding a node on a canvas, sometimes we will want to snap that dropped node into a grid or allow dropping this node inside of an existing node, or only allow dropping in a specific area\s.
除了在画布上简单地添加一个节点外,有时我们还想将已删除的节点捕捉到网格中,或者允许将该节点拖放到现有节点内,或者只允许在特定区域内拖放。
So how can we detect that we are dragging a node over another node? How can we set only specific drop points?
那么,如何检测到我们正在将一个节点拖到另一个节点上呢? 我们如何仅设置特定的放置点?
I will try to cover those scenarios in my next post.
我将在下一篇文章中尝试介绍这些场景。
You can find the complete code in my Github repo here, or CodeSandBox:
你可以在我的Github上的完整代码回购这里 ,或CodeSandBox:
翻译自: https://medium.com/@kinneretzin/how-to-implement-drag-and-drop-from-react-to-svg-d3-16700f01470c


 969
969

 被折叠的 条评论
为什么被折叠?
被折叠的 条评论
为什么被折叠?
 到【灌水乐园】发言


