


Last week I wrote an article about adding an auto-generated admin panel to koa framework. I used AdminBro and asked you to “star” the GitHub repo to motivate the team behind this amazing project.
上周,我写了一篇文章, 向koa framework添加自动生成的管理面板 。 我使用了AdminBro,并要求您对GitHub存储库 “ 加注星标”,以激励该惊人项目背后的团队。
Apparently it worked because yesterday they released a long-awaited Feature to upload files: @admin-bro/upload.
显然它起作用了,因为昨天他们发布了期待已久的功能来上传文件: @ admin-bro / upload 。
我们将建造什么? (What will we build?)
Uploading files is always a pain in the code, especially when you build this feature for normal folks, or in other words “those for whom a POST endpoint is not enough”. These strange people must of course have some kind of pretty UI, and it has to be responsive.
上载文件始终是代码中的一个难题,尤其是当您为普通用户构建此功能时,换句话说就是“那些POST端点不足的人”。 这些陌生人当然必须具有某种漂亮的UI,并且必须具有响应能力。
Ahh — and the solution should be scalable (storage separated from the server) and best cloud-based, obviously.
嗯-显然,该解决方案应该是可扩展的(与服务器分离的存储),并且最好是基于云的。
All the above is handled by AdminBro right now with the help of @admin-bro/upload feature. So, in this extremely short tutorial, I will guide you on how to create a file upload interface for your Node.js app.
以上所有内容现在都由AdminBro借助@admin-bro/upload功能进行处理。 因此,在这个非常简短的教程中,我将指导您如何为Node.js应用程序创建文件上传界面。
但是从简单的事情开始 (But start with something simple)
We will do this in steps. First, let’s upload files locally and then migrate to AWS S3. In the last article I showed you how to build a full-featured admin panel with Koa — so let’s use it as a starting point. These are the 58 lines of code.
我们将分步进行。 首先,让我们在本地上传文件,然后迁移到AWS S3 。 在上一篇文章中,我向您展示了如何使用Koa构建功能全面的管理面板-因此,以它为起点。 这是58行代码 。
初始化项目 (Initialize the project)
(if you’re working on the project from the previous article, you can simply skip this step).
(如果您正在处理上一篇文章中的项目,则只需跳过此步骤)。
Start by initialising the project and installing all the needed dependencies.
首先初始化项目并安装所有需要的依赖项。
mkdir file-upload
cd file-upload
yarn inityarn add admin-bro @admin-bro/mongoose mongoose @admin-bro/koa koa @koa/router koa2-formidable @admin-bro/passwords argon2
Ok — there are many dependencies, but remember that this is a full-featured admin panel with CRUD, user management, sign in and password hashing (in 58 lines of code).
好的-有很多依赖性,但是请记住,这是一个功能全面的管理面板,带有CRUD,用户管理,登录和密码哈希(使用58行代码 )。
Next, paste the code to index.js:
接下来,将代码粘贴到index.js :
And make sure you have MongoDB installed because we use mongoose.
并确保您已安装MongoDB,因为我们使用mongoose 。
You can launch the app to see how it works:
您可以启动该应用程序以查看其工作方式:
node index.js# or if you want to reload on every change:
#或者如果您想在每次更改时重新加载:
yarn global add nodemon
nodemon index.js
After running the app you will see the login screen. If you are working on the database from the previous article, these are the credentials:
运行该应用程序后,您将看到登录屏幕。 如果您正在使用上一篇文章中的数据库,则这些是凭据:
admin@example.com:password.
admin@example.com:密码。
If you started from scratch, add this on the top of the run function:
如果从头开始,请将其添加到运行功能的顶部:
And re-run the app to create the first user.
并重新运行该应用程序以创建第一个用户。
将文件上传到本地文件夹 (Upload files to a local folder)
This is where we start. To make things easy in the beginning, let’s upload files locally.
这是我们的起点。 为了使事情从一开始就容易一点,让我们在本地上传文件。
Install @admin-bro/upload feature:
安装@ admin-bro / upload功能:
yarn add @admin-bro/uploadNext, you have to create the folder where you will store uploaded files (for now). Name it `uploads`
接下来,您必须创建一个文件夹,用于存储上传的文件(目前)。 将其命名为“上载”
mkdir uploadsNow we are ready to add this feature.
现在我们准备添加此功能。
Start by extending the collection with the fields where we will store all the file data. Since we are using MongoDB let’s nest all the properties under one schema and pass them together to the User object under the `uploadedFile` key:
首先使用将存储所有文件数据的字段扩展集合。 因为我们使用的是MongoDB,所以让我们将所有属性嵌套在一个模式下,然后将它们一起传递给`uploadedFile`键下的User对象:
const UploadedFile = new mongoose.Schema({
  path: String,
  type: String,
  size: Number,
  folder: String,
  filename: String
})


const User = mongoose.model('User', {
  email: { type: String, required: true },
  encryptedPassword: { type: String, required: true },
  uploadedFile: UploadedFile
});
I will explain all the fields in a second but let’s map them to @admin-bro/uploadfeature first:
我将在稍后解释所有字段,但首先将它们映射到@admin-bro/upload功能:
const adminBro = new AdminBro({
    resources: [{
      resource: User,
      options: {
        properties: { encryptedPassword: { isVisible: false } },
      },
      features: [
        passwordFeature(/** **/),
        uploadFeature({
          provider: { local: { bucket: 'uploads'}},
          properties: {
            key: 'uploadedFile.path',
            bucket: 'uploadedFile.folder',
            mimeType: 'uploadedFile.type',
            size: 'uploadedFile.size',
            filename: 'uploadedFile.filename',
            file: 'uploadFile',
          }
        })
      ]
    }],
    rootPath: '/admin',
  })
Now comes the explanation:
现在来解释一下:
Let’s start with the bucket — this is a general name describing the folder in which files will be stored. In our case we tell
@admin-bro/uploadto store the folder in the `folder` property of `uploadedFile` schema. We use mongoose dot notation. Mapping bucket is optional, but if you won’t store it, you will have problems after changing it in the future.让我们从存储桶开始-这是一个通用名称,描述了将在其中存储文件的文件夹。 在我们的例子中,我们告诉
@admin-bro/upload将文件夹存储在`uploadedFile`模式的`folder`属性中。 我们使用猫鼬点表示法。 映射存储桶是可选的,但是如果您不存储它,将来在更改它后将会遇到问题。Mapping key is required. It symbolizes the relative path of the file inside the bucket. In our case it will be `uploadedFile.path`
必须提供映射键 。 它象征着存储桶中文件的相对路径。 在我们的例子中,它将是“ uploadedFile.path”
Next, we have `mimeType`, `size`, and `filename` — all of them are self explanatory. But `mimeType`is quite important because if you don’t have it, you won’t see previews.
接下来,我们有`mime类型 `,`` 大小和`` 名 -所有的人都言自明。 但是`mimeType`非常重要,因为如果您没有它,就不会看到预览。
And finally, we have the file. This is where DropZone will be attached. It is a virtual field so we don’t need to have it in the database as a property.
最后,我们有file 。 这是DropZone的附加位置。 这是一个虚拟字段,因此我们不需要将它作为属性包含在数据库中。
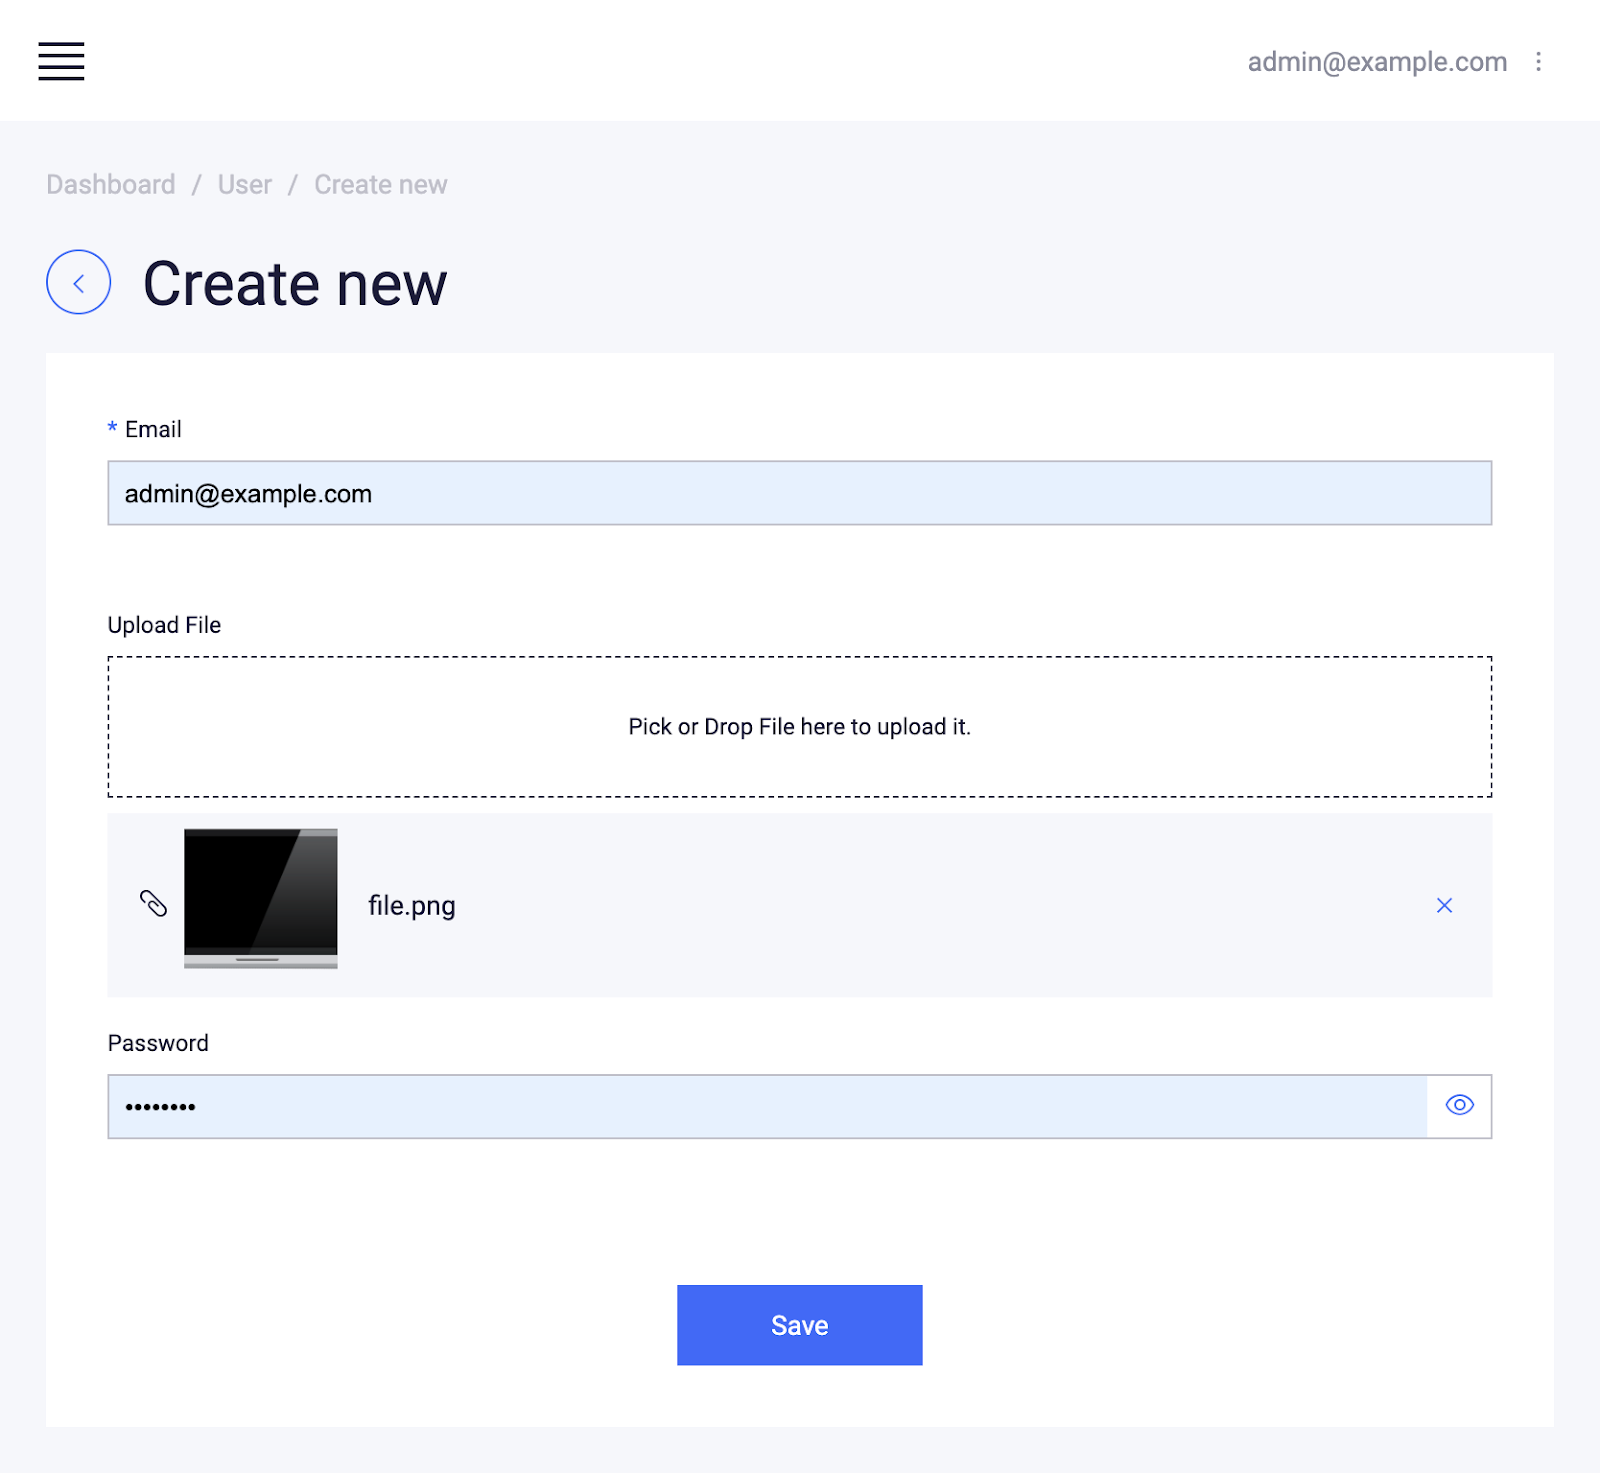
Ok, now let’s run the app and try to create the User. This is what you will see:
好的,现在让我们运行应用程序并尝试创建用户。 这是您将看到的:
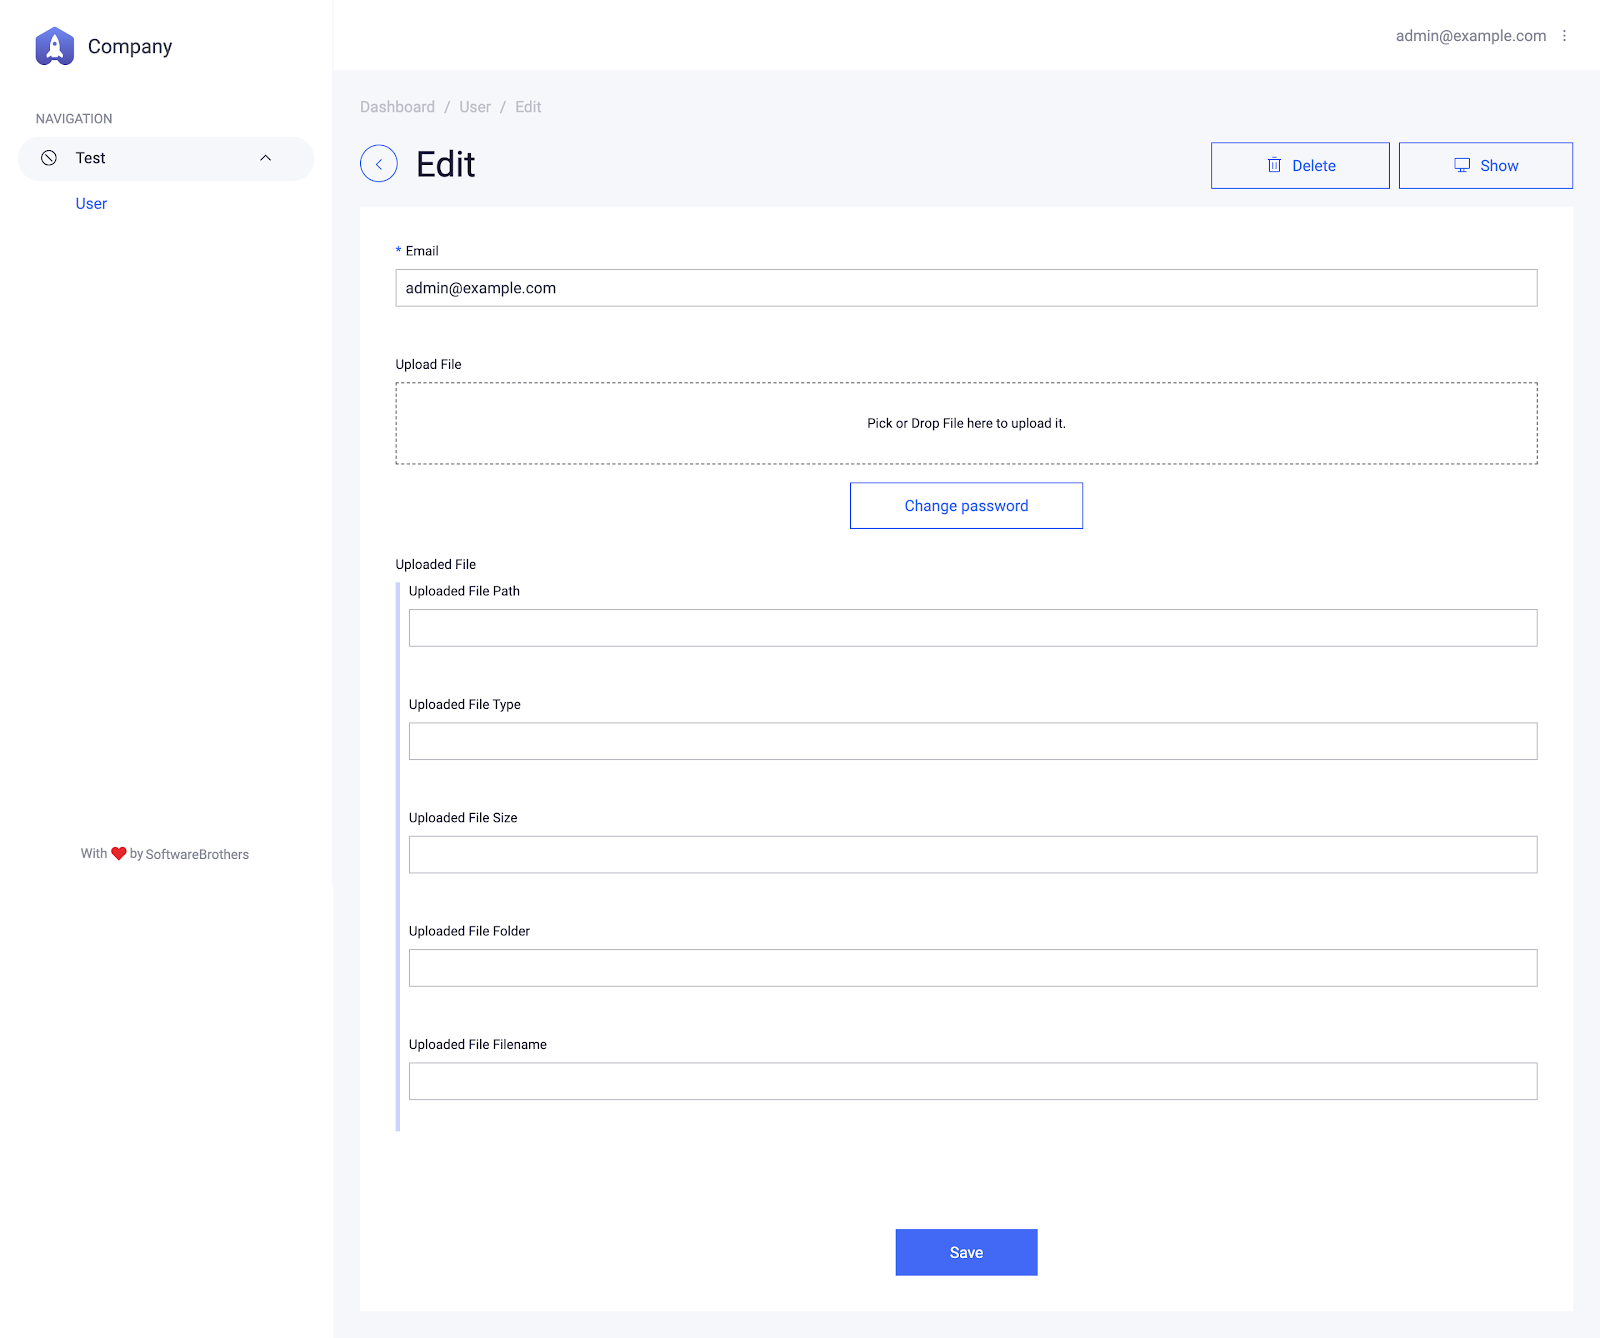
I think we can hide all these “storage” columns to make it more user friendly.
我认为我们可以隐藏所有这些“存储”列以使其更加用户友好。
Let’s add uploadFile: { isVisible: false } to properties. The same as we did previously with encryptedPassword.
让我们在属性中添加uploadFile: { isVisible: false } 。 与我们之前使用encryptedPassword所做的相同。
And this is it. Here is a screenshot with the dropped file:
就是这样。 这是删除文件的屏幕截图:
But don’t upload it yet — there is one more thing. We have to serve all the files from ‘uploads’ so users will see them. We can do this with:
但请不要上传-还有一件事。 我们必须提供“上传”中的所有文件,以便用户看到它们。 我们可以这样做:
koa-static: https://github.com/koajs/static
koa-static: https : //github.com/koajs/static
along with koa-mount: https://github.com/koajs/mount
连同koa-mount: https : //github.com/koajs/mount
Install them first:
首先安装它们:
yarn add koa-static koa-mountAnd initialise them just below the Koa instance creation.
然后在Koa实例创建下面对其进行初始化。
const serve = require(‘koa-static’)
const mount = require(‘koa-mount’)
//…
const app = new Koa()
app.use(mount(‘/uploads’, serve(‘uploads’)))
Explanation: we tell koa to serve all files inside uploads folder under /uploads path — makes sense?
说明:我们告诉koa在/uploads路径下的uploads文件夹中提供所有文件,这有意义吗?
And NOW you can play with it. Create, delete and update the uploaded files as you like.
现在,您可以使用它。 根据需要创建,删除和更新上传的文件。
迁移到云 (Migrate to the cloud)
Local file store could be ok for testing or working on the localhost, but in the real world application, Cloud Storage is much better. Mostly because it doesn’t bound you to one server, meaning you can spawn as many HTTP servers as you like. Plus it has a bunch of other advantages like CDN, speed, backup…
本地文件存储可以用于测试或在localhost上运行,但在实际应用程序中,Cloud Storage更好。 主要是因为它没有将您绑定到一台服务器,这意味着您可以生成任意数量的HTTP服务器。 此外,它还有很多其他优点,例如CDN,速度,备份...
Fortunately, the team of maintainers from AdminBro added AWS.S3 support to @admin-bro/upload out of the box. But you will need to have AWS credentials (region and keys) and the S3 bucket name in order to use it.
幸运的是,来自AdminBro的维护人员团队立即将@@@@@@@@@@@支持的AWS.S3添加到@admin-bro/upload中。 但是,您将需要具有AWS凭证(区域和密钥)和S3存储桶名称才能使用它。
I don’t want to paste screenshots with the steps showing how to sign up to AWS and get them, because someone already did that.
我不想在屏幕截图中粘贴显示如何注册和获取AWS的步骤的步骤, 因为有人已经这样做了 。
Once you have them, you must store them securely. It will be best to use dotenv.
拥有它们之后,必须安全地存储它们。 最好使用dotenv 。
Create .env file with the following content:
创建具有以下内容的.env文件:
AWS_ACCESS_KEY_ID=YOUR_YOUR_ACCESS_KEY
AWS_SECRET_ACCESS_KEY=YOUR_AWS_SECRET_ACCESS_KEY
AWS_BUCKET=YOUR_BUCKET_NAME
AWS_REGION=YOUR_REGION
Of course, change YOUR_…. To data from AWS.
当然,请更改您的_…。 来自AWS的数据。
If you want to push your app code to the git repository, make sure that .env file is in .gitignore so no one will access it.
如果要将应用程序代码推送到git存储库,请确保.env文件位于.gitignore以便没人能访问它。
install dotenv and aws-sdk, which is required when you use AWS Adapter in @admin-bro/upload
安装dotenv和aws-sdk ,这是在@admin-bro/upload使用AWS Adapter时必需的
yarn add dotenv aws-sdkAnd set it up on the top of the app. It will move all the variables to process.env.
并将其设置在应用程序的顶部。 它将所有变量移至process.env 。
// index.js, first line
1. require(‘dotenv’).config()
2. // rest of the code
And now change the uploadFeature():
现在更改uploadFeature():
uploadFeature({
  provider: { aws: {
    bucket: process.env.AWS_BUCKET,
    accessKeyId: process.env.AWS_ACCESS_KEY,
    secretAccessKey: process.env.AWS_SECRET_ACCESS_KEY,
    region: process.env.AWS_REGION,
    expires: 10,
  }},
  properties: {
    key: 'uploadedFile.path',
    bucket: 'uploadedFile.folder',
    mimeType: 'uploadedFile.type',
    size: 'uploadedFile.size',
    filename: 'uploadedFile.filename',
    file: 'uploadFile',
  }
});
Note the extra expires property. It indicates that files will be valid to read just 10 minutes. You can skip this, but you have to be sure that your bucket is public.
请注意额外的expires属性。 它表示文件仅读取10分钟即有效。 您可以跳过此步骤,但必须确保您的存储桶是公共的。
And this is it. Now run the server, upload files and see how they appear in your AWS Console. But bare in mind that files uploaded locally won’t work anymore.
就是这样。 现在运行服务器,上传文件,然后查看它们在AWS控制台中的显示方式。 但请记住,本地上传的文件将不再起作用。
The last thing you need to do is to remove static hosting (koa-mount and koa-serve), because it is not needed anymore.
您需要做的最后一件事是删除静态托管( koa-mount和koa-serve ),因为不再需要它。
还有更多 (There is more)
I wanted this tutorial to be super simple to follow, and short. But there are more topics regarding @admin-bro/uploads which are worth mentioning. First of all, it allows you to validate the uploaded data: you can restrict the allowed mime types and the maximum file size.
我希望本教程超级简单,而且简短。 但是还有更多有关@admin-bro/uploads话题值得一提。 首先,它允许您验证上传的数据 :您可以限制允许的mime类型和最大文件大小 。
Next, you can pass any provider you want, in case you want to upload files to let’s say Google. It is a temporary solution because I bet that it will be in the core soon — but still, it’s possible to do that..
接下来,如果您想上传文件,例如Google,则可以传递任何所需的提供程序 。 这是一个临时解决方案,因为我敢打赌它将很快成为核心,但仍然可以这样做。
接下来是什么 (What is next)
I am super excited about the AdminBro project, and I believe that:
我对AdminBro项目感到非常兴奋,并且我相信:
- the more stars it has, 它拥有的星星越多
- the more popular it will be, 越受欢迎
- the more features are created, 创建的功能越多,
- the harder SoftwareBrothers will work to make it even more awesome. 较难的软件兄弟会努力使它变得更强大。
Next time I will cover another AdminBro topic (maybe they will release some new features during this week ;).
下一次,我将讨论另一个AdminBro主题(也许他们将在本周发布一些新功能;)。
Code of the entire app is available here (now it has 97lines).
翻译自: https://itnext.io/the-easiest-and-fastest-way-to-upload-files-in-node-js-4b49e0123190


 260
260

 被折叠的 条评论
为什么被折叠?
被折叠的 条评论
为什么被折叠?
 到【灌水乐园】发言


