


mac 人脸识别sdk
It is just frustrating for me to type my lengthy password every time I open the lid of my mac. My phone and Ipad has Face ID, why not Mac?
每次打开Mac机盖时,键入冗长的密码对我来说都是一件令人沮丧的事情。 我的手机和Ipad具有人脸ID,为什么没有Mac?
Whenever I have a guest/cousin at my house and if I have to show them something on my Mac, it just feels weird to type my password fast, so that they can’t make out what I am typing. We all have been there in similar situations, haven’t we?.
每当我在家里有客人/表哥时,如果必须在Mac上给他们看一些东西,快速输入密码就很奇怪,这样他们就看不清我在输入什么。 我们所有人都曾在类似的情况下到过那里,不是吗?
Here’s the link to my funny YouTube video demonstrating the final outcome.
让我们解决这个问题 (Let’s solve this problem)
You will need several things to get started:-
您将需要几件事来开始:-
Python 3 and sleep watcher for mac. Also, make sure you have pip functioning properly so you can install required libraries.
适用于Mac的Python 3和Sleep Watcher 。 另外,请确保您的pip功能正常,以便可以安装所需的库。
收集影像 (Collecting Images)
import cv2
import pickle
import os
import time
import pathlib
directory = pathlib.Path(__file__).parent.absolute()
face = cv2.CascadeClassifier(f'{directory}/haarcascade_frontalface_alt2.xml')


img_dir = "Images/"
name = input('enter you name:          ')
label = name


font = cv2.FONT_HERSHEY_PLAIN
video = cv2.VideoCapture(0)


if os.path.isdir(f'{directory}/Images/{label}'):
    print("already exists")
else:
    os.mkdir(f'{directory}/Images/{label}')
    a = 1
    while(True):
        if a <= 20:
            ret,frame = video.read()
            gray = cv2.cvtColor(frame,cv2.COLOR_BGR2GRAY)
            faces = face.detectMultiScale(gray,scaleFactor = 1.5,minNeighbors = 5)


            for (x,y,w,h) in (faces):
                if (x,y,w,h) != (0,0,0,0) and a <= 20:
                    cv2.imwrite(f'{directory}/Images/{label}/{a}.jpg',frame)
                    cv2.imshow('face',frame)
                    a += 1
                    time.sleep(0.5)
                else:
                    break
        else:
            time.sleep(1)
            break


    print("done")
First, we need to collect images to train our model.
首先,我们需要收集图像来训练我们的模型。
We start by importing cv2, which allows us to work with images and do many things with it. pickle allows us to convert a python object into a byte stream to be stored as a file (we don’t need it here right now). os allows us to find and check for files and folders in this code. Time allows us to pause the script so we can collect images easily. pathlib allows us to get the path to the directory where all the files are. We then load the haar_cascade to detect faces. The following while loop checks if there is any face in the image or not and collects the images with faces and stores them in a folder called Images/{name}. name is the name of the person entered by the user.
我们从导入cv2开始,这使我们可以处理图像并使用它来做很多事情。 pickle允许我们将python对象转换为字节流以存储为文件(我们现在不需要在这里)。 os使我们可以在此代码中查找并检查文件和文件夹。 时间允许我们暂停脚本,以便我们可以轻松收集图像。 pathlib允许我们获取所有文件所在目录的路径。 然后,我们加载haar_cascade以检测面部。 以下while循环检查图像中是否有任何人脸,并收集带有人脸的图像并将其存储在名为Images / {name}的文件夹中。 name是用户输入的人的名字。
Full code with all the files available here:-
完整的代码与所有可用的文件在这里 : -
Now that we have collected the images, we need to train our model.
现在我们已经收集了图像,我们需要训练模型。
训练模型 (Training the model)
import os
import pickle
import cv2
from PIL import Image
import numpy as np
import pathlib
directory = pathlib.Path(__file__).parent.absolute()
img_dir = f"{directory}/Images/"
rec = cv2.face.LBPHFaceRecognizer_create()


ide =0
lab_ids = {}


face = cv2.CascadeClassifier(f'{directory}/haarcascade_frontalface_alt2.xml') #Please paste the full path of haar cascade file


x_train = []
y_train = []


for root,dirs,files in os.walk(img_dir):
    for file in files:
        if file.endswith('png') or file.endswith('jpg'):
            path = os.path.join(root,file)
            label = os.path.basename(root).replace(" ","-").lower()

            if not label in lab_ids:
                lab_ids[label] = ide
                ide += 1


            id_ = lab_ids[label]


            img = Image.open(path).convert("L") #converts to gray scale
            img_array = np.array(img,"uint8")

            faces = face.detectMultiScale(img_array,scaleFactor = 1.5, minNeighbors = 5)


            for (x,y,w,h) in faces:
                region = img_array[y:y+h, x:x+w]
                x_train.append(region)
                y_train.append(id_)


with open(f'{directory}/label.pickle', 'wb') as f:
    pickle.dump(lab_ids, f)


rec.train(x_train, np.array(y_train))
rec.save(f"{directory}/trained.yml")
print("successfully created file")
Here we will be using LBPH Face Recognizer. I found an excellent medium post by Kelvin Salton do Prado explaining the concept.
在这里,我们将使用LBPH人脸识别器。 我在Kelvin Salton do Prado的一篇出色的中级帖子中解释了这一概念。
In the for-loop, we first find all the images that are stored in the Images directory. Now we extract their labels using the folder names that we earlier created. Now each image is converted to grayscale and then we get the region of interest (the region where only the face is present).
在for循环中,我们首先找到存储在Images目录中的所有图像。 现在,我们使用之前创建的文件夹名称提取其标签。 现在,每个图像都转换为灰度,然后我们得到感兴趣的区域(只有脸部存在的区域)。
Now we train our LBPH recognizer in the last 3 lines and save the facial features data in trained.yml file, and labels in label.pickle file. Note — please collect images of over one person as the classifier cannot be trained for one individual class.
现在,我们在最后3行中训练LBPH识别器,并将面部特征数据保存在training.yml文件中,并将标签保存在label.pickle文件中。 注意—请收集超过一个人的图像,因为分类器不能针对一个单独的班级进行训练。
创建人脸检测器 (Creating the face detector)
import cv2
import os
import pathlib
directory = pathlib.Path(__file__).parent.absolute()
class Face_Detector():
def detect(self,video,boxes=False):
frame = video
gray = cv2.cvtColor(frame, cv2.COLOR_BGR2GRAY)
face = cv2.CascadeClassifier(f'{directory}/haarcascade_frontalface_default.xml')
faces = face.detectMultiScale(gray,scaleFactor = 1.5,minNeighbors = 5)
if faces != ():
for (x,y,w,h) in faces:
roi = gray[y:y+h, x:x+h]
roi_main = roi
cv2.rectangle(frame,(x,y),(x+w,y+h),(255,0,0),2)
if boxes:
x2 = int(x+(5*w/2)+10)
y2 = int((3*y/2)+h)
cv2.rectangle(frame,(x+w+10,y),(x2,y2),(0,255,0),4)
ROI = [(x+w+10,y),(x2,y2)]
else:
X = x
Y = y
ROI = roi_main
else:
if boxes:
height,width,*_ = frame.shape
cv2.rectangle(frame,(int(0.65*width),0),(width,int(height//1.5)),(0,0,255),4)
ROI = [(int(0.65*width),0),(width,int(height//1.5))]
else:
ROI = "No Face Detected"
X = 'no'
Y = 'no'
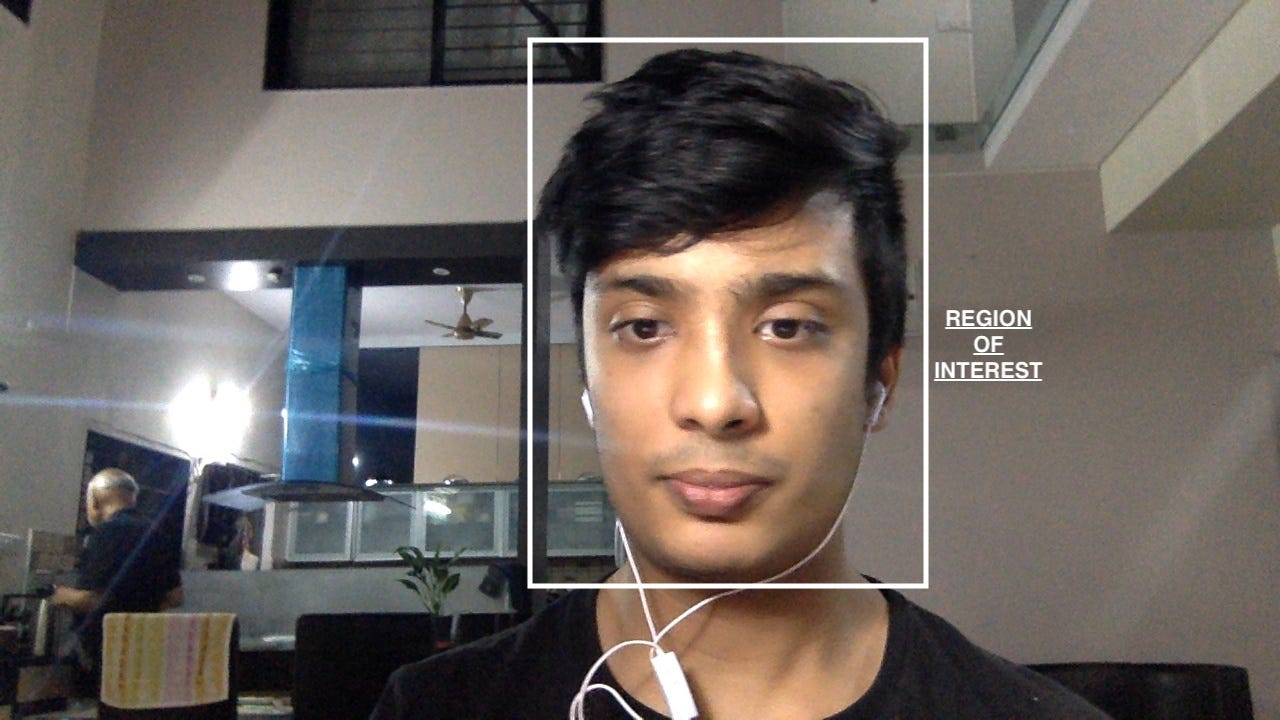
return frame,ROI,X,YThis is the face detector, you can use it in multiple projects. It is similar to collecting_images.py file except that it returns the region of face both as image and coordinates instead of saving the image.
这是人脸检测器,可以在多个项目中使用它。 它与collection_images.py文件相似,不同之处在于它返回人脸区域既作为图像又作为坐标,而不是保存图像。
from playsound import playsound
import sys
import pathlib
import os
directory = pathlib.Path(__file__).parent.absolute()
import pickle #To save and retrieve weights
from Face_Recogniser import Face_Detector
import cv2
import pyautogui


face = Face_Detector()
font = cv2.FONT_HERSHEY_PLAIN
rec = cv2.face.LBPHFaceRecognizer_create() #rec for trec or recognizer
print(directory)
rec.read(f'{directory}/trained.yml') #Use the full path of your trained.yml file. This file contains the weights for your face


vid = cv2.VideoCapture(0)


while (vid.isOpened()):
    _,frame = vid.read()
    frame = cv2.flip(frame,1)
    img,roi,x,y = face.detect(frame)


    with open(f'{directory}/label.pickle','rb') as f: #Use the full path of your lable.pickle file. This file contains the name of recognized users
        labels = {a:b for b,a in pickle.load(f).items()}
    if roi != "No Face Detected":
        idd,conf = rec.predict(roi)

        if conf >= 0.8:
            if labels[idd] == "shubh":   #Enter the name as in label.pickle file, for which the computer should log in
                pyautogui.click()
                pyautogui.write('Windows_Sucks')   #Enter you password here
                pyautogui.press('enter')
                os.system("test")
                os.system("say welcome shubh")   #Ask it to say whatever you want when user logs in
                break
            else:
                os.system("test")
                os.system("say eat shit")  #Ask it to say whatever you want when someone else logs in
        else:
            os.system("test")
            os.system("say eat shit")    #Ask it to say whatever you want when someone else logs in
            #cv2.putText(img,labels[idd],(x,y + 20),font,1,(0,255,0),2)


    #cv2.imshow('img',img)
    key = cv2.waitKey(1) & 0xFF
    if key == ord("q"):
        break

cv2.destroyAllWindows()
playsound(f'{directory}/napalm_death.mp3') #Replace this with the music of your choice. Or comment it if you do not want music
This is the main file of the project, it combines everything we have done so far. playsound library is optional, but it allows you to play music as soon as you log in, you can remove it by commenting out. make sure that you have pyautogui installed, this allows our code to type the password.
这是项目的主要文件,它结合了我们到目前为止所做的一切。 playsound库是可选的,但是它允许您登录后立即播放音乐,您可以通过注释将其删除。 确保您已安装pyautogui,这使我们的代码可以键入密码。
So, firstly we load our trained.yml file to use the collected data about the face, then we use our face detector class which we created above to get the region of interest i.e. our face with coordinates, then we open our labels.pickle file to get the names of all the users for whom we have saved the images. Now, we use our recognizer (rec) and pass it the region of interest to get the name of the detected person and the confidence level i.e. how sure our classifier is that the detected person is really that person. if the confidence level is > 80% and the detected person’s name is ‘shubh’ (i.e me) then it types in the password (‘Microsoft_Sucks’ in my case, change this to your password) and presses enter automatically. You should change that part to your name and you can also use ‘or’ to allow access to more people. I have also added the code that welcomes me every time you can edit it according to your needs.
因此,首先,我们加载训练有素的.yml文件以使用所收集的有关面部的数据,然后使用上面创建的面部检测器类来获取感兴趣的区域(即具有坐标的面部),然后打开labels.pickle文件以获得我们为其保存图像的所有用户的名称。 现在,我们使用识别器(rec)并将感兴趣的区域传递给它,以获取检测到的人的姓名和置信度,即我们的分类器如何确定检测到的人确实是该人。 如果置信度> 80%,并且检测到的人的名字是“ shubh”(即我),则输入密码(在我的情况下为“ Microsoft_Sucks”,将其更改为您的密码),然后自动按Enter。 您应该将该部分更改为您的姓名,也可以使用“或”允许更多人访问。 每当您可以根据需要对其进行编辑时,我还添加了欢迎我的代码。
一件事仍然不见了 (One thing is still missing)
we haven’t told the computer to run this code on wakeup, let’s do that.
我们还没有告诉计算机在唤醒时运行此代码,让我们开始吧。
We need to use sleepwatcher for this, you can download it from here: https://www.bernhard-baehr.de/. make sure that you put everything in one folder, in the desktop. Now I have prepared a bash script that completes the setup and does everything you need to do.
我们需要为此使用sleepwatcher,您可以从此处下载它: https ://www.bernhard-baehr.de/。 确保将所有内容都放在桌面的一个文件夹中。 现在,我准备了一个bash脚本,可以完成设置并完成您需要做的所有事情。
But before that just create this small file:-
但在此之前,只需创建一个小文件:-
#! /bin/bash


python3 ~/Desktop/Face_ID/Face-ID.py #Paste the path of your file here.
Now, this bash script is run by sleepwatcher on login and this script calls our Face_ID.py file. I could not directly run Face_ID.py from sleepwatcher as I was getting permission errors even though I gave it all the permissions, please comment if you know the reason why.
现在,该bash脚本由sleepwatcher在登录时运行,该脚本调用我们的Face_ID.py文件。 即使我授予了所有权限,我也无法从sleepwatcher直接运行Face_ID.py,因为我遇到了权限错误,如果您知道原因,请发表评论。
Now let’s create the final file that completes the setup.
现在,让我们创建完成设置的最终文件。
import os
os.system('pip3 install -r  ~/Desktop/Face_ID/requirements.txt')
import tkinter as tk
from tkmacosx import Button


root = tk.Tk()
root.title('Face ID Mac')
label = tk.Label(padx=50,pady=50)


def setting_sleep_watcher():
    try:
        os.system('sudo rm -rf /Library/StartupItems/SleepWatcher')
        os.system('sudo cp ~/Desktop/Face_ID/sleepwatcher_2.2.1/sleepwatcher /usr/local/sbin')
        os.system('sudo cp ~/Desktop/Face_ID/sleepwatcher_2.2.1/sleepwatcher.8 /usr/local/share/man/man8')
        os.system('sudo cp ~/Desktop/Face_ID/sleepwatcher_2.2.1/config/de.bernhard-baehr.sleepwatcher-20compatibility.plist /Library/LaunchDaemons/de.bernhard-baehr.sleepwatcher.plist')
        os.system('sudo cp ~/Desktop/Face_ID/sleepwatcher_2.2.1/config/rc.* /etc')
        os.system('sudo launchctl load /Library/LaunchDaemons/de.bernhard-baehr.sleepwatcher.plist')
    except Exception as e:
        label.insert(0, 'ERROR')


def click():
    #os.system('pip3 install -r requirements.txt')
    setting_sleep_watcher()
    try:
        os.system('python3 ~/Desktop/Face_ID/collecting_images.py')
        os.system('python3 ~/Desktop/Face_ID/creating_files.py')
    except Exception as e:
        label.insert(0, 'ERROR')

    os.system('/usr/local/sbin/sleepwatcher --verbose --wakeup ~/Desktop/Face_ID/hello.sh')


button = Button(root,command=click,text='RUN FACE ID',padx=50,pady=50,fg='red',bg='blue').pack()


root.mainloop()
quit()
This file completes the setup of sleepwatcher, starts collecting_images.py and creating_files.py. now you can exit the code and quit the program.
该文件完成了sleepwatcher的设置,开始了collection_images.py和creating_files.py。 现在您可以退出代码并退出程序。
open the terminal and run this code to start the program.
打开终端并运行此代码以启动程序。
/usr/local/sbin/sleepwatcher --verbose --wakeup ~/Desktop/Face_ID/hello.shif you are having any issues, check the structure of the directory with mine on GitHub.
如果您有任何问题,请在G itHub上使用mine检查目录的结构。
Any ideas to improve this code? Let me know below.
有任何改进此代码的想法吗? 让我在下面知道。
翻译自: https://medium.com/dev-genius/this-simple-code-allows-you-to-use-face-id-on-mac-29fc8334f080
mac 人脸识别sdk


 被折叠的 条评论
为什么被折叠?
被折叠的 条评论
为什么被折叠?
 到【灌水乐园】发言


