


 本文介绍了 GitHub Gists 的基本使用方法,包括创建代码片段、CSV 表格及如何在 Medium 上部署。Gists 是一种方便分享代码和数据的方式,支持公开或私密分享。
If you’ve been going through Medium, looking at technical articles, you’ve undoubtedly seen little windows that look like the below:
如果您一直在阅读Medium,并查看技术文章,那么您无疑会看到类似于以下内容的小窗口:
def hello_there(x):
  print('Hello there, ' + x)
These are called Github Gists. A gist is an easy way to share excerpts of code or data with others in a clean and reader friendly way. In this article, you’ll see ways to display a function you’ve created, a query into a table, or some other small piece of data (like a sneak peek at a dataframe). These bits of information are hosted by GitHub as a repository. Using gist has all the benefits of utilizing a GitHub repository with a lightweight and easy to share embedding feature.
这些被称为Github Gists。 要点是一种以简洁易懂的方式与他人共享代码或数据摘录的简便方法。 在本文中,您将看到显示创建的函数,查询表或其他小数据(例如偷偷看数据框)的方法。 这些信息由GitHub作为存储库托管。 使用gist具有利用具有轻量级且易于共享的嵌入功能的GitHub存储库的所有好处。
Not only are they cleaner but they allow coders who have vision issues a chance to read through your code using accessibility options.
它们不仅更清洁,而且还使视力有问题的编码人员可以使用辅助功能选项来阅读您的代码。
For now, let’s go through the basics:
现在,让我们看一下基础知识:
1.前往Github Gists (1. Getting to Github Gists)
There are two ways of getting to the gists portion of Github.com. The first way is for you to go to Gist.Github.com and it will take you to the new gist creation. Or you can go through your Github home page.
有两种方法可以访问Github.com的要点部分。 第一种方法是让您转到Gist.Github.com ,它将带您进入新的gist创作。 或者,您可以浏览您的Github主页。
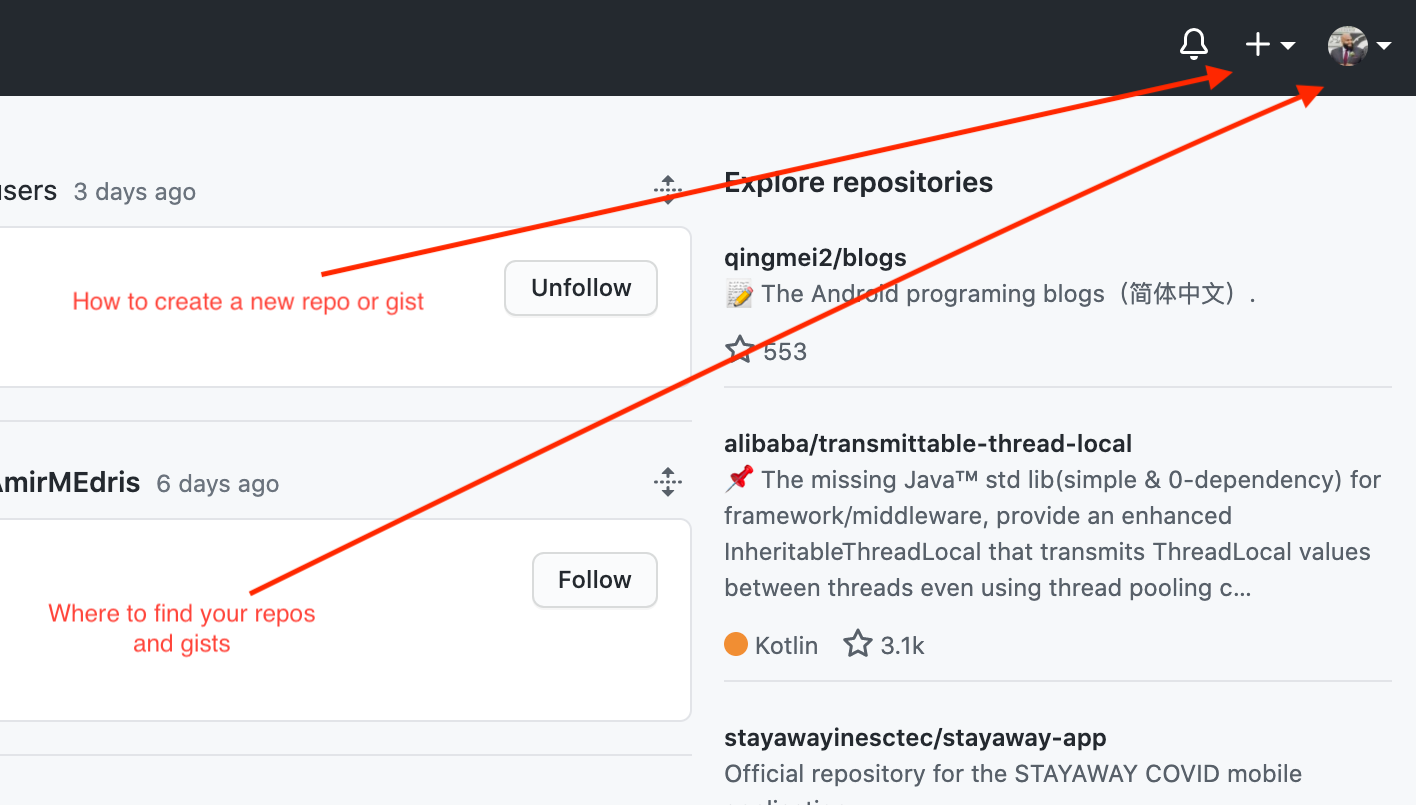
The bottom red arrow, pointing at my profile picture, is how you would get to your repositories or gists. We’ll ignore that one for now and leave it for when we talk about editing old gists. The top arrow, pointing to the plus sign, leads to creating repos, gists, or projects — and that is the one we will be looking at first. After you click on the plus sign, you’ll see a dropdown menu.
底部的红色箭头指向我的个人资料照片,它是您到达存储库或要点的方式。 我们暂时将其忽略,而在谈论编辑旧要点时将其保留。 顶部的箭头指向加号,它会导致创建存储库,要点或项目-这就是我们首先要看的那个。 单击加号后,您会看到一个下拉菜单。

That will bring you to the page below. Note how you have several fields to fill out.
那将带您到下面的页面。 请注意如何填写几个字段。
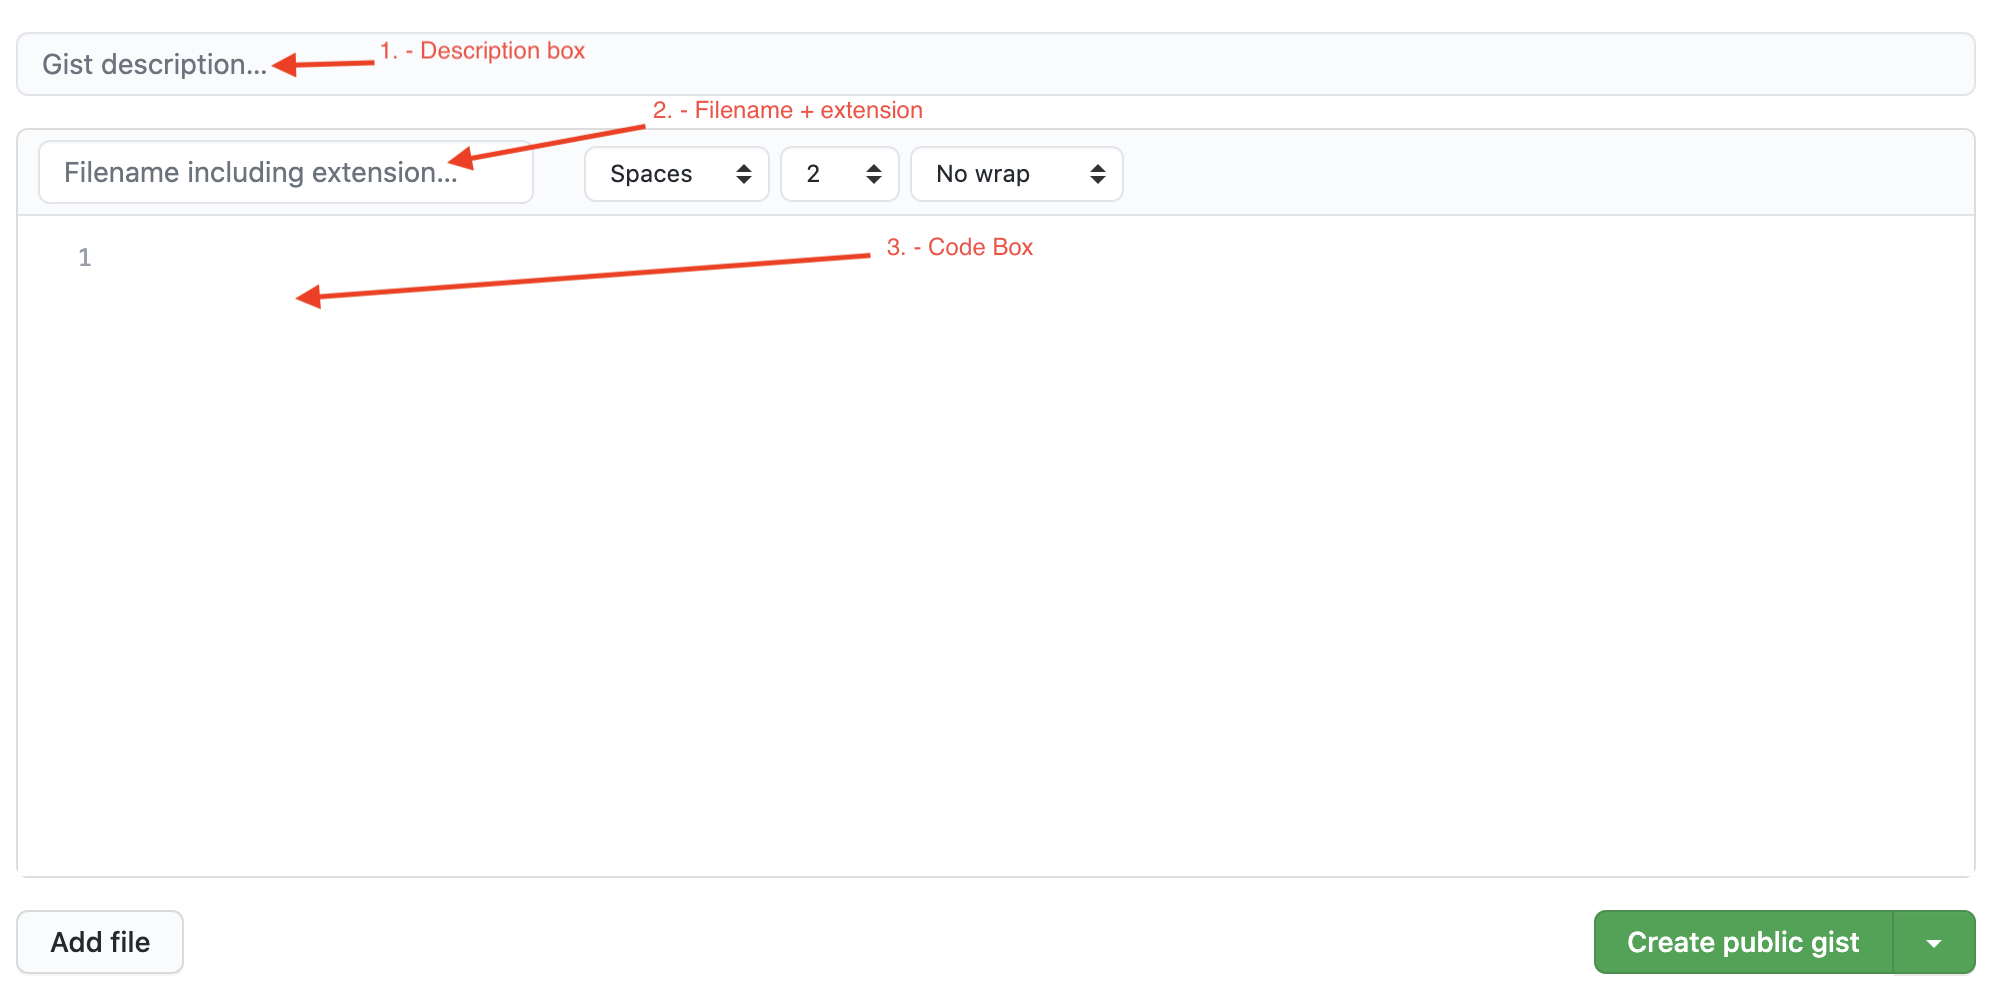
Description Box — This will be the title and unofficial name of the gist
说明框 -这将是要点的标题和非正式名称
Filename + Extension — This is going to be where you name the file, in case of download. It is also the place you declare an extension for the programming language you have used.
Filename + Extension ( 文件名+扩展名) —如果要下载,它将在其中命名文件。 在这里,您可以声明所用编程语言的扩展名。
Code Box — This is where you enter/paste the code/data you want to display.
代码框 -在此输入/粘贴要显示的代码/数据。
2.创建代码段 (2. Creating a Code Snippet)
From here it’s all plug and play. Let’s try to create a gist with a snippet of code we want to showcase — and I have just the one.
从这里开始即插即用。 让我们尝试创建一个包含要展示的代码片段的要点,而我只有一个。
Below I have a snippet of code written out to impute data from a recent linear regression project I finished. It was written to impute the number of bedrooms a house may have using the bathrooms and square footage of living space of a given house.
下面是我编写的一小段代码,用以估算来自最近完成的线性回归项目的数据。 撰写该文件的目的是使用给定房屋的浴室和居住空间的平方英尺来估算房屋的卧室数量。
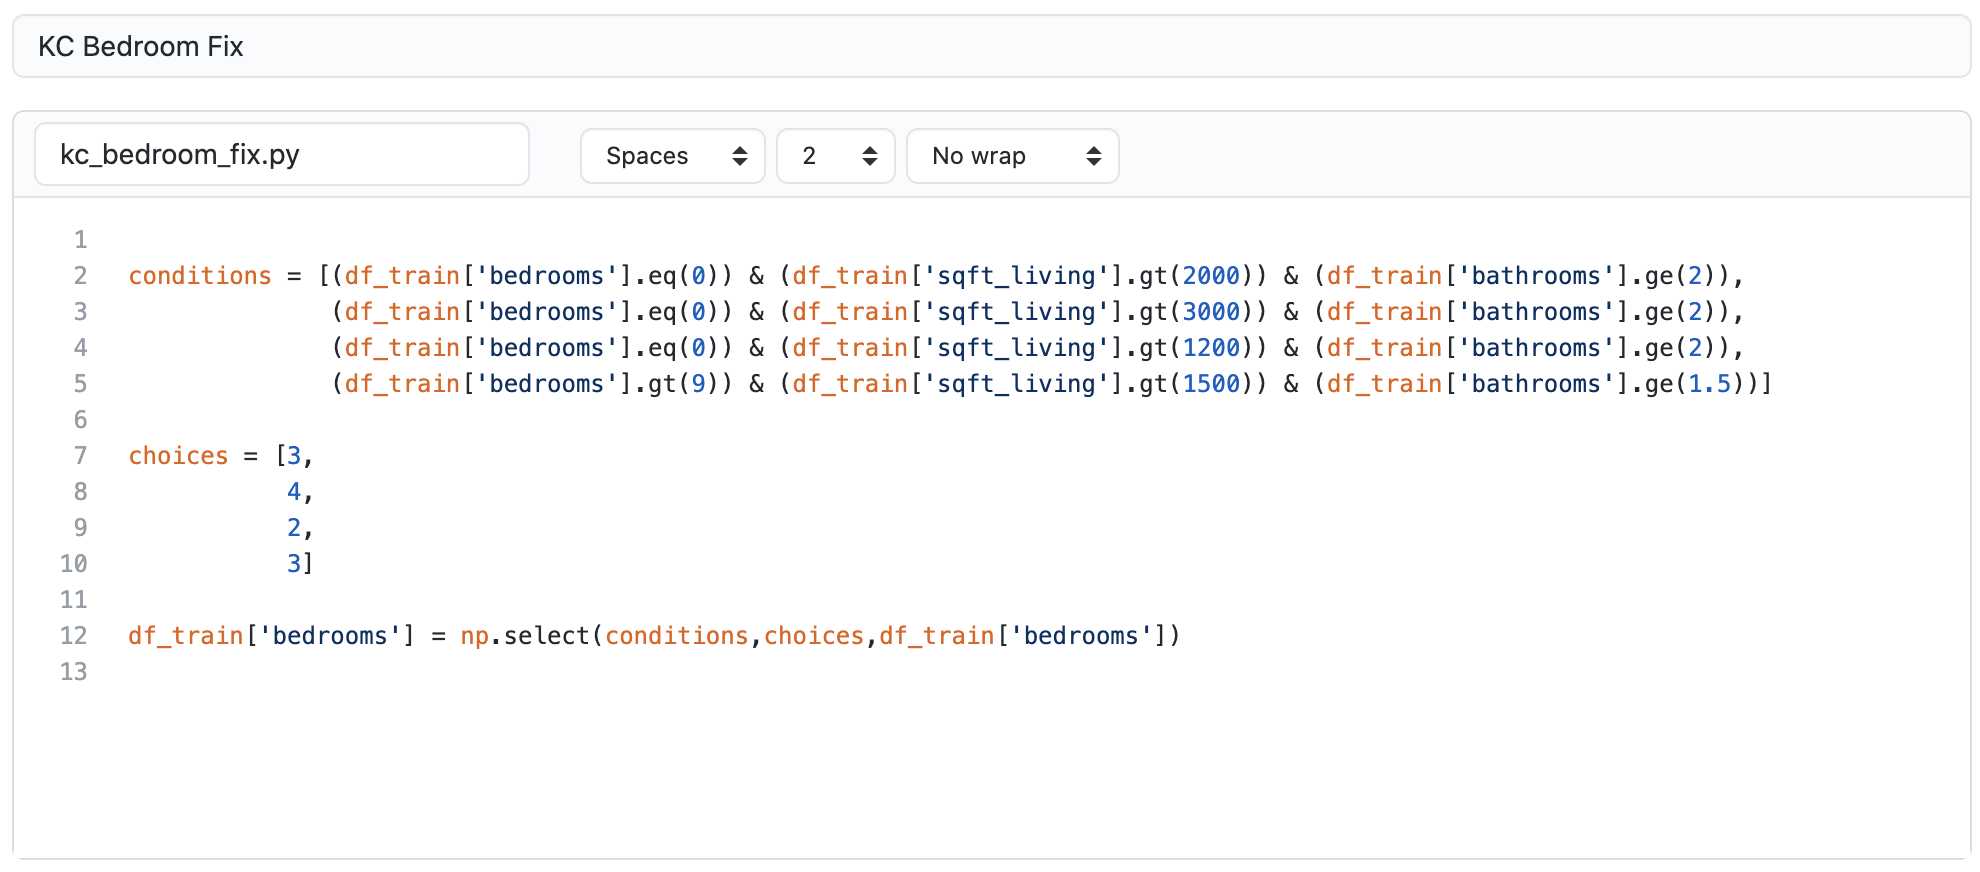
The extension is very important. You can put things like .txt, .py or .html. This notifies the reader what language it was written in — if it is not clear already, and it allows the file to be downloaded with the appropriate extension. The gist works whether you put an extension on it or not — but best ‘practices make better job opportunities’ — Paul Torres 2020.
扩展名非常重要。 您可以放入.txt , .py或.html之类的内容 。 这样可以通知读者使用的是哪种语言-如果尚不清楚,则可以使用适当的扩展名下载文件。 无论您是否进行扩展,要旨都是可行的-但最好的“实践会创造更好的工作机会” —保罗·托雷斯2020。
After simply copy and pasting the code into the window and filled out the description and the file name.
只需将代码复制并粘贴到窗口中,然后填写说明和文件名即可。
I set the settings to public so that the gist could be found in a search on the website. However, you have the option of making a secret gist that cannot be searched — these gists can still be shared with links you can hand out.
我将设置设为公开,以便可以在网站上的搜索中找到要点。 但是,您可以选择创建无法搜索的秘密要点-这些要点仍然可以与您可以分发的链接共享。
3.创建CSV表 (3. Creating a CSV Table)
The next feature we look at is the creation of tables using gists. Gists are not only for showing snippets of code. You can also display small shots of data in them. I say small because as of the publishing of this article, I have not found a method of entering data beyond copy and paste or manual entry.
我们要看的下一个功能是使用要点创建表。 要点不仅用于显示代码片段。 您也可以在其中显示少量数据。 我之所以这么说是因为,在撰写本文时,我还没有找到一种可以复制和粘贴或手动输入数据的方法。
The first step is to start a new gist and edit the file name so that it ends in .csv. This tells the website that you are going to be entering in values for the column index and cells separated by commas. Make sure that each column name is separated by a comma and each subsequent row is ordered in the same was as the column names.
第一步是启动新的摘要并编辑文件名,使其以.csv结尾。 这告诉网站您将要输入列索引的值以及用逗号分隔的单元格。 确保每个列名都用逗号分隔,并且每个后续行的排序顺序与列名相同。
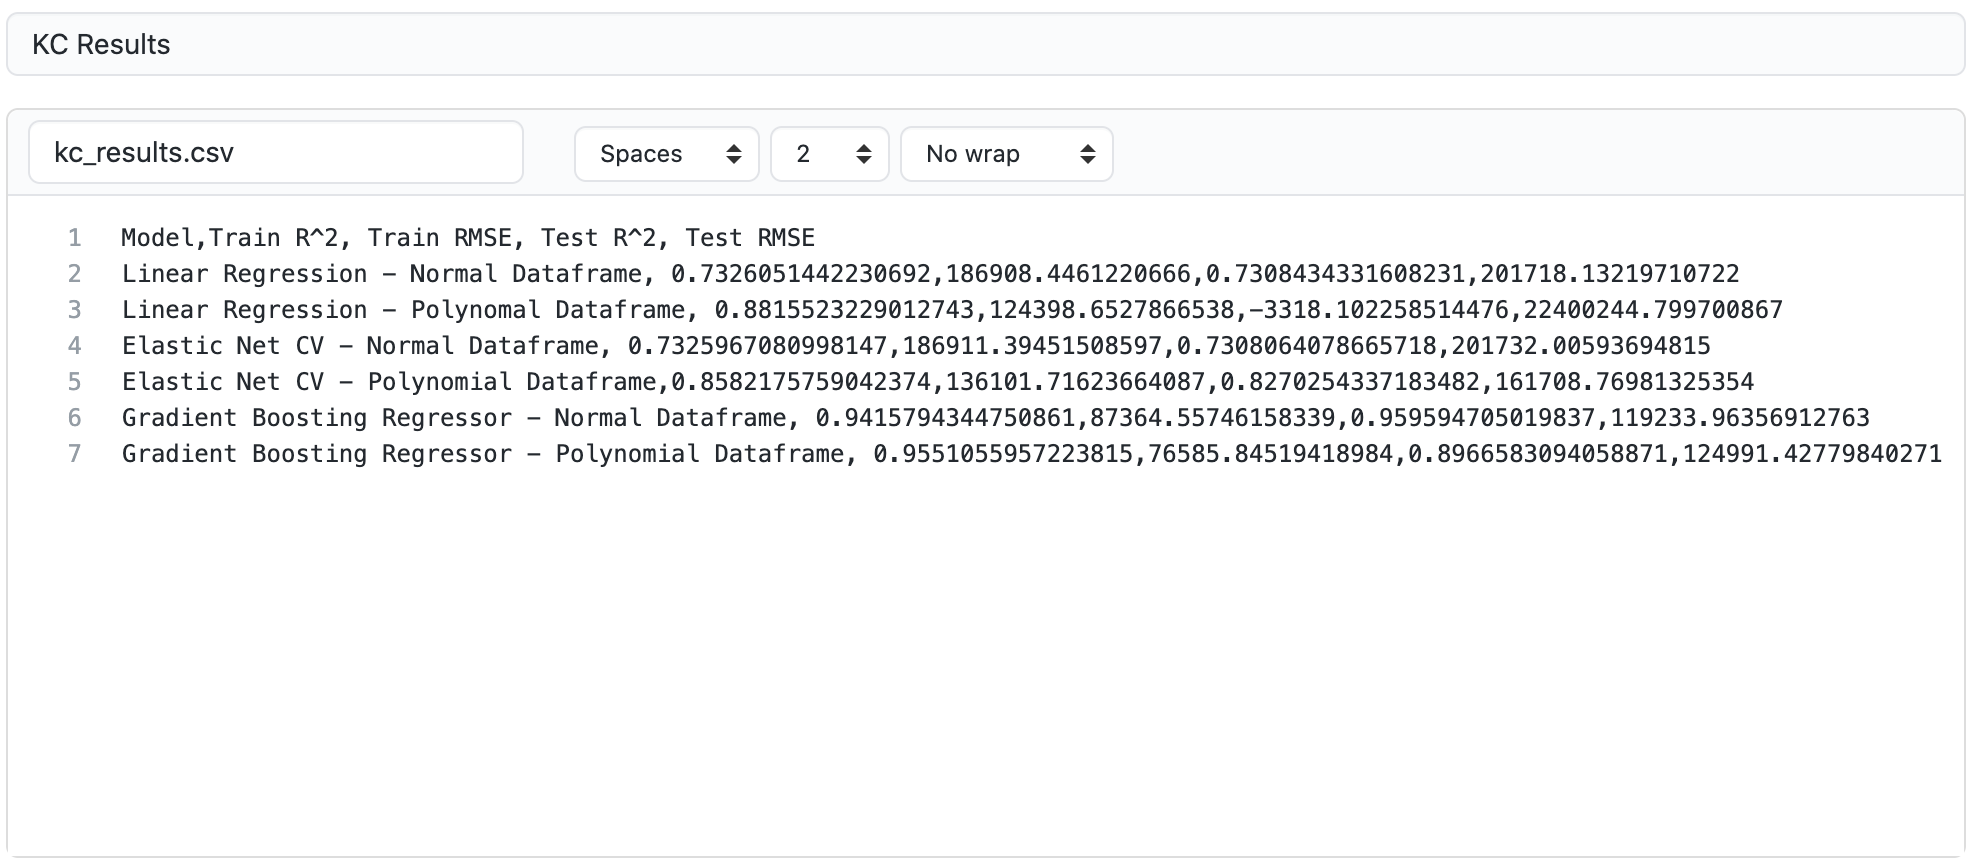
Looking at the picture above, we can see that the first row of entries are the column names. The second row is the first observation in the data. All of the entries have to be separated by a comma and they all have to be in the order of the column names in the first row. This continues on for the entirety of the table.
看上图,我们可以看到条目的第一行是列名。 第二行是数据中的第一个观察值。 所有条目都必须用逗号分隔,并且它们都必须按照第一行中列名的顺序排列。 对于整个表格,此操作继续进行。
Don’t worry about segmentation of the cells or the font of the column names — the website does it for you.
不必担心单元格的分割或列名称的字体-网站会为您完成。
Now, let’s take a look at the finished table.
现在,让我们看一下完成的表。
Each observation is segmented into a different row and each feature is segmented into its own cell. As we said before, the formatting of the font was done automatically when the column names are bolded and placed at the top of their columns.
每个观察值都被划分为不同的行,并且每个特征都被划分为自己的单元格。 如前所述,当列名加粗并放在其列的顶部时,字体的格式会自动完成。
One very helpful feature is the Search Box on the top of the table. It’s not accessible from the embedding but it is on the website. You can search the table and it returns only the values you designate.
一个非常有用的功能是表格顶部的搜索框 。 无法通过嵌入进行访问,但可以在网站上找到。 您可以搜索该表,它仅返回您指定的值。
4.在中部部署要点 (4. Deploying Gists on Medium)
Now we can talk about showing these gists to the world.
现在我们可以谈论向世界展示这些要旨。
Right here on Medium, it is as simple as clicking on the + on the next paragraph potion and clicking the <> option. After pasting the gist’s url, press enter.
就在此处,在Medium上,只需单击下一个段落部分上的+并单击<>选项即可。 粘贴要点的网址后,按Enter键。
Check out the gif.
查看gif。
5.查找或编辑以前的要点 (5. Finding or Editing Previously Made Gists)
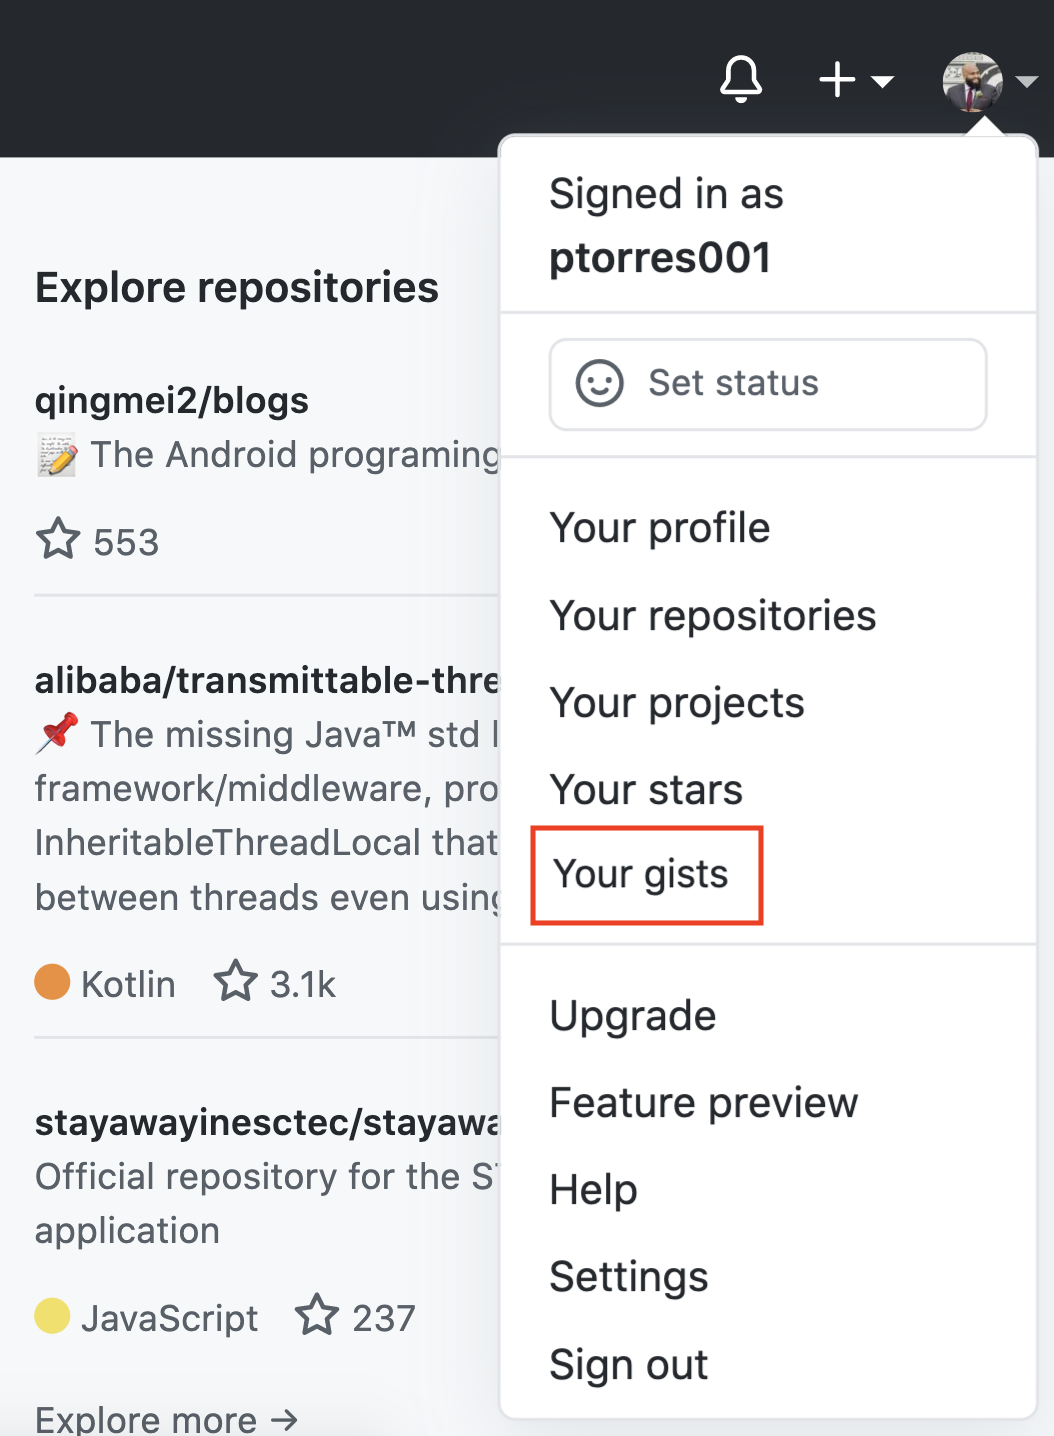
If you go back to your Github homepage, to the right of the create button is your picture. That dropdown menu is going to give you links to your profile and settings — but more importantly your repos, projects, and gists.
如果您返回Github主页,则创建按钮右侧为您的图片。 该下拉菜单将为您提供个人资料和设置的链接,但更重要的是您的存储库,项目和要旨。
Click on the link for Your gists.
单击您的概要的链接。
At which point, you will be taken to a page listing all of your gists.
届时,您将进入一个列出所有要点的页面。

Click on one and you will be able to edit. Any gist you edit will update any embedding you have elsewhere. This is a very handy feature in case you spot a mistake or want to format the code in a more pleasing way. Instead of having to visit each embedding, you can just update the gist and it will do the work for you.
单击一个,就可以进行编辑。 您编辑的要点将更新您在其他地方的任何嵌入。 如果发现错误或想要以更令人愉悦的方式格式化代码,这是一个非常方便的功能。 无需访问每个嵌入,您只需更新要点,它将为您完成工作。
Thanks for reading. I hope this helps you distribute the beautiful code I know you will write.
谢谢阅读。 希望这可以帮助您分发我知道您会编写的漂亮代码。
Connect with me on LinkedIn here.
在此处通过LinkedIn与我联系。
For more information about the projects these gists came from, check out my Github here. And you can check out the articles these gists came from below:
有关这些要点来自的项目的更多信息,请在此处查看我的Github 。 您可以查看以下要点的文章:
翻译自: https://towardsdatascience.com/github-gists-101-making-code-sharing-pretty-163d9321a0af


 被折叠的 条评论
为什么被折叠?
被折叠的 条评论
为什么被折叠?
 到【灌水乐园】发言


