


In this tutorial, we are going to learn how to process data from message broker RabbitMQ, and upload files to MinIO cloud storage. To make it more exciting, we are going to explore Epublib, an epub processor library to read and modify an ebook. Then we are going to upload it to MinIO and make it available for download.
在本教程中,我们将学习如何处理来自消息代理RabbitMQ的数据,以及如何将文件上传到MinIO云存储。 为了使它更加令人兴奋,我们将探索Epublib ,这是一个用于阅读和修改电子书的epub处理器库。 然后,我们将其上传到MinIO并可供下载。
Let’s imagine the following scenario: You are a generous writer, and you have published a free ebook. You want your readers to be able to download it in epub format and place a special signature on the cover page. For example, they can make a gift for their friends and sign the cover page with something like “Especially for XY.”
让我们想象一下以下情况:您是一个慷慨的作家,并且已经出版了免费的电子书。 您希望读者能够以epub格式下载它,并在封面上放置特殊签名。 例如,他们可以给朋友送礼物,并在封面上签名“特别是XY”。
In technical terms: The friend’s name will come from RabbitMQ as a message. Epublib will create the ebook’s cover page based on the received name. Finally, we will upload the new ebook to MinIO Cloud and provide a download link.
用技术术语来说:朋友的名字将来自RabbitMQ。 Epublib将根据收到的名称创建电子书的封面。 最后,我们会将新的电子书上传到MinIO Cloud,并提供下载链接。
Let’s get started!
让我们开始吧!
安装消息代理 (Install the Message Broker)
1.设置RabbitMQ环境 (1. Set up the RabbitMQ environment)
There are various installation methods, but in this tutorial, I am using a Docker image for simplicity. For more information on how to get started, refer to the documentation.
有多种安装方法,但是在本教程中,为简单起见,我使用了Docker映像。 有关如何开始的更多信息,请参阅文档 。
- If you have Docker on your machine, type this command into Terminal to pull the community image: 如果您的计算机上装有Docker,请在Terminal中键入以下命令以拉出社区映像:
docker run -it --rm --name rabbitmq -p 5672:5672 -p 15672:15672 rabbitmq:3-managementTo avoid typing the command every time, create a Docker yml file named
docker-compose.ymland type the following configuration:为避免每次都键入命令,请创建一个名为
docker-compose.yml的Docker yml文件,并输入以下配置:
version: '3.7'
services:
  avc-rabbit:
    image: rabbitmq:3-management
    container_name: rabbitmq
    ports:
      - "15672:15672"
      - "5672:5672"
2.测试安装 (2. Test the installation)
Now let’s start RabbitMQ by running this
docker-composecommand:现在,通过运行以下
docker-compose命令启动RabbitMQ:
docker-compose up -d
docker-compose up -d
If you navigate to
localhost:15672in your browser, you will be prompted to enter a username and a password. Log in with the official test credentials — “guest/guest.”如果在浏览器中导航到
localhost:15672,将提示您输入用户名和密码。 使用正式的测试凭据(“来宾/来宾”)登录。
You should see a page like this:
您应该看到这样的页面:

准备Java客户端 (Prepare the Java Client)
I am using Java to connect to RabbitMQ. Many other languages are supported, so if you want to experiment, check this documentation for client libraries.
我正在使用Java连接到RabbitMQ。 支持许多其他语言,因此,如果要尝试,请查看此文档以获取客户端库。
1.获取项目依赖项 (1. Get the project dependencies)
First, create a new Gradle project in your favourite IDE.
首先,在您喜欢的IDE中创建一个新的Gradle项目。
Put this content into the
build.gradlefile:将此内容放入
build.gradle文件中:
repositories {
    mavenCentral()
    maven {
        url 'https://github.com/psiegman/mvn-repo/raw/master/releases'
    }
}


dependencies {
    compile 'com.rabbitmq:amqp-client:5.9.0'
    compile group: 'nl.siegmann.epublib', name: 'epublib-core', version: '3.1'
    compile 'io.minio:minio:7.1.0'
}
We need only these three libraries for the project.
对于该项目,我们仅需要这三个库。
2.创建Java类 (2. Create the Java classes)
After a successful build, create a
MessageReceiver.javafile. This class will contain our application’s logic.成功构建之后,创建一个
MessageReceiver.java文件。 此类将包含我们应用程序的逻辑。- Let’s create the RabbitMQ connection: 让我们创建RabbitMQ连接:
private Connection createConnection() throws TimeoutException, InterruptedException {
        ConnectionFactory factory = new ConnectionFactory();
        // "guest"/"guest" by default, limited to localhost connections
        factory.setUsername("guest");
        factory.setPassword("guest");
        factory.setVirtualHost("/");
        factory.setHost("127.0.0.1");
        factory.setPort(5672);
        return connectToRabbitMQ(factory);
    }


    private Connection connectToRabbitMQ(ConnectionFactory factory) throws TimeoutException, InterruptedException {
        Connection conn = null;
        // if the connection has not been established, retry connection
        for (int retryNum = 100; retryNum >= 0; retryNum--) {
            try {
                conn = factory.newConnection("rabbitmq_connection");
                break;
            } catch (IOException e) {
                System.out.println("Waiting for Rabbitmq connection...");
                Thread.sleep(5000);
            }
        }
        if (conn == null){
            throw new IllegalStateException("Couldn't establish connection to rabbitMQ");
        }
        return conn;
    }
Note that we want to wait for the connection to be established. We’ll throw an exception if we can’t connect after all attempts.
请注意,我们要等待连接建立。 如果在所有尝试后都无法连接,我们将抛出异常。
- Then let’s prepare our message queue. It has to be declared before it can be used. Note that this would be a typical way to declare a queue when only one client wants to work with it: It doesn’t need a well-known name, no other client can use it (exclusive), and it will be cleaned up automatically (autodelete): 然后,让我们准备我们的消息队列。 必须先声明它,然后才能使用它。 请注意,这是当只有一个客户端要使用它时才声明队列的一种典型方法:它不需要众所周知的名称,没有其他客户端可以使用它(专有),并且它将自动清除。 (自动删除):
private void prepareRabbitQueue(Channel channel) throws IOException {
        int prefetchCount = 1;
        channel.basicQos(prefetchCount);
        channel.queueDeclare(QUEUE_INPUT, true, false, false, null);
    }
The prefetchCount value defines the maximum number of unacknowledged deliveries permitted on this channel. Once the number reaches the configured count, RabbitMQ will stop delivering more messages on the channel unless at least one of the outstanding ones is acknowledged. To explore more about acknowledgements, read the documentation.
prefetchCount值定义了此通道上允许的未确认交付的最大数量。 一旦数量达到配置的数量,RabbitMQ将停止在通道上传递更多消息,除非已确认至少一个未处理的消息。 要了解有关确认的更多信息,请阅读文档 。
QUEUE_INPUT is just a constant for the name of our queue:
QUEUE_INPUT只是队列名称的常量:
private static final String QUEUE_INPUT = "my.simple.queue_input";Now we have to create a channel to receive messages. Create a
startWork()method which will be responsible for our execution logic.现在我们必须创建一个接收消息的渠道。 创建一个
startWork()方法,该方法将负责我们的执行逻辑。
public void startWork() throws IOException, TimeoutException, InterruptedException {
    Channel channel = createConnection().createChannel();
    prepareRabbitQueue(channel);
    System.out.println("Waiting for messages...");
}
Create an
AppRunner.javaclass which is going to start the application:创建一个
AppRunner.java类,它将启动该应用程序:
class AppRunner {


    public static void main(String[] args) {


        MessageReceiver messageReceiver = new MessageReceiver();
        try {
            messageReceiver.startWork();
        } catch (IOException | TimeoutException | InterruptedException e) {
            System.err.println(e.getMessage());
        }
    }
}
Check if the connection is successful by running the
AppRunner.javaclass.通过运行
AppRunner.java类来检查连接是否成功。
You should be able to log in to RabbitMQ from the browser as we did before.
您应该能够像以前一样从浏览器登录RabbitMQ。
- Now let’s add the message consumer code to the same method: 现在,将消息使用者代码添加到相同的方法中:
DeliverCallback deliverCallback = (consumerTag, delivery) -> {
    String message = new String(delivery.getBody(), StandardCharsets.UTF_8);
    System.out.println(" [x] Received '" + message + "'");
};
channel.basicConsume(QUEUE_INPUT, true, deliverCallback, consumerTag -> {
});
Rerun the code and navigate to the message broker console. Go to Queues, type something into the PayLoad section, and hit Publish.
重新运行代码,然后导航到消息代理控制台。 进入队列,在PayLoad中输入内容 部分,然后点击发布。
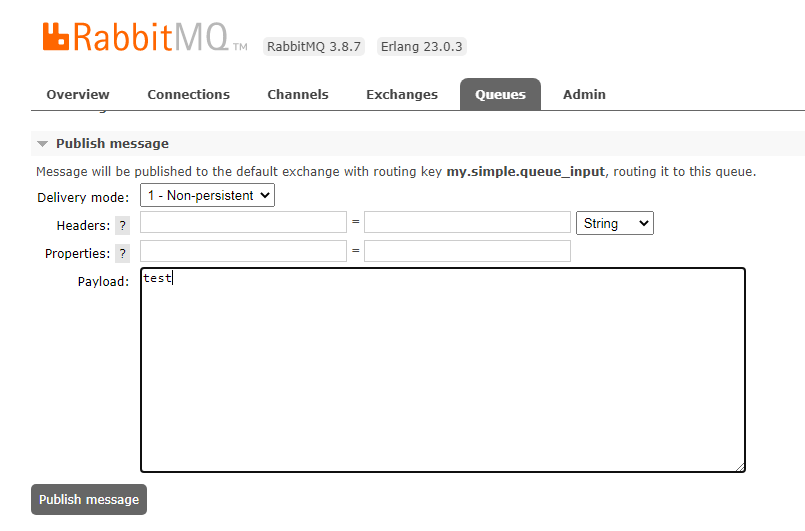
You should see the received message in your IDE Console.
您应该在IDE控制台中看到收到的消息。
准备MiniIO客户端 (Prepare the MiniIO Client)
We are going to use a Docker image to install MinIO. If you want to explore other installation ways, refer to the installation guide.
我们将使用Docker映像来安装MinIO。 如果您想探索其他安装方式,请参考安装指南 。
1.设置MinIO环境 (1. Set up the MinIO environment)
Add the following lines to the
docker-compose.ymlfile:docker-compose.yml添加到docker-compose.yml文件:
minio1:
    image: minio/minio:RELEASE.2020-08-27T05-16-20Z
    volumes:
      - data1-1:/data1
      - data1-2:/data2
    ports:
      - "9001:9000"
    environment:
      MINIO_ACCESS_KEY: minio
      MINIO_SECRET_KEY: minio123
    command: server http://minio{1...4}/data{1...2}
    healthcheck:
      test: ["CMD", "curl", "-f", "http://localhost:9000/minio/health/live"]
      interval: 30s
      timeout: 20s
      retries: 3


  minio2:
    image: minio/minio:RELEASE.2020-08-27T05-16-20Z
    volumes:
      - data2-1:/data1
      - data2-2:/data2
    ports:
      - "9002:9000"
    environment:
      MINIO_ACCESS_KEY: minio
      MINIO_SECRET_KEY: minio123
    command: server http://minio{1...4}/data{1...2}
    healthcheck:
      test: ["CMD", "curl", "-f", "http://localhost:9000/minio/health/live"]
      interval: 30s
      timeout: 20s
      retries: 3


  minio3:
    image: minio/minio:RELEASE.2020-08-27T05-16-20Z
    volumes:
      - data3-1:/data1
      - data3-2:/data2
    ports:
      - "9003:9000"
    environment:
      MINIO_ACCESS_KEY: minio
      MINIO_SECRET_KEY: minio123
    command: server http://minio{1...4}/data{1...2}
    healthcheck:
      test: ["CMD", "curl", "-f", "http://localhost:9000/minio/health/live"]
      interval: 30s
      timeout: 20s
      retries: 3


  minio4:
    image: minio/minio:RELEASE.2020-08-27T05-16-20Z
    volumes:
      - data4-1:/data1
      - data4-2:/data2
    ports:
      - "9004:9000"
    environment:
      MINIO_ACCESS_KEY: minio
      MINIO_SECRET_KEY: minio123
    command: server http://minio{1...4}/data{1...2}
    healthcheck:
      test: ["CMD", "curl", "-f", "http://localhost:9000/minio/health/live"]
      interval: 30s
      timeout: 20s
      retries: 3


## By default this config uses default local driver,
## For custom volumes replace with volume driver configuration.
volumes:
  data1-1:
  data1-2:
  data2-1:
  data2-2:
  data3-1:
  data3-2:
  data4-1:
  data4-2:
In this configuration, we are running MinIO in distributed mode. Basically, it can withstand multiple node failures and yet ensure full data protection because the drives are distributed across several nodes.
在此配置中,我们以分布式模式运行MinIO。 基本上,它可以承受多个节点的故障,但由于驱动器分布在多个节点上,因此可以确保全面的数据保护。
To run it in this mode, we need four disks according to the requirements. You can see that we named them minio1, minio2, minio3, minio4.
要在这种模式下运行它,根据需要我们需要四个磁盘。 您会看到我们将它们命名为minio1, minio2, minio3, minio4 。
To start a distributed MinIO instance, we pass the drive locations as parameters to the minio server command. All nodes should have the same access key and secret key for the nodes to connect. Note that we have created login credentials MINIO_ACCESS_KEY: minio and MINIO_SECRET_KEY: minio123 . Feel free to change them as you wish.
要启动分布式MinIO实例,我们将驱动器位置作为参数传递给minio服务器命令。 所有节点都应具有相同的访问密钥和秘密密钥,以便节点进行连接。 请注意,我们已经创建了登录凭据MINIO_ACCESS_KEY: minio和MINIO_SECRET_KEY: minio123 。 随意更改它们。
2.测试安装 (2. Test the installation)
Now run the
docker-composecommand as before:现在像以前一样运行
docker-compose命令:
docker-compose up -d
docker-compose up -d
When the application is up, log in to
http://localhost:9001/minio/loginusing the provided credentials from the docker yml file.应用程序启动后,使用
http://localhost:9001/minio/loginyml文件中提供的凭据http://localhost:9001/minio/login。
You should see the MinIO browser interface.
您应该看到MinIO浏览器界面。

3.准备原始电子书 (3. Prepare the original ebook)
Now, to follow our scenario, we have to upload the original ebook. Our program will later download it and add a new cover page.
现在,按照我们的方案,我们必须上传原始电子书。 我们的程序稍后将下载并添加新的封面。
I am going to use Adobe’s free sample library to download a book. For this tutorial, I have chosen Alice’s Adventures in Wonderland and named it
alice.epub.我将使用Adobe的免费样本库下载一本书。 在本教程中,我选择了《 爱丽丝梦游仙境》并将其命名为
alice.epub。- We have to create a Bucket using the MinIO Interface. Click on the Plus sign and choose Create bucket: 我们必须使用MinIO接口创建一个Bucket。 单击加号,然后选择创建存储桶:
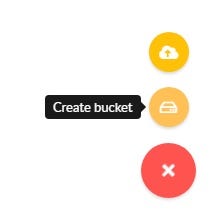
Let’s name it original-ebook.
让我们将其命名为original-ebook 。
Upload the epub file to the bucket. This is a prerequisite for our program.
将epub文件上传到存储桶。 这是我们程序的先决条件。
4.创建消息处理程序 (4. Create the message handler)
Now that we have our original ebook in cloud storage, we can continue with the coding.
现在我们有了原始的电子书在云存储中,我们可以继续进行编码。
I am using Java in this tutorial, so let’s follow the Java Client Library Guide. If you wish, check the documentation for other supported languages.
我在本教程中使用Java,因此让我们遵循Java Client Library Guide 。 如果需要,请查看文档中其他受支持的语言。
We have already pulled the MinIO dependencies in our build.gradle file.
我们已经在build.gradle文件中提取了MinIO依赖build.gradle 。
Create the MinIO connection in the
MessageReceiver.java:在
MessageReceiver.java创建MinIO连接:
private MinioClient getMinioClient() {


        return MinioClient.builder()
                .endpoint("localhost", 9001, false)
                .credentials("minio", "minio123")
                .build();
}- Then create the code for downloading a file in a new method: 然后使用新方法创建用于下载文件的代码:
private InputStream downloadOriginalBookAsStream(){
        InputStream stream;
        try {
            stream = getMinioClient().getObject(
                    GetObjectArgs.builder()
                            .bucket("original-ebook")
                            .object("alice.epub")
                            .build());
        }catch (InvalidKeyException | NoSuchAlgorithmException | ErrorResponseException | InvalidResponseException | InvalidBucketNameException |
                    ServerException | XmlParserException | InsufficientDataException |
                    InternalException | IOException e) {
                System.err.println(e.getMessage());
                throw new IllegalArgumentException("The original ebook file was not found");
            }
        return stream;
    }
Note that the bucket and object names have to match the ones we created beforehand.
请注意, bucket和object名称必须与我们之前创建的名称匹配。
- Create another method for file upload: 创建另一种文件上传方法:
private void handleFileUpload(String filename) {


        MinioClient minioClient = getMinioClient();
        try {

            ObjectWriteResponse response = createBucketAndUploadFile(minioClient, filename);
            if (response != null) {
                String url = createURL(minioClient, filename);
                System.out.println("Created url: " + url);
            }


        } catch (InvalidKeyException | NoSuchAlgorithmException | ErrorResponseException | InvalidResponseException | InvalidBucketNameException |
                ServerException | RegionConflictException | InvalidExpiresRangeException | XmlParserException | InsufficientDataException |
                InternalException | IOException e) {
            System.err.println(e.getMessage());
        }
    }
We will create another bucket for the modified ebooks. I called it
ebookcreator. Note that this time, the program will create the bucket automatically if it doesn’t already exist:我们将为修改后的电子书创建另一个存储桶。 我称它为
ebookcreator。 请注意,这次,程序将自动创建存储桶(如果尚不存在):
private ObjectWriteResponse createBucketAndUploadFile(MinioClient minioClient, String filename) throws
            IOException, InvalidKeyException, InvalidResponseException, InsufficientDataException, NoSuchAlgorithmException, ServerException, InternalException, XmlParserException, InvalidBucketNameException, ErrorResponseException, RegionConflictException {


        if (!minioClient.bucketExists(BucketExistsArgs.builder().bucket("ebookcreator").build())) {
            minioClient.makeBucket(MakeBucketArgs.builder().bucket("ebookcreator").build());
        }
        return minioClient.uploadObject(UploadObjectArgs.builder()
                .bucket("ebookcreator")
                .object(filename)
                .filename(filename)
                .contentType("application/epub")
                .build());
}- To make the file available for download, we have to create a URL: 为了使文件可供下载,我们必须创建一个URL:
private String createURL(MinioClient minioClient, String filename) throws
            IOException, InvalidKeyException, InvalidResponseException, InsufficientDataException, InvalidExpiresRangeException, ServerException, InternalException, NoSuchAlgorithmException, XmlParserException, InvalidBucketNameException, ErrorResponseException {
        return minioClient.getPresignedObjectUrl(
                GetPresignedObjectUrlArgs.builder()
                        .method(Method.GET)
                        .bucket("ebookcreator")
                        .object(filename)
                        .expiry(2, TimeUnit.HOURS)
                        .build());
    }
This URL will be valid for two hours. You can modify the expiration date by using the expiry parameter.
该URL有效期为两个小时。 您可以使用expiry参数修改到期日期。
处理电子书文件 (Process the Ebook File)
As we have already downloaded the necessary dependencies for the epub processor library, we just have to create the code for the ebook processing.
由于我们已经下载了epub处理器库的必要依赖项,因此我们只需要创建用于电子书处理的代码即可。
Create another class called EBookHandler.java :
创建另一个名为EBookHandler.java类:
import nl.siegmann.epublib.domain.Book;
import nl.siegmann.epublib.domain.Resource;
import nl.siegmann.epublib.epub.EpubReader;
import nl.siegmann.epublib.epub.EpubWriter;


import java.io.FileOutputStream;
import java.io.IOException;
import java.io.InputStream;
import java.util.ArrayList;


public class EBookHandler {


    public static Book openAndSignBook(InputStream origBook, String signedBookName, String readerName) throws IOException {
        EpubReader epubReader = new EpubReader();
        Book book = epubReader.readEpub(origBook);


        // set title
        book.getMetadata().setTitles(new ArrayList<String>() {{
            add("an awesome book");
        }});
        String body = "<div>Especially for " + readerName.toUpperCase() +"</div>";
        Resource res = new Resource(body.getBytes(),"signature.html");
        book.setCoverPage(res);


        // write epub
        EpubWriter epubWriter = new EpubWriter();
        epubWriter.write(book, new FileOutputStream(signedBookName));
        return book;
    }
}
We receive the original book, the reader’s name, and the new ebook’s name as parameters from our MessageReceiver.java class.
我们从MessageReceiver.java类中接收原始书籍,读者的姓名和新电子书的名称作为参数。
For simplicity, we are going to programmatically create a very basic signature.html file which will display the reader’s name. To explore more functions of the Epublib, check the official example programs.
为简单起见,我们将以编程方式创建一个非常基本的signature.html文件,该文件将显示读者的姓名。 要探索Epublib的更多功能,请查看官方示例程序 。
放在一起 (Put Everything Together)
Now we just have to connect our EBookHandler.java with the MessageReceiver.java by creating a Book object in the startWork()method.
现在,我们只需在EBookHandler.java startWork()方法中创建Book对象,即可将EBookHandler.java与MessageReceiver.java连接起来。
The complete method should look like this:
完整的方法应如下所示:
public void startWork() throws IOException, TimeoutException, InterruptedException {


        Channel channel = createConnection().createChannel();


        prepareRabbitQueue(channel);


        DeliverCallback deliverCallback = (consumerTag, delivery) -> {
            String message = new String(delivery.getBody(), StandardCharsets.UTF_8);
            System.out.println(" [x] Received '" + message + "'");


            String filename = UUID.randomUUID() + ".epub";


            Book eBook = EBookHandler.openAndSignBook(downloadOriginalBookAsStream(), filename, message);
            if (eBook != null) {
                System.out.println("eBook created " + filename);
                handleFileUpload(filename);
            }
        };
        channel.basicConsume(QUEUE_INPUT, true, deliverCallback, consumerTag -> {
        });
    }
The modified book’s filename will be uniquely generated using UUID.randomUUID() Java method.
修改后的图书的文件名将使用UUID.randomUUID() Java方法唯一生成。
That’s it!
而已!
实际应用 (The Application in Action)
Let’s check out our application’s functionality.
让我们检查一下应用程序的功能。
- Start the application. 启动应用程序。
- Publish a name using RabbitMQ Interface. 使用RabbitMQ接口发布名称。
- Log in to MinIO Interface. 登录到MinIO接口。
You should see our new bucket called ebookcreator containing a new epub file:
您应该会看到我们称为ebookcreator新存储桶 包含一个新的epub文件:

- Download the file before the link expires. 在链接过期之前下载文件。
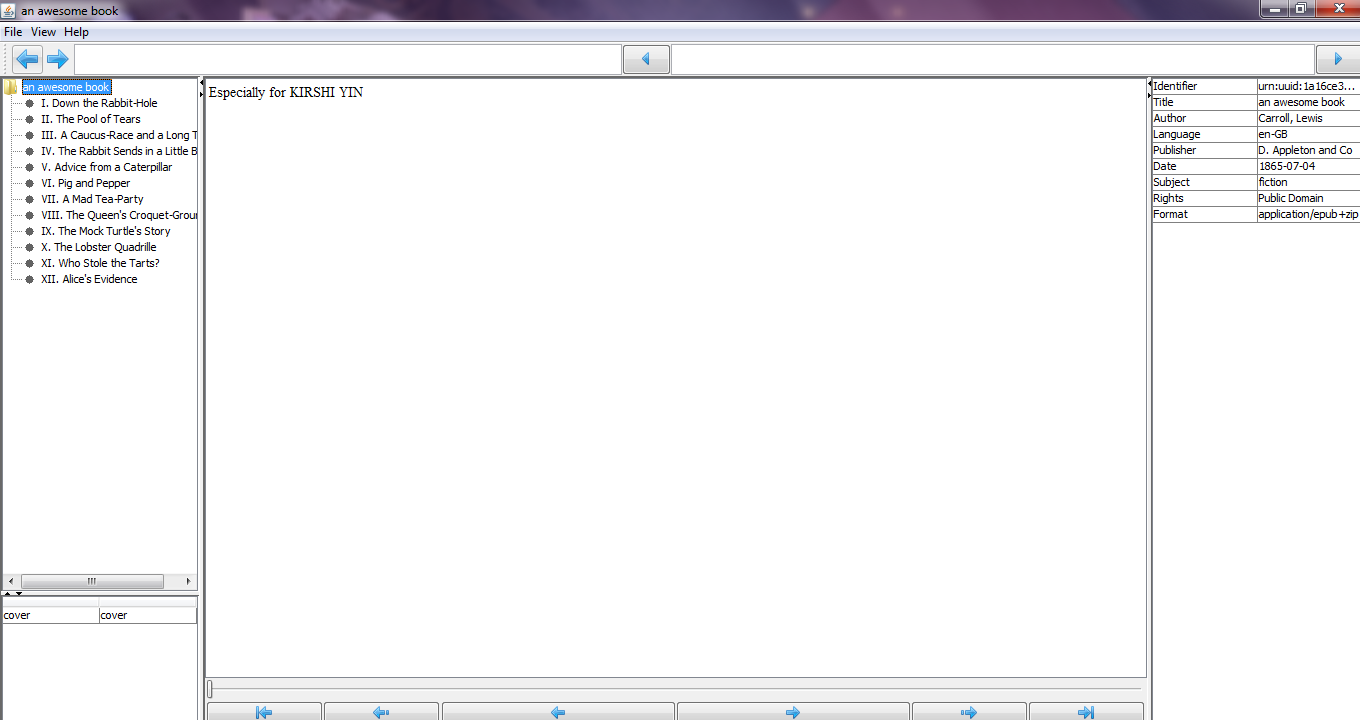
Open it using an epub viewer, or use the standalone Java epub viewer provided by the official library. It can be downloaded from here.
使用epub查看器打开它,或使用官方库提供的独立Java epub查看器打开它。 可以从这里下载 。
I am going to use the standalone viewer to open the newly created epub file. Your ebook’s cover page should look similar to this:
我将使用独立查看器打开新创建的epub文件。 您的电子书的封面应类似于以下内容:
结论 (Conclusion)
I hope that you have learned something new from this tutorial.
我希望您从本教程中学到了一些新知识。
Thank you for reading, and happy coding!
感谢您的阅读,并祝您编程愉快!


 6361
6361


 被折叠的 条评论
为什么被折叠?
被折叠的 条评论
为什么被折叠?
 到【灌水乐园】发言


