


深度学习分类pytorch
So have you heard the word deep learning before? Or have you just started learning it?
那么您以前听过深度学习这个词吗? 还是刚刚开始学习?
In this article, I am going to guide you to build your very own dog breed classifier. At the end of this project,
在本文中,我将指导您构建自己的狗品种分类器。 在该项目结束时,
- Your code will accept any user-supplied image as input. 您的代码将接受任何用户提供的图像作为输入。
- If a dog is detected in the image, it will provide an estimate of the dog’s breed. 如果在图像中检测到狗,它将提供狗的品种的估计值。
- If a human is detected, it will provide an estimate of the dog breed that is most resembling. 如果检测到人,它将提供最相似的犬种的估计。
I would make it as simple as possible without overwhelming you.
我会让它尽可能简单,而不会使您不知所措。
前方的路 (The Road Ahead)
- Step 0: Import Datasets 步骤0:导入数据集
- Step 1: Preprocessing of Images 步骤1:图像预处理
- Step 2: Choose a model for transfer learning 步骤2:选择转移学习的模型
- Step 3: Change the pre-trained model’s classifier 第3步:更改预训练模型的分类器
- Step 4: Write the training Algorithm 步骤4:编写训练算法
- Step 5: Train the Model 步骤5:训练模型
- Step 6: Test the Model 步骤6:测试模型
- Step 7: Test on your own images 步骤7:在您自己的图像上进行测试
So Are you excited??? Let’s dive in!
所以你兴奋吗??? 让我们潜入吧!
步骤0:导入数据集 (Step 0: Import Datasets)
You can download your own dataset from Kaggle visit this website. Or alternatively, you can download it from here.
您可以从Kaggle下载自己的数据集,请访问此网站 。 或者,您可以从此处下载。
Then just unzip the zip file!
然后只需解压缩zip文件!
Since the processing of images takes a lot of time and resources on the local machine, hence I’ll be using colab’s GPU to train my model. So, in case if you don’t have your own GPU’s make sure you switched to colab to follow along.
由于图像处理在本地计算机上花费大量时间和资源,因此我将使用colab的GPU来训练我的模型。 因此,如果您没有自己的GPU,请确保切换到colab进行后续操作。
It is always a good practice to import the necessary libraries in the first block of the notebook. So we would do that here.
在笔记本的第一块中导入必要的库始终是一个好习惯。 因此,我们将在这里进行操作。
#Importing Libraries
import numpy as np
import pandas as pd
import matplotlib.pyplot as plt
from PIL import Image
from PIL import ImageFile
import cv2


# importing Pytorch model libraries
import torch
import torchvision.models as models
import torchvision.transforms as transforms
from torchvision import datasets
import torch.nn as nn
import torch.nn.functional as F
import torch.optim as optim
Enter the path of dog_images inside the double quotes of glob’s parenthesis.
在glob括号的双引号内输入dog_images的路径。
dog_files = np.array(glob("/data/dog_images/*/*/*"))
# print number of images in each dataset
print('There are %d total dog images.' % len(dog_files))
Output : There are 8351 total dog images.步骤1:图像预处理 (Step 1: Preprocessing of images)
First, you would need to load the train, validation, and test folder into some variables.
首先,您需要将训练,验证和测试文件夹加载到一些变量中。
#Loading images data into the memory and storing them into the variables
data_dir = '/content/dogImages'
train_dir = data_dir + '/train'
valid_dir = data_dir + '/valid'
test_dir = data_dir + '/test'
then you would need to apply some transformation onto the loaded images. That is called the preprocessing of data.
那么您将需要对加载的图像进行一些转换。 这就是所谓的数据预处理 。
为什么有必要? (Why is it necessary?)
- Your images must match the input size of the network. If you need to adjust the size of your images to match the network, then you can rescale or crop your data to the required size. 您的图像必须匹配网络的输入大小。 如果需要调整图像的大小以匹配网络,则可以将数据重新缩放或裁剪为所需的大小。
Augmentation also enables you to train networks to be invariant to distortions in image data. For that purpose, I would be randomly cropping and resizing the images
增强功能还使您可以训练网络以使图像数据不失真。 为此,我将随机裁剪图像并调整其大小
Data normalization is an important step which ensures that each input parameter (pixel, in this case) has a similar data distribution. This makes convergence faster while training the network.
数据标准化是重要的一步,可确保每个输入参数(在这种情况下为像素)具有相似的数据分布。 这样可以在训练网络时更快地收敛。
#Applying Data Augmentation and Normalization on images
train_transforms = transforms.Compose([transforms.RandomRotation(30),
                                       transforms.RandomResizedCrop(224),
                                       transforms.RandomHorizontalFlip(),
                                       transforms.ToTensor(),
                                       transforms.Normalize([0.485, 0.456, 0.406],
                                                            [0.229, 0.224, 0.225])])


valid_transforms = transforms.Compose([transforms.Resize(256),
                                       transforms.CenterCrop(224),
                                       transforms.ToTensor(),
                                       transforms.Normalize([0.485, 0.456, 0.406],
                                                            [0.229, 0.224, 0.225])])


test_transforms = transforms.Compose([transforms.Resize(255),
                               transforms.CenterCrop(224),
                               transforms.ToTensor(),
                                       transforms.Normalize([0.485, 0.456, 0.406],
                                                            [0.229, 0.224, 0.225])])
将图像存储到数据加载器中 (Store Images into Data Loaders)
Now we need to load train, valid, and test directories into the data loaders. That would enable us to split the data into mini-batches.
现在我们需要将训练目录,有效目录和测试目录加载到数据加载器中。 这将使我们能够将数据分成多个小批。
I would be storing the loaders as key-value pairs into the dictionary which would help in calling them later.
我会将装入程序作为键值对存储在字典中,这将有助于以后调用它们。
# TODO: Load the datasets with ImageFolder
train_data = datasets.ImageFolder(train_dir, transform=train_transforms)
valid_data = datasets.ImageFolder(valid_dir,transform=valid_transforms)
test_data = datasets.ImageFolder(test_dir, transform=test_transforms)


# TODO: Using the image datasets and the trainforms, define the dataloaders
trainloader = torch.utils.data.DataLoader(train_data, batch_size=20, shuffle=True)
testloader = torch.utils.data.DataLoader(test_data, batch_size=20,shuffle=False)
validloader = torch.utils.data.DataLoader(valid_data, batch_size=20,shuffle=False)
loaders_transfer = {'train':trainloader,
                  'valid':validloader,
                  'test':testloader}
data_transfer = {
    'train':trainloader
}
步骤2:选择转移学习的模型 (Step 2: Choose a model for transfer learning)
什么是预训练模型,为什么要使用它? (What is a pre-trained model and why are we using it?)
A pre-trained model is a model created by someone else to solve a similar problem.
预训练模型是由其他人创建以解决类似问题的模型。
- Instead of building a model from scratch to solve a similar problem, you use the model trained on other problems as a starting point. 您无需使用从头开始构建模型来解决类似问题的方法,而可以将经过其他问题训练的模型用作起点。
- A pre-trained model may not be 100% accurate in your application, but it saves huge efforts required to re-invent the wheel. 预先训练的模型在您的应用中可能不是100%准确的,但是它节省了重新发明轮子的大量工作。
Transfer learning consists of taking features learned on one problem and leveraging them on a new, similar problem. For instance, features from a model that has learned to identify raccoons may be useful to kick-start a model meant to identify tanukis.
转移学习包括采用在一个问题上学到的功能,并在新的类似问题上加以利用。 例如,来自已学会识别浣熊的模型的特征可能对启动旨在识别狸小动物的模型很有用。
There are several pre-trained models you can choose for model training. For example Densenet, Resnet, VGG models. I would be using VGG-16 for model training. You can read about other models avaliable in pytorch here.
您可以选择几种预先训练的模型进行模型训练。 例如Densenet,Resnet,VGG模型。 我将使用VGG-16进行模型训练。 您可以在此处阅读有关pytorch中可用的其他模型的信息 。
#Loading vgg11 into the variable model_transfer
model_transfer = models.vgg11(pretrained=True)
第3步:更改预训练模型的分类器 (Step 3: Change the pre-trained model’s classifier)
The following steps would be taken in order to change the pre-trained classifier:
为了更改预训练的分类器,将采取以下步骤:
- Take layers from a previously trained model. 从先前训练过的模型中获取图层。
- Freeze them, so as to avoid destroying any of the information they contain during future training rounds. 冻结它们,以免在以后的训练中破坏它们包含的任何信息。
- Add some new, trainable layers on top of the frozen layers. They will learn to turn the old features into predictions on a new dataset. 在冻结层的顶部添加一些新的可训练层。 他们将学习将旧功能转变为对新数据集的预测。
- Train the new layers on your dataset. 在数据集上训练新图层。
As features are already learned by the pre-trained model so would freeze them during the training on dog images. We would only change the dimensions of the classifier and would only be training it.
由于预训练模型已经学习了特征,因此在对狗图像进行训练时会将其冻结。 我们只会更改分类器的尺寸,并且只会对其进行训练。
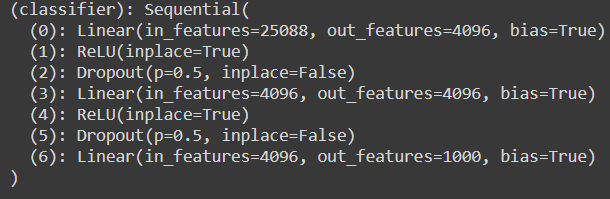
The original classifier layer has 25088 dimensions but to match it with our preprocessed image size we need to change it to 4096.
原始分类器图层的尺寸为25088,但要使其与我们预处理的图像尺寸匹配,我们需要将其更改为4096。
To train the model on GPU we would need to move it into GPU-RAM space by using the following commands.
要在GPU上训练模型,我们需要使用以下命令将其移入GPU-RAM空间。
#Freezing the parameters
for param in model_transfer.features.parameters():
    param.requires_grad = False

#Changing the classifier layer
model_transfer.classifier[6] = nn.Linear(4096,133,bias=True)

#Moving the model to GPU-RAM space
if use_cuda:
    model_transfer = model_transfer.cuda()
print(model_transfer)
Now we need to choose a loss function and optimizer.
现在我们需要选择损失函数和优化器。
The loss function would calculate the error between our model’s prediction and the actual image. If your predictions are totally off, your loss function will output a higher number. If they’re pretty good, it’ll output a lower number. I would be using Cross-Entropy loss.
损失函数将计算模型预测值与实际图像之间的误差。 如果您的预测完全无效,则损失函数将输出更高的数字。 如果它们很好,它将输出一个较小的数字。 我将使用交叉熵损失 。
The optimizers are algorithms or methods used to change the attributes of your neural network such as weights and learning rate in order to reduce the losses. I would be using SGD-Optimizer.
优化器是用于更改神经网络属性(例如权重和学习率 )以减少损失的算法或方法。 我将使用SGD-Optimizer 。
A learning rate of 0.001 is good for training. But you can experiments with other learning rates too.
0.001的学习率对于训练是好的。 但是您也可以尝试其他学习率。
### Loading the Loss-Function
criterion_transfer = nn.CrossEntropyLoss()


### Loading the optimizer
optimizer_transfer = optim.SGD(model_transfer.parameters(), lr=0.001, momentum=0.9)
步骤4:编写训练算法 (Step 4: Write the training Algorithm)
Now comes the exciting part we would be writing the training function. I have written the comments with the code. As everything in this function is self-explanatory.
现在是我们将要编写训练功能的令人兴奋的部分。 我已经用代码写了注释。 由于此功能中的所有内容都是不言自明的。
I have written the validation code lines with it. So on training the model we would be getting both losses side by side.
我已经用它编写了验证代码行。 因此,在训练模型时,我们将并肩承受损失。
I would also be storing the model every time the loss decreases. Then I wouldn’t have to train it every time I open a new instance later in the future.
每当损失减少时,我也会存储模型。 这样,以后以后我每次打开新实例时都不必培训它。
def train(n_epochs, loaders, model, optimizer, criterion, use_cuda, save_path):
    """returns trained model"""
    # initialize tracker for minimum validation loss
    valid_loss_min = np.inf   #--->   Max Value (As the loss decreases and becomes less than this value it gets saved)

    for epoch in range(1, n_epochs+1):
      #Initializing training variables
        train_loss = 0.0
        valid_loss = 0.0
        # Start training the model
        model.train()
        for batch_idx, (data, target) in enumerate(loaders['train']):
            # move to GPU's memory space (if available)
            if use_cuda:
                data, target = data.cuda(), target.cuda()
                model.to('cuda')
            optimizer.zero_grad()
            output = model(data)
            loss = criterion(output,target)
            loss.backward()
            optimizer.step()
            train_loss = train_loss + ((1 / (batch_idx + 1)) * (loss.data - train_loss))
        # validate the model #
        model.eval()
        for batch_idx, (data, target) in enumerate(loaders['valid']):
            accuracy=0
            # move to GPU's memory space (if available)
            if use_cuda:
                data, target = data.cuda(), target.cuda()
            ## Update the validation loss
            logps = model(data)
            loss = criterion(logps, target)


            valid_loss += ((1 / (batch_idx + 1)) * (loss.data - valid_loss))


        # print both training and validation losses
        print('Epoch: {} \tTraining Loss: {:.6f} \tValidation Loss: {:.6f}'.format(
            epoch,
            train_loss,
            valid_loss
            ))


        if valid_loss <= valid_loss_min:
            print('Validation loss decreased ({:.6f} --> {:.6f}).  Saving model ...'.format(
            valid_loss_min,
            valid_loss))
            #Saving the model
            torch.save(model.state_dict(), 'model_transfer.pt')
            valid_loss_min = valid_loss
    # return the trained model
    return model
步骤5:训练模型 (Step 5: Train the Model)
Now, I would start training the model by providing the arguments in the function. I would be training it for 10 epochs.
现在,我将通过在函数中提供参数来开始训练模型。 我会训练10个时代。
# train the model
model_transfer = train(10, loaders_transfer, model_transfer, optimizer_transfer, criterion_transfer, use_cuda, 'model_transfer.pt')


# load the model that got the best validation accuracy
model_transfer.load_state_dict(torch.load('model_transfer.pt'))
OUTPUT:Epoch: 1 Training Loss: 2.443815 Validation Loss: 0.801671
Validation loss decreased (inf --> 0.801671). Saving model ...
Epoch: 2 Training Loss: 1.440627 Validation Loss: 0.591050
Validation loss decreased (0.801671 --> 0.591050). Saving model ...
Epoch: 3 Training Loss: 1.310158 Validation Loss: 0.560950
Validation loss decreased (0.591050 --> 0.560950). Saving model ...
Epoch: 4 Training Loss: 1.200572 Validation Loss: 0.566340
Epoch: 5 Training Loss: 1.160727 Validation Loss: 0.530196
Validation loss decreased (0.560950 --> 0.530196). Saving model ...
Epoch: 6 Training Loss: 1.088659 Validation Loss: 0.560774
Epoch: 7 Training Loss: 1.060936 Validation Loss: 0.503829
Validation loss decreased (0.530196 --> 0.503829). Saving model ...
Epoch: 8 Training Loss: 1.010044 Validation Loss: 0.500608
Validation loss decreased (0.503829 --> 0.500608). Saving model ...
Epoch: 9 Training Loss: 1.054875 Validation Loss: 0.497319
Validation loss decreased (0.500608 --> 0.497319). Saving model ...
Epoch: 10 Training Loss: 1.000547 Validation Loss: 0.545735<All keys matched successfully>步骤6:测试模型 (Step 6: Test the Model)
Now I would test the model on new images that the model hasn’t seen before and calculate the validation accuracy.
现在,我将在该模型从未见过的新图像上测试该模型,然后计算验证准确性。
def test(loaders, model, criterion, use_cuda):


    # Initializing the variables
    test_loss = 0.
    correct = 0.
    total = 0.

    model.eval()  #So that it doesn't change the model parameters during testing
    for batch_idx, (data, target) in enumerate(loaders['test']):
        # move to GPU's memory spave if available
        if use_cuda:
            data, target = data.cuda(), target.cuda()
        # Passing the data to the model (Forward Pass)
        output = model(data)
        loss = criterion(output, target)   #Test Loss
        test_loss = test_loss + ((1 / (batch_idx + 1)) * (loss.data - test_loss))
        # Output probabilities to the predicted class
        pred = output.data.max(1, keepdim=True)[1]
        # Comparing the predicted class to output
        correct += np.sum(np.squeeze(pred.eq(target.data.view_as(pred))).cpu().numpy())
        total += data.size(0)

    print('Test Loss: {:.6f}\n'.format(test_loss))


    print('\nTest Accuracy: %2d%% (%2d/%2d)' % (
        100. * correct / total, correct, total))
test(loaders_transfer, model_transfer, criterion_transfer, use_cuda)
I have trained it for 10 epochs and got 83% accuracy . And, got the following output!
我已经训练了10个时代,并获得83%的准确率。 并且,得到以下输出!
Output:
Test Loss: 0.542430 Test Accuracy: 83% (700/836)
如何提高此模型的准确性? (How you can increase the accuracy of this model?)
- By training it for more epochs (Compare training and validation loss) 通过训练更多的时期(比较训练和验证损失)
- By changing the learning rate (Like 0.01, 0.05, 0.1) 通过更改学习率(例如0.01、0.05、0.1)
- By changing the pre-trained model (Like dense-net but it would take more training time) 通过更改预先训练的模型(例如密集网,但需要更多的训练时间)
- By further preprocessing the image 通过进一步预处理图像
步骤7:测试您自己的图片 (Step 7: Test Your own Images)
Now you’ve trained and tested your model. Now it’s the most exciting part. Kudos to you for making it so far.
现在,您已经训练并测试了模型。 现在,这是最令人兴奋的部分。 到目前为止,您感到很荣幸。
- Load the new images you want to test and saved model into the memory 将要测试的新图像加载并保存到内存中
#Loading the new image directory
dog_files_short = np.array(glob("/content/my_dogs/*"))
#Loading the model
model_transfer.load_state_dict(torch.load('model_transfer.pt'))
2. Now we have to preprocess the image and predict the class by testing it into our trained model
2.现在,我们必须预处理图像并通过将其测试到训练有素的模型中来预测班级
def predict_breed_transfer(img_path):

    #Preprocessing the input image
    transform = transforms.Compose([transforms.Resize(255),
                               transforms.CenterCrop(224),
                               transforms.ToTensor(),
                                       transforms.Normalize([0.485, 0.456, 0.406],
                                                            [0.229, 0.224, 0.225])])
    img = Image.open(img_path)
    img = transform(img)[:3,:,:].unsqueeze(0)
    if use_cuda:
        img = img.cuda()
        model_transfer.to('cuda')
        # Passing throught the model
    model_transfer.eval()
    # Checking the name of class by passing the index
    class_names = [item[4:].replace("_", " ") for item in data_transfer['train'].dataset.classes]


    idx = torch.argmax(model_transfer(img))
    return class_names[idx]


    output = model_transfer(img)
    # Probabilities to class
    pred = output.data.max(1, keepdim=True)[1]
    return pred
3. Now by passing the image path into this function as an argument we can predict the dog’s name.
3.现在,通过将图像路径作为参数传递给该函数,我们可以预测狗的名字。
I have passed the following image and got this name as an output.
我已经传递了以下图像,并将此名称作为输出。
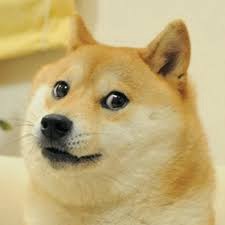
Output:
Norwegian buhund
Norwegian buhund looks a lot like our meme doge :D
挪威布恩看起来很像我们的模因总督:D
Conclusion
结论
This is just the starting you could do a lot more with this model. You can create an app with it by deploying it somewhere. I have tried creating my own model from scratch without using transfer learning but the testing accuracy couldn't get more than 13%. You can try that too as it would help in understanding the concepts.
这只是开始,您可以使用此模型做更多的事情。 您可以通过将其部署到某个地方来创建一个应用。 我尝试从头开始创建我自己的模型,而无需使用迁移学习,但是测试的准确性不能超过13%。 您也可以尝试这样做,因为这有助于理解概念。
Feel free to connect with me on Linkedin.
随时通过Linkedin与我联系。
深度学习分类pytorch


 被折叠的 条评论
为什么被折叠?
被折叠的 条评论
为什么被折叠?
 到【灌水乐园】发言


