


Publishing an application not an easy task there are many phases under which the app needs to go. Such as development, testing, etc. Out of that, testing the application is a major task to make the application stable. While testing it we actually maintain different servers(staging, production, development, etc) that we only use while developing and in testing. But when times come where the client wants the final build where we have to change all setup of the server URL and other stuff which we using while testing to Production set. During this time developers have to do it manually by changing the URL. What if we got a chance where we don’t need to do this all manual work. Yes!, You can do it that is what we are going to discuss it here.
发布应用程序不是一件容易的事,有许多阶段需要进行。 例如开发,测试等。此外,测试应用程序是使应用程序稳定的一项主要任务。 在测试它时,我们实际上维护了仅在开发和测试中使用的不同服务器(登台,生产,开发等)。 但是,当客户需要最终版本的时候,我们必须更改服务器URL的所有设置以及我们在测试到生产集时使用的其他内容。 在这段时间内,开发人员必须通过更改URL手动进行操作。 如果我们有机会不需要进行所有手动工作,该怎么办。 是的,您可以做到这一点,这就是我们将在这里讨论的内容。
有多种方法/方法来提供测试和生产版本。 (There are multiple ways/approaches to provide a build for testing and for production.)
First aproach is manually changing the code
第一个方法是手动更改代码
This is the easiest way of doing this where we are actually using a global variable to point the server/current environment. The environment could be set using enum swift or we can actually uncomment the current environment and commenting on the unuseful environment in the app delegate. But this leads to some manual error as sometimes the developer forgot to change the environment. Also, some time tested don’t know which build he is testing like is it staging or production, where he needs to confirm it from the developer, and the developer need to confirm it by seeing the code.
在我们实际上是使用全局变量来指向服务器/当前环境的情况下,这是最简单的方法。 可以使用enum swift设置环境,或者我们实际上可以取消注释当前环境,并在应用程序委托中对不可用的环境进行注释。 但这会导致一些人为错误,因为有时开发人员忘记更改环境。 此外,经过一段时间的测试后,他不知道他要测试的是哪个版本,例如阶段或生产,他需要从开发者那里确认,而开发者需要通过查看代码来确认。
Second is build scheme and build configuration
其次是构建方案和构建配置
In this approach, Xcode provides us a pre-included solution for this. In this solution, we can read words like Target, build scheme, and build configuration. So we will discuss these things before diving into it.
在这种方法中,Xcode为此提供了一个预先包含的解决方案。 在此解决方案中,我们可以阅读诸如Target,构建方案和构建配置之类的单词。 因此,在深入探讨之前,我们将讨论这些事情。
目标 (Target)
Each project has one or more target where it contains a list of classes, assets, etc. Target is another application with an enhanced feature of the current app or we can say the same application with different names, bundle id. Or we can say a copy of the project which we are providing it to other clients.
每个项目都有一个或多个目标,其中包含类,资产等的列表。目标是具有当前应用程序增强功能的另一个应用程序,或者我们可以说同一应用程序使用不同的名称,bundle ID。 或者,我们可以说我们正在提供给其他客户的项目副本。
建造方案 (Build Scheme)
A build scheme is a collection of targets to build an application, it is a configuration to use when building, and a collection of tests to execute.
构建方案是构建应用程序的目标的集合,是构建时要使用的配置,以及要执行的测试的集合。
构建配置 (Build Configuration)
Is a kind of setting that can be applied to target.
是一种可以应用于目标的设置。
构建配置和构建方案 (Build Configuration and Build Scheme)
These two things we must have to use when we are using the different-different environments. Let’s start setting up the environment. The following are the basic steps we need to perform.
当我们使用不同的环境时,我们必须使用这两件事。 让我们开始设置环境。 以下是我们需要执行的基本步骤。
- Create a single view application. 创建一个单视图应用程序。
- Create a different build configuration in the project editor. 在项目编辑器中创建一个不同的构建配置。
- Create a different scheme for each build configuration. 为每个构建配置创建一个不同的方案。
- Create a .xconfig file. 创建一个.xconfig文件。
1.创建一个单视图应用程序 (1.Create a single view application)
Create an app on how you are creating it normally. By default you can see the two build configuration with Debug and Release.
根据您的正常创建方式创建一个应用。 默认情况下,您可以看到带有D ebug和Release的两个构建配置。
2.在项目编辑器中创建不同的构建配置。 (2.Create different build configurations in the project editor.)
As you have seen two build configurations created now you can add it by clicking the plus button and selecting duplicate Debug configuration or Duplicate Release configuration as per your choice.
如您所见,现在已经创建了两个构建配置,您可以通过单击加号并根据您的选择选择重复的Debug配置或Duplicate Release配置来添加它。
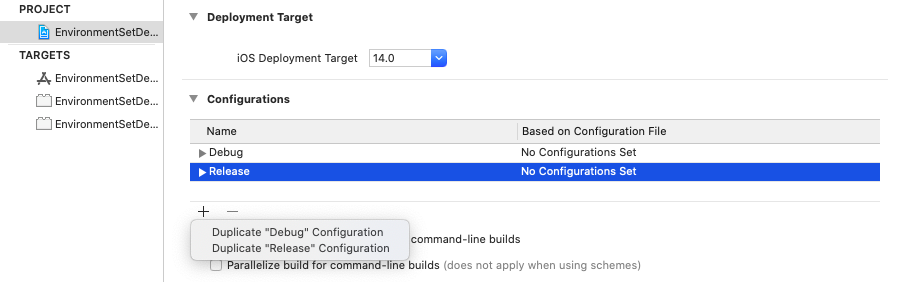
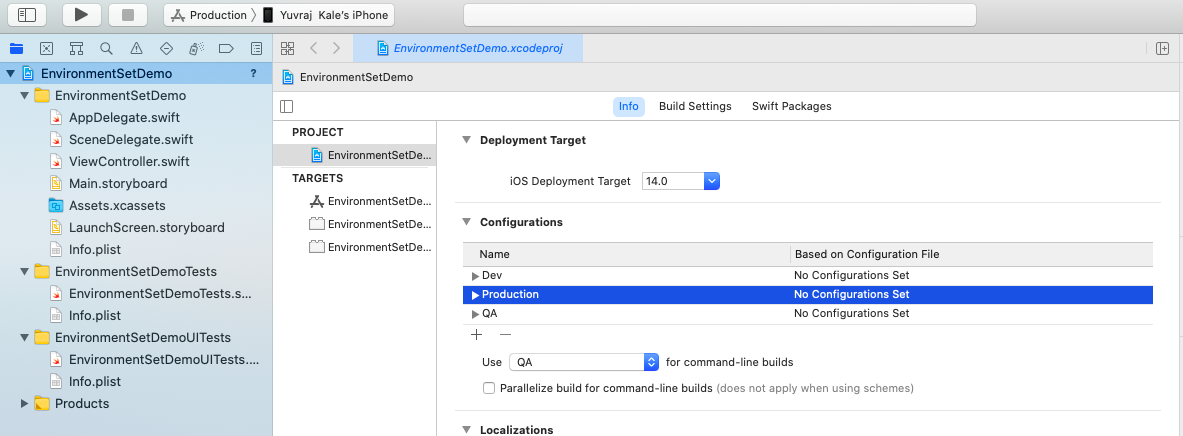
Let’s consider we have three build configuration like Dev, QA, Production. we are creating three configurations and one scheme for each. You can actually rename current Debug and Release configuration like Dev and Production by double-clicking it. And then you can add one more for QA by clicking on plus button.
让我们考虑一下,我们有三种构建配置,例如Dev,QA和Production。 我们正在为每种配置创建三种配置和一种方案。 您实际上可以通过双击重命名当前的“调试和发布”配置,例如“开发和生产”。 然后,您可以通过单击加号按钮为质量检查再添加一个。
3.为每个构建配置创建一个不同的方案。 (3.Create a different scheme for each build configuration.)
Now click on the current scheme located at the top left corner. Click on that you can see a drop-down of Edit scheme, New scheme.
现在,单击左上角的当前方案。 单击该按钮,您可以看到“编辑方案”,“新方案”的下拉列表。
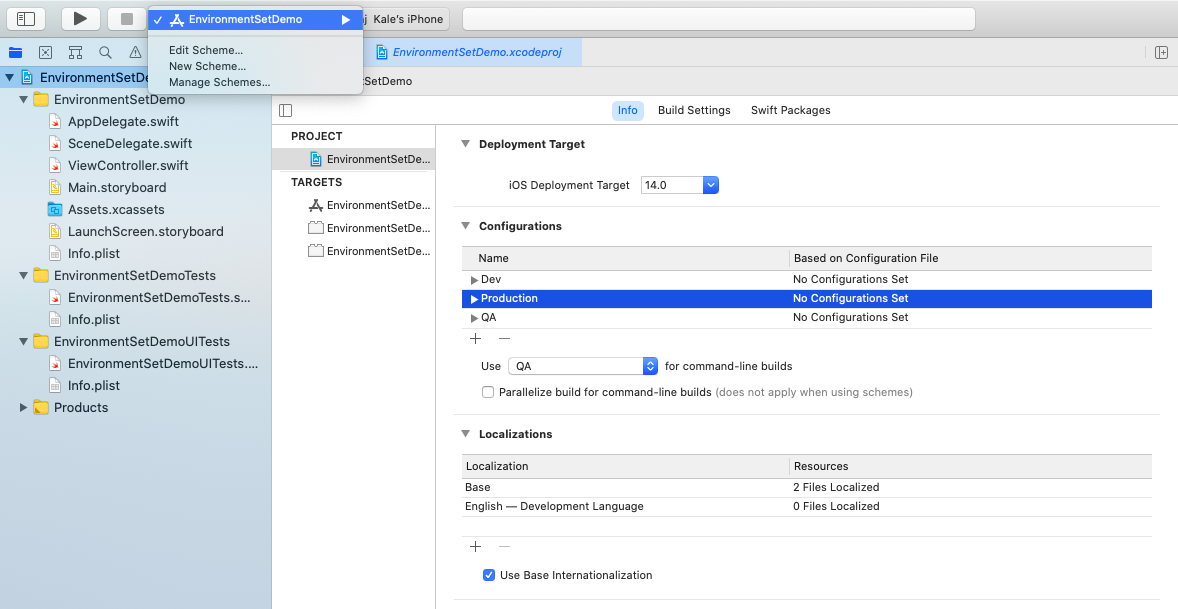
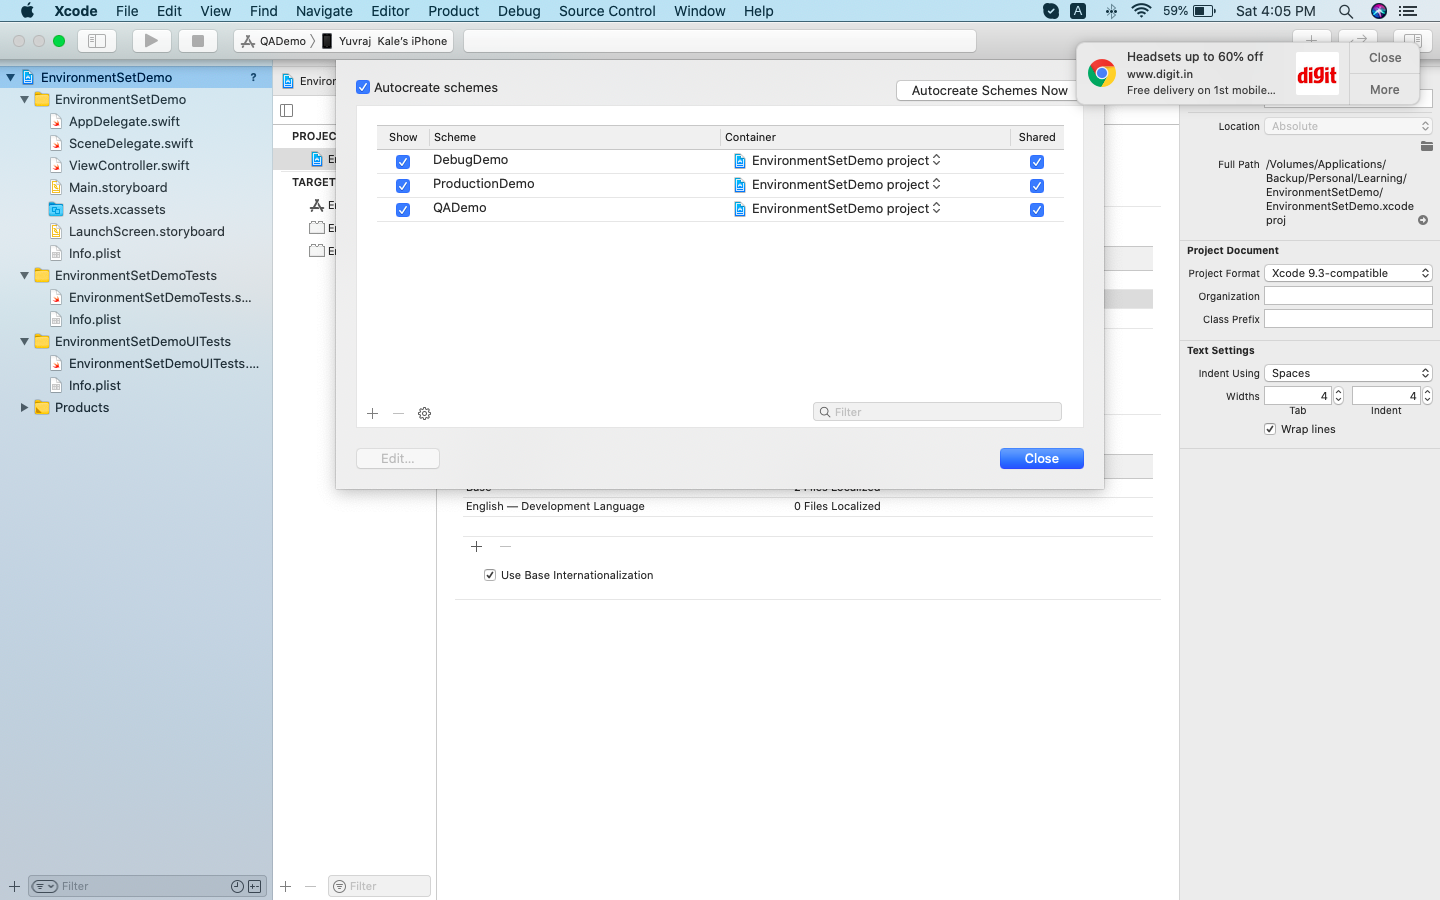
Select the Manage scheme where we are creating a different-different scheme for different-different build configurations.
选择我们要为不同的构建配置创建不同方案的管理方案。
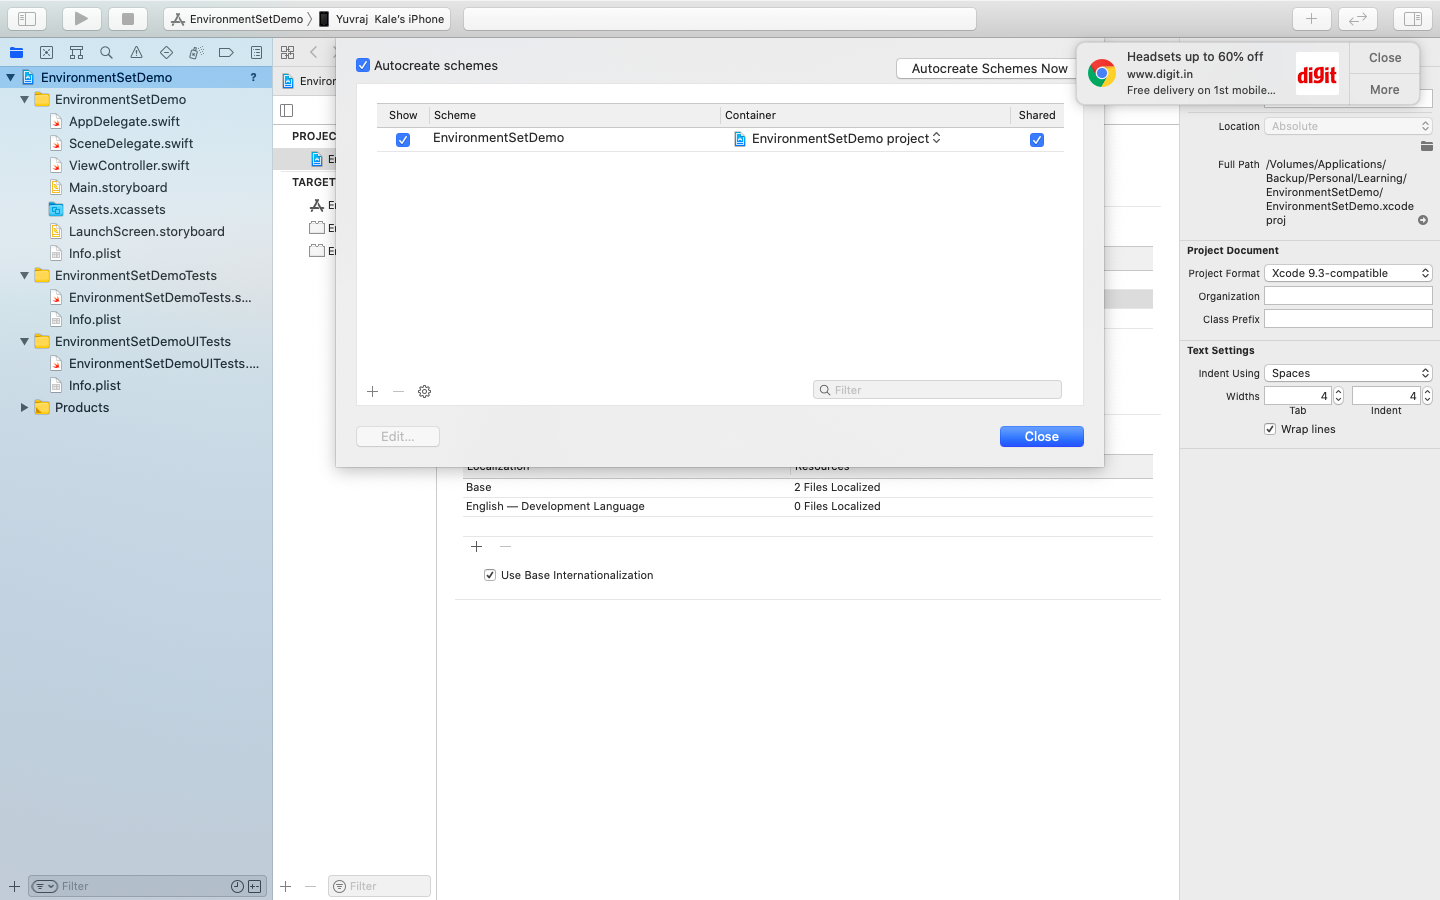
Here rename the current scheme name EnvironmentSetDemo to DebugDemo. You can create the other two schemes by clicking on the plus button. I have created the other two schemes like PriductionDemo and QADemo.
在这里,将当前方案名称EnvironmentSetDemo重命名为DebugDemo。 您可以通过单击加号按钮来创建其他两个方案。 我创建了其他两个方案,例如PriductionDemo和QADemo。
Now try to edit each scheme and change the build configuration of each scheme. You are changing the build configuration for each scheme from build configuration. I am editing the Debug scheme’s build configuration to debug. But while editing you can see multiple options and you will get confused for which we need to change the configuration. So my suggestion is a change for the Run and Archive option. As we are running and archiving applications mostly. I am changing it to dev as DebugDemo is for dev environment.
现在尝试编辑每个方案并更改每个方案的构建配置。 您正在从构建配置更改每个方案的构建配置。 我正在编辑调试方案的构建配置以进行调试。 但是在编辑时,您会看到多个选项,您会感到困惑,我们需要更改配置。 因此,我的建议是更改“运行并存档”选项。 因为我们主要在运行和归档应用程序。 我将其更改为dev,因为DebugDemo用于dev环境。
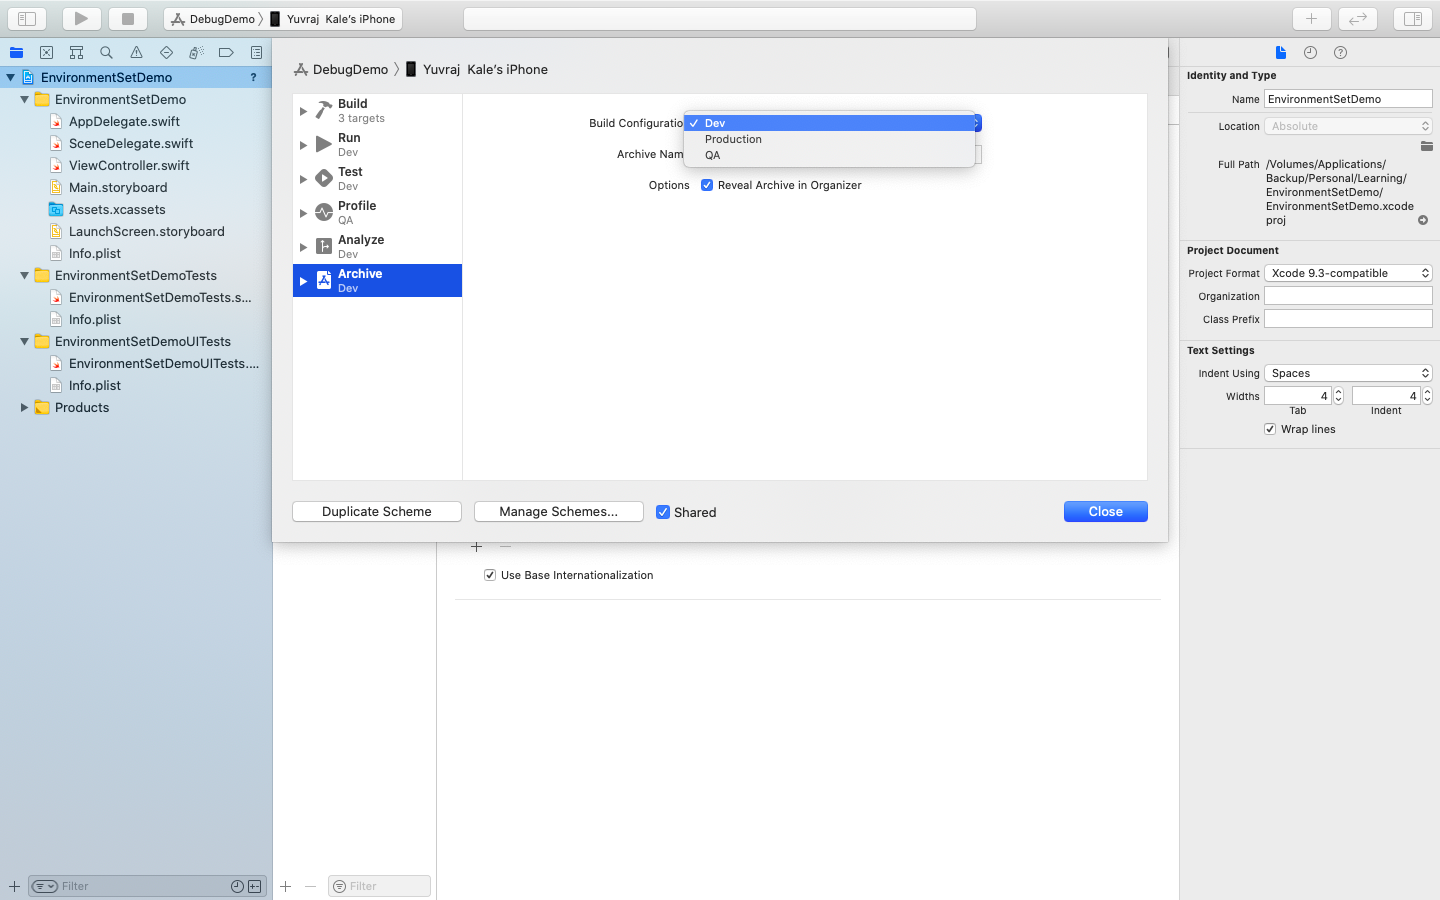
You can change other configuration accordingly.
您可以相应地更改其他配置。
Until now you have done the setup for all environments. Now, how can I access this configuration for different-different setup? So for that, we need to create a build configuration file
到目前为止,您已经完成了所有环境的设置。 现在,如何访问此配置以进行不同的设置? 因此,我们需要创建一个构建配置文件
4.创建.xconfig文件(4.Create .xconfig file)
This file plays important role in the environment setup. From this file, we are actually fetching the values for each environment separately.
该文件在环境设置中起重要作用。 实际上,我们实际上是从该文件中分别获取每个环境的值。
To create this file goto File->New File->Configuration Settings File.
要创建此文件,请转到文件->新文件->配置设置文件。
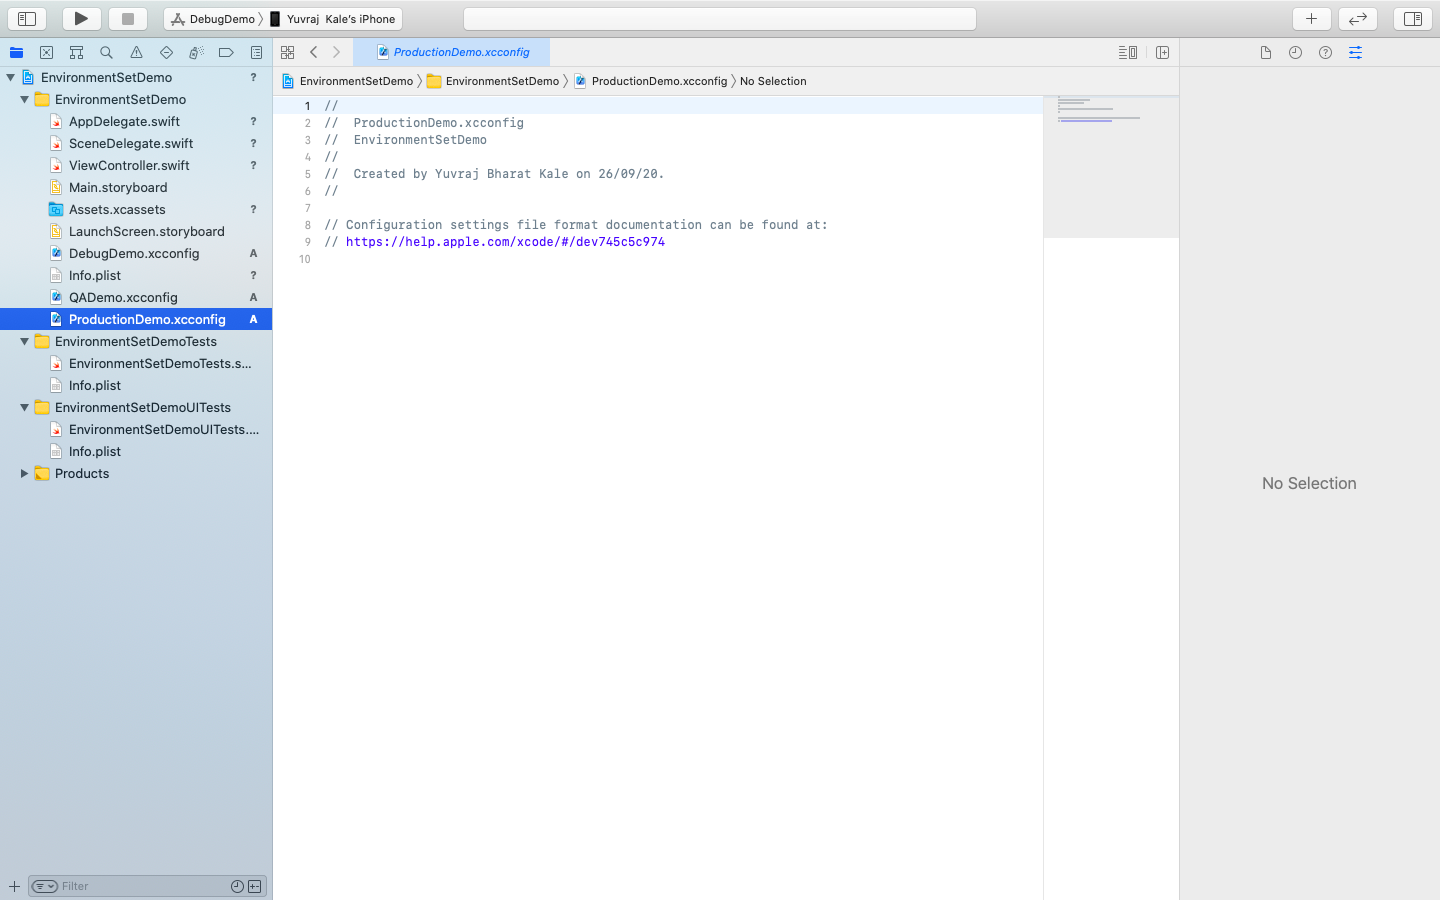
Name it the same as the scheme name. Like DebugDemo, QADemo, ProductionDemo. In the end, your file structure looks like the following.
命名与方案名称相同。 像DebugDemo,QADemo,ProductionDemo。 最后,您的文件结构如下所示。
Keep in mind while creating this config file do not select any target.
创建此配置文件时请记住不要选择任何目标。
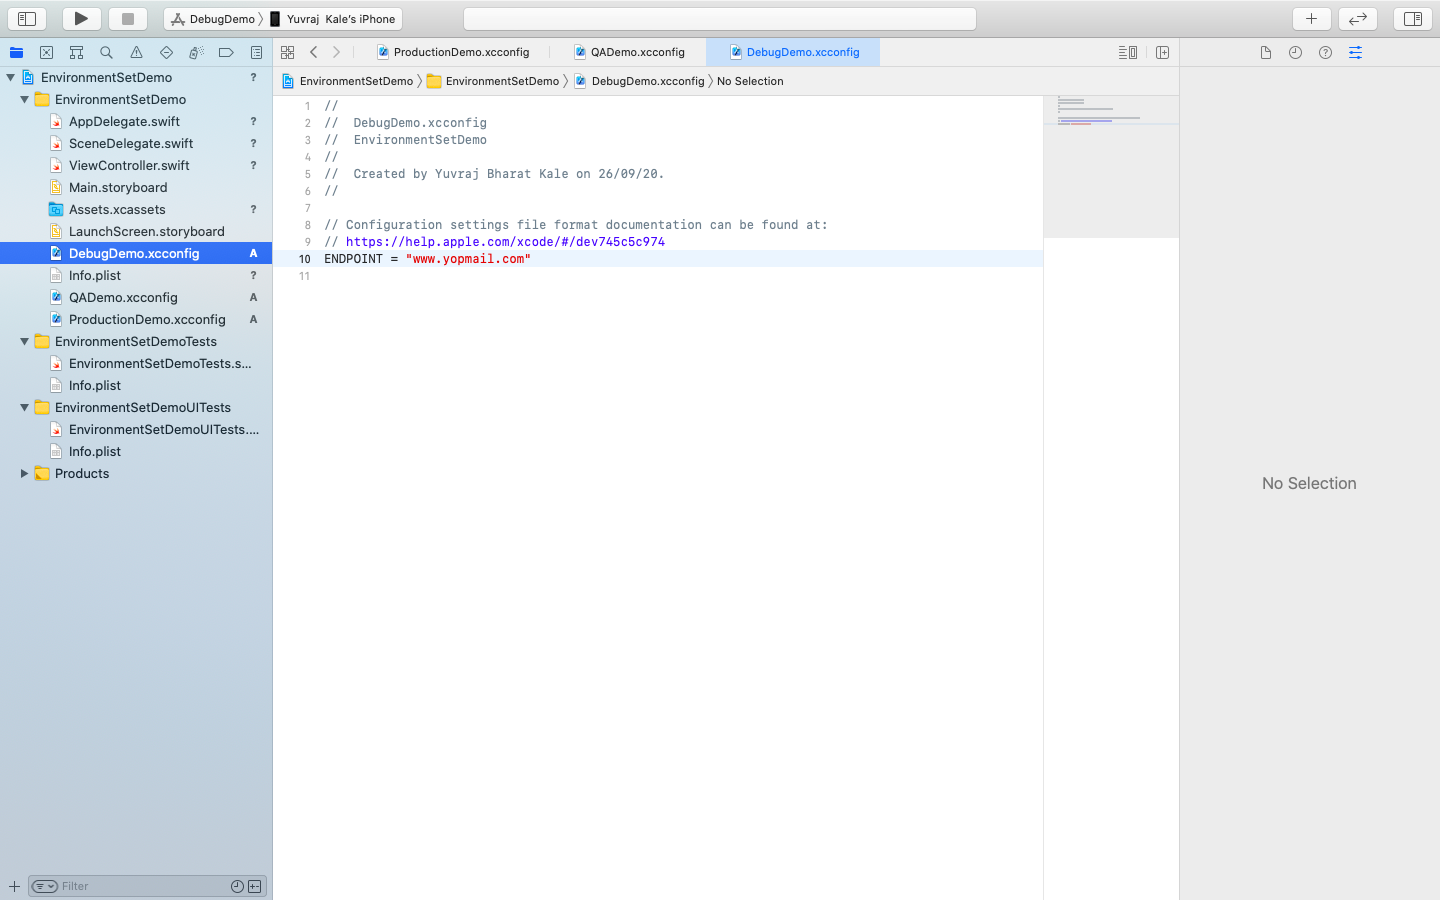
Each of .xconfig file containg key-value pair. Where we are using the key info.plist
每个.xconfig文件都包含键/值对。 我们在哪里使用关键info.plist
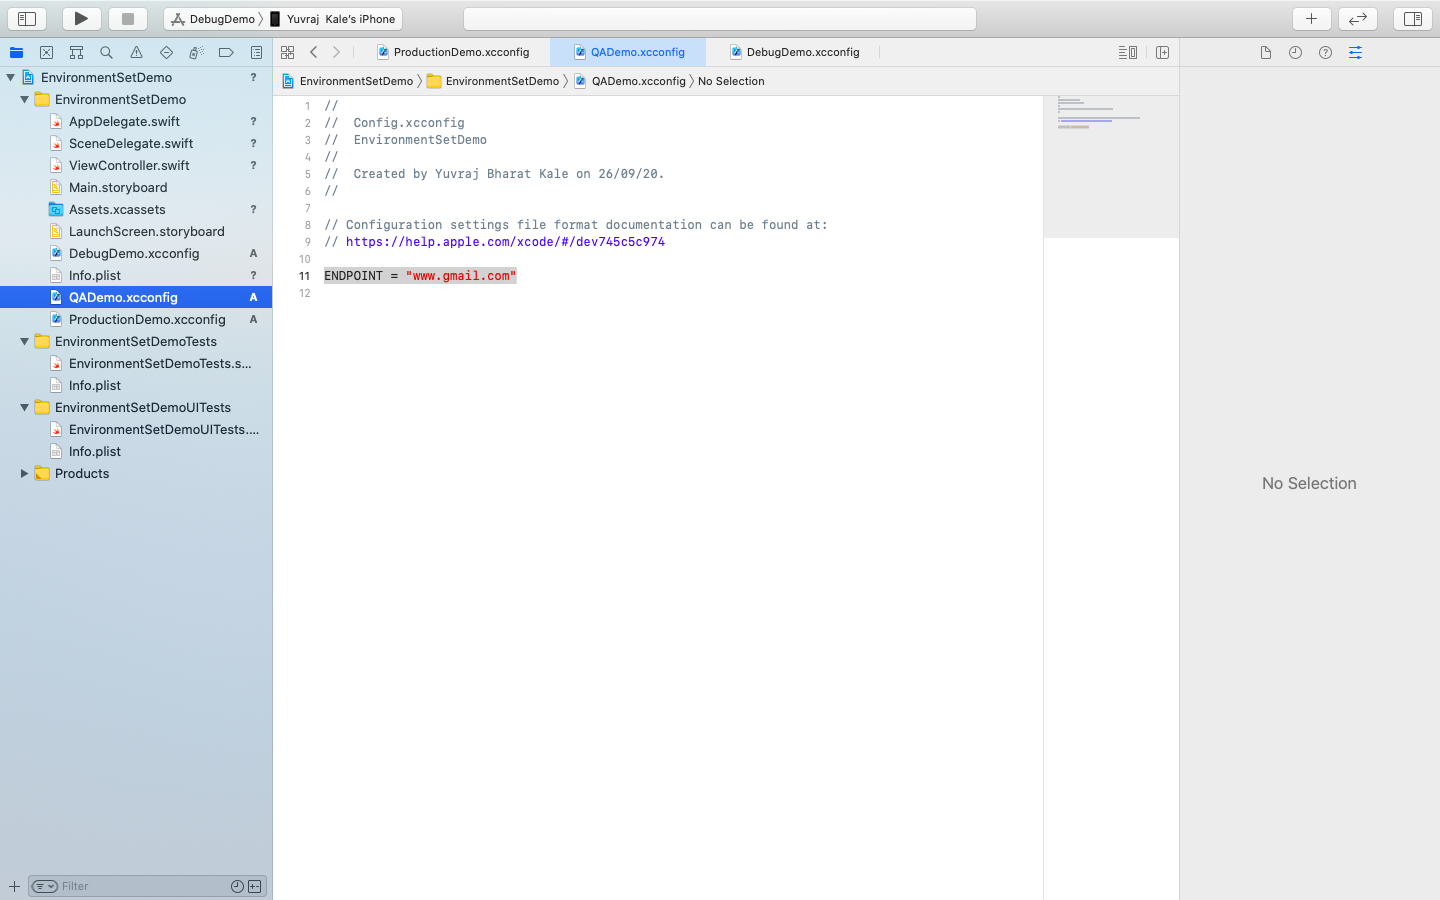
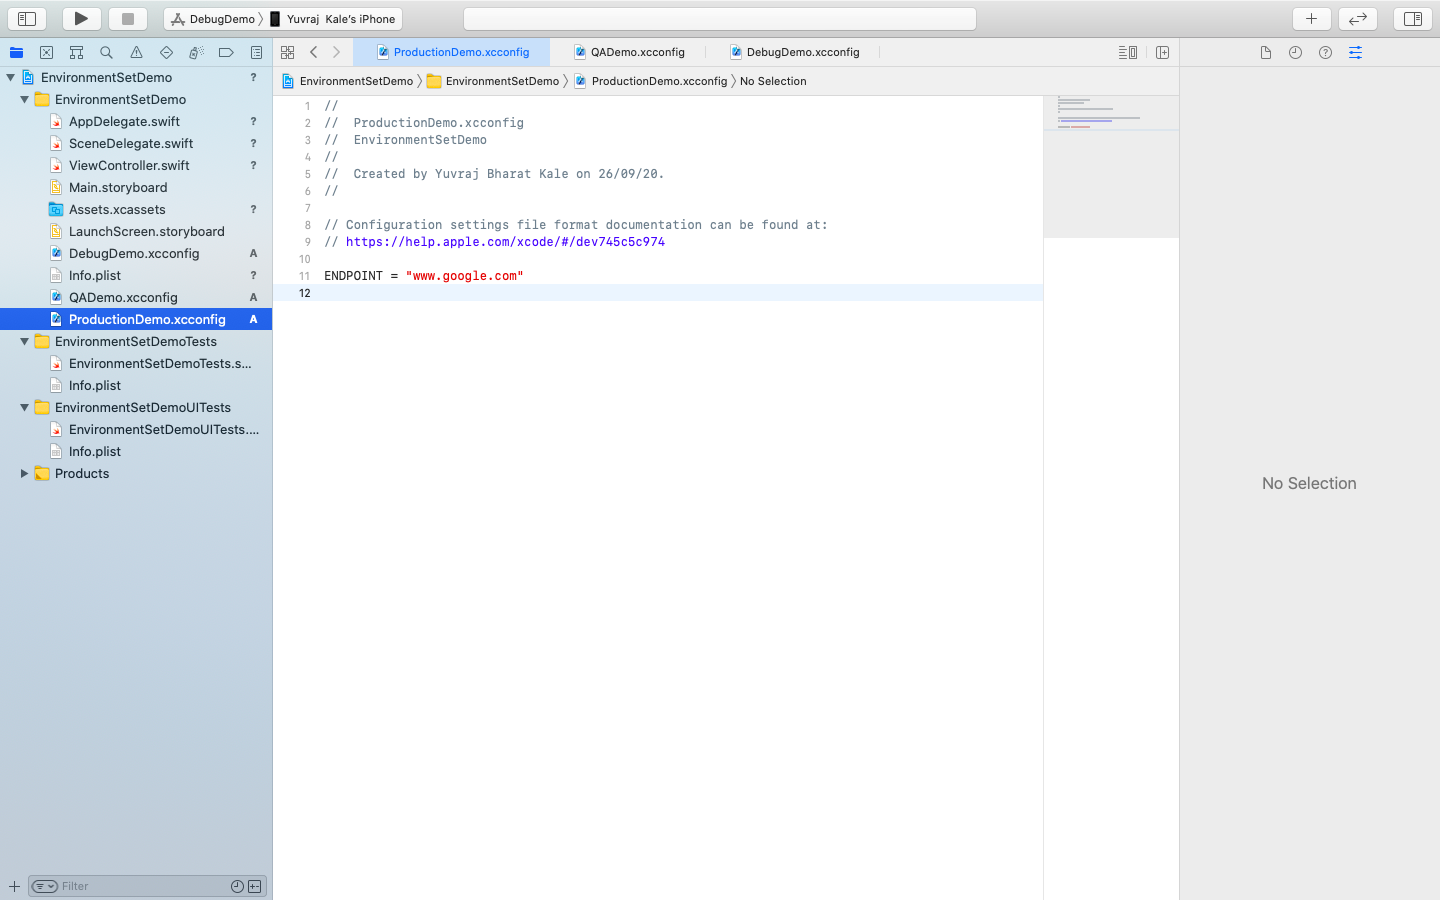
For example, I am using the key of ENDPOINT which points to different-different servers in each .xconfig file.
例如,我正在使用ENDPOINT的键,该键指向每个.xconfig文件中的不同服务器。
For DebugDemo
对于DebugDemo
For QADemo
对于QADemo
For ProductionDemo
对于生产演示
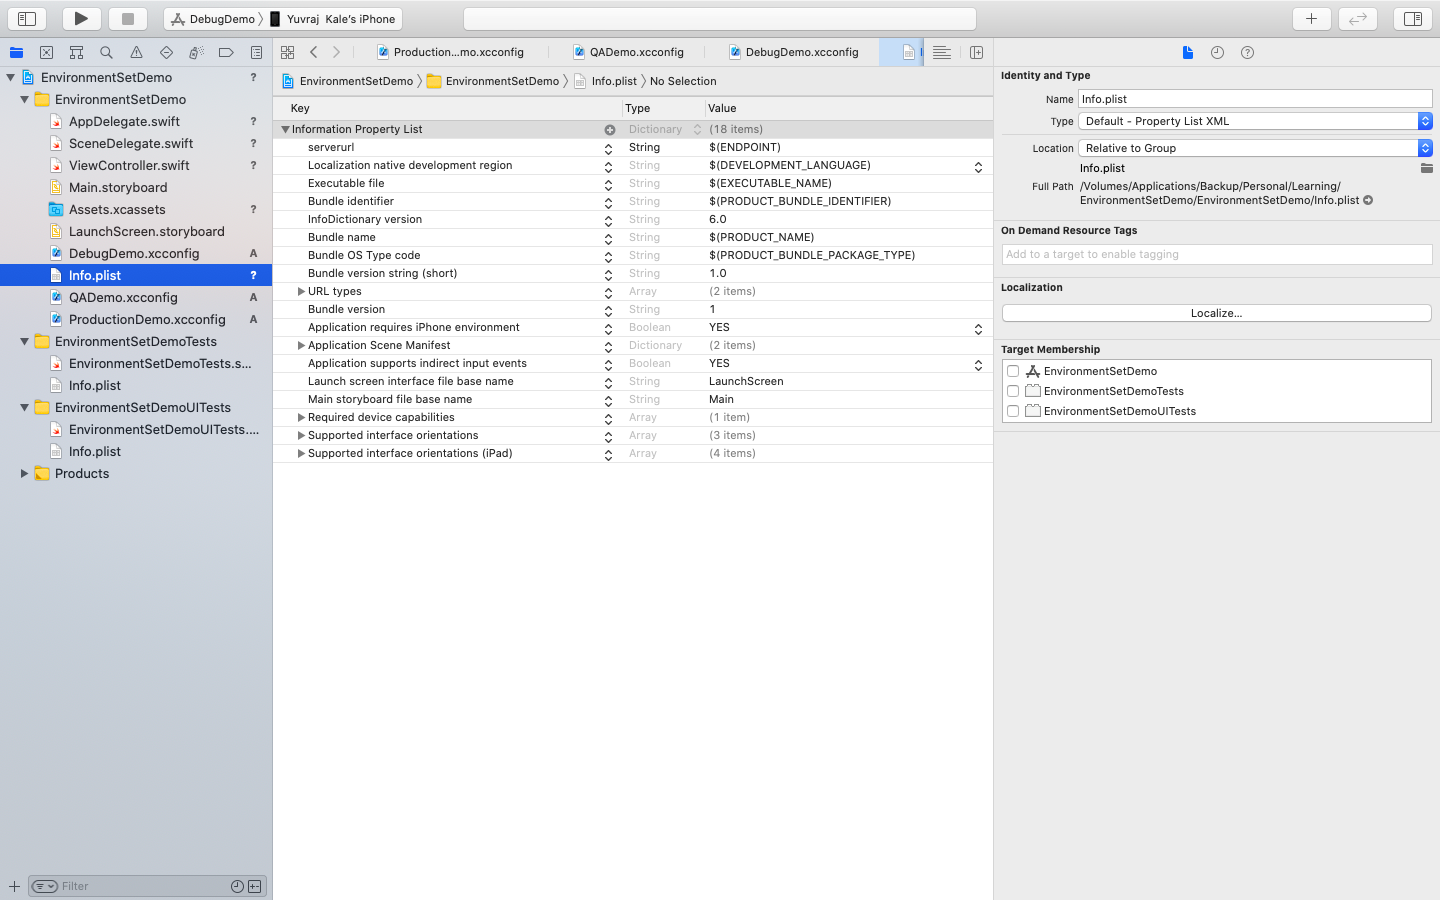
Now this configuration file’s setting is done. How can I use these URL's in the project. For that, you need to add key in info.plist. Where the key is anything and value should be the key(i.e ENDPOINT) in the config file. The key should be included in $(). Like in our case it should be $(ENDPOINT).
现在,此配置文件的设置已完成。 如何在项目中使用这些URL。 为此,您需要在info.plist中添加密钥。 键是任何东西,值应该是配置文件中的键(即ENDPOINT)。 密钥应包含在$()中。 就像我们的情况一样,它应该是$(ENDPOINT)。
See following screen shot of info.plist where serverurl is key and its value is $(ENDPOINT)
见info.plist中的下面的屏幕截图,其中SERVERURL是关键,它的值是$(端点)
Now we all are done with the initial setup now how can we use it in code? No worries here is the final thing we need to do to get access of the endpoint url
现在我们都完成了初始设置,现在如何在代码中使用它呢? 不用担心,这是我们获取端点URL所要做的最后一件事
let url = Bundle.main.infoDictionary?[“serverurl”] as? String
让url = Bundle.main.infoDictionary?[“ serverurl”]表示为? 串
Now you are ready to use all environments just by changing the scheme only. While uploading the build you have to just change the scheme and accordingly, you can submit build no need to do extra work.
现在,您只需更改方案即可使用所有环境。 在上载构建时,您只需更改方案即可,因此,您无需进行额外的工作即可提交构建。
Now we are clear to the basic setup of the environment but we can actually change the Name, App Icon, Bundle ID for each scheme. For that, you can do the following steps.
现在我们已经清楚了环境的基本设置,但是实际上我们可以更改每个方案的名称,应用程序图标和捆绑ID。 为此,您可以执行以下步骤。
Name change
名称变更
For changing you need goto Target->Build setting then search Product name. Then you can see each environment and name. Now you can change the name whatever you want. I have done it as DEV, PROD, QA.
要进行更改,您需要转到Target-> Build setting,然后搜索Product name 。 然后,您可以看到每个环境和名称。 现在,您可以根据需要更改名称。 我已经完成了DEV,PROD和QA的任务。

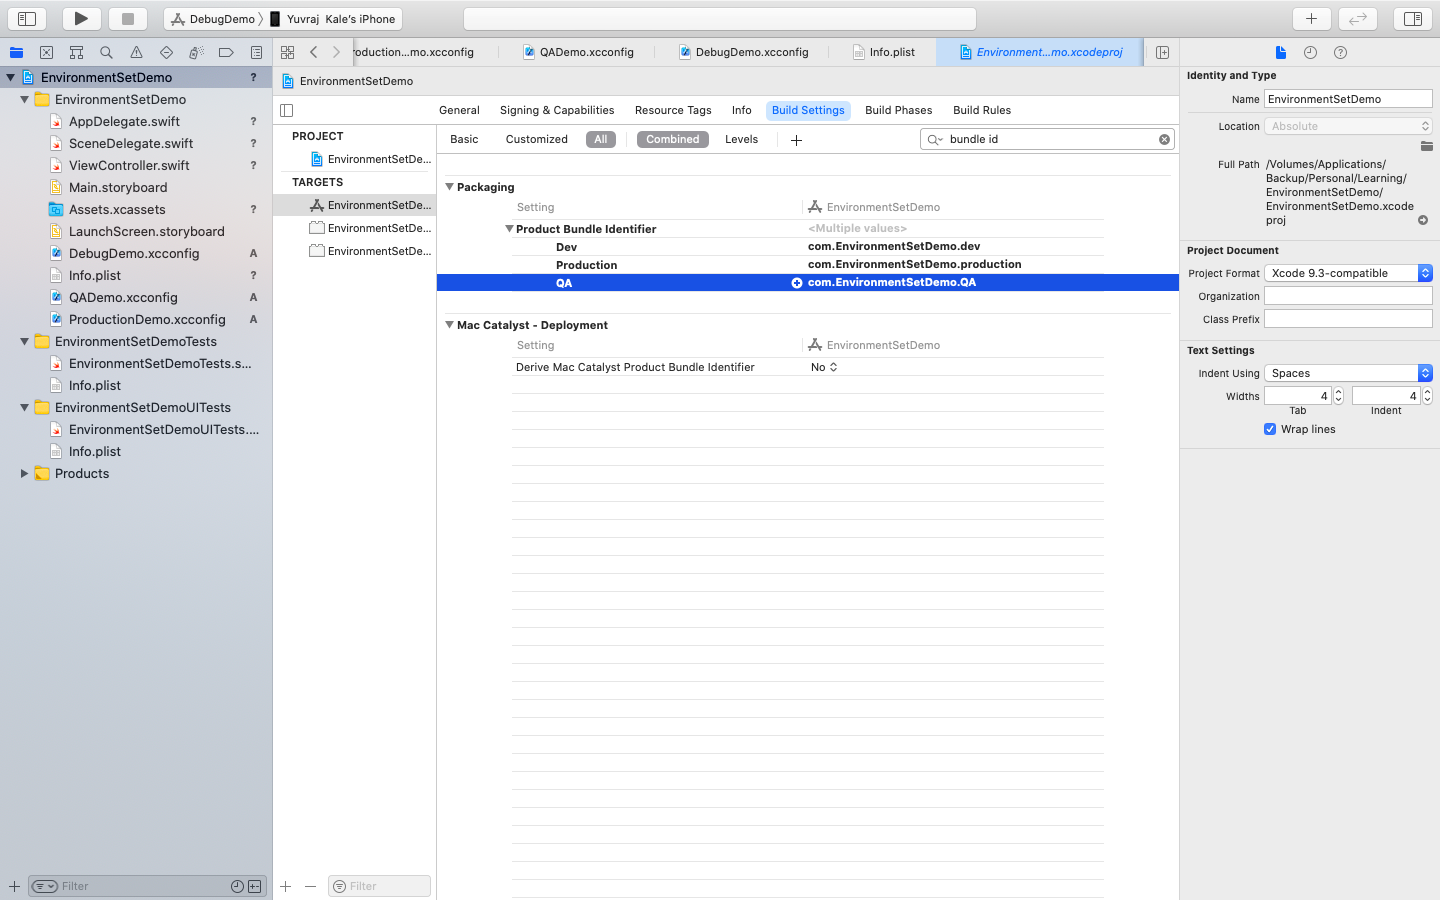
BundleID change
BundleID变更
For changing again you need goto Target->Build setting then search Bundle ID. Like before a set, you can see each environment and can change the bundle as you wish. In my case, I have just appended it with .dev, .QA, and .production
要再次更改,您需要转到Target-> Build设置,然后搜索Bundle ID。 与设置之前一样,您可以看到每个环境,并可以根据需要更改包。 就我而言,我刚刚将其附加了.dev,.QA和.production
注意 (NOTE)
Make sure that in build configuration for each configuration we have selected the right configuration. Check the following screen-shot.
确保在构建配置中,对于每个配置,我们都选择了正确的配置。 检查以下屏幕截图。
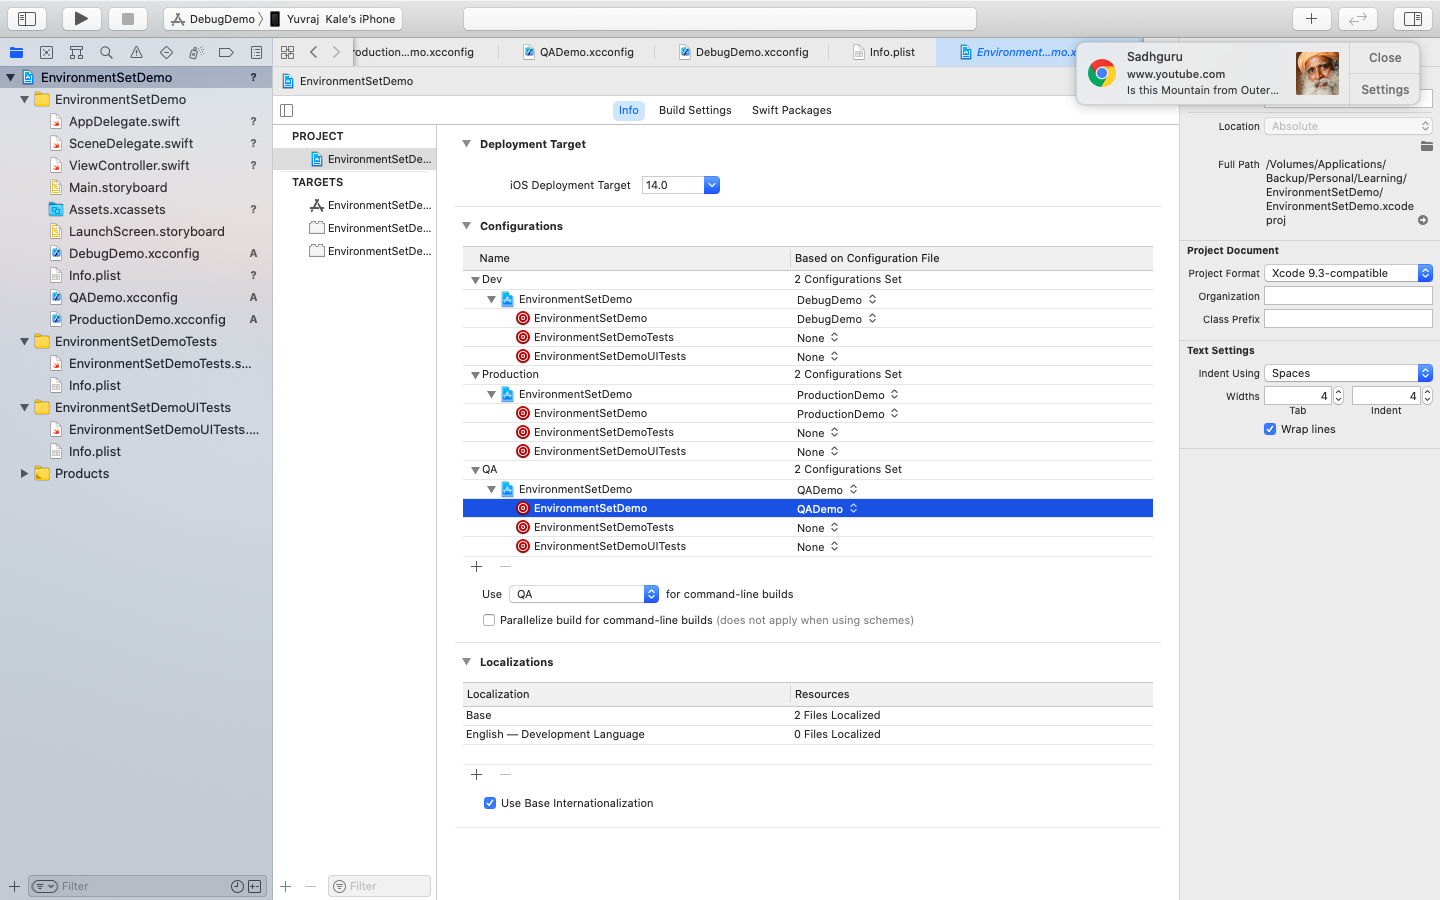
If the above way is your selection then only your config file gets read. Otherwise, It will return an empty value.
如果选择上述方式,则仅读取配置文件。 否则,它将返回一个空值。
结论 (Conclusion)
Using Xcode configuration files is an efficient and powerful solution for configuring different build settings. This is a good practice to get rid of manual work. I recommend you should always do these setup before starting any project which helps you to be a good developer.
使用Xcode配置文件是用于配置不同构建设置的高效强大的解决方案。 这是摆脱手工工作的好习惯。 我建议您在开始任何有助于您成为优秀开发人员的项目之前,应始终执行这些设置。
翻译自: https://medium.com/@YuvrajKale/ios-environment-setup-e42cb4997e39


 652
652


 被折叠的 条评论
为什么被折叠?
被折叠的 条评论
为什么被折叠?
 到【灌水乐园】发言


