


nuxt 调用原生js函数
tl;dr: Here’s an example repo of Nuxt.js & Express using TypeScript, deployable to Firebase Cloud Functions and Hosting, set up for both development and production use.https://github.com/williamchong/nuxtjs-express-firebase-typescript
tl; dr:这是使用TypeScript的Nuxt.js&Express的示例存储库,可部署到Firebase Cloud Functions and Hosting,设置用于开发和生产用途。 https://github.com/williamchong/nuxtjs-express-firebase-typescript
Last time I shared how to deploy Nuxt.js on Firebase Cloud Functions. However some common use cases were not covered. What if I want to run a separate backend API server, instead of using Nuxt.js server middleware? Firebase Cloud Function supports TypeScript, what if I want to migrate to TypeScript?
上次我分享了如何在Firebase Cloud Functions上部署Nuxt.js。 但是,未涵盖一些常见用例。 如果我想运行单独的后端API服务器而不使用Nuxt.js服务器中间件怎么办? Firebase Cloud Function支持TypeScript ,如果要迁移到TypeScript怎么办?
In fact, in LikeCoin we are also trying to migrate our JavaScript codebase to TypeScript. Need not worry, this guide will get you covered.
实际上,在LikeCoin中,我们还尝试将JavaScript代码库迁移到TypeScript。 不用担心,本指南将帮助您。
开发设置 (Development Setup)
开发文件夹结构(Development Folder Structure)
We will begin with a simple create-nuxt-app template withaxios module and TypeScript support. However, I will modify the folder structure a bit, moving all Nuxt.js source file into /src, and adding a /src/server and /src/server/api for placing our APIs. It should look like this.
我们将从带有axios模块和TypeScript支持的简单create-nuxt-app模板开始。 但是,我将稍微修改文件夹结构,将所有Nuxt.js源文件移至/src ,并添加/src/server和/src/server/api来放置我们的API。 它应该看起来像这样。
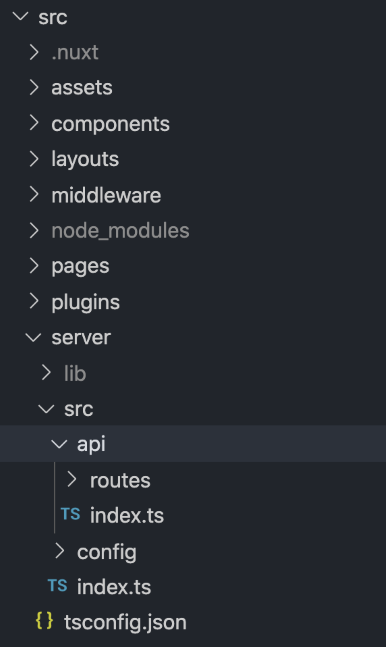
The reason for placing /server inside /src is that I want to run both the Nuxt builder and Express API server in a single npm command, allowing hot reload to trigger on file change in either directory.
将/server放在/src内的原因是我想在单个npm命令中同时运行Nuxt生成器和Express API服务器,从而允许热重载在任一目录中的文件更改时触发。
开发服务器 (Development Server)
Inside /api are the server API routes that should be customized to your backend business logic. In this sample, they are just stub and will the actual code be omitted. Here I want to focus on /src/server/index.ts, which is the main Express instance of this development setup.
/api是应根据您的后端业务逻辑自定义的服务器API路由。 在此示例中,它们只是存根,将省略实际代码。 在这里,我想重点介绍/src/server/index.ts ,这是此开发设置的主要Express实例。
import path from 'path';
import express from 'express';
import cookieParser from 'cookie-parser';
import consola from 'consola';
// @ts-ignore
import { loadNuxt, build } from 'nuxt';


import api from './api';


const app = express();


async function start() {
  const isDev = process.env.NODE_ENV !== 'production';
  // Init Nuxt.js
  const nuxt = await loadNuxt({
    rootDir: path.join(__dirname, '../../'),
    for: isDev ? 'dev' : 'start',
  });


  const {
    host = process.env.HOST || '127.0.0.1',
    port = process.env.PORT || 3000,
  } = nuxt.options.server;


  // Enable live build & reloading on dev
  if (isDev) {
    build(nuxt);
  }
  await nuxt.ready();


  app.use('/api', api);
  app.use(cookieParser());
  // Give nuxt middleware to express
  app.use(nuxt.render);


  // Listen the server
  app.listen(port, host);
  consola.ready({
    message: `Server listening on http://${host}:${port}`,
    badge: true,
  });
}
start();


export {};
I have used new programmatic render syntax for Nuxt renderer/builder, loadNuxt and build. The advantage of using loadNuxt is that you won’t have to directly require() the nuxt.config.js config file. This solves the issue that if your config file uses import or other TypeScript syntax, it needed additional transpile to commonjs. The API routes are all included inside the /api/index.ts as an Express router and are served under /api.
我已经为Nuxt渲染器/构建器, loadNuxt和build使用了新的程序化渲染语法。 使用loadNuxt的优点是您不必直接require() nuxt.config.js配置文件。 这解决了以下问题:如果您的配置文件使用import或其他TypeScript语法,则需要额外的对commonjs的转换。 API路由都作为Express路由器包含在/api/index.ts ,并在/api 。
By using this configuration, the development server will trigger a Nuxt build if run in a development environment. By running the server, both the /api endpoints and the Nuxt renderer with being served in an all-in-one configuration.
通过使用此配置,如果在开发环境中运行,开发服务器将触发Nuxt构建。 通过运行服务器, /api端点和Nuxt渲染器都可以在多合一配置中进行服务。
额外提示: (Extra tips:)
Like I mentioned in my previous article, using the nuxt-start library for a lighter weight production start-up would also be a good idea for cloud function. However, to keep this example simple I will be using nuxt instead.
就像我在前一篇文章中提到的那样,使用nuxt-start库进行更轻量级的生产启动对于云功能也是个好主意。 但是,为使此示例简单,我将改用nuxt 。
Since Nuxt middleware is not yet properly typed, in line 5 I used @ts-ignore, You can use other mitigation like declare module 'nuxt' . Also, there is an export {} at the end to ignore unwanted TypeScript warning.
由于尚未正确键入Nuxt中间件,因此在第5行中,我使用了@ts-ignore ,您可以使用其他缓解措施,例如declare module 'nuxt' 。 另外,末尾有一个export {} ,可忽略不需要的TypeScript警告。
开发服务器TypeScript配置 (Development Server TypeScript config)
Speaking of TypeScript warning, we also want a separate tsconfig.json for this Express server. This is because the one provided in create-nuxt-app the template includes the DOM lib used for a browser environment. This will emit many unwanted warnings when running the Express server in node.js serve environment. The tsconfig.json for the server can be found here, and the main difference is to remove DOM from lib. However you can also set up other rules according to your needs, should you have some rules that differ in your Nuxt and Express environment.
说到TypeScript警告,我们还希望为此Express服务器使用单独的tsconfig.json 。 这是因为模板在create-nuxt-app的模板包含用于浏览器环境的DOM库。 在node.js服务环境中运行Express服务器时,这将发出许多不必要的警告。 可以在这里找到服务器的tsconfig.json,主要区别是从lib删除DOM 。 但是,如果您在Nuxt和Express环境中有一些不同的规则,也可以根据需要设置其他规则。
开发package.json (Development package.json)
The last part is how to run the above development server. One good developer experience for Nuxt is that when running, it provides hot-reload whenever we changed our code, and we definitely want to keep that trait in our new setup. We will be using ts-watch which is basically node-mon + tsc built together. This will provide hot-reload for the server-side code. When we are running the Nuxt builder and renderer middleware in development mode, they will provide the client-side hot reload just like running the default nuxt-ts command.
最后一部分是如何运行上述开发服务器。 Nuxt的一个良好的开发人员经验是,在运行时,只要我们更改代码,它就可以提供热重载,我们当然希望在新设置中保留该特征。 我们将使用ts-watch ,它基本上是node-mon + tsc一起构建的。 这将为服务器端代码提供热重载。 在开发模式下运行Nuxt构建器和渲染器中间件时,它们将提供客户端热重载,就像运行默认的nuxt-ts命令一样。
To archive this behavior, we will use these package.json scripts.
要存档此行为,我们将使用这些package.json脚本。
"scripts": {
    "dev": "cd server && tsc-watch --onSuccess \"node ./lib/index.js\"",
    "build": "yarn build:server && yarn build:client",
    "build:client": "nuxt-ts build",
    "build:server": "cd server && tsc",
    "start": "nuxt-ts start",
    "generate": "nuxt-ts generate",
    "lint:js": "eslint --ext .js,.vue --ignore-path .gitignore .",
    "lint:server": "eslint --ext .ts --ignore-path .gitignore server",
    "lint:style": "stylelint **/*.{vue,css} --ignore-path .gitignore",
    "lint": "yarn lint:js && yarn lint:style && yarn lint:server",
    "test": "jest"
  },
The major changes I have made are splitting up the build script into build:client and build:server. Also the dev script is changed to using tsc-watch. The build:server script is a standard one using tsc to compile Typescript into JavaScript. The dev script watches the server folder for any change in server code, rebuild the code into the output folder lib, then run the server code.
我所做的主要更改是将build脚本分为build:client和build:server 。 dev脚本也更改为使用tsc-watch 。 build:server脚本是使用tsc将Typescript编译为JavaScript的标准脚本。 dev脚本监视server文件夹中服务器代码的任何更改,将代码重建到输出文件夹lib ,然后运行服务器代码。
One point to notice is that any change in server code will reload the server instance and thus the Nuxt builder, which will trigger a full rebuild. So I recommend finishing the server API development first before drilling deep into the fancy frontend side of your application.
需要注意的一点是,服务器代码中的任何更改都将重新加载服务器实例,从而重新加载Nuxt构建器,这将触发完全重新构建。 因此,我建议先深入研究应用程序的前端,然后再完成服务器API的开发。
The above files are the main components of a dev setup. By now you should be able to run just run npm run dev and enjoy a front-backend hot reload server.
以上文件是开发设置的主要组成部分。 现在,您应该可以只运行npm run dev并享受前端后端热重装服务器。
生产设置 (Production Setup)
生产文件夹结构(Production Folder Structure)
After you complete the development of your Nuxt application. It is time to bring it to production. As mentioned we will be using Firebase hosting for static assets, and cloud functions for running SSR renderer. In addition, we will be serving our Express API server with a cloud function too.
在完成Nuxt应用程序的开发之后。 现在是时候将其投入生产了。 如前所述,我们将使用Firebase托管静态资产,并使用云功能运行SSR渲染器。 此外,我们还将为具有云功能的Express API服务器提供服务。
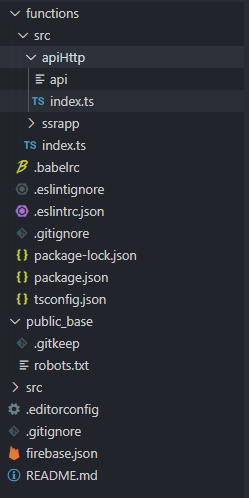
Let us begin by adding two new folders /functions and /public_base. /functions is for housing our cloud functions, and /public_base is the folder for your static asset. We will later merge this folder with the static scripts generated by Nuxt builder together into the final /public folder to be put on hosting.
让我们从添加两个新文件夹/functions和/public_base 。 /functions用于容纳我们的云功能, /public_base是您的静态资产的文件夹。 稍后,我们将把这个文件夹与Nuxt Builder生成的静态脚本合并到最终的/public文件夹中进行托管。
生产功能设置(Production Functions setup)
Like in the dev environment, we will be putting our TypeScript source code into src and later build them into JavaScript in lib.
像在开发环境中一样,我们将把TypeScript源代码放入src ,然后将它们构建到lib JavaScript中。
Inside the /functions/src, we have ssrapp which houses the Nuxt SSR renderer functions. We also have apiHttp which houses the API Express instance in index.ts and api which is a symlink to /src/server/api. A symlink was used so that we can guarantee the consistency of server code in the dev environment and production deployment without any extra synchronization overhead.
在/functions/src内部,我们有ssrapp ,其中包含Nuxt SSR渲染器功能。 我们也有apiHttp容纳在API Express实例index.ts和api这是一个符号链接到/src/server/api 。 使用了符号链接,以便我们可以保证开发环境和生产部署中服务器代码的一致性,而不会产生任何额外的同步开销。
import { config, https } from 'firebase-functions';
import express from 'express';
import helmet from 'helmet';
import api from './api';


const app = express();


app.use(helmet());
app.set('trust proxy', 1);
app.use('/api', api);


if ((config().constant || {}).external_url) {
  process.env.API_URL = config().constant.external_url;
}


const internalHttp = https.onRequest(app);


module.exports = internalHttp;
The difference between the index.ts used in dev and production environ for API is that Nuxt builder and renderer is not included thus nuxt not need to be loaded, and helmet was used to improve security. This separation of API and frontend rendering functions would be good for API performance. Also, it is useful if you have any other non-Nuxt.js frontend that you plan to share this set of API with.
API的开发环境和生产环境中使用的index.ts之间的index.ts是,不包括Nuxt构建器和渲染器,因此不需要加载nuxt ,并且使用helmet来提高安全性。 API和前端呈现功能的这种分离对于API性能将是有益的。 另外,如果您打算与其他非Nuxt.js前端共享该套API,这将非常有用。
生产Firebase配置设置 (Production Firebase config setup)
Finally, the last step to wrap all things up ready for deployment is the firebase.json used by the Firebase command line. We can deploy the app with a simple firebase deploy command with the following configuration.
最后,最后一步包装所有东西准备部署是firebase.json由火力地堡命令行中使用。 我们可以使用具有以下配置的简单firebase deploy命令部署该应用程序。
{
  "functions": {
    "source": "functions",
    "predeploy": [
      "npm --prefix src run lint",
      "npm --prefix src run build",
      "rm -rf functions/src/nuxt",
      "cp -r src/.nuxt/ functions/lib/nuxt/",
      "cp src/nuxt.config.js functions/src",
      "cp src/nuxt.config.js functions/lib",
      "npm --prefix functions run lint",
      "npm --prefix functions run build"
    ]
  },
  "hosting": {
    "predeploy": [
      "rm -rf public/* && mkdir -p public/_nuxt && cp -a src/.nuxt/dist/client/. public/_nuxt && cp -a src/static/. public/ && cp -a public_base/. public/"
    ],
    "public": "public",
    "ignore": [
      "firebase.json",
      "**/.*",
      "src/node_modules/**"
    ],
    "rewrites": [
      {
        "source": "/api/**",
        "function": "apiHttp"
      },
      {
        "source": "**",
        "function": "ssrapp"
      }
    ]
  }
}
Like in my previous article, we will first build the production build for Nuxt.js frontend. In functions state we will build the TypeScript into JavaScript using tsc , then copy the nuxt build output for SSR function deployment. In hosting we also copy the static asset part of the nuxt output and put together with /public_base into /public for upload.
就像我之前的文章一样,我们将首先为Nuxt.js前端构建生产版本。 在functions状态下,我们将使用tsc将TypeScript构建到JavaScript中,然后复制nuxt构建输出以进行SSR函数部署。 在hosting我们还复制了nuxt输出的静态资产部分,并将nuxt与/public_base放到/public进行上传。
Also, we have defined redirection rules for hosting, anything under /api is directed to the API function, otherwise, the frontend SSR function will handle the rest. Since an exact match on hosting asset has higher priority then the rewrites, the static asset in/public will be served from CDN instead of cloud functions if the URL is an exact match.
另外,我们已经定义了用于托管的重定向规则, /api下的任何内容都将定向到API函数,否则,前端SSR函数将处理其余的内容。 由于hosting资产的完全匹配具有更高的优先级,因此重写会具有更高的优先级,因此,如果URL完全匹配,则/public的静态资产将由CDN而不是云功能提供。
As you might have noticed, using TypeScript actually made the functions build process simpler!
您可能已经注意到,使用TypeScript实际上使functions构建过程更简单!
部署到生产 (Deploy to production)
The final step would be running the Firebase deploy command
最后一步是运行Firebase deploy命令
firebase deployThen the Nuxt.js app and Express API server will be deployed to Firebase automagically.
然后,Nuxt.js应用程序和Express API服务器将自动部署到Firebase。
The above instructions only cover the essential steps and concepts. For a complete config/code example, please visit my sample repo here. Also here is a sample site deployed to Firebase.
以上说明仅涵盖基本步骤和概念。 有关完整的配置/代码示例,请在此处访问我的示例存储库。 这也是部署到Firebase的示例站点。
额外 (Extra)
If you encounter an error like this
如果遇到这样的错误
HTTP Error: 400, Billing account for project ‘xxxxxx’ is not found. Billing must be enabled for activation of service(s) ‘cloudbuild.googleapis.com,containerregistry.googleapis.com’ to proceed.
HTTP错误:400,找不到项目“ xxxxxx”的计费帐户。 必须启用计费功能才能激活服务“ cloudbuild.googleapis.com,containerregistry.googleapis.com”才能继续。
You probably are on a free tier plan for Firebase and you are trying to deploy a Node.js 10 cloud function. Setting engines to Node.js 8 in cloud functions’ package.json should solve your issue.
您可能正在为Firebase制定免费套餐,并且正在尝试部署Node.js 10云功能。 在云函数的package.json中将引擎设置为Node.js 8可以解决您的问题。
"engines": { "node": "8"}
" engines": { " node " : " 8 " }
However, I recommend using an instance with Node.js version 10 if you do have a billing account setup, as version 8 is already deprecated.
但是,如果您已经设置了计费帐户,则建议您将实例与Node.js版本10一起使用,因为版本8已被弃用。
nuxt 调用原生js函数


 220
220

 被折叠的 条评论
为什么被折叠?
被折叠的 条评论
为什么被折叠?
 到【灌水乐园】发言


