


mongodb 移除节点
Let's dive in by defining the functionality and the structure we are going to have.
让我们通过定义功能和结构来深入研究。
- Ability to create, read, update, and delete tasks. 能够创建,读取,更新和删除任务。
- User profile with CRUD operations. 具有CRUD操作的用户个人资料。
- User authentication. 用户认证。
- The user profile picture is always great for personalization, so we will also cover file uploading. 用户个人资料图片始终非常适合个性化,因此我们还将介绍文件上传。
- And we want our users to be safe, so we will encrypt user passwords in the database. 而且我们希望用户安全,因此我们将在数据库中加密用户密码。
- And we would like to run operations on tasks using their id, so we will cover that as well. 而且,我们希望使用其ID对任务进行操作,因此我们也会对此进行介绍。
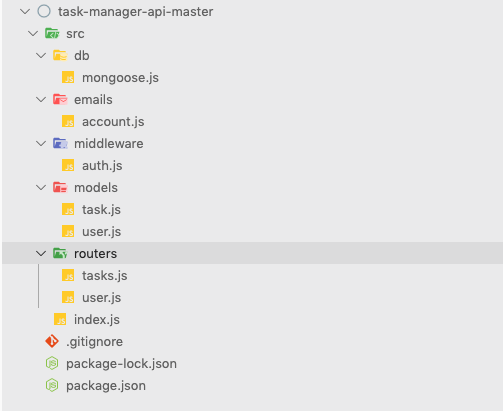
Let’s structure the app source -
让我们构建应用程序源-
- Index.js — our index app file to run. Index.js —我们要运行的索引应用文件。
- Routers — We will put our users and tasks functionality into different files to reduce the complexity of our API. 路由器-我们会将用户和任务功能放入不同的文件中,以降低API的复杂性。
- Models —Here we will define models to store data in the database in a good structure. 模型-在这里,我们将定义模型以良好的结构将数据存储在数据库中。
- Middleware — Initially we only have one which is authentication, but this is a good structure for future use when we might want to add more. 中间件-最初我们只有一个身份验证,但是当我们可能想添加更多内容时,这是一个很好的结构,供将来使用。
- Emails — We are going to use Sendgrid to send a few automated emails to our users on certain operations. 电子邮件-我们将使用Sendgrid在某些操作上向我们的用户发送一些自动电子邮件。
- DB — And our database. DB —和我们的数据库。
- Other than the source files, we will have our default package and git ignore(if used) file. 除了源文件,我们将拥有默认的包和gitignore(如果使用)文件。
So the structure will look like —
所以结构看起来像-
Now let's dive in the real code.
现在,让我们深入研究真实代码。
索引文件 (Index File)
Now we know the app structure and basics we need for our app so let's define them and we are going to be using JSON for data operations.
现在我们知道了我们的应用程序所需的应用程序结构和基础知识,因此让我们对其进行定义,并且我们将使用JSON进行数据操作。
// Requiring the packages we will need in the app.const express = require(`express`);
const userRouter = require("./routers/user");
const taskRouter = require("./routers/tasks");
const mongooserequiring = require(`./db/mongoose`);// Defining app to be an express app and the port to use, we define PORT number in our config file for security and reliability const app = express();
const port = process.env.PORT; // Using in appapp.use(express.json());
app.use(userRouter);
app.use(taskRouter); // Just logging the app startapp.listen(port, () => {console.log("Server is up at " + port);});
数据库设置 (DB Setup)
Also, let's define our mongoose database file.
另外,让我们定义我们的猫鼬数据库文件。
const mongoose = require("mongoose");mongoose.connect(process.env.MONGODB_URL, {useNewUrlParser: true,useCreateIndex: true,useUnifiedTopology: true,});创建用户模型 (Creating the User Model)
Here we define the data we want in our user profile for our Mongo Database, we are using Mongoose for data modeling.
在这里,我们在我们的Mongo数据库用户配置文件中定义所需的数据,我们使用Mongoose进行数据建模。
// Requiring Stuff const mongoose = require("mongoose");const validator = require("validator"); // For easy email updation, etc.const bcrypt = require("bcryptjs"); // For encrypting passwordconst jwt = require("jsonwebtoken"); // For user authentication tokenconst Task = require("./task");Defining the Schema with Mongoose :
用猫鼬定义模式:
const userSchema = new mongoose.Schema({name: {type: String,required: true,trim: true,},age: {type: Number,},email: {type: String,unique: true,required: true,trim: true,lowercase: true,validate(value) {if (!validator.isEmail(value)) {throw new Error("Email is invalid");}},},password: {type: String,required: true,trim: true,validate(value) {if (value.length < 6) {throw new Error("Password should be more than 6 characters!");} else if (value.toLowerCase() == "password") {throw new Error("Password cannot be password, come on man!");}},},tokens: [{token: {type: String,required: true,},}, ],avatar: {type: Buffer,},}, {timestamps: true,});We link the user to the task model and also authenticate operation of the user model as:
我们将用户链接到任务模型,并通过以下方式验证用户模型的操作:
userSchema.virtual("tasks", {ref: "Task",localField: "_id",foreignField: "owner",});userSchema.statics.findByCredentials = async(email, password) => {const user = await User.findOne({ email });if (!user) {throw new Error("Unable to login, please check your details.");}const isMatch = await bcrypt.compare(password, user.password);if (!isMatch) {throw new Error("Unable to login, please recheck your details.");}return user;};userSchema.methods.generateAuthToken = async function() {
const user = this;const token = jwt.sign({ _id: user._id.toString() }, process.env.JWT_SECRET);user.tokens = user.tokens.concat({ token });await user.save();return token;};// Sending back user profile info, excluding some attributesuserSchema.methods.toJSON = function() {const user = this;const userObject = user.toObject();delete userObject.password;delete userObject.tokens;delete userObject.avatar;return userObject;};// Hashing the password before savinguserSchema.pre("save", async function(next) {const user = this;if (user.isModified("password")) {user.password = await bcrypt.hash(user.password, 8);}next();});
// Remove all tasks of a user, if user is deleteduserSchema.pre("remove", async function(next) {const user = this;await Task.deleteMany({ owner: user._id });next();});const User = mongoose.model("User", userSchema);module.exports = User;
So now we have our user model ready, so we can move forward to define our users.
现在我们已经准备好了用户模型,因此可以继续定义用户。
创建新用户的用户路线 (User Route for creating a new user)
Here we define the app most of the user-related functions :
在这里,我们为应用定义了大多数与用户相关的功能:
// Requiring stuff that we will need in the user route file once we define all functions const express = require("express");
const sharp = require("sharp");
const router = new express.Router();
const User = require("../models/user");
const auth = require("../middleware/auth");
const multer = require("multer");
const { sendWelcomeEmail, sendCancelationEmail } = require("../emails/account"); // Creating a new user router.post( "/users", async ( req, res ) => {const user = new User( req.body );try {await user.save();sendWelcomeEmail( user.email, user.name );const token = await user.generateAuthToken();res.status( 200 ).send( { user, token } );} catch ( e ) {res.status( 400 ).send( e );}} );
Sign In and Sign Out User Routes:
登录和注销用户路由:
router.post( "/users/login", async ( req, res ) => {try {const user = await User.findByCredentials(req.body.email,req.body.password);const token = await user.generateAuthToken();res.send( {user,token,} );} catch ( e ) {res.status( 400 ).send( {error: "Catch error",e,} );}} );router.post( "/users/logout", auth, async ( req, res ) => {try {req.user.tokens = req.user.tokens.filter( ( token ) => {return token.token !== req.token;} );await req.user.save();res.status( 200 ).send();} catch ( e ) {res.status( 500 ).send();}} );router.post( "/users/logoutAll", auth, async ( req, res ) => {try {req.user.tokens = [];await req.user.save();res.status( 200 ).send();} catch ( e ) {res.status( 500 ).send();}} );Read, Update, and Delete operations on User profile :
对用户个人资料的读取,更新和删除操作:
router.get( "/users/me", auth, async ( req, res ) => {res.send( req.user );} );router.patch( "/users/me", auth, async ( req, res ) => {const updates = Object.keys( req.body );const allowedUpdates = [ "name", "email", "password", "age" ];const isValidOperation = updates.every( ( update ) =>allowedUpdates.includes( update ));if ( !isValidOperation ) {return res.status( 401 ).send( { error: "Invalid updates" } );}try {updates.forEach( ( update ) => ( req.user[ update ] = req.body[ update ] ) );await req.user.save();res.status( 201 ).send( req.user );} catch ( e ) {res.status( 404 ).send( {e,} );}} );router.delete( "/users/me", auth, async ( req, res ) => {try {await req.user.remove();sendCancelationEmail( req.user.email, req.user.name );res.send( req.user );} catch ( e ) {res.status( 500 ).send( { e: "Catch Error", e } );}} );Adding, Deleting, and Fetching Avatar (Profile Picture), we are using for Multer package for uploading :
添加,删除和获取头像(个人资料图片),我们正在使用Multer包进行上传:
const upload = multer( {limits: {fileSize: 1000000,},fileFilter ( req, file, cb ) {if ( !file.originalname.match( /\.(jpg|jpeg|png)$/ ) ) {return cb( new Error( "Please upload jpg, jpeg or png image format file" ) );}cb( undefined, true );},} );router.post("/users/me/avatar",auth,upload.single( "avatar" ),async ( req, res ) => {const buffer = await sharp( req.file.buffer ).resize( { width: 200, height: 200 } ).jpeg().toBuffer();req.user.avatar = buffer;await req.user.save();res.send();},( error, req, res, next ) => {res.status( 400 ).send( {error: error.message,} );});router.delete( "/users/me/avatar", auth, async ( req, res ) => {req.user.avatar = undefined;await req.user.save();res.send();} );router.get( "/users/:id/avatar", async ( req, res ) => {try {const user = await User.findById( req.params.id );if ( !user || !user.avatar ) {throw new Error();}res.set( "Content-Type", "image/jpg" );res.send( user.avatar );} catch ( e ) {res.status( 404 ).send();}} );module.exports = router;So we complete our user model here.
因此,我们在这里完成我们的用户模型。
任务模型 (Task Model)
We now define our task model, we are going to have operations on a task, description, and completion status, so our model is going to be simple :
现在,我们定义了任务模型,我们将对任务,描述和完成状态进行操作,因此我们的模型将变得简单:
const mongoose = require("mongoose");const taskSchema = new mongoose.Schema({Task: {type: String,required: true,},completed: {type: Boolean,default: false,},owner: {type: mongoose.Schema.Types.ObjectId,required: true,ref: "User",},}, {timestamps: true,});const Task = mongoose.model("Task", taskSchema);
module.exports = Task;
Now we can define our task route.
现在我们可以定义任务路线。
任务路线 (Task Route)
For the creation of the task and task route requirements :
为了创建任务和任务路线需求:
const express = require("express");const router = new express.Router();const Task = require("../models/task");const auth = require("../middleware/auth");
// Create a task
router.post("/tasks", auth, async(req, res) => {const task = new Task({...req.body,owner: req.user._id,});try {await task.save();res.status(200).send("Task saved: " + task);} catch (e) {res.status(400).send(e);}});
Reading/Requesting the tasks and sorting by date creation :
阅读/请求任务并按创建日期排序:
router.get("/tasks", auth, async(req, res) => {const match = {};const sort = {};if (req.query.completed) {match.completed = req.query.completed === "true";}if (req.query.sortBy) {const parts = req.query.sortBy.split(":");sort[parts[0]] = parts[1] === "desc" ? -1 : 1;}try {await req.user.populate({path: "tasks",match,options: {limit: parseInt(req.query.limit),skip: parseInt(req.query.skip),sort,},}).execPopulate();res.send(req.user.tasks);} catch (e) {res.status(500).send(e);}});Operations using the task ID :
使用任务ID的操作:
router.get("/tasks/:id", auth, async(req, res) => {const _id = req.params.id;try {const task = await Task.findOne({ _id, owner: req.user._id });if (!task) {return res.status(401).send({ error: "Task id not found" });}res.send(task);} catch (e) {res.status(400).send(e);}});router.patch("/tasks/:id", auth, async(req, res) => {const updates = Object.keys(req.body);const allowedUpdates = ["Task", "completed"];const isValidOperation = updates.every((update) =>allowedUpdates.includes(update));if (!isValidOperation) {return res.status(401).send({ error: "Invalid updates" });}try {const task = await Task.findOne({_id: req.params.id,owner: req.user._id,});if (!task) {res.send({ error: "Task id not found to update" });}updates.forEach((update) => (task[update] = req.body[update]));await task.save();res.send(task);} catch (e) {res.status(400).send(e);}});router.delete("/tasks/:id", auth, async(req, res) => {try {const task = await Task.findOneAndDelete({_id: req.params.id,owner: req.user._id,});if (!task) {res.status404.send({ error: "Task id not found" });}res.send(task);} catch (e) {res.status(500).send({ e: "Catch Error", e });}});module.exports = router;And now we have the models and routes for both the users and the tasks. So we head to the middleware.
现在,我们为用户和任务提供了模型和路线。 因此,我们转向中间件。
中间件-身份验证 (Middleware — Authentication)
Here we have the auth.js middleware for the authentication of the user, which we use for user verification on almost all of our routes to verify user identity for security.
这里,我们具有用于验证用户身份的auth.js中间件,我们将其用于几乎所有路由上的用户验证,以验证用户身份的安全性。
const jwt = require("jsonwebtoken");const User = require("../models/user");const auth = async(req, res, next) => {try {const token = req.header("Authorization").replace("Bearer ", "");const decoded = jwt.verify(token, process.env.JWT_SECRET);const user = await User.findOne({_id: decoded._id,"tokens.token": token,});if (!user) {throw new Error();}req.token = token;req.user = user;next();} catch (e) {res.status(403).send({error: "Please authenticate.",});}};module.exports = auth;电邮 (Emails)
Our email automation with SendGrid in the account.js file.
account.js文件中使用SendGrid进行的电子邮件自动化。
const sgMail = require("@sendgrid/mail");sgMail.setApiKey(process.env.SENDGRID_API_KEY);const sendWelcomeEmail = (email, name) => {sgMail.send({to: email,from: "abhisheksoni1551@gmail.com",subject: "Thanks for joining in!",text: `Welcome to the app, ${name}. Let me know how you get along with the app.`,}).then(() => {console.log("Email sent success");}).catch((error) => {console.log("error", error);});};const sendCancelationEmail = (email, name) => {sgMail.send({to: email,from: "abhisheksoni1551@gmail.com",subject: "Sorry to see you go.",text: `We would love to see you back, ${name}.`,}).then(() => {console.log("Delete user email success");}).catch((error) => {console.log("error", error);});};module.exports = {sendWelcomeEmail,sendCancelationEmail,};And in our config file, we can define details as, and save file with ‘.env’ format:
在我们的配置文件中,我们可以将详细信息定义为,并以'.env'格式保存文件:
PORT=[Port number]SENDGRID_API_KEY=[YOUR KEY]MONGODB_URL=[Your Mongo URL]JWT_SECRET=[Your Secret Key]Congratulations, we have our task manager API ready now.
恭喜,我们现在已经准备好任务管理器API。
If you have any queries or comments, feel free to comment or email me at abhishek@abhisheknotes.com. Happy programming.
如果您有任何疑问或意见,请随时通过abhishek@abhisheknotes.com发表评论或给我发送电子邮件。 编程愉快。
mongodb 移除节点


 3591
3591

 被折叠的 条评论
为什么被折叠?
被折叠的 条评论
为什么被折叠?
 到【灌水乐园】发言


