


kafka 低级api
In this article, we will build a model using low-level API in AWS SageMaker. If you are a beginner, start with the post for high-level API (where steps one and two of this guide are explained in detail) before moving onto this article. If you would like to follow along, please find the codes for the project in the GitHub Repository. The codes for the project are in the spam-classifier-low-level.ipynb notebook in the repository.
在本文中,我们将使用AWS SageMaker中的低级API构建模型。 如果您是初学者,请先阅读有关高级API的文章(其中详细介绍了本指南的第1步和第2步),然后再继续阅读本文。 如果您想继续,请在GitHub Repository中找到该项目的代码。 该项目的代码位于存储库中的spam-classifier-low-level.ipynb笔记本中。
1.启动SageMaker会话和s3文件夹 (1. Initiate SageMaker session and s3 folders)
We will begin by initiating SageMaker session, role, and setting s3 folders to save training and testing data. To learn more about this section in detail, refer to the high-level API article.
首先,我们将启动SageMaker会话,角色,并设置s3文件夹以保存培训和测试数据。 要详细了解本节,请参阅高级API文章。
#1. Initiate a session
session = sagemaker.Session()


#2. Get execution roles
role = get_execution_role()


#3. Set up S3 bucket and folder
s3_bucket = sagemaker.Session().default_bucket()
s3_prefix = 'spam-data' #prefix used for data stored within the bucket
s3_path = 's3://{}/{}/'.format(s3_bucket, s3_prefix)2.准备数据并将其上传到S3(2. Prepare the data and upload it to S3)
#1. Load the data
data = pd.read_csv('SMSSpamCollection.txt', sep="\t", header=None, names = ['labels', 'messages'])


#2. Preprocess data
tf_idf = Pipeline([('cv',CountVectorizer()), ('tfidf_transformer',TfidfTransformer(smooth_idf=True,use_idf=True))])
tf_idf_vector  = pd.DataFrame(tf_idf.fit_transform(data['messages']).todense())
data['labels'] = label_binarize(data['labels'], classes=['ham', 'spam'])


#3. Split the data into train, val and test
X_train, X_test, y_train, y_test = train_test_split(tf_idf_vector, data['labels'], test_size=0.3, random_state=2020)
X_train, X_val, y_train, y_val = train_test_split(X_train, y_train, test_size=0.3, random_state=2020)


#4. Upload to local directory
data_dir = 'data'
if not os.path.exists(data_dir):
    os.makedirs(data_dir)

X_test.to_csv(os.path.join(data_dir, 'test_data.csv'), header=False, index=False)
pd.concat([y_train, X_train], axis=1).to_csv(os.path.join(data_dir, 'train_data.csv'), header=False, index=False)
pd.concat([y_val, X_val], axis=1).to_csv(os.path.join(data_dir, 'val_data.csv'), header=False, index=False)


# Upload to S3
test_path = session.upload_data(os.path.join(data_dir, 'test_data.csv'), key_prefix = s3_prefix)
train_path = session.upload_data(os.path.join(data_dir, 'train_data.csv'), key_prefix = s3_prefix)
val_path = session.upload_data(os.path.join(data_dir, 'val_data.csv'), key_prefix = s3_prefix)


#5. Clean the vars
X_train = X_test = y_train = X_val = y_val = None
Now that the training and testing data are uploaded to s3, let’s construct a model. A model in SageMaker includes the model artifacts created during training and some additional information on how to use those model artifacts. To do this, we will create a training job.
现在将训练和测试数据上传到s3,让我们构建一个模型。 SageMaker中的模型包括在训练期间创建的模型工件,以及有关如何使用这些模型工件的一些其他信息。 为此,我们将创建一个培训工作。
3.创建培训工作 (3. Create Training Job)
When you initiate model training, SageMaker starts a model. After training completes, Amazon SageMaker saves the resulting model artifacts that are required to deploy the model to an Amazon S3 location that you specify.
当您启动模型训练时,SageMaker会启动模型。 培训完成后,Amazon SageMaker保存将模型部署到您指定的Amazon S3位置所需的结果模型工件。
output_path = s3_path + 'model_output'Before creating a training job, we will have to think about the model we may want to use and define the hyperparameters if required. We will use the XGBoost algorithm for this project. Let’s go ahead and declare the hyperparameters. Please note that the hyperparameters can have value or string for high-level; however, both the key and value must be in string format for low-level.
在创建培训工作之前,我们将必须考虑可能要使用的模型,并在需要时定义超参数。 我们将在该项目中使用XGBoost算法。 让我们继续声明超参数。 请注意,超参数可以具有用于高级的值或字符串。 但是,对于低级别,键和值都必须为字符串格式。
hyperparameters = {
"max_depth": 5,
"eta": 0.2,
"gamma": 2,
"min_child_weight": 5,
"subsample": 0.8,
"objective": "binary:logistic",
"early_stopping_rounds": 25,
"num_round": 150,
}# Convert values in hyper parameters dictionary to strings
hyperparameters_str = {key: str(value) for key, value in hyperparameters.items()}
Next, create a unique training job name to make it easy to refer back to the specific training job in the future. Let’s append the current timestamp to the name string to create a unique training job name.
接下来,创建一个唯一的培训工作名称,以方便将来参考特定的培训工作。 让我们将当前时间戳附加到名称字符串以创建唯一的培训作业名称。
from time import strftime, gmtimetraining_job_name = "sagemaker-buildmodel" + strftime("%Y-%m-%d-%H-%M-%S", gmtime())In this section, we will create a training job manually. We will need to specify parameters like AlgorithmSpecification, HyperParameters, InputDataConfig, OutputDataConfig, ResourceConfig, EnableManagedSpotTraining, RoleARN, and StoppingCondition to create a training job. Please refer to this link for a detailed explanation of each parameter.
在本节中,我们将手动创建培训工作。 我们将需要指定参数,例如AlgorithmSpecification,HyperParameters,InputDataConfig,OutputDataConfig,ResourceConfig,EnableManagedSpotTraining,RoleARN和StoppingCondition,以创建训练作业。 请参考此链接以获取每个参数的详细说明。
The below code snippet includes four steps:
以下代码段包括四个步骤:
- Get xgboost container 获取xgboost容器
- Declare the training job parameters in a dictionary在字典中声明训练作业参数
- Execute training job执行培训工作
- Get the output from the training job running in the background从后台运行的训练作业中获取输出
# 1. Get xgboost container
container = get_image_uri(session.boto_region_name, 'xgboost')
# 2. Set the required parameters.
tr_job_params = {}
tr_job_params['TrainingJobName'] = training_job_name
tr_job_params['AlgorithmSpecification'] = {"TrainingImage": container,"TrainingInputMode": 'File'}
tr_job_params['HyperParameters'] = hyperparameters_str
tr_job_params['OutputDataConfig'] = {'S3OutputPath': output_path}
tr_job_params['ResourceConfig'] = {'InstanceCount': 1, "InstanceType": "ml.m4.xlarge", "VolumeSizeInGB": 5}
tr_job_params['RoleArn'] = role
tr_job_params['StoppingCondition'] = {"MaxRuntimeInSeconds": 86400}
tr_job_params['InputDataConfig'] = [
{
"ChannelName": "train",
"CompressionType": "None",
"ContentType": "csv",
"DataSource": {
"S3DataSource": {
"S3DataDistributionType": "FullyReplicated",
"S3DataType": "S3Prefix",
"S3Uri": train_path
}
}
},
{
"ChannelName": "validation",
"CompressionType": "None",
"ContentType": "csv",
"DataSource": {
"S3DataSource": {
"S3DataDistributionType": "FullyReplicated",
"S3DataType": "S3Prefix",
"S3Uri": val_path
}
}
}
]
# 3. Create training job
training_job = session.sagemaker_client.create_training_job(**tr_job_params)
# 4. Get output of training job
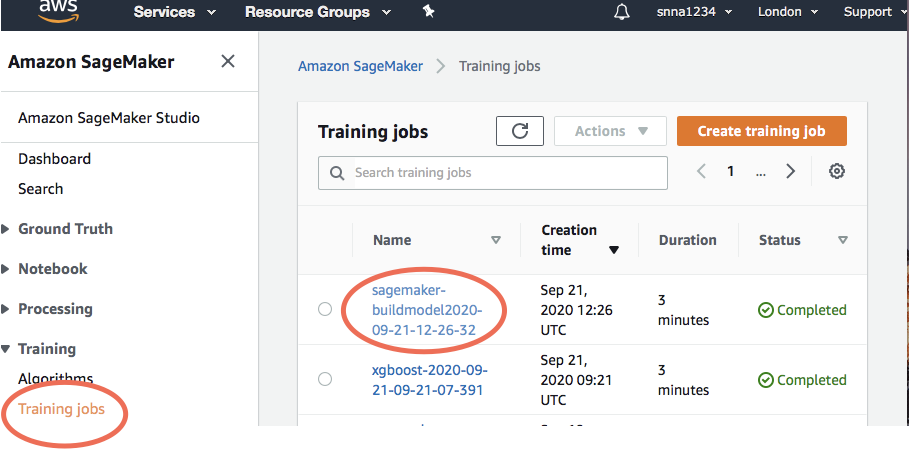
session.logs_for_job(training_job_name, wait=True)After creating the training job, check the logs. Click on training jobs in the SageMaker page, click the specific unique training job name, and go to the monitor section and click on view logs.
创建培训作业后,请检查日志。 单击SageMaker页面中的培训作业,单击特定的唯一培训作业名称,然后转到监视器部分,然后单击查看日志。
4.建立SageMaker模型 (4. Build SageMaker Model)
To build the model in SageMaker, we will use the information created with the training job method; like the model artifacts and the additional information on how to use those model artifacts.
要在SageMaker中构建模型,我们将使用通过训练作业方法创建的信息; 例如模型工件,以及有关如何使用这些模型工件的其他信息。
tr_job_info = session.sagemaker_client.describe_training_job(
                       TrainingJobName = training_job_name)model_artifacts = tr_job_info['ModelArtifacts']['S3ModelArtifacts']
With the available information, we can now create a model.
有了可用的信息,我们现在可以创建一个模型。
# 1. Create unique model name
model_xgb_name = training_job_name +'-modelxgb'# 2. Specify the container for the inference code
reference_container = {
"Image": container,
"ModelDataUrl": model_xbg_artifacts
}# 3. Construct the SageMaker model
model_xgb = session.sagemaker_client.create_model(
ModelName = model_xgb_name,
ExecutionRoleArn = role,
PrimaryContainer = reference_container
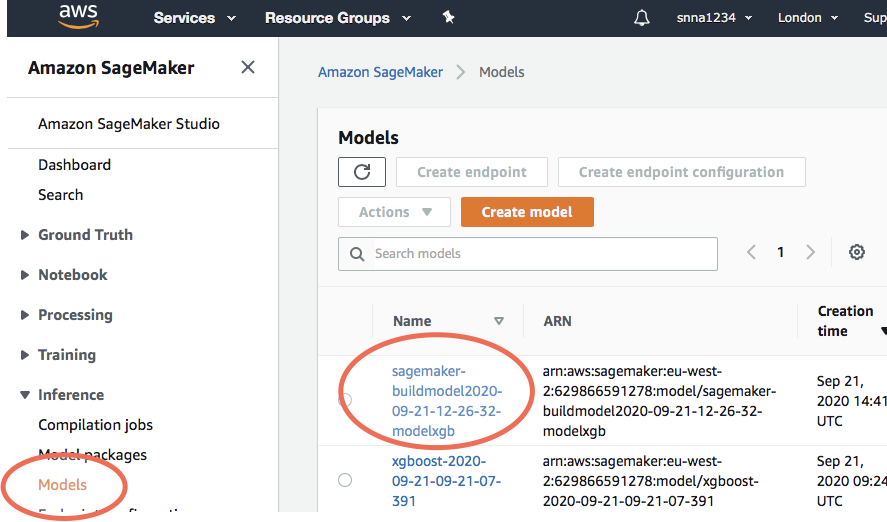
)Follow the below link to find all the information regarding the model, training job, containers, link to model artifacts, and others.
按照以下链接查找有关模型,培训工作,容器,模型工件链接等的所有信息。
5.测试模型 (5. Test the model)
Similar to how we created a training job in step 3, we will create a batch transform in this section. A transform job uses a trained model to get inferences on a dataset and saves these results to an Amazon S3 location that you specify. To perform batch transformations, you create a transform job and use the data that you have readily available.
与我们在第3步中创建培训工作的方式类似,我们将在本节中创建批处理转换。 转换作业使用训练有素的模型来获取数据集上的推论,并将这些结果保存到您指定的Amazon S3位置。 要执行批处理转换,请创建转换作业并使用现有的数据。
In the request body, provide the parameters like TransformJobName, ModelName, TransformInput, TransformOutput, MaxConcurrentTransforms, MaxPayloadInMB, BatchStrategy, TransformResources. To learn more about creating batch transform and its parameters, refer to this link.
在请求正文中,提供诸如TransformJobName,ModelName,TransformInput,TransformOutput,MaxConcurrentTransforms,MaxPayloadInMB,BatchStrategy,TransformResources之类的参数。 要了解有关创建批处理变换及其参数的更多信息,请参考此链接。
The below code snippet includes four steps:
以下代码段包括四个步骤:
- Define transform job name 定义转换作业名称
- Declare the transform job parameters in a dictionary在字典中声明转换作业参数
- Execute transform job执行转换作业
- Get the output from the transform job running in the background获取后台运行的转换作业的输出
# 1. Get the transform request job name
transform_job_name = training_job_name + '-transformxgb'


# 2. Create a dictionary with transform parameters
transform_request = {}
transform_request['TransformJobName'] = transform_job_name
transform_request['ModelName'] = model_xgb_name
transform_request['MaxConcurrentTransforms'] = 1
transform_request['MaxPayloadInMB'] = 2
transform_request['BatchStrategy'] = "MultiRecord"


transform_request['TransformOutput'] = {
    'S3OutputPath':'s3://{}/{}/batch-transform'.format(session.default_bucket(), s3_prefix)
}


transform_request['TransformInput'] = {
    "ContentType": "text/csv",
    "SplitType": "Line",
    "DataSource": {
        "S3DataSource": {
            "S3DataType": "S3Prefix",
            "S3Uri": test_path
        }
    }
}

transform_request['TransformResources'] = {
    "InstanceType": "ml.m4.xlarge",
    "InstanceCount":1
}


# 3. Execute the the batch transform job
transform_response = session.sagemaker_client.create_transform_job(**transform_request)


# 4. Get the output of the batch transformjob running in the background
transform_output = session.wait_for_transform_job(transform_job_name)
Let's analyze the results. Pull the results from the output path parameter, “TransformOutput” declared in the transform_request dictionary. Then copy the data to SageMaker jupyter notebook to analyze the result.
让我们分析结果。 从transform_request字典中声明的输出路径参数“ TransformOutput”中提取结果。 然后将数据复制到SageMaker jupyter笔记本以分析结果。
# Get the outputs
results = 's3://{}/{}/batch-transform'.format(session.default_bucket(), s3_prefix)# Copy the results from s3 to sagemaker
!aws s3 cp --recursive $results $data_dir
Now, get the prediction accuracy score.
现在,获取预测准确性得分。
from sklearn.metrics import accuracy_scorepredictions = pd.read_csv(os.path.join(data_dir, 'test_data.csv.out'), header=None)
predictions = [round(val) for val in predictions.squeeze().values]
accuracy_score(y_test, predictions)
部署模型 (Deploy the model)
To deploy the model please refer to this article.
要部署模型,请参考本文。
Find the codes for the project in the GitHub Repository.
在GitHub Repository中找到该项目的代码。
结论 (Conclusion)
There you have it; how to build a model using low-level API in AWS SageMaker. I hope that you find this article helpful, please feel welcome to add any questions or feedback in the comments section. Thanks for reading!
你有它; 如何在AWS SageMaker中使用低级API构建模型。 希望本文对您有所帮助,欢迎在评论部分添加任何问题或反馈。 谢谢阅读!
翻译自: https://codeburst.io/build-a-model-in-sagemaker-in-5-steps-using-low-level-api-8139dd7f98a0
kafka 低级api


 1010
1010


 被折叠的 条评论
为什么被折叠?
被折叠的 条评论
为什么被折叠?
 到【灌水乐园】发言


