


openshift 部署
Note: This blog is a part of blog Series: Deploying Java applications onto Kubernetes using Eclipse JKube
注意:此博客是博客系列的一部分: 使用Eclipse JKube将Java应用程序部署到Kubernetes上
I recently saw a blogpost on IBM Developer about deploying an OpenLiberty cloud-native application onto Kubernetes using Eclipse Codewind . I thought it would be nice idea to showcase something similar with Eclipse JKube on how we can achieve the same goal with local development perspective.
我最近在IBM Developer上看到了一篇博客文章 ,内容涉及使用Eclipse Codewind将OpenLiberty云原生应用程序部署到Kubernetes上 。 我认为与Eclipse JKube展示类似的东西是一个不错的主意,以我们如何从本地开发角度实现相同的目标。
I have already written a blogpost about deploying OpenLiberty application on top of Kubernetes using Eclipse JKube. So I migrated it to a very basic web application using Jboss Servlet API 4.0 to demonstrate how Eclipse JKube deploys web applications onto Kubernetes/ Red Hat OpenShift smoothly.
我已经写了一篇关于使用Eclipse JKube在Kubernetes上部署OpenLiberty应用程序的博客 。 因此,我使用Jboss Servlet API 4.0将其迁移到一个非常基本的Web应用程序,以演示Eclipse JKube如何将Web应用程序顺利地部署到Kubernetes / Red Hat OpenShift上 。
This application is a port of IBM/build-deploy-cloud-native-application-using-cp4a. It does the same thing as that application but uses basic HttpServlet based on Jboss Servlet API 4.0. It displays a basic html form for getting details for weather and in order to fetch weather details it queries OpenWeatherMap using REST API.
该应用程序是IBM / build-deploy-cloud-native-application-using-cp4a的端口 。 它执行与该应用程序相同的操作,但是使用基于Jboss Servlet API 4.0的基本HttpServlet 。 它显示一个基本的html表单,用于获取天气详细信息,并获取天气详细信息,并使用REST API查询OpenWeatherMap 。
One notable difference in my project and their project is how OpenWeatherMap REST API access token is handled. I saw that project used in the IBM Codewind blog has hardcoded API token inside their source(which is not quite Cloud-Native in my opinion 😉 ). Ideally we should be using Kubernetes Secrets to store sensitive information like these. Other difference is that I would be using Eclipse JKube to deploy it to Kubernetes and Red Hat OpenShift.
我的项目与他们的项目之间的一个显着差异是OpenWeatherMap REST API访问令牌的处理方式。 我看到IBM Codewind博客中使用的项目在其源代码中有硬编码的API令牌(我认为这不是Cloud-Native)。 理想情况下,我们应该使用Kubernetes Secrets来存储此类敏感信息。 另一个区别是,我将使用Eclipse JKube将其部署到Kubernetes和Red Hat OpenShift 。
项目结构: (Project Structure:)
All right, let’s look at the project structure. I have two source files APIKeyService and WeatherServlet which contain all the logic for the application. Other notable file is index.html inside src/main/webapp which shows default page on application root endpoint. There are two yaml files inside src/main/jkube . I would explain them later when I come to deploying to Kubernetes section.
好吧,让我们看一下项目结构。 我有两个源文件APIKeyService和WeatherServlet ,其中包含应用程序的所有逻辑。 其他值得注意的文件是src/main/webapp index.html ,它显示了应用程序根端点上的默认页面。 src/main/jkube内部有两个yaml文件。 稍后我将在部署到Kubernetes的部分中向我解释。
weather-web-application : $ tree src/
src/
└── main
    ├── java
    │   └── org
    │       └── jboss
    │           └── as
    │               └── quickstarts
    │                   └── helloworld
    │                       └── WeatherServlet.java
    ├── jkube
    │   ├── apikey-secret.yml
    │   └── deployment.yml
    └── webapp
        ├── index.html
        └── WEB-INF
            ├── beans.xml
            └── web.xml10 directories, 6 files
let’s take a look at WeatherServlet.java it is handler of endpoint /getWeather, basically index.html calls this endpoint for fetching weather details of a specified location, it just fetches city, longitude and latitude from query parameters and hits OpenWeather API with those parameters. While requesting OpenWeatherAPI, it fetches token from APIKeyService:
让我们看一下WeatherServlet.java它是端点/getWeather处理程序,基本上index.html调用此端点以获取指定位置的天气详细信息,它只是从查询参数中获取城市,经度和纬度,并使用这些参数访问OpenWeather API 。 请求OpenWeatherAPI时,它会从APIKeyService获取令牌:
package org.jboss.as.quickstarts.helloworld;


import okhttp3.HttpUrl;
import okhttp3.OkHttpClient;
import okhttp3.Request;
import okhttp3.Response;


import java.io.IOException;
import java.io.PrintWriter;
import java.util.HashMap;
import java.util.Map;


import javax.servlet.annotation.WebServlet;
import javax.servlet.http.HttpServlet;
import javax.servlet.http.HttpServletRequest;
import javax.servlet.http.HttpServletResponse;


@SuppressWarnings("serial")
@WebServlet("/getWeather")
public class WeatherServlet extends HttpServlet {
    private static final String OPENWEATHERMAP_WEATHER = "http://api.openweathermap.org/data/2.5/weather";
    public static final String CITY = "getCity";
    private static final String LAT = "lat";
    private static final String LON = "lon";
    private static final String OPENWEATHERMAP_CITY_PARAM = "q";
    private static final String OPENWEATHERMAP_APPID_PARAM = "appid";
    public static final String APITOKEN_ENV_VAR = "OPENWEATHER_API_KEY";


    @Override
    protected void doGet(HttpServletRequest req, HttpServletResponse resp) throws IOException {
        Map<String, String> queryParamMap = getQueryParameters(req);
        String response = performGetToWeatherAPI(queryParamMap);


        resp.setContentType("application/json");
        PrintWriter writer = resp.getWriter();
        writer.println(response);
        writer.close();
    }


    private String performGetToWeatherAPI(Map<String, String> queryParamMap) {
        OkHttpClient client = new OkHttpClient();
        HttpUrl httpUrl = getWeatherQueryUrl(queryParamMap);
        Request request = new Request.Builder()
                .url(httpUrl)
                .build();


        try (Response response = client.newCall(request).execute()) {
            if (response.isSuccessful() && response.body() != null) {
                return response.body().string();
            } else {
                return "{\"message\": \"Nothing received from OpenWeather API. url: "+httpUrl.toString() +"\", }";
            }
        } catch (IOException exception) {
            return "{\"message\": \"error in connecting to OpenWeather API. url:" + httpUrl.toString() + " " + exception.getMessage() + "}";
        }
    }


    private HttpUrl getWeatherQueryUrl(Map<String, String> queryParamMap) {
        HttpUrl.Builder httpUrlBuilder = HttpUrl.get(OPENWEATHERMAP_WEATHER).newBuilder();
        if (queryParamMap.containsKey(CITY)) {
            httpUrlBuilder.addQueryParameter(OPENWEATHERMAP_CITY_PARAM, queryParamMap.get(CITY));
        }
        if (queryParamMap.containsKey(LAT) && queryParamMap.containsKey(LON)) {
            httpUrlBuilder.addQueryParameter(LAT, queryParamMap.get(LAT));
            httpUrlBuilder.addQueryParameter(LON, queryParamMap.get(LON));
        }
        httpUrlBuilder.addQueryParameter(OPENWEATHERMAP_APPID_PARAM, System.getenv(APITOKEN_ENV_VAR));
        return httpUrlBuilder.build();
    }


    private Map<String, String> getQueryParameters(HttpServletRequest request) {
        Map<String, String> result = new HashMap<>();
        String queryParameterString = request.getQueryString();
        String[] queryParameterStringParts = queryParameterString.split("&");
        for (String queryParameterStringPart : queryParameterStringParts) {
            String[] singleQueryParameterParts = queryParameterStringPart.split("=");
            result.put(singleQueryParameterParts[0], singleQueryParameterParts[1]);
        }
        return result;
    }
}
部署到Kubernetes : (Deploying to Kubernetes:)
Okay, we know application structure now so we can proceed to deploying it onto Kubernetes. You might need to get an API key from OpenWeatherMap website. We will be storing our API Key inside a Kubernetes Secret and we’ll configure our project’s Deployment to pick this Secret. Eclipse JKube provides a very powerful Kubernetes resources configuration mechanism called Resource Fragments. You can place any Kubernetes YAML manifest or a fragment of it inside src/main/jkube directory and it would be merged/created by Eclipse JKube during resource creation phase. So first we would place our secret file inside jkube directory:
好的,我们现在知道了应用程序结构,因此我们可以继续将其部署到Kubernetes上。 您可能需要从OpenWeatherMap网站获取API密钥 。 我们将把我们的API密钥存储在Kubernetes Secret中,并将配置项目的Deployment来选择这个Secret 。 Eclipse JKube提供了一种非常强大的Kubernetes资源配置机制,称为Resource Fragments 。 您可以将任何Kubernetes YAML清单或其片段放在src/main/jkube目录中,并且它将在资源创建阶段由Eclipse JKube合并/创建。 因此,首先我们将我们的秘密文件放在jkube目录中:
src/main/jkube/apikey-secret.yml:
src / main / jkube / apikey-secret.yml:
apiVersion: v1
kind: Secret
metadata:
  name: apikeysecret
type: Opaque
data:
  apitoken: MjI3NjQ1NDY5NDkxNzQxOGVhNWJhY2RmZmE0OWUxMDE=
Okay, with this Eclipse JKube would create a secret during it’s resource apply phase along with your application’s Deployment. But we also need to tell Eclipse JKube to use this Secret inside our Deployment. So we will just provide a fragment of our Deployment YAML spec to add Secret as an environment variable(see kubernetes docs about this topic). Here is how our Deployment fragment would look like(notice that we haven’t provided anything extra, we only provided the parts we wanted to override in resulting Deployment fragment:
好的,有了这个Eclipse JKube,它将在资源应用阶段以及应用程序的Deployment期间创建一个秘密。 但是我们还需要告诉Eclipse JKube在我们的Deployment使用此Secret 。 因此,我们将仅提供一部分Deployment YAML规范,以将Secret添加为环境变量(有关此主题,请参见kubernetes文档 )。 这是我们的Deployment片段的样子(注意,我们没有提供任何额外的内容,我们只提供了我们想要在生成的Deployment片段中覆盖的部分:
src/main/jkube/deployment.yml:
src / main / jkube / deployment.yml:
spec:
  template:
    spec:
      containers:
      - env:
        - name: OPENWEATHER_API_KEY
          valueFrom:
            secretKeyRef:
              name: apikeysecret
              key: apitoken
With this, now our application Pods would have environment variable named OPENWEATHER_API_KEY which would contain Api Key for interacting with OpenWeatherMap API.
这样,现在我们的应用程序Pods将具有名为OPENWEATHER_API_KEY环境变量,其中将包含用于与OpenWeatherMap API交互的Api密钥。
Okay, we’re all set to deploy our application onto Kubernetes, I have provided Eclipse JKube into <plugins> section of my pom.xml:
好的,我们已经准备好将应用程序部署到Kubernetes上,我已经将Eclipse JKube提供到pom.xml的<plugins>部分中:
<plugin>
    <groupId>org.eclipse.jkube</groupId>
    <artifactId>kubernetes-maven-plugin</artifactId>
    <version>${kubernetes-maven-plugin.version}</version>
</plugin>
I can now go ahead and issue JKube goals for creating a docker image, creating Kubernetes manifests and applying them onto Kubernetes Cluster
我现在可以继续发布JKube目标,以创建docker映像,创建Kubernetes清单并将其应用于Kubernetes集群
mvn k8s:build k8s:resource k8s:apply
mvn k8s:构建k8s:资源k8s:应用
weather-web-application : $ mvn k8s:build k8s:resource k8s:apply
[INFO] Scanning for projects...
[INFO]
[INFO] -------------< org.eclipse.jkube:weather-web-application >--------------
[INFO] Building Simple Weather Application 1.0.0-SNAPSHOT
[INFO] --------------------------------[ war ]---------------------------------
[INFO]
[INFO] --- kubernetes-maven-plugin:1.0.0-rc-1:build (default-cli) @ weather-web-application ---
[INFO] k8s: Running in Kubernetes mode
[INFO] k8s: Building Docker image in Kubernetes mode
[INFO] k8s: Running generator webapp
[INFO] k8s: webapp: Using quay.io/jkube/jkube-tomcat9-binary-s2i:0.0.7 as base image for webapp
[INFO] k8s: [jkube/weather-web-application:latest] "webapp": Created docker-build.tar in 42 milliseconds
[INFO] k8s: [jkube/weather-web-application:latest] "webapp": Built image sha256:0bfd7
[INFO] k8s: [jkube/weather-web-application:latest] "webapp": Tag with latest
[INFO] --- kubernetes-maven-plugin:1.0.0-rc-1:resource (default-cli) @ weather-web-application ---
[INFO] k8s: Running generator webapp
[INFO] k8s: webapp: Using quay.io/jkube/jkube-tomcat9-binary-s2i:0.0.7 as base image for webapp
[INFO] k8s: using resource templates from /home/rohaan/work/repos/weather-web-application/src/main/jkube
[INFO] k8s: jkube-service: Adding a default service 'weather-web-application' with ports [8080]
[INFO] k8s: jkube-revision-history: Adding revision history limit to 2
[INFO]
[INFO] --- kubernetes-maven-plugin:1.0.0-rc-1:apply (default-cli) @ weather-web-application ---
[INFO] k8s: Using Kubernetes at https://192.168.39.134:8443/ in namespace default with manifest /home/rohaan/work/repos/weather-web-application/target/classes/META-INF/jkube/kubernetes.yml
[INFO] k8s: Using namespace: default
[INFO] k8s: Using namespace: default
[INFO] k8s: Creating a Secret from kubernetes.yml namespace default name apikeysecret
[INFO] k8s: Created Secret: target/jkube/applyJson/default/secret-apikeysecret.json
[INFO] k8s: Creating a Service from kubernetes.yml namespace default name weather-web-application
[INFO] k8s: Created Service: target/jkube/applyJson/default/service-weather-web-application.json
[INFO] k8s: Creating a Deployment from kubernetes.yml namespace default name weather-web-application
[INFO] k8s: Created Deployment: target/jkube/applyJson/default/deployment-weather-web-application.json
[INFO] k8s: HINT: Use the command `kubectl get pods -w` to watch your pods start up
[INFO] ------------------------------------------------------------------------
[INFO] BUILD SUCCESS
[INFO] ------------------------------------------------------------------------
[INFO] Total time:  9.016 s
[INFO] Finished at: 2020-08-30T21:54:22+05:30
[INFO] ------------------------------------------------------------------------
Note that Eclipse JKube detected that it’s a web application and used Apache Tomcat as a base image for application. It also created an opinionated Deployment and Service(with minor configuration provided in src/main/jkube fragments). You can check all created Kubernetes resources once goals have finished their execution:
请注意,Eclipse JKube检测到它是一个Web应用程序,并使用Apache Tomcat作为应用程序的基础映像。 它还创建了一个自以为是的Deployment and Service (在src/main/jkube片段中提供了次要配置)。 目标完成执行后,您可以检查所有创建的Kubernetes资源:
weather-web-application : $ kubectl get all
NAME                                          READY   STATUS    RESTARTS   AGE
pod/weather-web-application-cf6d4b4ff-pwrfc   1/1     Running   0          2m35s

NAME                              TYPE        CLUSTER-IP     EXTERNAL-IP   PORT(S)          AGE
service/kubernetes                ClusterIP   10.96.0.1      <none>        443/TCP          3m37s
service/weather-web-application   NodePort    10.108.23.30   <none>        8080:30424/TCP   2m35s

NAME                                      READY   UP-TO-DATE   AVAILABLE   AGE
deployment.apps/weather-web-application   1/1     1            1           2m35s

NAME                                                DESIRED   CURRENT   READY   AGE
replicaset.apps/weather-web-application-cf6d4b4ff   1         1         1       2m35s
Once your application Pods are in Running state you can expect your application to be ready for serving requests. Eclipse JKube also generates a Service for exposing your application pods. By default it creates a Service of type ClusterIP, but I added a property in my project jkube.enricher.jkube-service.type=NodePort in order to override this. This way we would be able to access application from outside of minikube:
一旦您的应用程序Pods处于“ Running状态,您就可以期望您的应用程序已准备好处理请求。 Eclipse JKube还生成了一个Service来公开您的应用程序容器。 默认情况下,它创建类型为ClusterIP的Service ,但是我在项目jkube.enricher.jkube-service.type=NodePort中添加了一个属性以覆盖此属性。 这样,我们将能够从minikube外部访问应用程序:
weather-web-application : $ MINIKUBE_IP=`minikube ip`
weather-web-application : $ WEATHER_WEB_APP_PORT=`kubectl get svc weather-web-application -ojsonpath='{.spec.ports[0].nodePort}'`
weather-web-application : $ firefox $MINIKUBE_IP:$WEATHER_WEB_APP_PORT
If everything goes as expected, you can see your application running in your browser like this:
如果一切都按预期进行,您可以看到您的应用程序在浏览器中的运行方式如下:

You can clean up all the resources created using Eclipse JKube undeploy goal:
您可以清理使用Eclipse JKube undeploy目标创建的所有资源:
weather-web-application : $ mvn k8s:undeploy
[INFO] Scanning for projects...
[INFO]
[INFO] -------------< org.eclipse.jkube:weather-web-application >--------------
[INFO] Building Simple Weather Application 1.0.0-SNAPSHOT
[INFO] --------------------------------[ war ]---------------------------------
[INFO]
[INFO] --- kubernetes-maven-plugin:1.0.0-rc-1:undeploy (default-cli) @ weather-web-application ---
[INFO] k8s: Using Kubernetes at https://192.168.39.134:8443/ in namespace default with manifest /home/rohaan/work/repos/weather-web-application/target/classes/META-INF/jkube/kubernetes.yml
[INFO] k8s: Using namespace: default
[INFO] k8s: Deleting resource Deployment default/weather-web-application
[INFO] k8s: Deleting resource Service default/weather-web-application
[INFO] k8s: Deleting resource Secret default/apikeysecret
[INFO] k8s: HINT: Use the command `kubectl get pods -w` to watch your pods start up
[INFO] ------------------------------------------------------------------------
[INFO] BUILD SUCCESS
[INFO] ------------------------------------------------------------------------
[INFO] Total time:  4.070 s
[INFO] Finished at: 2020-08-30T22:09:26+05:30
[INFO] ------------------------------------------------------------------------
weather-web-application : $
部署到Red Hat OpenShift: (Deploying onto Red Hat OpenShift:)
Deploying application onto Red Hat OpenShift is no different from deploying onto Kubernetes. Eclipse JKube offers a separate plugin for OpenShift which works in a similar way to Kubernetes plugin.
在Red Hat OpenShift上部署应用程序与在Kubernetes上部署没有什么不同。 Eclipse JKube为OpenShift提供了一个单独的插件,其工作方式与Kubernetes插件类似。
<plugin>
                <groupId>org.eclipse.jkube</groupId>
                <artifactId>openshift-maven-plugin</artifactId>
                <version>${kubernetes-maven-plugin.version}</version>
            </plugin>
mvn oc:build oc:resource oc:apply
mvn oc:build oc:resource oc:apply
weather-web-application : $ mvn oc:build oc:resource oc:apply
[INFO] Scanning for projects...
[INFO]
[INFO] -------------< org.eclipse.jkube:weather-web-application >--------------
[INFO] Building Simple Weather Application 1.0.0-SNAPSHOT
[INFO] --------------------------------[ war ]---------------------------------
[INFO]
[INFO] --- openshift-maven-plugin:1.0.0-rc-1:build (default-cli) @ weather-web-application ---
[INFO] oc: Using OpenShift build with strategy S2I
[INFO] oc: Running in OpenShift mode
[INFO] oc: Running generator webapp
[INFO] oc: webapp: Using quay.io/jkube/jkube-tomcat9-binary-s2i:0.0.7 as base image for webapp
[INFO] oc: [weather-web-application:latest] "webapp": Created docker source tar /home/rohaan/work/repos/weather-web-application/target/docker/weather-web-application/latest/tmp/docker-build.tar
[INFO] oc: Adding to Secret pullsecret-jkube
[INFO] oc: Using Secret pullsecret-jkube
[INFO] oc: Creating BuildServiceConfig weather-web-application-s2i for Source build
[INFO] oc: Adding to ImageStream weather-web-application
[INFO] oc: Starting Build weather-web-application-s2i
[INFO] oc: Waiting for build weather-web-application-s2i-1 to complete...
[INFO] oc: Using quay.io/jkube/jkube-tomcat9-binary-s2i:0.0.7 as the s2i builder image
[INFO] oc: tar: scripts: time stamp 2020-08-30 16:13:49 is 0.271696204 s in the future
[INFO] oc: tar: src/.s2i/environment: time stamp 2020-08-30 16:13:49 is 0.27022746 s in the future
[INFO] oc: tar: src/.s2i: time stamp 2020-08-30 16:13:49 is 0.27017005 s in the future
[INFO] oc: tar: src/Dockerfile: time stamp 2020-08-30 16:13:49 is 0.270095083 s in the future
[INFO] oc: tar: src/deployments/ROOT.war: time stamp 2020-08-30 16:13:49 is 0.265381556 s in the future
[INFO] oc: tar: src/deployments: time stamp 2020-08-30 16:13:49 is 0.265313505 s in the future
[INFO] oc: tar: src: time stamp 2020-08-30 16:13:49 is 0.265279047 s in the future
[INFO] oc: + SRC_DIR=/tmp/src/
[INFO] oc: + copy_dir bin
[INFO] oc: + local src=/tmp/src//bin
[INFO] oc: + [ -d /tmp/src//bin ]
[INFO] oc: + copy_dir deployments
[INFO] oc: + local src=/tmp/src//deployments
[INFO] oc: + [ -d /tmp/src//deployments ]
[INFO] oc: + echo copying /tmp/src//deployments to /deployments
[INFO] oc: copying /tmp/src//deployments to /deployments
[INFO] oc: + cp -a /tmp/src//deployments/ROOT.war /deployments
[INFO] oc: + copy_dir maven
[INFO] oc: + local src=/tmp/src//maven
[INFO] oc: + [ -d /tmp/src//maven ]
[INFO] oc:
[INFO] oc: Pushing image 172.30.39.149:5000/rokumar/weather-web-application:latest ...
[INFO] oc: Pushed 2/12 layers, 17% complete
[INFO] oc: Pushed 3/12 layers, 25% complete
[INFO] oc: Pushed 4/12 layers, 34% complete
[INFO] oc: Pushed 5/12 layers, 50% complete
[INFO] oc: Pushed 6/12 layers, 58% complete
[INFO] oc: Pushed 7/12 layers, 67% complete
[INFO] oc: Pushed 8/12 layers, 75% complete
[INFO] oc: Pushed 9/12 layers, 83% complete
[INFO] oc: Pushed 10/12 layers, 92% complete
[INFO] oc: Pushed 11/12 layers, 100% complete
[INFO] oc: Pushed 12/12 layers, 100% complete
[INFO] oc: Push successful
[INFO] oc: Build weather-web-application-s2i-1 in status Complete
[INFO] oc: Found tag on ImageStream weather-web-application tag: sha256:6e13df601a856ba9264cccaeb5c10dcbad0d66ed6ac9509ad37fb83c039becf8
[INFO] oc: ImageStream weather-web-application written to /home/rohaan/work/repos/weather-web-application/target/weather-web-application-is.yml
[INFO]
[INFO] --- openshift-maven-plugin:1.0.0-rc-1:resource (default-cli) @ weather-web-application ---
[INFO] oc: Using docker image name of namespace: rokumar
[INFO] oc: Running generator webapp
[INFO] oc: webapp: Using quay.io/jkube/jkube-tomcat9-binary-s2i:0.0.7 as base image for webapp
[INFO] oc: using resource templates from /home/rohaan/work/repos/weather-web-application/src/main/jkube
[INFO] oc: jkube-service: Adding a default service 'weather-web-application' with ports [8080]
[INFO] oc: jkube-revision-history: Adding revision history limit to 2
[INFO] oc: validating /home/rohaan/work/repos/weather-web-application/target/classes/META-INF/jkube/openshift/apikeysecret-secret.yml resource
[INFO] oc: validating /home/rohaan/work/repos/weather-web-application/target/classes/META-INF/jkube/openshift/weather-web-application-route.yml resource
[INFO] oc: validating /home/rohaan/work/repos/weather-web-application/target/classes/META-INF/jkube/openshift/weather-web-application-deploymentconfig.yml resource
[INFO] oc: validating /home/rohaan/work/repos/weather-web-application/target/classes/META-INF/jkube/openshift/weather-web-application-service.yml resource
[INFO]
[INFO] --- openshift-maven-plugin:1.0.0-rc-1:apply (default-cli) @ weather-web-application ---
[INFO] oc: Using OpenShift at https://api.rh-idev.openshift.com:443/ in namespace rokumar with manifest /home/rohaan/work/repos/weather-web-application/target/classes/META-INF/jkube/openshift.yml
[INFO] oc: OpenShift platform detected
[INFO] oc: Using project: rokumar
[INFO] oc: Using project: rokumar
[INFO] oc: Creating a Secret from openshift.yml namespace rokumar name apikeysecret
[INFO] oc: Created Secret: target/jkube/applyJson/rokumar/secret-apikeysecret-1.json
[INFO] oc: Creating a Service from openshift.yml namespace rokumar name weather-web-application
[INFO] oc: Created Service: target/jkube/applyJson/rokumar/service-weather-web-application-1.json
[INFO] oc: Creating a DeploymentConfig from openshift.yml namespace rokumar name weather-web-application
[INFO] oc: Created DeploymentConfig: target/jkube/applyJson/rokumar/deploymentconfig-weather-web-application-1.json
[INFO] oc: Creating Route rokumar:weather-web-application host: null
[INFO] oc: HINT: Use the command `oc get pods -w` to watch your pods start up
[INFO] ------------------------------------------------------------------------
[INFO] BUILD SUCCESS
[INFO] ------------------------------------------------------------------------
[INFO] Total time:  38.868 s
[INFO] Finished at: 2020-08-30T21:44:12+05:30
[INFO] ------------------------------------------------------------------------
You can check your pods once goals have finished their execution:
目标完成执行后,您可以检查Pod:
weather-web-application : $ oc get pods
NAME                                  READY     STATUS      RESTARTS   AGE
weather-web-application-1-cmf82       1/1       Running     0          1m
weather-web-application-s2i-1-build   0/1       Completed   0          1m
Once pod are in Running state, you can expect your application to be ready for receiving requests. Eclipse JKube generates an OpenShift Route with which you can access your application with ease:
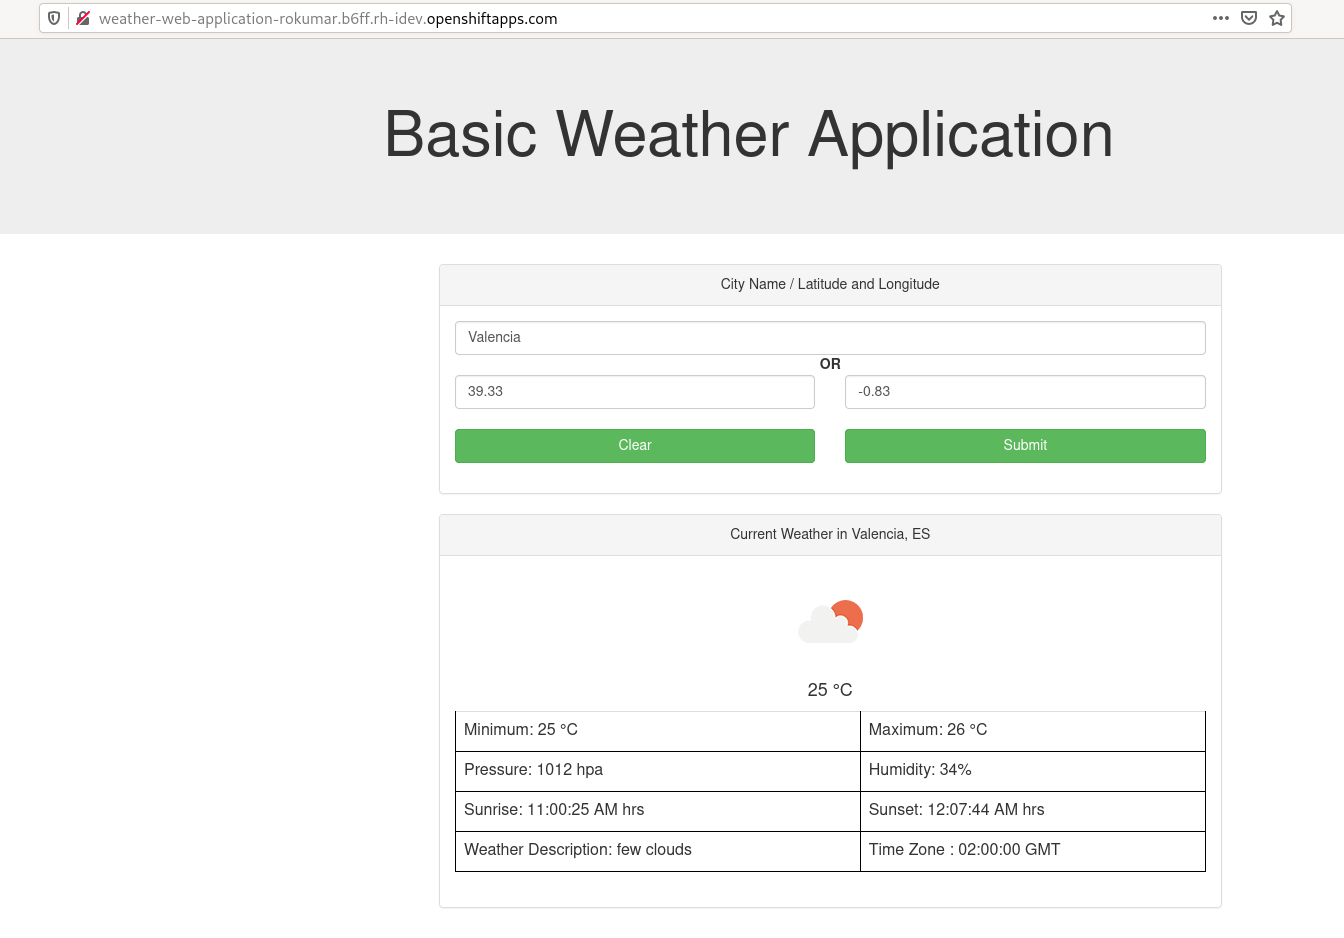
窗格处于“ Running状态后,您可以期望您的应用程序已准备就绪,可以接收请求。 Eclipse JKube生成一个OpenShift Route通过它您可以轻松地访问您的应用程序:
weather-web-application : $ oc get routes
NAME                      HOST/PORT                                                        PATH      SERVICES                  PORT      TERMINATION   WILDCARD
weather-web-application   weather-web-application-rokumar.b6ff.rh-idev.openshiftapps.com             weather-web-application   8080                    None
weather-web-application : $ firefox weather-web-application-rokumar.b6ff.rh-idev.openshiftapps.com
weather-web-application : $
If everything goes as expected you can see an application page like this and start testing the application.
如果一切都按预期进行,您将看到一个这样的应用程序页面并开始测试该应用程序。
You can clean up all the created resource using Eclipse JKube undeploy goal for OpenShift:
您可以使用OpenShift的Eclipse JKube取消部署目标来清理所有创建的资源:
mvn oc:undeploy
mvn oc:undeploy
It’s output is similar to k8s:undeploy go I’m skipping it.
它的输出类似于k8s:undeploy go我正在跳过它。
结论: (Conclusion:)
This concludes today’s blog. I hope it would be helpful for people who are interested in deploying their web applications onto Kubernetes with ease. You can find the project used in the blog here:
今天的博客到此结束。 我希望这对有兴趣轻松地将其Web应用程序部署到Kubernetes的人们有所帮助。 您可以在此处找到博客中使用的项目:
来加入我们吧: (Come Join Us:)
We value your feedback a lot so please report bugs, ask for improvements… Let’s build something great together!
我们非常重视您的反馈意见,因此请报告错误,寻求改进...
If you are a Eclipse JKube user or just curious, don’t be shy and join our welcoming community:
如果您是Eclipse JKube用户或只是好奇,请不要害羞并加入我们的欢迎社区:
provide feedback on GitHub;
在GitHub上提供反馈;
discuss with us on Gitter and on the mailing list;
ask your questions on Stack Overflow.
在Stack Overflow上问您的问题。
Orignally published on Wordpress.
原版发表在Wordpress上 。
openshift 部署


 336
336


 被折叠的 条评论
为什么被折叠?
被折叠的 条评论
为什么被折叠?
 到【灌水乐园】发言


