


firebase使用
Want to learn how to automate your deployment workflow? Then look no further. In this guide, I will go over the steps required to set up CI/CD with Firebase on the Google Cloud Platform (GCP).
是否想了解如何自动化您的部署工作流程? 然后,再没有其他。 在本指南中,我将介绍在Google Cloud Platform(GCP)上使用Firebase设置CI / CD所需的步骤。
But first, why?
但是首先,为什么呢?
When you work on a team, new features are continually getting implemented. Once the features are implemented, they need to be tested, deployed, and released. Moving your app from a local environment to a production environment requires many steps. But there is a way to automate these steps. This is where Continuous Integration (CI) and Continuous Deployment (CD) come in. Adopting CI/CD can help teams to catch bugs early on.
当您在团队中工作时,新功能会不断实现。 实施这些功能后,需要对其进行测试,部署和发布。 将您的应用程序从本地环境迁移到生产环境需要很多步骤。 但是有一种方法可以自动执行这些步骤。 这就是持续集成(CI)和持续部署(CD)出现的地方。采用CI / CD可以帮助团队尽早发现错误。
What are Continuous Integration (CI) and Continuous Deployment (CD)?
什么是持续集成(CI)和持续部署(CD)?
Continuous integration can allow developers to push up the changes to a shared repository. Tests can be put in place to make sure the code is ready for the next stage.
持续集成可以使开发人员将更改推送到共享存储库。 可以进行测试以确保代码已准备好进入下一阶段。
Continuous deployment is a process in which new code changes get pushed to a staging environment before moving the code to production.
持续部署是一个过程,在此过程中,将新代码更改推送到暂存环境,然后再将代码移至生产环境。
创建一个React App(可选) (Create a React App (Optional))
If you already have an app ready, proceed to Step 1.
如果您已经准备好应用程序,请继续执行步骤1。
Run the following command to create and start an app called cicd-demo:
运行以下命令以创建并启动一个名为cicd-demo的应用程序:
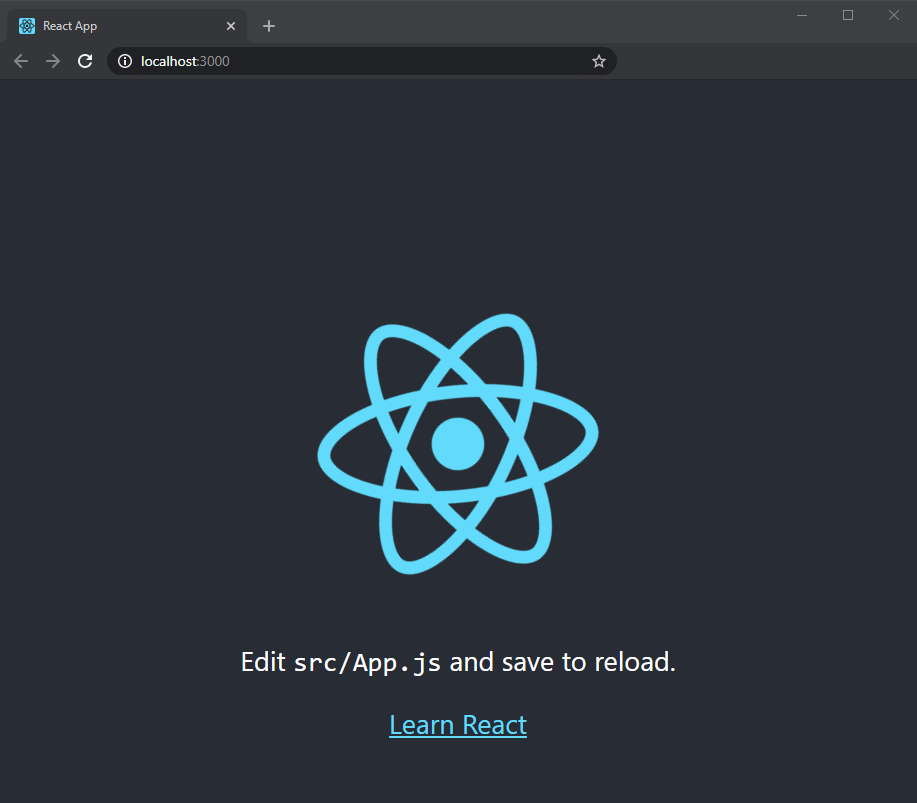
npx create-react-app cicd-demo
npm start
You should see a page like this:
您应该看到这样的页面:
1.创建一个Firebase项目 (1. Create a Firebase Project)
If you have an existing Firebase project, go to Step 2.
如果您已有Firebase项目,请转到步骤2。
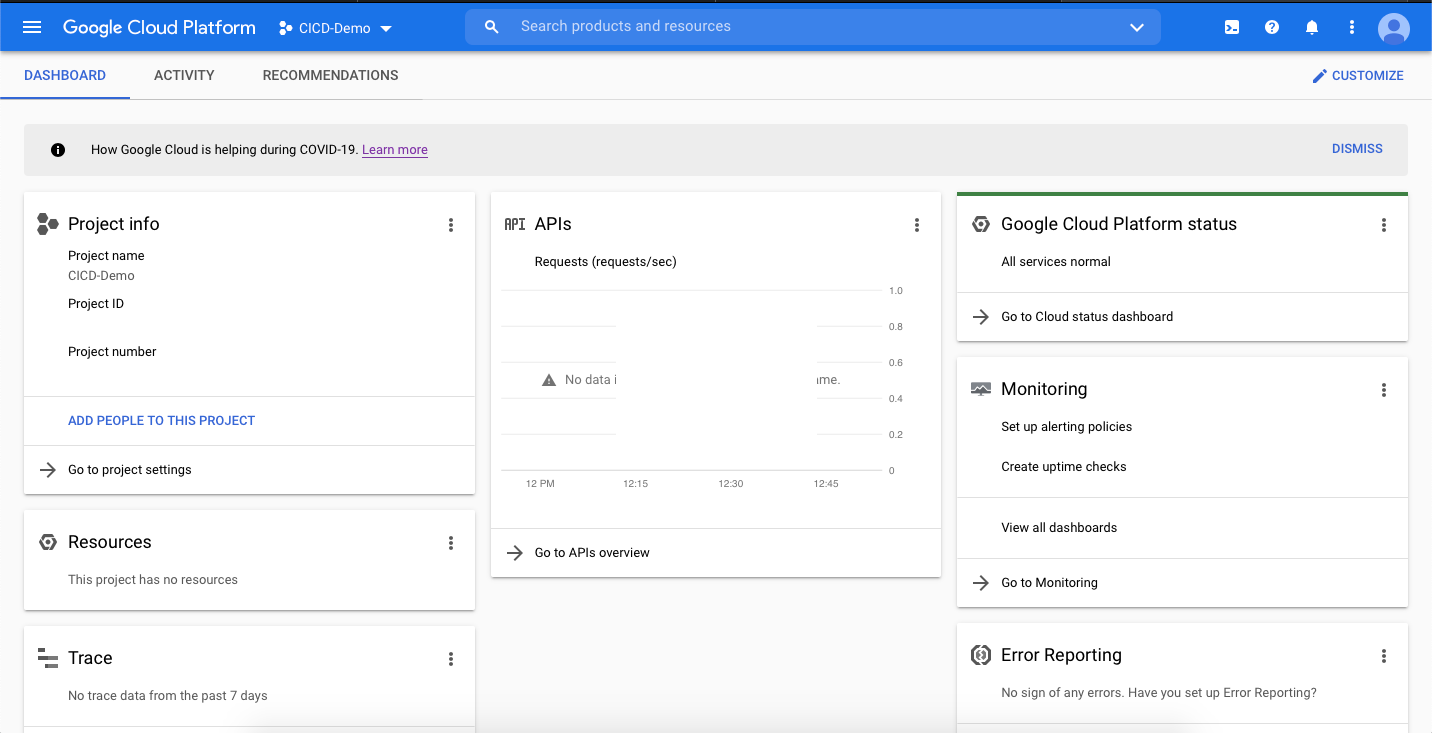
Head to Firebase’s website, go to the console, and create a new project. By creating a new project in Firebase, the same project will also appear in the GCP console. For this guide, I created a project called CICD-Demo to go through the steps.
转到Firebase的网站 ,转到控制台,然后创建一个新项目。 通过在Firebase中创建新项目,该项目也将出现在GCP控制台中。 对于本指南,我创建了一个名为CICD-Demo的项目来完成这些步骤。

Once you’ve created a project, you should be directed to the project homepage:
创建项目后,应直接转到项目主页:

2.设置持续部署 (2. Set Up Continuous Deployment)
In your project root directory, create a cloudbuild.yaml file. The purpose of this file is to list the necessary steps to get the app build:
在项目根目录中,创建一个cloudbuild.yaml文件。 该文件的目的是列出获取应用程序构建的必要步骤:
steps:
      - name: 'gcr.io/cloud-builders/npm'
        args: ['install']
      # Build
      - name: 'gcr.io/cloud-builders/npm'
        args: ['run', 'build']
      # Deploy
        args: ['deploy', '--project=project-id', '--only=hosting']
3.将应用程序链接到Firebase (3. Link App to Firebase)
Install the Firebase CLI and log in:
安装Firebase CLI并登录:
npm install -g firebase-tools
firebase login
After you authenticate, you need to initialize your project:
认证之后,您需要初始化您的项目:
firebase initMake sure you select “Use an existing project” because we already created a project in the Firebase console.
确保您选择“使用现有项目”,因为我们已经在Firebase控制台中创建了一个项目。
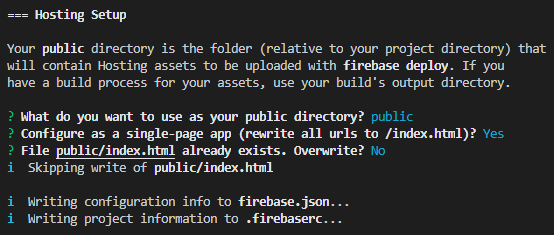
Since this is a React app, change “public” to “build” in the firebase.json file:
由于这是一个React应用,因此在firebase.json文件中将“ public”更改为“ build”:
"public": "build"4.设置GCP项目 (4. Set Up GCP Project)
Go to the Google Cloud Platform website and select the correct project in the top left corner if you have multiple projects.
如果您有多个项目,请访问Google Cloud Platform网站并在左上角选择正确的项目。
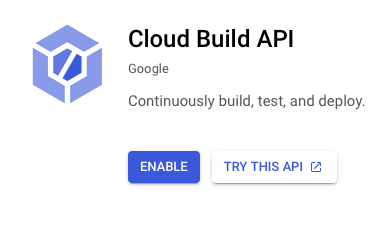
Open up the sidebar and go to “Cloud Build.” Enable the Cloud Build API:
打开侧边栏,然后转到“ Cloud Build”。 启用Cloud Build API:
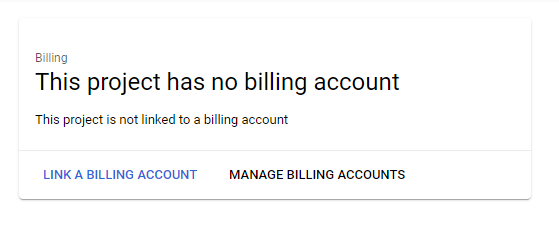
If you are new to GCP, you might need to add a billing account. Go to the “Billing” tab located on the sidebar to set up an account:
如果您不熟悉GCP,则可能需要添加一个结算帐户。 转到位于侧栏上的“结算”标签以设置帐户:
5.创建一个触发器 (5. Create a Trigger)
Creating a trigger will automatically start a build when you push to a branch. In the “Cloud Build” tab, select “Triggers” to start the process:
当您按下分支时,创建触发器将自动开始构建。 在“云构建”选项卡中,选择“触发器”以开始该过程:

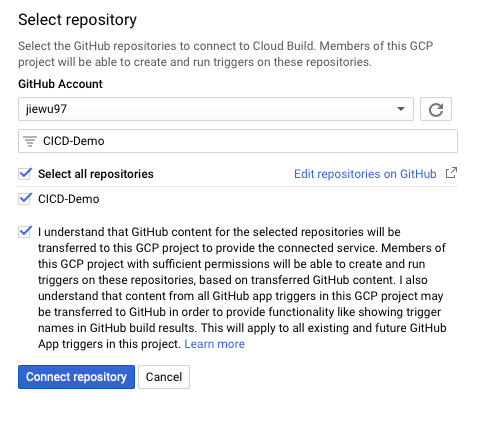
Select GitHub as your source:
选择GitHub作为源:
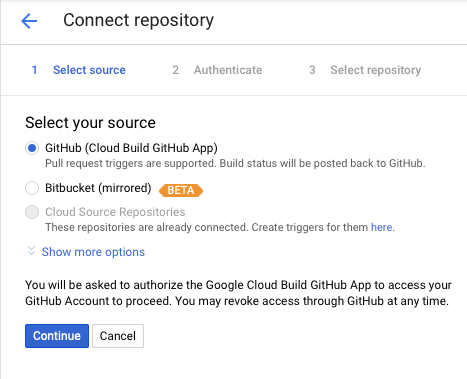
A new window should pop up for you to authenticate your GitHub account. Once you do, select the correct repository and continue:
应该会弹出一个新窗口,供您验证GitHub帐户。 完成后,选择正确的存储库并继续:
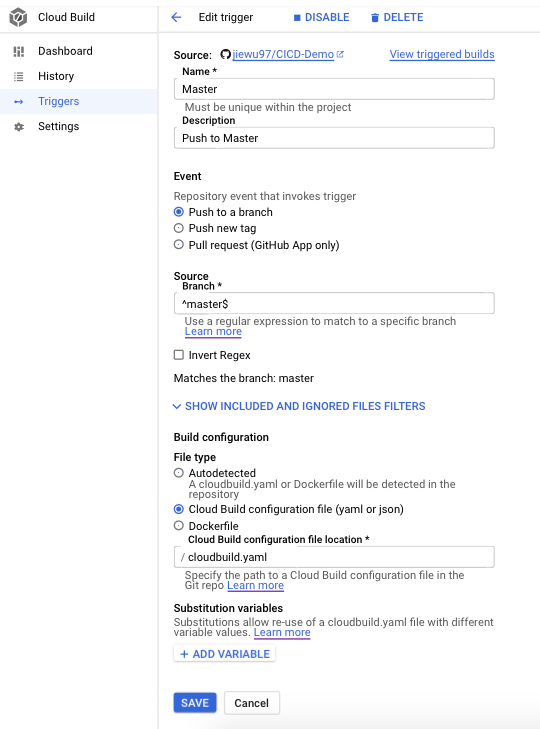
Then select “Create push trigger.” You should see a trigger page like this. This trigger will start a build when there is a push to any branch:
然后选择“创建推式触发器”。 您应该看到这样的触发页面。 当推送到任何分支时,此触发器将开始构建:

Optional: If you want to limit the trigger to only the master branch, click on the default-push-trigger-1 to edit.
可选:如果要将触发器限制为仅主分支,请单击 default-push-trigger-1 进行编辑。
6.安装gcloud SDK (6. Install gcloud SDK)
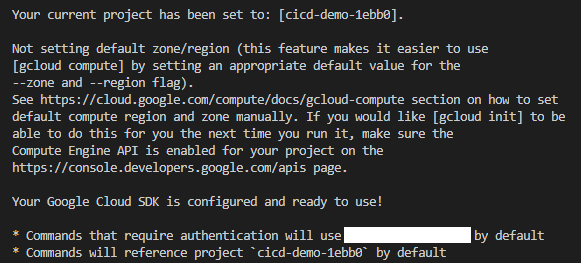
Go to the Cloud SDK website to install the gcloud SDK and then initialize it:
转到Cloud SDK网站以安装gcloud SDK,然后对其进行初始化:
gcloud initLog in with your account and select the correct project. This will make sure an image is created for the right project in the next step.
使用您的帐户登录并选择正确的项目。 这将确保在下一步中为正确的项目创建图像。
7.设置Cloud Builder社区 (7. Set Up Cloud Builder Community)
Since we are using Firebase, Cloud Build doesn’t have the right image. So we need to use an image from the cloud builder community.
由于我们使用的是Firebase,因此Cloud Build没有正确的映像。 因此,我们需要使用来自云构建器社区的图像。
Go to its GitHub page and clone the repo. Make sure you clone the repo to your root directory. Then, navigate to the Firebase folder and open up the Dockerfile.
转到其GitHub页面并克隆存储库。 确保将存储库克隆到根目录。 然后,导航到Firebase文件夹并打开Dockerfile。
Replace the contents in the Dockerfile with the following steps:
用以下步骤替换Dockerfile中的内容:
FROM node
RUN apt-get update
RUN apt-get upgrade -y
RUN apt-get install dos2unix
RUN echo "Installing firebase tools ..."
RUN npm i -g firebase-tools
ADD firebase.bash /usr/bin
RUN chmod +x /usr/bin/firebase.bash
RUN dos2unix /usr/bin/firebase.bashENTRYPOINT [ "/usr/bin/firebase.bash" ]
The original contents in the Cloud Builder Community Dockerfile will result in the following error because of the file format. To fix it, install dos2unix:
由于文件格式的原因,Cloud Builder Dockerfile中的原始内容将导致以下错误。 要修复它,请安装dos2unix:
Then build the image. The output should end with SUCCESS.
然后建立图像。 输出应以SUCCESS结尾。
gcloud builds submit .8.配置权限 (8. Configure Permissions)
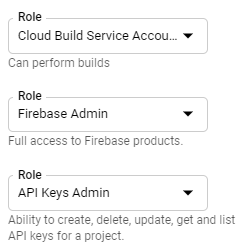
Now that the CI/CD pipeline is set up, we need to give a service account permissions for Firebase deployments. Go to the GCP sidebar and the “IAM & Admin” tab. Find the member that ends in cloudbuild.gserviceaccount.com. Then go to edit to add another role called “Firebase Admin.” If your app uses an API, you have to add “API Keys Admin.”
现在,已经设置了CI / CD管道,我们需要为Firebase部署授予服务帐户权限。 转到GCP侧栏和“ IAM&Admin”标签。 查找以cloudbuild.gserviceaccount.com结尾的成员。 然后进行编辑以添加另一个名为“ Firebase Admin”的角色。 如果您的应用程序使用API,则必须添加“ API Keys Admin”。
9.推送到GitHub (9. Push to GitHub)
Create a GitHub repository and push up your code if you haven’t done so already.
创建一个GitHub存储库并提升代码(如果尚未完成的话)。
git add --all
git commit -m 'initial commit'
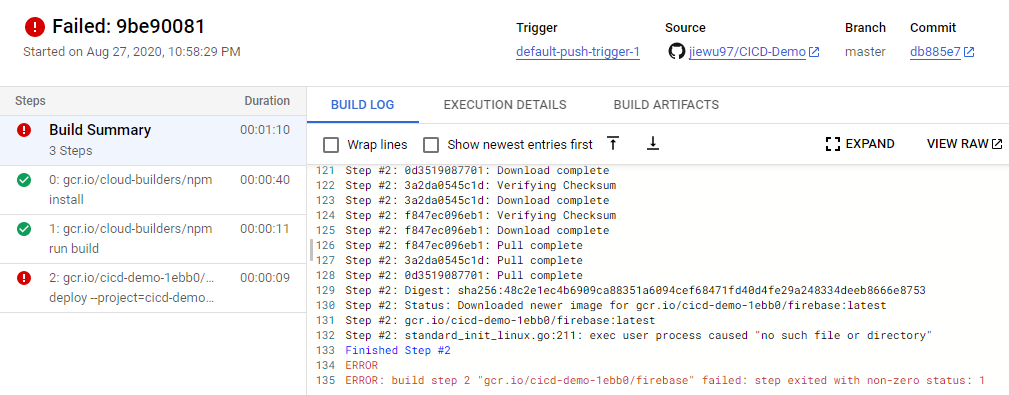
git push10.测试CI / CD管道 (10. Test CI/CD Pipeline)
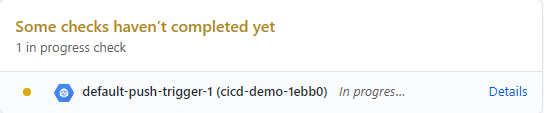
To test your CI/CD pipeline, make some changes to your project and push up the code. Once you push up the changes, go to GitHub and you should see a yellow dot next to the commit. This indicates that the build is in progress. You can click the build logs by going to “Details,” leading you to the cloud build history.
要测试您的CI / CD管道,请对项目进行一些更改并增加代码。 推送更改后,转到GitHub,您应该在提交旁边看到一个黄点。 这表明构建正在进行中。 您可以通过转到“详细信息”来单击构建日志,从而转到云构建历史记录。

firebase使用


 817
817

 被折叠的 条评论
为什么被折叠?
被折叠的 条评论
为什么被折叠?
 到【灌水乐园】发言


