


openshift平台
了解如何在OpenShift容器平台上将Quarkus微服务作为无服务器部署 (Learn how to deploy Quarkus microservice as serverless on the OpenShift Container Platform)
The serverless computing architecture has the following attributes: the ability to run just the business logic code with very small disk and memory footprint and not needing any “server” configuration plus the ability to scale down to zero after use, so the service only runs when is called (it starts automatically, it scales on demand and it can scale down to zero again). To support that you need a platform that will be able to respond to such calls and also an efficient serverless application runtime that will be able to react extremely fast so no delays are experienced.
无服务器计算架构具有以下属性:能够仅以很小的磁盘和内存占用空间运行业务逻辑代码,而无需任何“服务器”配置,并且能够在使用后缩减为零,因此该服务仅在以下情况下运行称为(它会自动启动,根据需要缩放,并且可以再次缩小为零)。 为了支持您,您需要一个能够响应此类调用的平台,以及一个高效的无服务器应用程序运行时,该运行时将能够非常快速地做出React,因此不会出现延迟。
In the Red Hat OpenShift Container Platform, serverless capabilities are provided via the Red Hat OpenShift Serverless service. It is based on the open source Knative project and allows applications to be packaged as Open Container Initiative containers. The OpenShift Serverless offers two components: Knative Serving and Knative Eventing. In this article we will focus on the Knative Serving component.
在Red Hat OpenShift容器平台中,通过Red Hat OpenShift无服务器服务提供了无服务器功能。 它基于开源Knative项目,并允许将应用程序打包为Open Container Initiative容器。 OpenShift Serverless提供两个组件: Knative服务和Knative事件 。 在本文中,我们将重点介绍Knative Serving组件。
As we mentioned before, you will also need fast responding runtime in your container. Quarkus running in native mode is providing the Java platform with the serverless attributes described above.
如前所述,您还需要在容器中快速响应运行时。 在纯模式下运行的Quarkus为Java平台提供了上述的无服务器属性。
In the previous article we discussed how to build a JAX-RS compatible microservice to run in Quarkus runtime. We will use that service and deploy it as serverless.
在上一篇文章中,我们讨论了如何构建兼容JAX-RS的微服务以在Quarkus运行时中运行。 我们将使用该服务并将其部署为无服务器。
启用OpenShift无服务器 (Enabling OpenShift Serverless)
Before you can run your first serverless service on the OpenShift Container Platform, you need to perform a few installation steps that will be discussed in short in this section. You can read in more details about OpenShift Serverless and its requirements here.
在OpenShift容器平台上运行第一个无服务器服务之前,您需要执行一些安装步骤,本节将对此进行简要讨论。 您可以在此处阅读有关OpenShift Serverless及其要求的更多详细信息。
First step is to install the OpenShift Serverless Operator. We will install it via the OpenShift Container Platform console, using Operator Hub.
第一步是安装OpenShift Serverless Operator。 我们将使用操作员中心通过OpenShift Container Platform控制台进行安装。
Go to the Operators > OperatorHub and select the OpenShift Serverless Operator.
转到“ 运算符”>“ OperatorHub”,然后选择“ OpenShift无服务器运算符” 。
Install the operator accepting the default subscription configuration to install it in all namespaces on the cluster.
安装接受默认订阅配置的操作员,以将其安装在集群上的所有名称空间中。
Wait a few moments till the operator is successfully installed. You can verify it in the Installed Operators page:
请稍等片刻,直到成功安装操作员。 您可以在“已安装的运营商”页面中进行验证:

Once the operator is successfully installed we can configure the Knative Serving environment.
成功安装操作员后,我们可以配置Knative Serving环境。
Start with creating the knative-serving namespace via console or command line issuing:
首先通过控制台或命令行发布来创建knative-serving名称空间:
$ oc create namespace knative-servingNext, go to the Installed Operators page in the console, select the OpenShift Serverless Operator. Make sure that the knative-serving project is selected. Then switch to the Knative Serving tab and click the Create Knative Serving button as show below:
接下来,转到控制台中的Installed Operators页面,选择OpenShift Serverless Operator 。 确保选择了knative-serving项目。 然后切换到“ Knative服务”标签,然后点击“ 创建Knative服务”按钮,如下所示:

For simple configurations accept all defaults and click Create. After that you will be redirected to the Knative Serving page again.
对于简单的配置,请接受所有默认设置,然后单击“ 创建” 。 之后,您将再次被重定向到Knative服务页面。

Click the newly created resource and scroll down to Conditions section to check if it has deployed successfully:
单击新创建的资源,然后向下滚动到“ 条件”部分,以检查它是否已成功部署:

If your installation is successful, after reloading the console page, you should see the new Serverless menu in the tree:
如果安装成功,则在重新加载控制台页面之后,您应该在树中看到新的无服务器菜单:

部署第一个无服务器应用程序 (Deploying your first serverless application)
Once the platform is fully configured, you can deploy your application. Your application needs to be packaged as container and available via registry (public, private, OpenShift internal). We are using the StockQuote application that we built in the previous article, which image is already deployed to the OpenShift internal registry and available as an ImageStream. If you need details how build and deploy application image to the OpenShift registry you can check the previous article.
完全配置平台后,即可部署应用程序。 您的应用程序需要打包为容器,并可以通过注册表(公共,私有,OpenShift内部)使用。 我们正在使用上一篇文章中构建的StockQuote应用程序,该图像已经部署到OpenShift内部注册表中,并且可以作为ImageStream使用。 如果您需要有关如何构建应用程序映像并将其部署到OpenShift注册表的详细信息,则可以查看上一篇文章 。
Create the yaml file that will define your service - svrless-stock-quote.yaml:
创建将定义您的服务的yaml文件-svrless-stock-quote.yaml:
apiVersion: serving.knative.dev/v1
kind: Service
metadata:
  name: svrless-stock-quote
spec:
  template:
    spec:
      containers:
        - image: >-
            image-registry.openshift-image-registry.svc:5000/stock-quote-quarkus/minimal-stock-quote-quarkus:latest
          ports:
            - containerPort: 8080
          env:
            - name: REDIS_URL
              valueFrom:
                secretKeyRef:
                  name: redis
                  key: redis.url
            - name: MP_JWT_VERIFY_PUBLICKEY
              valueFrom:
                configMapKeyRef:
                  name: jwt-config
                  key: jwt-ca.crt
            - name: MP_JWT_VERIFY_ISSUER
              valueFrom:
                configMapKeyRef:
                  name: jwt-config
                  key: mp.jwt.verify.issuer
            - name: SMALLRYE_JWT_VERIFY_AUD
              valueFrom:
                configMapKeyRef:
                  name: jwt-config
                  key: smallrye.jwt.verify.aud
You need to define name and image location. In addition, we customized it providing specific container port and environment variables.
您需要定义名称和图像位置 。 此外,我们对其进行了定制,以提供特定的容器端口和环境变量。
You can deploy it via OCP web console, oc or kn command line tools.
您可以通过OCP Web控制台, oc或kn命令行工具进行部署。
We will deploy using the console. Navigate to Serverless > Services, and select your project.
我们将使用控制台进行部署。 导航到无服务器>服务 ,然后选择您的项目。

Click Create Service button and paste contents of the yaml file there:
单击创建服务按钮,然后在其中粘贴yaml文件的内容:

Click Create button. Scroll down to the Conditions section to check if service was successfully deployed.
单击创建按钮。 向下滚动到“ 条件”部分,以检查服务是否已成功部署。

You can also see that Revision was created. Revision is an immutable object that reflects point-in-time snapshot of the code and configuration.
您还可以看到已创建修订 。 修订版是一个不变的对象,反映了代码和配置的时间点快照。

And Route was also created that defines your serverless application endpoint:
并且还创建了Route来定义您的无服务器应用程序端点:

The platform automatically created a deployment object for the application, and as application currently did not received any traffic it is scaled to 0.
该平台会自动为该应用程序创建一个部署对象,并且由于应用程序当前未收到任何流量, 因此将其缩放为0 。

Lets generate some load — use the given route to call the application several times. You will not see any output, since the service is protected by the JWT token, but you will notice that deployment was automatically scaled to 1 and service was called.
让我们产生一些负载-使用给定的路由多次调用应用程序。 由于该服务受JWT令牌保护,因此您将看不到任何输出,但是您会注意到部署已自动缩放为1并调用了服务。

After a short time of inactivity, it will automatically scaled down to zero.
短暂的不活动后,它将自动缩小为零。
Congratulations. You successfully deployed and tested serverless application on the OpenShift Container Platform.
恭喜你 您已在OpenShift容器平台上成功部署和测试了无服务器应用程序。
如何对应用程序进行版本控制? (How about versioning of the application?)
Very often you will deploy new versions of your application. OpenShift Serverless gives you an easy way to do it. Whenever you will change the definition of the service object, a new revision is created. We emulated it by adding additional environment entry, but typically it will be a new image version.
通常,您将部署应用程序的新版本。 OpenShift Serverless为您提供了一种简单的方法。 每当您更改服务对象的定义时,都会创建一个新修订。 我们通过添加其他环境条目来模拟它,但是通常它将是一个新的映像版本。

Now, for example for canary testing of the new version, we will split traffic coming to the application in a 90/10% ratio.
现在,例如,对于新版本的金丝雀测试 ,我们将以90/10%的比例分配进入应用程序的流量。
Switch to the Developer view of the console, select Topology. In the topology view click your service and switch to the Resources tab.
切换到控制台的“ 开发人员”视图,选择“ 拓扑” 。 在拓扑视图中,单击您的服务,然后切换到“ 资源”选项卡。
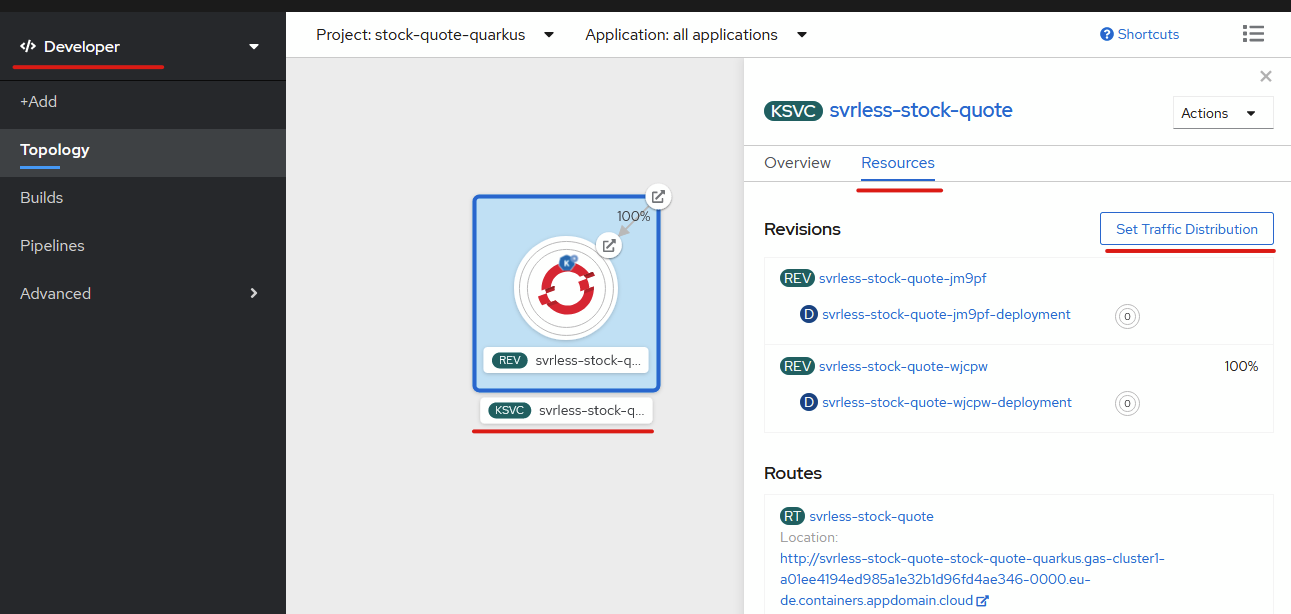
Click Set Traffic Distribution do define the splitting percentage, tags for your version and select specific revisions:
点击设置流量分配 ,为您的版本定义拆分百分比,标签并选择特定的修订:

After you save the changes, the topology view will be updated to show defined traffic rules.
保存更改后,拓扑视图将更新以显示已定义的流量规则。

You can now continue to use the old route endpoint, in which case traffic will be split according to the definition or use endpoints for the specific revision e.g.
现在,您可以继续使用旧的路由端点,在这种情况下,流量将根据定义进行拆分,或者将端点用于特定版本,例如
http://v1-svrless-stock-quote-stock-quote-quarkus.gas-cluster1-a01ee4194ed985a1e32b1d96fd4ae346-0000.eu-de.containers.appdomain.cloudhttp://v2-svrless-stock-quote-stock-quote-quarkus.gas-cluster1-a01ee4194ed985a1e32b1d96fd4ae346-0000.eu-de.containers.appdomain.cloudAfter you finish the testing, you may remove the old revision from the traffic definition.
完成测试后,您可以从流量定义中删除旧版本。
摘要 (Summary)
In this blog, we showed how to configure OpenShift Container Platform to run serverless workload, deploy containerized application as serverless service and define traffic among several application revisions.
在此博客中,我们展示了如何配置OpenShift容器平台以运行无服务器工作负载,将容器化的应用程序部署为无服务器服务以及定义多个应用程序修订版之间的流量。
openshift平台


 386
386

 被折叠的 条评论
为什么被折叠?
被折叠的 条评论
为什么被折叠?
 到【灌水乐园】发言


