evga x58服务器芯片组,多图:EVGA双路LGA1366 X58主板细节分析

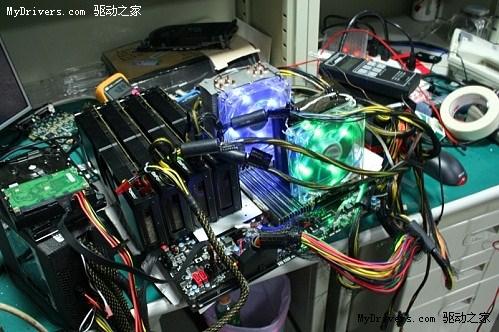
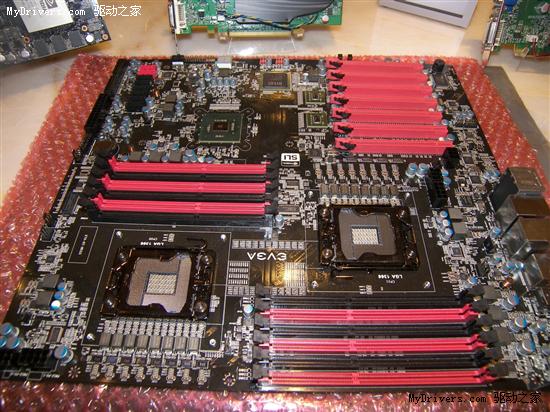
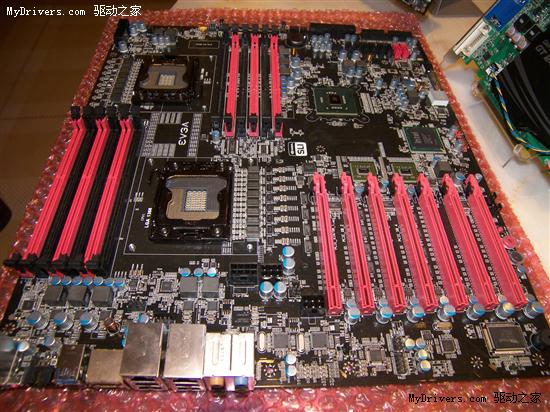
相比于华硕的最新玩家国度Rampage III Extreme,EVGA的双路X58主板更令人垂涎三尺,EVGA也自豪地将其称为“X58主板的终极之作”:支持两颗45nm Core i7-900/Xeon 5500四核心处理器或者32nm Gulftown Core i7-980X六核心处理器,十二条内存插槽支持48GB DDR3-1600+,七条PCI-E x16插槽支持高带宽多路显卡并行……

该主板目前只有一个产品编号“270-GT-W555”,还没有正式型号命名,不出意外应该会归入Classified系列。

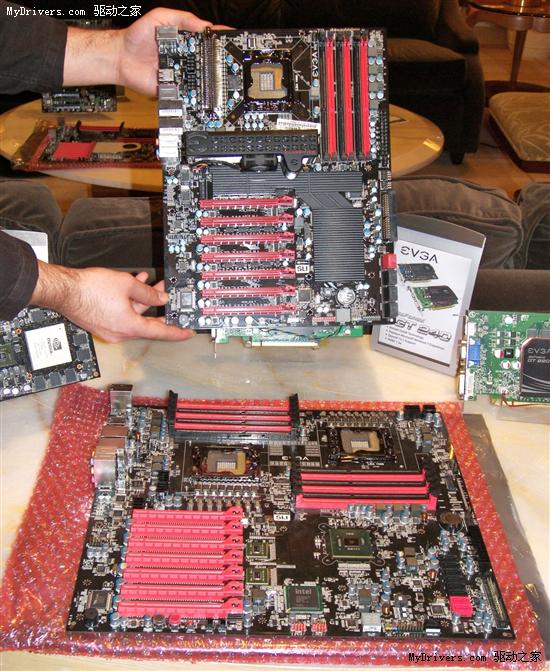
看到这块庞大的主板,很多人可能会想知道,它使用的究竟是什么规格的板型标准?EVGA的回应是:目前还没有相应的官方ATX标准,而是他们自行设计的。确切的长度和宽度数字还没有,但你可以想象一下:这个地球上只有两个机箱能够容纳它,一个来自联力,一个来自超微(SuperMicro)。

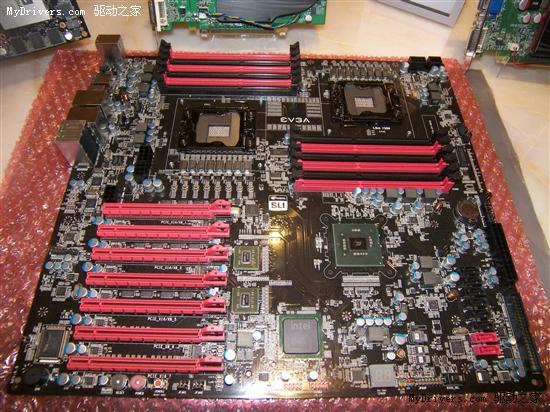
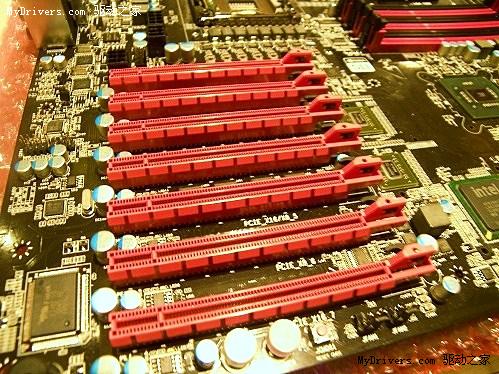
和之前的X58 Classified一样,这块板子上也有多达七条PCI-E 2.0 x16插槽,都是醒目的红色调。由于搭配了两颗nForce 200桥接芯片,带宽不是问题。从上往下数,第一、第三、第五、第七条可以同时运行在x16模式,因此可以组建全速四路SLI/CrossFireX系统或者三路SLI+PhysX物理加速系统。如果全部插满七条单插槽显卡的话,则是上边六条全部x8半速模式,最下方的第七条仍是x16全速模式,事实上无论什么配置这条插槽都是全速的。

如此密集的插槽排列必然会导致空间拥挤。尽管EVGA将全速插槽隔开放置,方便使用大型显卡,但如果安装了X58北桥散热器,安装在第一条插槽上的显卡基本就没办法插拔了。EVGA正在就此征求各方面意见,争取寻求一个妥善的解决方案。

主板上同样有NEC和Marvell的控制器,提供两个USB 3.0和两个SATA 6Gbps接口(红色),另外还有来自ICH10R南桥的六个SATA 3Gbps(黑色)。虽然没有再附加JMicron控制器,但还是保留了一个IDE接口。

值得一提的是,虽然这八个SATA接口都是竖直放置的,但因为主板空间异常宽阔,不会有任何显卡挡住它们,即使长达31厘米的Radeon HD 5970也不成问题。

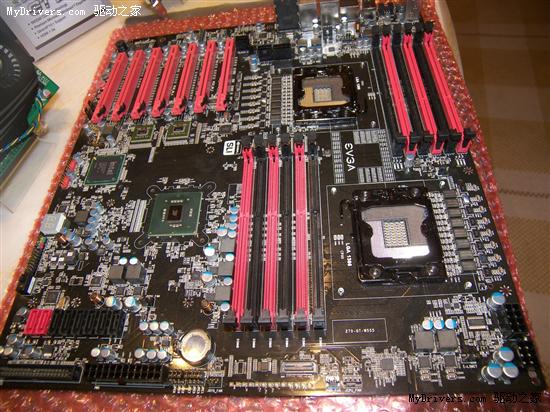
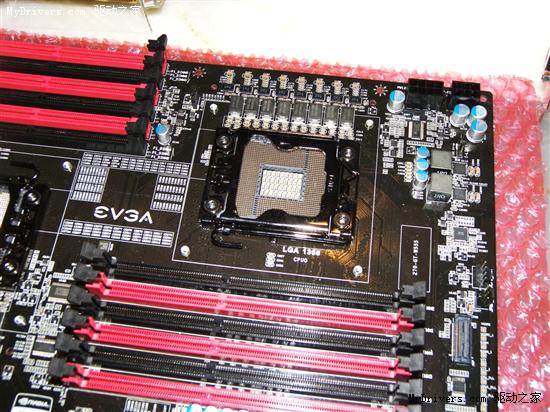
回头再看看供电:两个处理器插座,各自辅以八相数字PWM供电电路,频率最高1333kHz并能在BIOS里自行管理。为了增强稳定性,EVGA也在插座触点上使用了三倍金,插座旁边还有之前用过的LICC电容,或者说是超低ESR/ESL薄膜电容。

主板上还有三重BIOS,能让超频玩家使用三种不同的配置启动系统。这个是在P55 FTW上开始引入的,将成为EVGA高端主板的标准功能。

你问价格?EVGA还没有最终决定,估计非常有希望冲击700美元,这样一来华硕Rampage III Extreme就算达到400美元也不值一提了。

ae84c4e934ad4e9459d4509afff3a1a9.png

9ad455e811448505e00e6d7ab7950deb.png

33cb274c7715adb33ce7634d43e3e4e1.png

fe21e638585256a889a1f9712484f862.png

721011487f5c20787a5d748dce03d3a1.png

d6304d6b51a6fcd14e48b7cfd7e1c0d4.png

521548b9a165b3312d2fb1211af1fa2a.png

acc20f9f4804b43b5ae2f880e6f91ac7.png

  • 0
    点赞
  • 0
    收藏
    觉得还不错? 一键收藏
  • 0
    评论
好的,采用面向接口编程思想,我们可以定义一些接口来描述计算机所需的硬件组件,然后再根据这些接口的定义来选择具体的实现。以下是一个简单的示例: 1. CPU接口: ```java public interface CPU { String getModel(); String getBrand(); int getCores(); int getThreads(); } ``` 我们可以选择Intel或者AMD的CPU实现该接口,这里以Intel为例: ```java public class IntelCPU implements CPU { private String model; private String brand; private int cores; private int threads; public IntelCPU(String model, int cores, int threads) { this.model = model; this.brand = "Intel"; this.cores = cores; this.threads = threads; } public String getModel() { return model; } public String getBrand() { return brand; } public int getCores() { return cores; } public int getThreads() { return threads; } } ``` 2. 主板接口: ```java public interface Motherboard { String getModel(); String getBrand(); String getChipset(); } ``` 我们可以选择ASUS、Gigabyte或者MSI等品牌的主板实现该接口,这里以ASUS为例: ```java public class AsusMotherboard implements Motherboard { private String model; private String brand; private String chipset; public AsusMotherboard(String model, String chipset) { this.model = model; this.brand = "ASUS"; this.chipset = chipset; } public String getModel() { return model; } public String getBrand() { return brand; } public String getChipset() { return chipset; } } ``` 3. 显卡接口: ```java public interface GraphicsCard { String getModel(); String getBrand(); int getMemory(); } ``` 我们可以选择NVIDIA或者AMD的显卡实现该接口,这里以NVIDIA为例: ```java public class NvidiaGraphicsCard implements GraphicsCard { private String model; private String brand; private int memory; public NvidiaGraphicsCard(String model, int memory) { this.model = model; this.brand = "NVIDIA"; this.memory = memory; } public String getModel() { return model; } public String getBrand() { return brand; } public int getMemory() { return memory; } } ``` 4. 内存接口: ```java public interface Memory { String getModel(); String getBrand(); int getSize(); int getSpeed(); } ``` 我们可以选择Kingston、Corsair或者G.Skill等品牌的内存实现该接口,这里以Kingston为例: ```java public class KingstonMemory implements Memory { private String model; private String brand; private int size; private int speed; public KingstonMemory(String model, int size, int speed) { this.model = model; this.brand = "Kingston"; this.size = size; this.speed = speed; } public String getModel() { return model; } public String getBrand() { return brand; } public int getSize() { return size; } public int getSpeed() { return speed; } } ``` 5. 存储接口: ```java public interface Storage { String getModel(); String getBrand(); int getCapacity(); int getSpeed(); } ``` 我们可以选择Kingston、Samsung或者Western Digital等品牌的存储实现该接口,这里以Kingston为例: ```java public class KingstonStorage implements Storage { private String model; private String brand; private int capacity; private int speed; public KingstonStorage(String model, int capacity, int speed) { this.model = model; this.brand = "Kingston"; this.capacity = capacity; this.speed = speed; } public String getModel() { return model; } public String getBrand() { return brand; } public int getCapacity() { return capacity; } public int getSpeed() { return speed; } } ``` 6. 机箱接口: ```java public interface ComputerCase { String getModel(); String getBrand(); int getSize(); } ``` 我们可以选择Corsair、Cooler Master或者NZXT等品牌的机箱实现该接口,这里以Corsair为例: ```java public class CorsairComputerCase implements ComputerCase { private String model; private String brand; private int size; public CorsairComputerCase(String model, int size) { this.model = model; this.brand = "Corsair"; this.size = size; } public String getModel() { return model; } public String getBrand() { return brand; } public int getSize() { return size; } } ``` 7. 电源接口: ```java public interface PowerSupply { String getModel(); String getBrand(); int getPower(); String getCertification(); } ``` 我们可以选择Cooler Master、EVGA或者Seasonic等品牌的电源实现该接口,这里以Cooler Master为例: ```java public class CoolerMasterPowerSupply implements PowerSupply { private String model; private String brand; private int power; private String certification; public CoolerMasterPowerSupply(String model, int power, String certification) { this.model = model; this.brand = "Cooler Master"; this.power = power; this.certification = certification; } public String getModel() { return model; } public String getBrand() { return brand; } public int getPower() { return power; } public String getCertification() { return certification; } } ``` 最后,我们可以定义一个计算机接口来组装这些硬件组件: ```java public interface Computer { CPU getCPU(); Motherboard getMotherboard(); GraphicsCard getGraphicsCard(); Memory getMemory(); Storage getStorage(); ComputerCase getComputerCase(); PowerSupply getPowerSupply(); } ``` 然后可以定义一个类来实现该接口,组装一个完整的计算机: ```java public class MyComputer implements Computer { private CPU cpu; private Motherboard motherboard; private GraphicsCard graphicsCard; private Memory memory; private Storage storage; private ComputerCase computerCase; private PowerSupply powerSupply; public MyComputer(CPU cpu, Motherboard motherboard, GraphicsCard graphicsCard, Memory memory, Storage storage, ComputerCase computerCase, PowerSupply powerSupply) { this.cpu = cpu; this.motherboard = motherboard; this.graphicsCard = graphicsCard; this.memory = memory; this.storage = storage; this.computerCase = computerCase; this.powerSupply = powerSupply; } public CPU getCPU() { return cpu; } public Motherboard getMotherboard() { return motherboard; } public GraphicsCard getGraphicsCard() { return graphicsCard; } public Memory getMemory() { return memory; } public Storage getStorage() { return storage; } public ComputerCase getComputerCase() { return computerCase; } public PowerSupply getPowerSupply() { return powerSupply; } } ``` 最后,我们可以使用以下代码来创建并使用组装好的计算机: ```java CPU cpu = new IntelCPU("Core i5 10600K", 6, 12); Motherboard motherboard = new AsusMotherboard("PRIME B460M-A", "B460"); GraphicsCard graphicsCard = new NvidiaGraphicsCard("GeForce GTX 1660 SUPER", 6); Memory memory = new KingstonMemory("HyperX Fury DDR4 16GB", 16, 3200); Storage storage = new KingstonStorage("A2000 1TB NVMe SSD", 1000, 2000); ComputerCase computerCase = new CorsairComputerCase("Carbide Series 100R", 2); PowerSupply powerSupply = new CoolerMasterPowerSupply("MWE 550W 80 PLUS Bronze", 550, "80 PLUS Bronze"); Computer myComputer = new MyComputer(cpu, motherboard, graphicsCard, memory, storage, computerCase, powerSupply); System.out.println("我的计算机配置:"); System.out.println("CPU:" + myComputer.getCPU().getBrand() + " " + myComputer.getCPU().getModel()); System.out.println("主板:" + myComputer.getMotherboard().getBrand() + " " + myComputer.getMotherboard().getModel()); System.out.println("显卡:" + myComputer.getGraphicsCard().getBrand() + " " + myComputer.getGraphicsCard().getModel()); System.out.println("内存:" + myComputer.getMemory().getBrand() + " " + myComputer.getMemory().getModel()); System.out.println("存储:" + myComputer.getStorage().getBrand() + " " + myComputer.getStorage().getModel()); System.out.println("机箱:" + myComputer.getComputerCase().getBrand() + " " + myComputer.getComputerCase().getModel()); System.out.println("电源:" + myComputer.getPowerSupply().getBrand() + " " + myComputer.getPowerSupply().getModel()); ``` 输出结果如下: ``` 我的计算机配置: CPU:Intel Core i5 10600K 主板:ASUS PRIME B460M-A 显卡:NVIDIA GeForce GTX 1660 SUPER 内存:Kingston HyperX Fury DDR4 16GB 存储:Kingston A2000 1TB NVMe SSD 机箱:Corsair Carbide Series 100R 电源:Cooler Master MWE 550W 80 PLUS Bronze ``` 通过采用面向接口编程思想,我们可以更加灵活地组装计算机,同时也使代码更加易于扩展和维护。

“相关推荐”对你有帮助么?

  • 非常没帮助
  • 没帮助
  • 一般
  • 有帮助
  • 非常有帮助
提交
评论
添加红包

请填写红包祝福语或标题

红包个数最小为10个

红包金额最低5元

当前余额3.43前往充值 >
需支付:10.00
成就一亿技术人!
领取后你会自动成为博主和红包主的粉丝 规则
hope_wisdom
发出的红包
实付
使用余额支付
点击重新获取
扫码支付
钱包余额 0

抵扣说明:

1.余额是钱包充值的虚拟货币,按照1:1的比例进行支付金额的抵扣。
2.余额无法直接购买下载,可以购买VIP、付费专栏及课程。

余额充值