


lambda实现
Serverless functions helped democratize cloud scale development. They abstract a very complex set of infrastructure pieces, allowing developers to focus on solving the problems at hand instead of focusing on operational “chores”. This also extends to configuring source control, builds and deployments. There are several awesome tools out there that provide a frictionless “code to prod” experience. In this blog I will walk you through using a SAM template and GitHub actions to deploy a Lambda function every time new code is pushed to the masterbranch of their GitHub repository. This can set the basis for a robust CI/CD workflow. Let’s take a look!
无服务器功能有助于使云规模开发民主化。 他们抽象出非常复杂的基础结构集,使开发人员可以专注于解决手头的问题,而不必专注于操作上的“杂务”。 这也扩展到配置源代码控制,构建和部署。 有几种很棒的工具可以提供无摩擦的“代码生成”体验。 在此博客中,每次将新代码推送到其GitHub存储库的master分支时,我将带您逐步使用SAM模板和GitHub动作部署Lambda函数。 这可以为强大的CI / CD工作流奠定基础。 让我们来看看!
我们要建造什么 (What are we going to build)
Our custom SAM template will setup a project that includes a “Hello World” Python 3.8 Lambda function and a GitHub action that updates the function in AWS once a git push event happens in the resulting repository. The files generated after using the templates are:
我们的自定义SAM模板将设置一个项目,其中包括一个“ Hello World” Python 3.8 Lambda函数和一个GitHub操作,该操作git push在结果存储库中发生git push事件时更新AWS中的功能。 使用模板后生成的文件是:
.
{{ cookiecutter.project_name }}
├─ .github                         <--- GitHub workflow
│   └─ workflows
│      └─ deploy.yml               <--- GitHub action instructions
├─ {{ cookiecutter.project_name }} <--- Folder for the Lambda function code
│   └─ __init__.py
│   └─ app.py                      <--- function code
│   └─ requirements.txt
├─ cmd.sh                          <--- executed after publish
├─ template.yaml                   <--- SAM instructions
要求 (Requirements)
git installed
git安装
GitHub account
GitHub帐户
AWS CLI already configured with Administrator permission
已经配置了管理员权限的AWS CLI
SAM CLI — Install the SAM CLI
SAM CLI-安装SAM CLI
Docker installed this is optional unless you wish to test your function locally
Docker安装是可选的,除非您希望在本地测试功能
建立 (Setup)
使用SAM模板创建新的Lambda函数(Use the SAM template to create a new Lambda function)
Make sure you use the same AWS access keys to run this command as you would use to deploy your function. To understand and create an access key check out this link. In a terminal window, type:
确保使用与部署功能相同的AWS访问密钥来运行此命令。 要了解和创建访问密钥,请查看此链接。 在终端窗口中,键入:
$ sam init --location https://github.com/nirmash/python-sam-template.gitFollow the instructions as they appear during the process (example below).
请按照在此过程中出现的说明进行操作(以下示例)。
project_name [Project Name]: <project name>
function_name [Function Name]: <function name>
aws_region [AWS Region]: <AWS region>           (https://docs.aws.amazon.com/general/latest/gr/rande.html#regional-endpoints) for your function
% Total % Received % Xferd Average Speed Time Time Time Current
100 515 100 515 0 0 2181 0 --:--:-- --:--:-- --:--:--  2182
make_bucket: bucket-<project name>
Template ready
Note: The setup script is using curl to download the GitHub Action workflowyamlfile under the.github/workflows folder.
注意:安装脚本使用curl在.github/workflows文件夹下下载GitHub Action工作流yaml文件。
创建本地git存储库 (Create your local git repository)
Setup a local repository to be pushed to GitHub later by typing the below commands:
通过键入以下命令来设置本地存储库,以便稍后将其推送到GitHub:
$ cd <project name>
$ git init
$ git add .
$ git commit . -m "Initial Commit"
设置和配置您的远程存储库 (Setup and configure your remote repository)
Create a new GitHub repository, it doesn’t matter whether it is Public or Private.
创建一个新的GitHub存储库,无论是公共还是私有。
Add your AWS keys to your GitHub repository by configuring 2 new secrets, AWS_ACCESS_KEY_ID and AWS_SECRET_ACCESS_KEY. To obtain them on a MacOS you can use the below terminal commands.
通过配置2个新密钥AWS_ACCESS_KEY_ID和AWS_SECRET_ACCESS_KEY将AWS密钥添加到GitHub存储库中。 要在MacOS上获取它们,可以使用以下终端命令。
$ cat ~/.aws/credentialsYou can also access your secret in the AWS console, use the below steps for that:
您还可以在AWS控制台中访问您的秘密,为此,请执行以下步骤:
- Click on your username near the top right and select My Security Credentials 单击右上角附近的用户名,然后选择“我的安全证书”
- Click on Users in the sidebar 点击边栏中的用户
- Click on your username点击您的用户名
- Click on the Security Credentials tab单击安全证书选项卡
- Click Create Access Key单击创建访问密钥
- Click Show User Security Credentials单击显示用户安全凭证
To learn about secrets in GitHub see the instructions. Create two new secrets AWS_ACCESS_KEY_ID and AWS_SECRET_ACCESS_KEY and insert the value of your aws_access_key_id and aws_secret_access_key respectively.
要了解GitHub中的秘密,请参阅说明。 创建两个新的秘密AWS_ACCESS_KEY_ID和AWS_SECRET_ACCESS_KEY并分别插入aws_access_key_id和aws_secret_access_key的值。
Save the git repository URL, it is the URL of the repository you just created and configured with followed by.git. The format looks like:
保存git存储库URL,它是您刚创建并配置的存储库的URL,后跟.git 。 格式如下:
https://github.com/<user name>/<repo name>.git将代码推送到GitHub (Push the code to GitHub)
Once the secrets are configured, it is time to push code to GitHub. Back in the terminal type the below:
一旦配置了机密,就可以将代码推送到GitHub了。 返回终端,输入以下内容:
$ git remote add origin https://github.com/<user name>/<repo name>.git
$ git branch -M master
$ git push -u origin master
You should see the output below:
您应该看到以下输出:
Counting objects: 11, done.
Delta compression using up to 4 threads.
Compressing objects: 100% (8/8), done.
Writing objects: 100% (11/11), 1.89 KiB | 484.00 KiB/s, done.
Total 11 (delta 0), reused 0 (delta 0)
To https://github.com/<user name>/<repo name>.git
 * [new branch]      master -> master
Branch 'master' set up to track remote branch 'master' from 'origin'.
验证和测试 (Verify and test)
To make sure the GitHub Action executed correctly, browse over to GitHub to the repository you just created. It takes about 2 minutes to deploy.
为了确保正确执行GitHub Action,请浏览GitHub到刚刚创建的存储库。 部署大约需要2分钟。
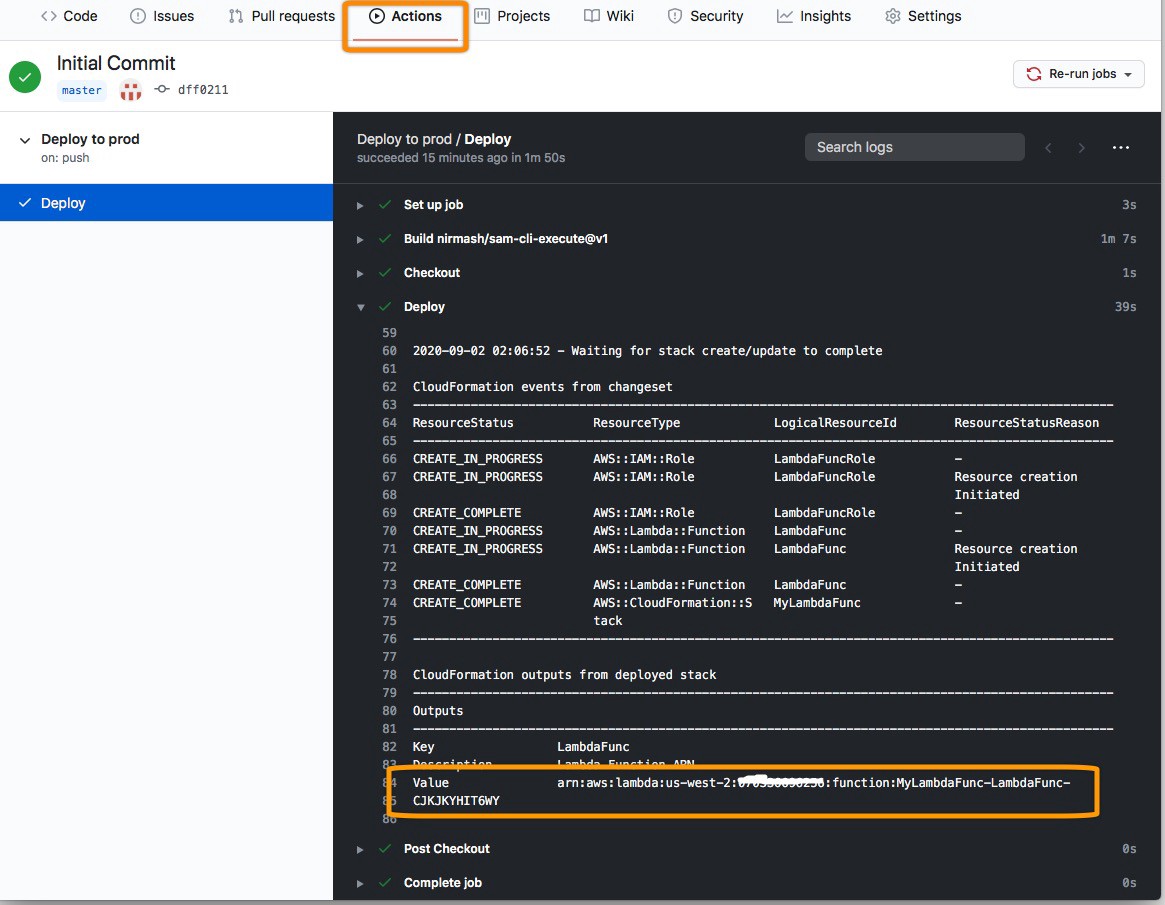
Copy thearnfor the function (marked in the image above). Note that the function expects a JSON payload that includes anobj_nameandbody elements. You can test your function in the AWS console or in the terminal using the AWS cli as shown below:
复制该函数的arn (如上图所示)。 请注意,该函数需要一个包含obj_name和body元素的JSON有效负载。 您可以使用AWS cli在AWS控制台或终端中测试功能,如下所示:
aws lambda invoke \
    --function-name <your function arn> \
    --invocation-type RequestResponse \
    --payload '{ "obj_name": "Bob", "body" : "brr" }' \
    --cli-binary-format raw-in-base64-out \
    response.json
The response from the function should look like:
该函数的响应应类似于:
{
    "StatusCode": 200,
    "ExecutedVersion": "$LATEST"
}
The function response is saved into the response.json file. To see the content of the file, type:
函数响应保存到response.json文件中。 要查看文件的内容,请键入:
$ cat response.json
{"message": "Hello World!"}
Moving forward, any change you make to your repository and push to the master branch in GitHub will be redeployed to AWS. You can add more components to your AWS application by changing the template.yaml file (more information here). You can add more CI\CD rules by changing the deploy.yml file located under the .github/workflows folder in your repository (more information here).
展望未来,您对存储库进行的任何更改并推送到GitHub中的master分支都将重新部署到AWS。 您可以通过更改template.yaml文件将更多组件添加到AWS应用程序中(更多信息在此处)。 您可以通过改变添加更多的CI \ CD规则deploy.yml位于下的文件.github/workflows文件夹在你的仓库(详情点击这里)。
概要 (Summary)
I’ve just walked you through creating a Lambda function and setting it up to update every time you check code in. Once you have created the local repository from the SAM template you can tweak thetemplate.yamlfile in the <project name> folder and add more AWS resources and functions to your repository.
我刚刚向您介绍了创建Lambda函数并将其设置为在每次您检入代码时进行更新的过程。从SAM模板创建本地存储库后,您可以调整<project name>文件夹中的template.yaml文件。并将更多AWS资源和功能添加到您的存储库中。
lambda实现


 被折叠的 条评论
为什么被折叠?
被折叠的 条评论
为什么被折叠?
 到【灌水乐园】发言


