


实体框架
Entity Framework Core (EF Core) is an Object-Relational Mapping (ORM). It works between the application and the database. To explain how we can implement the relationships of our entities, I will be using the Code First approach (with a new database), which means that first I’m going to the create the entities classes, and the EF Core will create the database and the tables, based on these entities (EF Core maps the entities to the database).
实体框架核心(EF Core)是一个对象关系映射(ORM)。 它在应用程序和数据库之间工作。 为了解释我们如何实现实体之间的关系,我将使用“代码优先”方法(带有一个新的数据库),这意味着首先我要创建实体类,然后EF Core将创建数据库以及基于这些实体的表(EF Core将实体映射到数据库)。
We are going to see how we can create relationships between classes using EF Core and Fluent API. For demonstration purpose, I’ve created a Console Application using .NET Core 3.1.
我们将看到如何使用EF Core和Fluent API在类之间创建关系。 为了演示,我使用.NET Core 3.1创建了一个控制台应用程序。
What is a Relationship?
什么是关系?
A relationship defines how two entities relate to each other. In a relational database, this is represented by a foreign key constraint.
关系定义两个实体之间的相互关系。 在关系数据库中,这由外键约束表示。
There are three kinds of relationship:
有三种关系:
One to Many (1:N)
一对多(1:N)
One to One (1:1)
一对一(1:1)
Many to Many (N:N)
多对多(N:N)
We are going to see how we can implement each one of them.
我们将看到如何实现它们中的每一个。
Relationships between entities in an Entity Framework model are defined by Navigation Properties. A navigation property is one that the database provider being used cannot map to a primitive (or scalar) type.
实体框架模型中实体之间的关系由导航属性定义。 导航属性是所使用的数据库提供程序无法映射到原始(或标量)类型的属性。
Fluent API
流利的API
EF Core follows conventions to generate the database and the tables. These conventions are the rules to create the model, based in the entities classes. With Fluent API we can override these configurations and explicitly defined the configuration that we want to set in the tables in the database.
EF Core遵循约定来生成数据库和表。 这些约定是基于实体类创建模型的规则。 使用Fluent API,我们可以覆盖这些配置,并显式定义我们要在数据库表中设置的配置。
We need to install some packages in the application. You can do it through NuGet or through the Package Manager Console with the commands:
我们需要在应用程序中安装一些软件包。 您可以通过以下命令通过NuGet或程序包管理器控制台执行此操作:
EF Core
EF核心
Install-Package Microsoft.EntityFrameworkCore
Install-Package Microsoft.EntityFrameworkCore.Tools
SQL Server package
SQL Server程序包
Install-Package Microsoft.EntityFrameworkCore.SqlServerDbContext class
dbContext类
We need to create the DbContext class, which in this case will be EFCoreRelationshipsExamplesDbContext class. This class must inherit from DbContext and override the method OnConfiguring, where we must add the configuration of the database, which in this case is the localdb:
我们需要创建DbContext类,在本例中为EFCoreRelationshipsExamplesDbContext类。 此类必须继承自DbContext并重写OnConfiguring方法,在该方法中,我们必须添加数据库的配置,在本例中为localdb:
using Microsoft.EntityFrameworkCore;


namespace EFCoreRelationshipsExamples
{
    public class EFCoreRelationshipsExamplesDbContext : DbContext
    {
        protected override void OnConfiguring(DbContextOptionsBuilder optionsBuilder)
        {
            optionsBuilder.UseSqlServer(@"Server=(localdb)\MSSQLLocalDB;Database=EFCoreRelationshipsExamples;Trusted_Connection=True;MultipleActiveResultSets=true");
        }
    }
}
Because the focus of this article is to explain about the relationship between the entities, I’m using a very simple structure, with just one layer and simples model classes, but in a real-world project, you should create the DbContext class in a separated layer. If you want to know more about how can you create the structure of your project, you can check the article “Creating an Application from Scratch using .NET Core and Angular — Part 1” clicking here.
因为本文的重点是解释实体之间的关系,所以我使用的是一个非常简单的结构,只有一层和简单模型类,但是在实际项目中,您应该在一个实例中创建DbContext类。分离层。 如果您想了解有关如何创建项目结构的更多信息,请单击此处单击“使用.NET Core和Angular从头开始创建应用程序-第1部分”一文。
One-to-Many (1:N)
一对多(1:N)
You will see two ways to create a One-To-Many relationship. For this first example, we will have the following scenario: we have two entities: Course and Student. For this example, a Course can have many students, and a student can only have one course, so it’s a one-to-many (1:N) relationship. For One-to-Many relationships, we must have navigation properties defined in both ends of the relationship.
您将看到两种创建一对多关系的方法。 对于第一个示例,我们将有以下情形:我们有两个实体:Course和Student。 对于此示例,一门课程可以有很多学生,而一个学生只能有一门课程,因此这是一对多(1:N)的关系。 对于一对多关系,我们必须在关系的两端都定义导航属性。
This is the Student class:
这是学生班:
namespace EFCoreRelationshipsExamples.Models.OneToMany
{
    public class Student
    {
        public int Id { get; set; }
        public string Name { get; set; }


        /* EF Relation */
        public Course Course { get; set; }
    }
}
There is a navigation property, which you can see in the line 9. This means that a Student can have only one course.
有一个导航属性,您可以在第9行中看到它。这意味着学生只能选择一门课程。
This is the Course class:
这是课程类:
using System.Collections.Generic;


namespace EFCoreRelationshipsExamples.Models.OneToMany
{
    public class Course
    {
        public int Id { get; set; }
        public string Name { get; set; }


        /* EF Relations */
        public IEnumerable<Student> Students { get; set; }
    }
}
The navigation property for this class is an IEnumerable of Student because a course can have one or more students, so this needs to be a list.
此类的导航属性是“学生IEnumerable”,因为一门课程可以有一个或多个学生,因此这需要一个列表。
On this case of a one-to-many relationship, the entity that has the collection navigation property, that in this case is the Course entity, is the principal entity, and the entity that has the reference navigation property is the dependent entity, which in this case is the Student.
在一对多关系的情况下,具有集合导航属性的实体(在这种情况下是课程实体)是主体实体,而具有参考导航属性的实体是从属实体,在这种情况下是学生。
DbContext
DbContext
Now in the Dbcontext class, it’s necessary to override the method OnModelCreating. Inside this method, we are going to set the configuration for the entities using Fluent API.
现在在Dbcontext类中,有必要重写OnModelCreating方法。 在此方法内部,我们将使用Fluent API设置实体的配置。
For One-To-Many relationship, it’s possible to configure the relationship using both ends of the relationship. On the example below, I implemented in both ways to show as an example.
对于一对多关系,可以使用关系的两端配置关系。 在下面的示例中,我以两种方式实现了示例。
The Fluent API configuration we must add in the method “OnModelCreating” in the EFCoreRelationshipsExamplesDbContext class. For each kind of relationship, there is a separated method:
我们必须在EFCoreRelationshipsExamplesDbContext类的“ OnModelCreating”方法中添加Fluent API配置。 对于每种关系,都有一个单独的方法:
This is the method with the Fluent API configuration:
这是Fluent API配置的方法:
The “isRequired” is used to prevent the relationship from being optional.
“ isRequired”用于防止关系是可选的。
For One-To-Many, it’s possible to configure using any of both ends of the relationship. On this example, it’s starting with Course, but could also start using the Student class:
对于一对多,可以使用关系的两端进行配置。 在此示例中,它从课程开始,但也可以开始使用Student类:
modelBuilder.Entity<Student>()
   .HasOne(s => s.Course)
   .WithMany(c => c.Students)
Now we can create the migration and update the database. Migration is a way to update the database in an incrementally way. So always when you create a new entity class in the application, or when you change some existing entity, you need to generate a new migration and update the database with this migration.
现在,我们可以创建迁移并更新数据库。 迁移是一种以增量方式更新数据库的方式。 因此,总是在您在应用程序中创建新的实体类时,或者在更改某些现有实体时,都需要生成一个新的迁移并使用该迁移来更新数据库。
Open the Package Manager Console and execute the commands:
打开软件包管理器控制台并执行以下命令:
Add-Migration AddedOneToManyRelationship
Update-Database
This is the command using the .NET Core CLI:
这是使用.NET Core CLI的命令:
dotnet ef migrations add AddedOneToManyRelationship
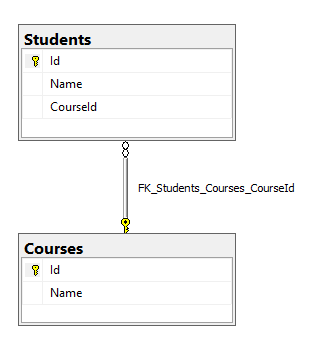
dotnet ef database updateWe can see the relationship between the tables in the SQL Server:
我们可以看到SQL Server中的表之间的关系:
In the Program class, we have the seeding to add data in the tables in the database. On the main method there is the call to the seeding method:
在Program类中,我们有种子可以在数据库的表中添加数据。 在main方法上,调用了seeding方法:
static void Main(string[] args)
{
    using (var context = new EFCoreRelationshipsExamplesDbContext())
    {
        OneToManyRelationship(context);
    }
}
This is the implementation of the seeding method:
这是播种方法的实现:
private static void OneToManyRelationship(EFCoreRelationshipsExamplesDbContext context)
{
var course = new Course
{
Name = "Computer Science",
Students = new List<Student>()
{
new Student { Name = "James" },
new Student { Name = "Mathew" },
new Student { Name = "John" },
new Student { Name = "Luke" }
}
};
context.Add(course);
context.SaveChanges();
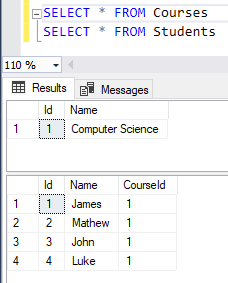
}Now we can run the application and check the data in the database:
现在,我们可以运行该应用程序并检查数据库中的数据:
Fully Defined Relationships
完全定义的关系
Another way to create the One-to-many relationship it’s by the fully defined relationships. The way of doing this is similar to the previous approach, but we also need to create an “Id” property that is related to the related object.
创建一对多关系的另一种方法是通过完全定义的关系。 这样做的方法与以前的方法相似,但是我们还需要创建一个与相关对象相关的“ Id”属性。
So for this first example, we need to have navigation properties defined on both ends of the relationship and a foreign key property defined in the dependent entity class.
因此,对于第一个示例,我们需要在关系的两端定义导航属性,并在从属实体类中定义外键属性。
For this example, we will have two entities: Customer and Order. For this scenario, one customer can have many orders, and one order can have only one customer.
对于此示例,我们将有两个实体:客户和订单。 对于这种情况,一个客户可以有很多订单,而一个订单只能有一个客户。
This is the Order class:
这是Order类:
namespace EFCoreRelationshipsExamples.Models.OneToMany.FullyDefinedRelationships
{
    public class Order
    {
        public int Id { get; set; }
        public string Description { get; set; }


        /* EF Relation */
        public int CustomerId { get; set; }
        public Customer Customer { get; set; }
    }
}
This is the Customer class:
这是客户类:
using System.Collections.Generic;


namespace EFCoreRelationshipsExamples.Models.OneToMany.FullyDefinedRelationships
{
    public class Customer
    {
        public int Id { get; set; }
        public string Name { get; set; }


        /* EF Relations */
        public IEnumerable<Order> Orders { get; set; }
    }
}
With fully defined relationships we do not need to add any configuration in Fluent API. So in the DbContext class we just need to add the DbSets:
通过完全定义的关系,我们不需要在Fluent API中添加任何配置。 因此,在DbContext类中,我们只需要添加DbSet:
public DbSet<Customer> Customers { get; set; }
public DbSet<Order> Orders { get; set; }
Now we can create the migration and we will have a similar relationship to the previous approach:
现在,我们可以创建迁移,并且与之前的方法有相似的关系:
Add-Migration AddedOneToManyFullyDefinedRelationship
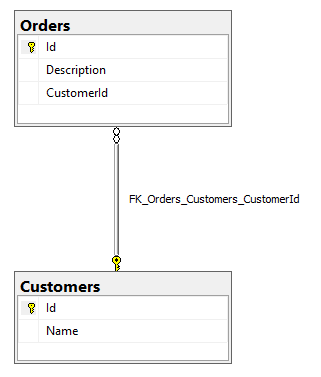
Update-DatabaseWe can see the relationship between the tables in the SQL Server:
我们可以看到SQL Server中的表之间的关系:
In the Program class, we need to add the call for the seeding method in the Main method:
在Program类中,我们需要在Main方法中添加对seeding方法的调用:
static void Main(string[] args)
{
    using (var context = new EFCoreRelationshipsExamplesDbContext())
    {
        [...]
        OneToManyFullyDefinedRelationships(context);
    }
}
And this is the seeding method:
这是播种方法:
private static void OneToManyFullyDefinedRelationships(EFCoreRelationshipsExamplesDbContext context)
{
var customer = new Customer
{
Name = "Robert",
Orders = new List<Order>()
{
new Order { Description = "Order 1" },
new Order { Description = "Order 2" },
new Order { Description = "Order 3" },
new Order { Description = "Order 4" }
}
};
context.Add(customer);
context.SaveChanges();
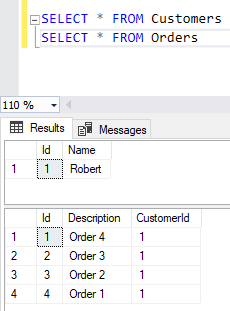
}Then we can run the application again and check the data in the database:
然后,我们可以再次运行该应用程序,并检查数据库中的数据:
Many-to-Many (N:N)
多对多(N:N)
For this Many-to-Many relationship, we will have two entities: the Movie and the Actor. One movie can have many actors, and one actor can have many movies.
对于这种多对多关系,我们将有两个实体:电影和演员。 一部电影可以有许多演员,而一部演员可以有很多电影。
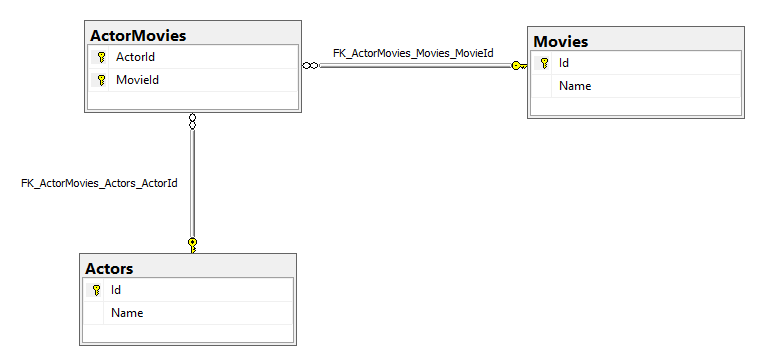
EF Core does not support many-to-many relationships without using a third entity to represent the join table. So for this case, we need to have another entity, which will be the ActorMovie. On this entity, we are going to mapping two separated one-to-many relationships.
EF Core在不使用第三个实体表示联接表的情况下不支持多对多关系。 因此,对于这种情况,我们需要有另一个实体,即ActorMovie。 在这个实体上,我们将映射两个单独的一对多关系。
“Many-to-many relationships without an entity class to represent the join table are not yet supported in EF Core. However, you can represent a many-to-many relationship by including an entity class for the join table and mapping two separate one-to-many relationships.”
“ EF Core尚不支持没有实体类来表示联接表的多对多关系。 但是,您可以通过为联接表包括一个实体类并映射两个单独的一对多关系来表示多对多关系。”
This is the Actor class:
这是Actor类:
using System.Collections.Generic;


namespace EFCoreRelationshipsExamples.Models.ManyToMany
{
    public class Actor
    {
        public int Id { get; set; }
        public string Name { get; set; }


        /* EF Relations */
        public List<ActorMovie> ActorMovies { get; set; }
    }
}
This is the Movie class:
这是电影类:
using System.Collections.Generic;


namespace EFCoreRelationshipsExamples.Models.ManyToMany
{
    public class Movie
    {
        public int Id { get; set; }
        public string Name { get; set; }


        /* EF Relations */
        public List<ActorMovie> ActorMovies { get; set; }
    }
}
This is the ActorMovie class:
这是ActorMovie类:
namespace EFCoreRelationshipsExamples.Models.ManyToMany
{
    public class ActorMovie
    {
        public int ActorId { get; set; }
        public Actor Actor { get; set; }


        public int MovieId { get; set; }
        public Movie Movie { get; set; }
    }
}
In the DbContext class, we are going to use the Fluent API to declare the relationship configuration in the DbContext class. In the method OnModelCreating, let’s add the call to the configuration method:
在DbContext类中,我们将使用Fluent API在DbContext类中声明关系配置。 在方法OnModelCreating中,让我们将调用添加到配置方法中:
protected override void OnModelCreating(ModelBuilder modelBuilder)
{
    [...]
    ManyToManyRelationshipConfiguration(modelBuilder);
}
This is the configuration method:
这是配置方法:
private void ManyToManyRelationshipConfiguration(ModelBuilder modelBuilder)
{
    modelBuilder.Entity<ActorMovie>()
        .HasKey(t => new { t.ActorId, t.MovieId });


    modelBuilder.Entity<ActorMovie>()
        .HasOne(am => am.Actor)
        .WithMany(a => a.ActorMovies)
        .HasForeignKey(am => am.ActorId);


    modelBuilder.Entity<ActorMovie>()
        .HasOne(am => am.Movie)
        .WithMany(m => m.ActorMovies)
        .HasForeignKey(am => am.MovieId);
}
On the method ManyToManyRelationshipConfiguration, we defined the property ActorId and Movie Id as the primary key of the ActorMovie table, and we also added the configuration defining that the table Actor can have many movies, and the table Movies can have many actors.
在方法ManyToManyRelationshipConfiguration上,我们将属性ActorId和Movie Id定义为ActorMovie表的主键,并且还添加了配置,定义表Actor可以有很多电影,而Movies表可以有很多演员。
Now we can create the migration and update the database:
现在,我们可以创建迁移并更新数据库:
Add-Migration AddedManyToManyRelationship
Update-Database
We can see the relationship between the tables in the SQL Server:
我们可以看到SQL Server中的表之间的关系:
In the Program class, in the Main method, we have the call to the seeding method:
在Program类的Main方法中,我们可以调用seeding方法:
static void Main(string[] args)
{
    using (var context = new EFCoreRelationshipsExamplesDbContext())
    {
       [...]
        ManyToManyRelationship(context);
    }
}
This is the seeding method:
这是播种方法:
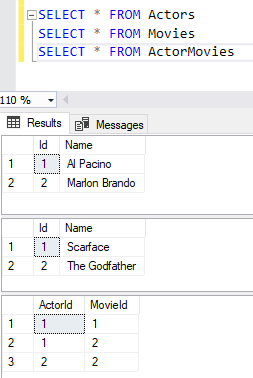
private static void ManyToManyRelationship(EFCoreRelationshipsExamplesDbContext context)
{
    var actor1 = new Actor { Name = "Marlon Brando" };
    var actor2 = new Actor { Name = "Al Pacino" };
    context.Add(actor1);
    context.Add(actor2);


    var movie1 = new Movie { Name = "The Godfather" };
    var movie2 = new Movie { Name = "Scarface" };
    context.Add(movie1);
    context.Add(movie2);
    context.SaveChanges();


    var actorMovies1 = new ActorMovie() { ActorId = actor1.Id, MovieId = movie1.Id };
    var actorMovies2 = new ActorMovie() { ActorId = actor2.Id, MovieId = movie1.Id };
    var actorMovies3 = new ActorMovie() { ActorId = actor2.Id, MovieId = movie2.Id };


    context.Add(actorMovies1);
    context.Add(actorMovies2);
    context.Add(actorMovies3);
    context.SaveChanges();
}
Then we can run the application again and check the data in the database:
然后,我们可以再次运行该应用程序,并检查数据库中的数据:
One-to-one (1:1)
一对一(1:1)
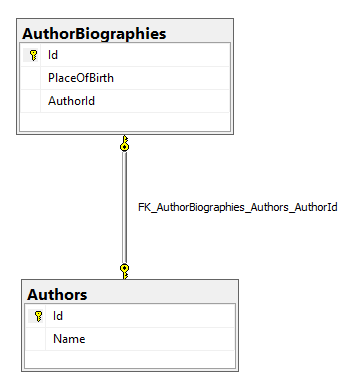
One to one relationships have a reference navigation property on both sides. They follow the same conventions as one-to-many relationships, but a unique index is introduced on the foreign key property to ensure only one dependent is related to each principal.
一对一关系的两侧都有参考导航属性。 它们遵循与一对多关系相同的约定,但是在外键属性上引入了唯一索引,以确保每个主体都只有一个依赖项。
For this example, we will have two entities, the Author and the AuthorBiography. One Author can only have only one AuthorBiography, and one AuthorBiography can only belong to only one Author.
对于此示例,我们将有两个实体,Author和AuthorBiography。 一位作者只能拥有一个AuthorBiography,而一个AuthorBiography只能属于一个Author。
A one to one (or more usually a one to zero or one) relationship exists when only one row of data in the principal table is linked to zero or one row in a dependent table.
当主体表中只有一行数据链接到从属表中的零行或一行时,就存在一对一(或更通常是一对零或一)的关系。
This is the Author entity:
这是作者实体:
namespace EFCoreRelationshipsExamples.Models.OneToOne
{
    public class Author
    {
        public int Id { get; set; }
        public string Name { get; set; }


        /* EF Relation */
        public AuthorBiography Biography { get; set; }
    }
}
This is the AuthorBiography entity:
这是AuthorBiography实体:
namespace EFCoreRelationshipsExamples.Models.OneToOne
{
    public class AuthorBiography
    {
        public int Id { get; set; }
        public string PlaceOfBirth { get; set; }


        // The AuthorId property is the Foreign Key
        public int AuthorId { get; set; }
        public Author Author { get; set; }
    }
}
In the DbContext class, we are going to use the Fluent API to declare the relationship configuration in the DbContext class. In the method OnModelCreating, let’s add the call to the configuration method:
在DbContext类中,我们将使用Fluent API在DbContext类中声明关系配置。 在方法OnModelCreating中,让我们将调用添加到配置方法中:
protected override void OnModelCreating(ModelBuilder modelBuilder)
{
    [...]
    OneToOneRelationshipConfiguration(modelBuilder);
}
This is the configuration method:
这是配置方法:
private void OneToOneRelationshipConfiguration(ModelBuilder modelBuilder)
{
    modelBuilder.Entity<Author>()
        .HasOne(a => a.Biography)
        .WithOne(b => b.Author)
        .HasForeignKey<AuthorBiography>(b => b.AuthorId);
}
As you can see on the example above, it’s necessary to set the foreign key, using the “HasforeinKey”.
如您在上面的示例中看到的,有必要使用“ HasforeinKey”来设置外键。
Now we can create the migration and update the database:
现在,我们可以创建迁移并更新数据库:
Add-Migration AddedOneToOneRelationship
Update-Database
We can see the relationship between the tables in the SQL Server:
我们可以看到SQL Server中的表之间的关系:
In the Program class, in the Main method, we have the call to the seeding method:
在Program类的Main方法中,我们可以调用seeding方法:
static void Main(string[] args)
{
    using (var context = new EFCoreRelationshipsExamplesDbContext())
    {
        [...]
        OneToOneRelationship(context);
    }
}
This is the seeding method:
这是播种方法:
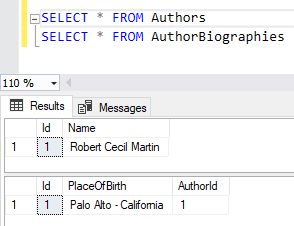
private static void OneToOneRelationship(EFCoreRelationshipsExamplesDbContext context)
{
    var author = new Author { Name = "Robert Cecil Martin" };
    context.Add(author);
    context.SaveChanges();


    var authorBiography = new AuthorBiography { AuthorId = author.Id, PlaceOfBirth = "Palo Alto - California" };
    context.Add(authorBiography);
    context.SaveChanges();
}
Then we can run the application again and check the data in the database:
然后,我们可以再次运行该应用程序,并检查数据库中的数据:
Conclusion
结论
These are examples of how we can create One-to-Many, One-to-One and Many-to-Many relationships between the entities using EF Core and Fluent API. Fluent API allows us to configure manually how the tables will be created in the database. You can check the code of this project here:
这些示例说明了我们如何使用EF Core和Fluent API在实体之间创建一对多,一对一和多对多关系。 Fluent API使我们可以手动配置如何在数据库中创建表。 您可以在此处检查该项目的代码:
https://github.com/henriquesd/EFCoreRelationshipsExamplesThanks for reading!
谢谢阅读!
翻译自: https://medium.com/@henriquesd/entity-framework-core-relationships-with-fluent-api-8f741c57b881
实体框架


 160
160

 被折叠的 条评论
为什么被折叠?
被折叠的 条评论
为什么被折叠?
 到【灌水乐园】发言


